Table of Contents
Advertisement
Advertisement
Table of Contents

Related Manuals for Mamiya 7


Summary of Contents for Mamiya 7
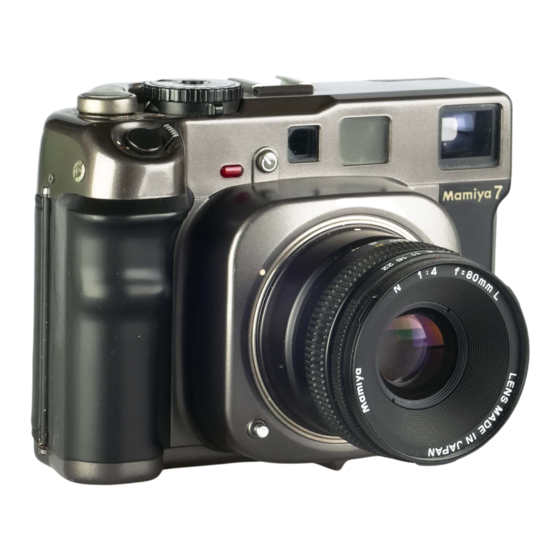
- Page 2 6x7 rectangular image as the "ideal format". Now we are proud to present the Mamiya 7, 6 x 7cm rangefinder camera. Reflecting Mamiya's traditional quality workmanship plus modern design, the Mamiya 7 is compact and lightweight.
-
Page 3: Table Of Contents
Contents Mamiya 7, the ultimate 6 x 7 rangefinder camera ...2 Nomenclature and Functional Parts ...3 Inserting Battery ...7 Removing Camera Body Cap ...7 Opening/Closing Light Shield Curtain ...8 Mounting/Removing Lenses ...9 Battery Check ... 10 Releasing the Shutter ... 11 Before Loading the Film ... -
Page 4: Mamiya 7, The Ultimate 6X7 Rangefinder Camera
Mamiya 7, the ultimate 6x7 rangefinder camera. The Mamiya 7 is the only camera in the world that has these exclusive features: • Ideal 6x7cm film format that enlarges to standard photographic and industrial paper sizes without cropping and without wasting film. -
Page 5: Product View And Functional Parts
Nomenclature and Functional Parts Exposure compensation scale Exposure counter window "S" appears automatically when opening the back cover. (Any other numeral indicates that the film is loaded. Do not open the back cover under this condition.) Exposure compensation lever Cable release socket Shutter release button Power on/off lever Turn off after use... - Page 6 Nomenclature and Functional Parts Hot Shoe for mounting electronic flash Spool release levers When replacing the film, be sure to push this lever to the side to lower the spool stud. Film spool stud Film holder spring Back cover latch Back cover lock release button Shutter speed dial When A or AEL on the shutter speed dial is aligned with the indicator...
- Page 7 Viewfinder eyepiece Rubber eyecup Carrying strap lugs Film spool stud Lower cover Tripod socket The socket has U1/4" threads. Back cover Memo clip Holds the film box top or memo as a film type reminder. 120-220/135 selector index window When the pressure plate is aligned with the film type used, either "120"...
- Page 8 Nomenclature and Functional Parts Aperture scale Focusing ring Used to focus the lens. Depth-of-field scale Allows the aperture (f-stop) to be checked in relation to the correct focusing range. Lens alignment dot When mounting or changing a lens, align this dot with the dot on the camera body.
-
Page 9: Inserting Battery
Photo, being sure to properly place the battery with the "+" side up, facing the cover. [Batteries] The Mamiya 7 uses one of 4SR44 silver oxide battery, 4LR44 alkaline battery or 2CR1/3 lithium battery. [Power on/off] 1. -
Page 10: Opening/Closing Light Shield Curtain
Opening/Closing Light Shield Curtain Before opening/closing the light shield curtain, be sure to cock the shutter, otherwise, it will not open/close. CAUTION: Never touch the light shield curtain. If touched, light leakage or a malfunction may result. [Opening the light shield curtain] [Closing the light shield curtain] * When the light shield curtain is open, the lens cannot be removed. -
Page 11: Mounting/Removing Lenses
Mounting/Removing Lenses [Mounting lens] Remove the front and rear lens caps. The front lens cap can be removed by pressing in the tabs on the right and left with your fingers and pulling the cap towards you. The rear lens cap can be removed by rotating it counterclockwise. -
Page 12: Battery Check
CAUTION 3) Be careful not to damage the rangefinder coupling lever and the shutter cocking lever at the rear of each lens. Position the front face of the lens which has been removed as shown in the photo. 4)When mounting the 43mm or 65mm wide angle lenses make sure that the rear lens rims do not touch the rangefinder coupling roller. -
Page 13: Releasing The Shutter
Just leave the back cover open: Set to ON. (See page 7) Wind the lever to cock the shutter . Open. (See page 8) -
Page 14: Before Loading The Film
Before Loading the Film [Setting the film speed] Set the film speed of the film being used by lifting up the outer rim of the shutter speed dial and rotate it until the correct ISO value appears in the window. •... -
Page 15: Loading The Film
[Memo clip] This memo clip on the back cover is used to hold the film box tab to serve as a convenient reminder of the type of film in the camera or for recording other data. Loading the Film 1. Push the spool release lever on right side to the right, and install the take-up spool in the take-up spool chamber, top first, then push the lower spool stud up. - Page 16 Loading the Film 3. When the new roll has been inserted, be sure to reset the lower spool stud by pressing it in. (Also, be sure to reset the take-up spool stud in a similar manner.) 4. Pull out the backing paper, and insert the tip into the slot on the take-up spool as pictured.
-
Page 17: Shutter Speed
Shutter Speed The Mamiya 7 has an aperture-priority, AE lens shutter. Once the aperture and film speed are set, the AE meter selects a proper shutter speed in relation to the set aperture. In the manual photographic mode, proper shutter speed is indicated by a blinking red LED within the viewfinder. -
Page 18: Shutter Release Button
Shutter Release Button The shutter release button is designed so that pressure can be applied in two stages. When it is lightly touched, correct metering data is displayed on the bottom of the view finder. When it is depressed all the way, the shutter is released and an exposure is made. - Page 19 LED Indicators in the Viewfinder AE photography Long time exposure 1 sec to 4 sec at the A and AEL modes. 2 sec and 4 sec at the Manual mode. Battery drain increases in the AE mode Battery capacity is sufficient.
-
Page 20: Focusing The Lens
The composition will be within in the lines of the bright frame “A” for 6 x 7 format and “B” for 135 panoramic format. 83% of the field of view is visible at infinity and 100% is visible at the minimum focusing distance. -
Page 21: Taking Photographs
Taking Photographs 1. Press the shutter release button when have focused determined composition. 2. Advance the film by winding the film advance lever until it stops. (The shutter is then cocked.) 3. After completing the last exposure, wind the advance lever several times, until the film with its backing paper is completely wound onto the take-up spool. -
Page 22: Ae Lock Photography
AE (Automatic Exposure) Photography The aperture priority metering device is incorporated into rangefinder system. The correct shutter speed for preselected aperture automatically be determined. 1. Align "A" on the shutter speed dial with the white line index mark on the camera body. -
Page 23: Manual Photography
Manual Photography You may override the AE mode and select the aperture and shutter speed manually. Simply set the shutter speed against the white line index mark and also set the lens aperture to the desired "f" stop. 1. When the shutter release button is touched gently, the selected shutter speed LED only will be continuously illuminated or another LED may also flash. -
Page 24: Depth-Of-Field
Depth-of-Field The depth-of-field varies according to the aperture. The smaller the aperture (f/8, f/11, f/16...) the greater the depth- of-field; the larger the aperture (f/8, f/ 5.6,...) the smaller the depth-of-field. To take pictures which are sharp from foreground to infinity or when taking snap shots, the focusing range is extended or depth increased by using a smaller aperture. -
Page 25: Exposure Compensation
Exposure Compensation The exposure compensator functions in a number of important ways. It can be used to correct exposure values (EVs) or the differences in brightness between a primary subject background -especially when over or under-exposures occur. It can also be used when filters are employed or when engaged in available light photography - or under high contrast conditions (i.e. -
Page 26: Flash Photography
Flash Photography The Mamiya 7 features an X synchro flash terminal and its lens shutter system permits flash synchronization at all shutter speeds. Shoe-mounted flash units attached directly to the hot-shoe, while flash brackets can be attached to the tripod socket for larger flash guns. -
Page 27: How To Hold The Camera
How to Hold the Camera Because most out of focus pictures are the result of camera movement, make sure not to move when pressing the shutter button. Hold the camera with your elbows close your body: pressing part of the camera on your forehead will help stabilize it. -
Page 28: Trouble Shooting
Trouble shooting Uniquely designed to prevent errors, the Mamiya 7 incorporates numerous safety features. If the shutter will not function, it is very likely due to user error rather than camera malfunction. Should there be problems, be sure to review the following points. -
Page 29: Lenses
Lenses N43mm f/4.5L Lens construction: 9 elements in Lens construction: 10 elements in 5 groups 6 groups Angle of view: 69° Angle of view: 92° Minimum aperture: 22 Minimum aperture: 22 35mm equivalent: 32mm 35mm equivalent: 21 mm Minimum focusing distance: 1m Minimum focusing distance: 1m Magnification Magnification... -
Page 30: Accessories
Number of exposures: 135 Film 36EXP...16 135 Film 24EXP ...10 The picture area (24 x 65mm) provided by the Mamiya 7 panoramic format is 3.3 x larger the 35mm panoramic for mat (13 x 36mm). Note: A panoramic paper slide mount, 24 x 65mm, is also available. -
Page 31: System Chart
System chart... -
Page 32: Specifications
Specifications Type of Camera : 6 x 7cm format interchangeable lenses, rangefinder camera, double formats (6 x 7 and 35mm panorama) Film Used : 120 Roll Film (10 exposures) , 220 Roll Film (20 exposures), 135 Roll Film (16 exposures with 36 exp. -
Page 33: Common Sense Camera Care And Practice
Common Sense Camera Care and Practice The Mamiya 7 is a precision optical/mechanical instrument, built for heavy professional use and a long service life, if properly treated and maintained. Please observe these basic caveats: • Read instructions before using camera. - Page 34 6. Always keep batteries out of the reach of children and never throw used batteries into a fire or expose to excessive heat. 7. When going on trips be sure to carry spare batteries to ensure that the camera will function. Also, as batteries tend to temporarily...
- Page 35 Prevention of Light Leaks Due To Loose Film Wending • Thread the paper leader on the empty take up spool so the film will be wound evenly and parallel. This will prevent the film from winding loosely or over the edge of the spool, which can cause light leaks and film fogging.
Need help?
Do you have a question about the 7 and is the answer not in the manual?
Questions and answers