Table of Contents
Advertisement
Quick Links
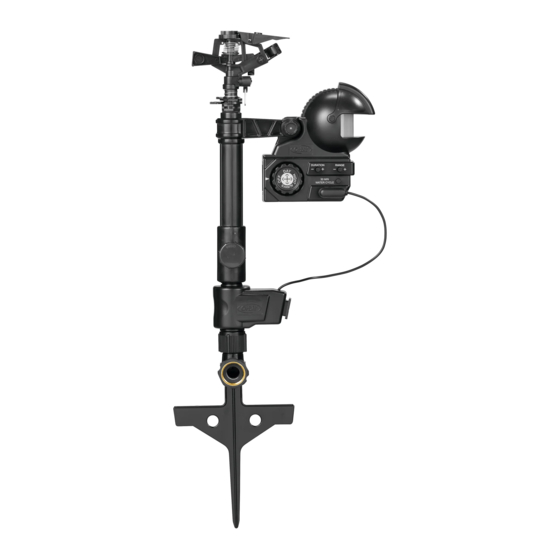
YARD ENFORCER
®
IN THE BOX
B
A
IMPACT SPRINKLER
HEAT SENSOR
B1
RISER MOUNTING ARM
C
RISER AND VALVE
B2
VALVE MOUNTING ARM
D
STEP SPIKE
WHEN EXPECTING FREEZING TEMPERATURES,
REMOVE FROM THE HOSE AND STORE INDOORS.
FILTER WASHER TRAPS DIRT PARTICLES.
CLEAN FILTER REGULARLY AND REPLACE IF WORN.
INSTALLING THE BATTERIES
BATTERIES
AA AA AA AA
NOT INCLUDED
WATERPROOF
BATTERY TRAY
1. Verify the operation dial is in the "OFF" position.
2. Remove the tray on the back of the sensor by sliding it out.
Battery tray is waterproof. You may need to use a flathead
screwdriver to push on the tab and slide the compartment out.
3. Insert four AA (1.5V) alkaline batteries (not included) as
directed on the tray and replace the tray.
Note: Do not mix old and new batteries.
Use only alkaline batteries.
ASSEMBLY FOR DETECTING LARGE ANIMALS
1. Ensure the Riser Mounting Arm [B1] is atttached to the
sensor.
2. Slip the mounting arm [B1] over the collar of the riser [C].
3. Thread the impact sprinkler [A] into the riser [C].
4. Thread the step-spike [D] onto the valve and tighten the
swivel coupling.
5. Insert the valve cable into the sensor aligning the grooves.
6. Position the Heat Sensor at a 10° angle away
from the ground.
10˚
A
B
WITH B1
ATTACHMENT
C
D
ASSEMBLY FOR DETECTING SMALL ANIMALS
1. Unscrew the Riser Mounting Arm [B1] and screw in the
Valve Mounting Arm [B2] to the sensor.
2. Thread the impact sprinkler [A] into the riser [C].
3. Thread the step-spike [D] onto the valve and tighten the
swivel coupling.
4. Mount the sensor unit [B] onto the front of the valve by
sliding it onto the square bracket until it clicks into place.
5. Insert the valve cable into the sensor aligning the grooves.
6. Position the Heat Sensor at a 10° angle away
from the ground.
10˚
A
B1
B2
C
D
HOW MOTION DETECTION WORKS
The sensor detects a combination of heat and nonlinear motion to activate
the valve.
The sensor relies on the body temperature of the unwanted pest to differ from
the surrounding ambient temperature.
Bigger animals have a larger heat signature and will be easier to detect.
Smaller animals, like rodents, do not produce enough heat to trigger the heat
sensor.
INTELLIGENT SENSING MODE
This mode conserves water and batteries by detecting significant, repeat activity
(false alerts) and then reducing the frequency of activation. To disable Intelligent
Sensing Mode: turn dial to OFF position then press and hold 30 MIN Watering
button for 20 seconds until unit clicks. To re-enable Intelligent Sensing Mode:
repeat steps above.
OPERATION FEATURES
B
DURATION
Dial
30 MINUTE
WATER CYCLE
Duration
Adjustment
Knob
B
OFF
Turns the sensor and valve off. Must be in this mode to install batteries or to
WITH B2
ATTACHMENT
turn Intelligent Sensing on or off. Resets the time delays between valve
activation if Intelligent Sensing is on.
DAY
Activates sensor and valve only during daylight.
Note: Sensor does not register actual time, but uses a photocell. Shady areas
may cause the sensor to register day as night time.
NIGHT
Activates sensor and valve only when dark.
ALWAYS
Sensor and valve are always active.
DURATION ADJUSTMENT KNOB
Adjust the duration of the water from approximately 3 seconds to 10 seconds.
• Turn knob towards the + to increase how long the water sprays.
• Turn knob towards the – to decrease how long the water sprays.
SENSOR ADJUSTMENT KNOB
The sensor range is adjustable up to 40 ft. For smaller animals increase the
distance the sensor monitors. For larger ones decrease the distance.
• Turn knob towards the + to increase the distance the sensor monitors.
• Turn knob towards the – to decrease the distance the sensor monitors.
30 MIN. WATER CYCLE BUTTON
• Press button to activate a 30 minute watering cycle.
• Press button again to stop the 30 minute watering cycle.
• A slight delay allows the user to move a safe distance away from the unit
before watering begins
Sensor Range
Adjustment
Knob
RANGE
30 Minute Water
Cycle Button
Advertisement
Table of Contents

Related Manuals for Orbit YARD ENFORCER


Summary of Contents for Orbit YARD ENFORCER
- Page 1 HOW MOTION DETECTION WORKS YARD ENFORCER ASSEMBLY FOR DETECTING LARGE ANIMALS ASSEMBLY FOR DETECTING SMALL ANIMALS ® The sensor detects a combination of heat and nonlinear motion to activate 1. Ensure the Riser Mounting Arm [B1] is atttached to the 1.
- Page 2 3. Make adjustments to the impact sprinkler head so when • Angle of sensor on mounting arm is too steep and adjust sensor angle if the Yard Enforcer and learn how to avoid the spray. Weekly adjustments may needed. activated the spray is in the direction of the desired be necessary to continue to discourage these animals.
Need help?
Do you have a question about the YARD ENFORCER and is the answer not in the manual?
Questions and answers