Advertisement
Table of Contents
- 1 Table of Contents
- 2 Introduction
- 3 About this Manual
- 4 Getting Started
- 5 Programing Your Timer
- 6 Using the Remote Control Device
- 7 Using the Optional Rain-Freeze Sensor
- 8 Installing Indoor Mount Sprinkler Timer and Remote Control Device Sleeve
- 9 Diagnostics Circuit Breaker
- 10 Glossary of Terms
- 11 Trouble Shooting
- Download this manual
Advertisement
Table of Contents

Subscribe to Our Youtube Channel
Related Manuals for Orbit ST2-RF


Summary of Contents for Orbit ST2-RF
- Page 1 ST2-RF SPRINKLER TIMER MANUAL RF SYNC ACTIVE BYPASS MODELS: 57926, 57922, 57916, 57912, 91916, 91912, 91926, 91922, 94916, 94912, 94926, 94922 PN 57926-24 Rev C...
-
Page 2: Table Of Contents
Signature Control timer, ENGLISH the most advanced and versatile controller available. Orbit ® • Introduction ........2 designers have combined the latest technological features with •... - Page 3 Docking Port Choice of Five Languages This timer has been designed for convenience and “armchair” You can easily set the LCD display to read in any of five programming. The timer’ s docking port is mounted on a wall languages: English, Spanish, French, German or Italian. and all wires are connected to it.
-
Page 4: Getting Started
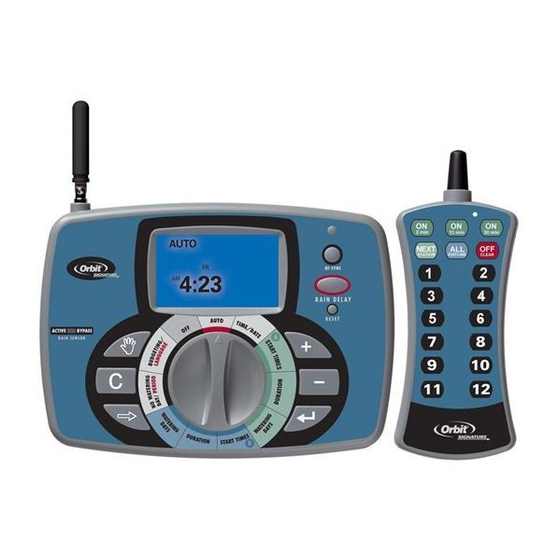
Programming Buttons Selection Dial These nine buttons are used for programming and other This dial is used for programming, reviewing and operating the operations: sprinkler timer. Rain Sensor Bypass Switch In Active position the controller will monitor the rain sensor, in RF SYNC Bypass position the controller will ignore the rain sensor. - Page 5 Activating the Batteries If no programming occurs after the RESET button has been pressed and the dial is left in the AUTO position the timer will • Slide the docking port off the timer unit to gain access to the assume a default program mode.
-
Page 6: Programing Your Timer
• Press the • Turn the selection dial to ENTER button. The display now reads “SET START TIMES for the program you MONTH.” Set the current month by pressing either the wish to set (A or B). button. • Set Start Time 1 using the buttons. - Page 7 Set Watering Days CLEAR button or by selecting another watering day mode. The water drop will disappear. • Turn the selection dial to WATERING DAYS for the program Set to Water - Interval you wish to set (A or B). •...
- Page 8 • Turn the selection dial to says. (For example, in some water districts, watering is NO WATERING DAY/PERIOD. prohibited on certain days.) To cancel programmed watering on • Press the specific days of the week, follow these steps: RAIN DELAY button.
- Page 9 • Press the duration to 20 minutes, and a setting of 10% will decrease a NEXT button. 10 minute duration to 1 minute. • The display reads “MANUAL ALL” to the right of the letters • Exit the set water budgeting mode by turning the selection “A”...
- Page 10 Manual Watering - Program B: • Press the buttons to select the number of min- utes to water that station (from 1 to 120 minutes). This will allow you to water only those stations with set dura- • Press the ENTER button.
-
Page 11: Using The Remote Control Device
• Press the the current station to the next station in the cycle. This can button on the remote or depress the stem of be done during scheduled, manual, or remote actuated the RF sensor (the red light should start blinking). watering. -
Page 12: Using The Optional Rain-Freeze Sensor
• Press Installing the Sprinkler Timer ON “X” MIN to water those stations for the desired (“X”) number of minutes. in Five Easy Steps To Cancel Remote Control Device Operation 1. Select a Location and Return Control to Timer: Select a location with the following criteria: •... - Page 13 A. Wire the Electric Valves • Do not slide the timer back onto the docking port yet. NOTE: If the distance between the sprinkler timer and valves is under 700’ (210 m), use Orbit sprinkler wire or 20 gauge ®...
- Page 14 • To avoid electrical hazards, only one valve should be • Connect the common wire to one of the two sockets connected to each station. (white in color) labeled “COM.” IMPORTANT: The wire can be buried in the ground. However, NOTE: Insert only one wire into each “COM”...
-
Page 15: Diagnostics Circuit Breaker
• Secure the sleeve to the wall by screwing a No. 8 screw 4. If the message continues, a short in the wiring still exists. (included) through each of the two holes. Internal Auto-Resetting Electronic Circuit Breaker • Slide the remote control device into the sleeve. The sprinkler timer is equipped with an internal electronic Section 7: Diagnostics Circuit Breaker... -
Page 16: Glossary Of Terms
Section 8: Glossary of Terms TERM DEFINITION The time the program begins watering the cycle Cycle Start Time A valve that prohibits water from reaching station valves Master Valve A feature that allows a program to be operated multiple times on the same day Multiple Start Times A schedule for a group of stations that determines the date and time for watering Program (A or B) - Page 17 1. For each station (or valve) write down the watering IMPORTANT: Be aware of any watering restrictions through location, the type of sprinkler head and the types of your local water district. plants to be watered. 3. Determine, based on step 2, the ideal watering option for 2.
-
Page 18: Trouble Shooting
Section 9: Trouble Shooting Symptom Possible Causes of Problems Correction Replace solenoid One or more stations do 1. Faulty Solenoid Repair wire and check connections not turn on 2. Wire broken or not connected Turn flow control stem counter-clockwise 3. Flow control stem screwed down, shutting valve off until desired flow is achieved Check to make sure the station in 4. - Page 19 Help • Connect the equipment into an outlet on a circuit different from that to which the receiver is connected. Before returning this sprinkler timer to the store, contact Orbit ® • Consult the dealer or an experienced radio/TV Technical Service at: technician for help.
Need help?
Do you have a question about the ST2-RF and is the answer not in the manual?
Questions and answers