Advertisement
ENGLISH
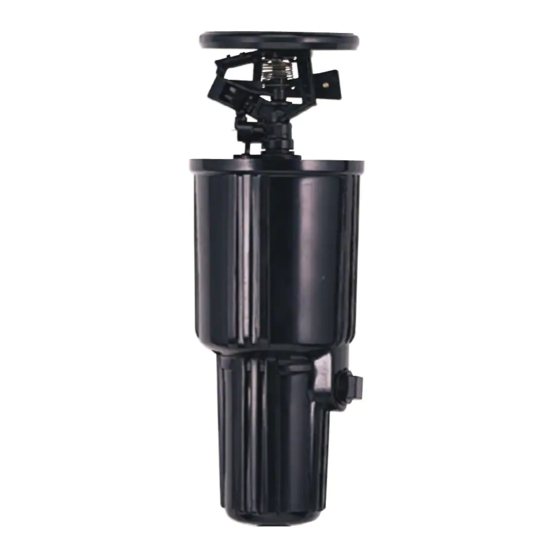
Installation Instructions
1. Connect the head to sprinkler pipe using either the side or bottom
inlet. Be sure to use the 1/2" (13 mm) plug on the unused inlet. In
freezing areas, insert a 1/2" (13 mm) Orbit
2. Pack gravel around the outside of the canister to allow the water
to drain from inside.
Installation Tips
1. Flush sprinkler lines before installing.
2. Oil, grease or pipe joint compound should not be used on this
sprinkler. Use thread seal tape to seal the inlet connection.
Adjusting the spray
Raise the lid to make pattern adjustments.
1. Part-circle adjustment
Slide the adjustment friction collars (from side-to-side) to adjust
spray pattern from 25º-360º. Be sure trip lever is in the down
position.
2. Full-circle adjustment
Flip the trip lever up.
3. Distance of spray and water break-up
Screw the diffuser pin into the stream of water.
Maintenance and cleaning
To clean and maintain the impact head, without removing it from the
ground, follow these easy steps.
1. Pull the head up all the way and flip trip lever to up position.
2. With the head still in the up position, use a wrench to turn the
"Guide Nut" counter clockwise several times.
3. Next, lift the head (which will be attached to the "Guide Stem")
out of the canister.
4. The filter will be attached to the bottom of the Guide Stem.
Remove filter and flush with clean water.
proof no:
date:
des:
client:
sku:
p 801 295 9820
upc:
f 801 951 5815
www.fluid-studio.net
file name:
1065 South 500 West
software:
Bountiful, Utah 84010
automatic drain valve.
®
2
dimensions:
flat: w: 8.25" h: 5.75"
01.04.11
finished: w: 8.25" d: 0.0" h: 5.75"
colors
MZ
Orbit
Registration
55100
BLACK
N/A
additional instructions:
· LB614673
55100-24 rA.indd
·
·
InDesign CS5
ESpAñoL
Instrucciones de instalación
1. Conecte la cabeza al tubo del regador utilizando la entrada lateral
o del fondo. Asegúrese de utilizar el conector de 13 mm en la
entrada que no se use. En áreas congeladas, inserte una válvula
de desagüe automático Orbit
2. Coloque grava alrededor de la parte externa del recipiente para
permitir que el agua drene desde dentro.
Consejos de instalación
1. Lave bien las líneas del regador antes de instalar.
2. No se debe utilizar aceite, grasa o compuestos para uniones de
tuberías en este regador. Utilice cinta de sellado para sellar la
conexión de la entrada.
Ajuste del atomizador
Levante la tapa para hacer ajustes de patrones.
1. Ajustes de círculo parcial
Deslice los anillos de ajuste de fricción (de lado a lado) para
ajustar los patrones de atomización de 25º a 360º. Asegúrese de
que la palanca de corte esté hacia abajo.
2. Ajustes de círculo completo
Coloque la palanca de corte hacia arriba.
3. Distancia del atomizador y cierre del agua
Gire el terminal difusor hacia la corriente de agua.
Limpieza y mantenimiento
Para limpiar y mantener la cabeza de impacto sin retirarla del
suelo, siga estos simples pasos.
1. Tire de la cabeza hacia arriba y gire la palanca de corte hacia
arriba.
2. Con la cabeza todavía hacia arriba, use una llave inglesa para
girar la "tuerca guía" en dirección contraria a la de las agujas
del reloj varias veces.
3. Luego, levante la cabeza (que estará sujeta al "vástago guía")
hacia afuera del recipiente.
4. El filtro estará sujeto al fondo del vástago guía. Retire el filtro y
enjuague con abundante agua limpia.
color
color
non printing
non printing
PMS
PMS
???
????
de 13 mm.
®
Printers are responsible for
meeting print production
requirements. Any changes
must be approved by the
client and Fluid Studio.
printed piece must meet
designated specifications
on this form.
PMS
????
© 2011 Fluid Studio. This
work is the property of Fluid
Studio, and cannot be used,
reproduced or distributed
in any way without their
express permission.
Advertisement
Table of Contents

Related Manuals for Orbit 55100


Summary of Contents for Orbit 55100
- Page 1 Be sure to use the 1/2” (13 mm) plug on the unused inlet. In o del fondo. Asegúrese de utilizar el conector de 13 mm en la freezing areas, insert a 1/2” (13 mm) Orbit automatic drain valve. entrada que no se use. En áreas congeladas, inserte una válvula ®...
- Page 2 Riegue en las horas en que se 1,2-1,4 bares utilice menos agua 1-800-488-6156 Las arandelas del cojinete están Cambie el ensamble de la cabeza 1-801-299-5555 gastadas El ensamble de corte está Cambie el ensamble de la cabeza www.orbitonline.com gastado PN 55100-24 rA...
Need help?
Do you have a question about the 55100 and is the answer not in the manual?
Questions and answers