Advertisement
Available languages
Available languages
Quick Links
Advertisement

Subscribe to Our Youtube Channel
Related Manuals for Autel EVO II Enterprise V3


Summary of Contents for Autel EVO II Enterprise V3
- Page 1 QUICK START GUIDE クイックシガリーイズド 快速指引 快速指引 퀵 가이드...
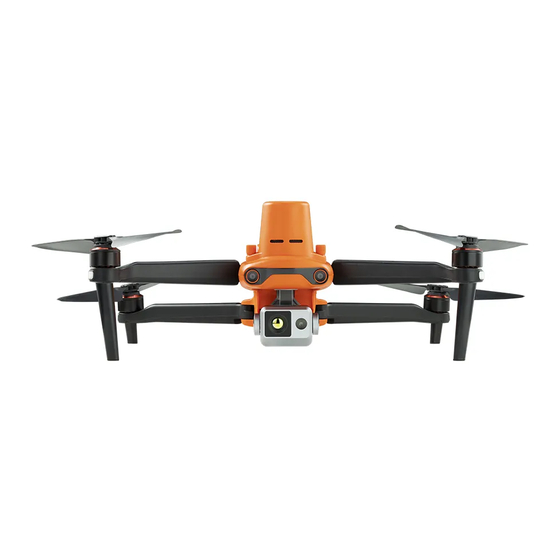
- Page 3 1. OVERVIEW The EVO II Enterprise V3 brings excellent flight performance, achieving a top speed of 20m/s (45mph), 42-minute flight time, and an operating distance at 15km (9.32miles, FCC). The aircraft comes with a 7.9 inch touch-screen controller, boasts a 2048x1536 pixel resolution.
- Page 4 Power Button Rear LED Indicators Rear Vision System Left Side Vision System SD Card Slot Right Side Vision System USB-C Port Aircraft Battery Pairing Button / Pairing Indicator Air Vent...
- Page 5 Upward Vision System Enterprise Accessory Interface Ultrasonic Sensor Downward Vision System Downward Vision Lighting LED...
- Page 6 3. FLIGHT LED INDICATIONS A LED indicator is located on the end of each aircraft arm. The front LEDs will light up solid red to help you identify the direction of the aircraft's nose. The rear LEDs will display the current flight status of the aircraft. The chart below shows the meaning of each status indicator.
- Page 7 4. REMOTE CONTROLLER Left Command Stick HDMI Port Customizable Button C2 Gimbal Pitch Angle Wheel USB TYPE-C Port Photo Shutter Button Video Recording Button USB TYPE-A Port *Zoom Control Wheel Customizable Button C1 Power Button Right Command Stick Air outlet *The function may alter, please take the practical effect as standard.
- Page 8 Air Vent Speaker Hole Grips Tripod Mount Hole Bottom Hook 5. CHARGING Aircraft Battery: Plug the charging connector into the battery’s charge port, and connect the other end to power adapter. Plug the power adapter into a power outlet (100-240V). Controller: Connect the charging cable to the USB port at the top of the controller, and the other end to power adapter.
- Page 9 6. AUTEL EXPLORER APP Search for ‘Autel Explorer’ from Google Play and install the app on your controller. 7. PREPARING THE AIRCRAFT Before powering on the aircraft, please remove the gimbal guard. Unfold the arms and propellers. NOTE: Power off the aircraft before folding the arms. Fold in the rear...
- Page 10 8. PROPELLERS Because the propellers come attached to the aircraft, the following instructions apply if you need to reinstall propellers. • Attaching the Propellers Power off the aircraft. Pair the propellers and corresponding motors according to the white mark . Press each propeller down firmly and rotate in the lock direction to securely attach the propeller.
- Page 11 9. ENTERPRISE ACCESSORIES Loudspeaker Spotlight Strobe RTK Module 1. Detach the accessory (1) Please ensure the aircraft is powered off. (2) Lose the screws on both sides, and remove the accessory. (3) Insert both ends of the protective cover into the corresponding slots. 2.
- Page 12 10.PREPARING THE CONTROLLER Unfold the antenna, detach the stick heads on the back of the controller handle, and screw them into the corresponding screw holes on both sides of the screen. Adjust the antenna angle, and when the antenna and the back of the controller are at the angle of 180 or 260, and the antenna surface is facing the aircraft, the signal quality of the aircraft and controller will reach the optimal condition.
- Page 13 Press and hold the power button 3 seconds to turn on the aircraft.The current battery level will be clearly displayed. 12. TAKE OFF Start the motors by holding both command sticks for two seconds as shown below. Push the left command stick slowly upward. NOTE: •...
-
Page 14: Command Stick Controls(Mode 2)
13. COMMAND STICK CONTROLS(MODE 2) Left Command Stick Left Side View Left Side View Ascend Descend Upward Downward Top View Top View Nose Rotates Left Nose Rotates Right Move Left Move Right Right Command Stick Left Side View Left Side View Forward Backward Upward... -
Page 15: Specifications
14. SPECIFICATIONS Aircraft 902~928MHz (FCC); 2.4~2.4835GHz; Operating Frequency 5.725~5.850GHz (Non-Japan); 5.650-5.755GHz (Japan) 900MHz: FCC/ISED<=31dBm 2.4GHz: FCC/ISED<=32dBm; Transmission Power (EIRP) CE/MIC/SRRC/RCM<=20dBm 5.8GHz/5.7GHz: FCC/ISED/SRRC/MIC<=33dBm; CE/RCM<=14dBm Remote Controller 902~928MHz (FCC); 2.4~2.4835GHz; Operating Frequency 5.725~5.850GHz (Non-Japan); 5.650-5.755GHz (Japan) FCC: ≤33dBm Transmission Power (EIRP) CE: ≤20dBm@2.4G, ≤14dBm@5.8G/5.7G SRRC: ≤20dBm@2.4G, ≤33dBm@5.8G/5.7G... - Page 16 1. 概要 EVO II Enterprise V3 の最高速度時速は 72km、最大飛行時間は 42 分、 最大飛行距離は 15km です。送信機は、2048x1536 ピクセルの解像度 を誇る 7.9 インチのタッチスクリーンと一体化されています。 注: 初めての飛行を始める前に、利用可能な参考文書をすべて お読みください。責任を持って機体を操作しなければ、傷 害や損害につながり、保証が適用できなくなるおそれがあ ります。 2. 機体 プロペラ 着陸装置 モータ 前方視覚システム 正面 LED インジケータ カメラ用ジンバル...
- Page 17 電源スイッチ 後面 LED インジケータ 後方視覚システム 左側視覚システム SD カードスロット 右側視覚システム USB ポート 機体バッテリー ペアリングボタン / ファン排気口 ペアリングインジケータ...
- Page 18 上部視覚システム アクセサリインターフェイス 超音波センサ 下方視覚システム 視覚照明 LED...
- Page 19 3. 飛行 LED インジケータ LED インジケータは機体の各アームの先端にあります。正面の LED は、 赤色に点灯し、それによって機首の方向がわかります。後面の LED は、 機体の現在の飛行状態を表示しています。以下の表は、各状態インジ ケータの意味を示しています。 インジケータキー: 色キー: 遅い点滅:每 � 秒闪烁一次 R - 赤 速い点滅:每 � 秒闪烁两次 G - 绿 二重点滅:� 回点滅し、ポーズをおいてからまた点滅 Y - 黄色 定 義 正 常 RGY - 交互点滅 システムの自己診断が起動 YG - 交互点滅...
- Page 20 4. 送信機 左ジョイスティック USB タイプ -A ポート ジンバルピッチ角度ホイール 電源ボタン ビデオ録画ボタン カスタマイズボタン C� カスタマイズボタン C� 写真シャッターボタン エアー吹き出し口 * ズームコントロールホイール HDMI ポート 右ジョイスティック USB タイプ -C ポート * 機能が変更される可能性がありますが、実用上は標準的機能です。 バッテリー残量表示 一旦停止ボタン アンテナ 自動離陸 /RTH ボタン タッチスクリーン マイクフォン...
- Page 21 スピーカーホール ボトムフック 三脚取り付け穴 グリップ エアー吸い込み口 5. 充電 (1) バッテリー:充電コネクタをバッテリーの充電ポートに差し込みま す。 (2) 送信機:USB ポートのプロテクターを開き、付属の充電ケーブルを 差し込みます。 注: • 飛行する前に、機体と送信機のバッテリーを常に完全に充電 してください。 • 飛行の前にはいつも機体バッテリーと送信機をフル充電して ください。バッテリーを完全に充電するには約 �� 分、送信機 を充電するには ��� 分かかります。...
- Page 22 6. Autel Explorer App Google Play で「Autel Explorer」をダウンロードします。 7. 機体の準備 (1) ジンバルホルダーを取り外します。 (2) アームとプロペラを広げます。 注 : 折りたたむ前に機体の電源を OFF にします。最初にリアア ームとプロペラを、次にフロントアームを折りたたみます。...
- Page 23 8. プロペラ プロペラは機体に装着されるので、プロペラを装着し直す場合は以下 の手順で行います。白で色分けされたプロペラは、白で色分けされた モータと対にします。 • 装着 (1) 機体の電源が OFF になっていることを確認します。 (2) プロペラを選び、モーターと組み合わせます。 (3) 各プロペラをしっかり押さえつけて、ロックがかかる方向に回し て、プロペラを確実に装着します。 • 取り外し (1) 機体の電源を OFF にします。 (2) 各プロペラをしっかり押さえつけて、ロックが外れる方向に回し て、プロペラを取り外します。 説明 ロックがかかる方向:プロペラを矢印の方向に回して締めます。 ロックが外れる方向:プロペラを矢印の方向に回して緩めます。 注: プロペラの取り付け、取り外しの前に機体の電源を OFF • にすること。 プロペラは、損傷がないものをしっかりと装着しなけれ • ばなりません。上。...
- Page 24 9. アクセサリー スピーカー スポットライト ストロボ RTK モジュール 1. アクセサリを取り外します (1) 機体の電源がオフになっていることを確認してください。 (2) 両側のネジを外し、付属品を取り外します。 (3) 保護カバーの両端を対応するスロットに挿入します。 2. アクセサリを取り付ける (1) 機体の電源がオフになっていることを確認してください。 (2) 両端を軽く絞って保護カバーを外します (3) アクセサリの両側のネジをネジ穴に合わせ、ネジを締めます。...
- Page 25 10. 送信機の準備 (1) アンテナを広げ、送信機ハン ドルの背面にあるスティック ヘッドを取り外し、画面の両 側にある対応するネジ穴にねじ 込みます。 (1) アンテナと送信機背面の角度が 180°または 260°で、アンテナ面が機 体に向くと、機体とコントローラー間の信号品質が最適な状態にな ります。 11. パワーオン (1) 送信機の電源を ON にします。 電源スイッチを 2 秒間長押し します。...
- Page 26 (1) 機体の電源を ON にします。機体の電源スイッチを 3 秒間長押しし ます。現在のバッテリー残量が明示されます。 12. 離陸 (1) 両方のスティックを下図のいずれかの位置にして 2 秒間押し、モー タを始動します。 また (2) 左側のスティックをゆっくり上に押し上げる (Mode 2) 。 注: Mode � は、送信機のデフォルトの制御モードです。左 • スティックで機体の高度と方位を、右スティックで前後 左右の動きを制御します。 離陸の前に、機体を平坦で水平な場所に置き、機体の後 • 面をパイロット側にします。...
- Page 27 13. スティックのコントロール(Mode 2) 左側のスティック 左側面図 左側面図 上昇 下降 押し上げる 押し下げる 上面図 上面図 機首左回転 機首右回転 左に押す 右に押す 右側のスティック 左側面図 左側面図 前進 後退 押し上げる 押し下げる 後面図 後面図 左 右 左に押す 右に押す...
- Page 28 14. 仕様 機 体 902~928MHz (FCC); 2.4~2.4835GHz; 動作周波数 5.725~5.850GHz( 日本以外 ); 5.650-5.755GHz ( 日本 ) 900MHz: FCC/ISED<=31dBm 2.4GHz: FCC/ISED<=32dBm; 送信出力 (EIRP) CE/MIC/SRRC/RCM<=20dBm 5.8GHz/5.7GHz: FCC/ISED/SRRC/MIC<=33dBm; CE/RCM<=14dBm 送 信 機 902~928MHz (FCC); 2.4~2.4835GHz; 動作周波数 5.725~5.850GHz( 日本以外 ); 5.650-5.755GHz ( 日本 ) FCC: ≤ 33dBm 送信出力...
- Page 29 1. 产品简介 EVO II 行业版 V3 拥有卓越的飞行性能,轻松实现 20m/s 的最高速度, 最长达 42 分钟的飞行时间、15 千米(FCC)的操作距离。并标配 Autel 智能遥控器 V3,集成 7.9 英寸 2048x1536 高清触控屏,可实现 1080P 实时画面回传。 注意: 初次飞行之前查阅所有文档说明。不当操作无人机将会带来 伤害或损失,并失去所有适用的质保服务。 2. 飞行器部件 螺旋桨 起落架 电机 前视视觉系统 前 LED 指示灯 相机云台...
- Page 30 电源按钮 后 LED 指示灯 后视视觉系统 左视视觉系统 SD 卡卡槽 右视视觉系统 USB-C 端口 飞行器电池 配对按键 / 风扇排风口 配对指示灯...
- Page 31 上视视觉系统 扩展配件接口 超声波传感器 下视视觉系统 LED 补光灯...
- Page 32 3. 飞行指示灯 飞行器每个机臂的末端均有一个 LED 指示灯。前面的 LED 亮起后为稳定 的红色,可以帮助您辨别机头的方向。后面的 LED 将显示飞行器当前的 飞行状态。下表为每个状态指示灯的含义。 指示灯: 颜色: 慢速闪烁:每 � 秒闪烁一次 R - 红色 快速闪烁:每 � 秒闪烁两次 G - 绿色 交替闪烁:以不同的颜色交替闪烁 Y - 黄色 指示灯状态定义 正常状态 RGY - 交替闪烁 系统自检 YG - 交替闪烁 预热 G - 慢速闪烁 飞行器处于...
- Page 33 4. 遥控器 左摇杆 HDMI 接口 自定义键 C� 云台俯仰拨轮 TYPE-C 接口 拍照按键 录像按键 USB 接口 * 变焦拨轮 自定义键 C� 电源按键 右摇杆 出风口 * 后续拨轮功能可能变更,请以实际使用效果为准 电量指示灯 触摸显示屏 自动起飞 / 返航按键 天线 暂停按键 麦克风...
- Page 34 喇叭孔 进风口 保护罩 标准 �/� 接口 下挂钩 5. 充电 (1) 飞行器电池:将充电线一端插入电池的充电槽口,另一端通过适配器 连接至交流电源(100-240V)。 (2) 遥控器充电:将充电线的一端接入遥控器顶部的 USB 接口,另一端 通过适配器连接至交流电源(100-240V)。 注意: 请使用标配的充电器给电池和遥控器充电。 • • 飞行器电池充满需要 �� 分钟,遥控器充满需 ��� 分钟。...
- Page 35 6. Autel Explorer App 请在安卓应用市场搜索并下载 Autel Explorer。 7. 准备飞行器 (1) 开启飞行器电源开关前,请先取下云台保护罩。 (2) 展开机臂和螺旋桨。 注意: 折叠机臂之前,应先关闭飞行器电源开关。先折叠后机臂 • 和螺旋桨,再折叠前机臂。...
- Page 36 8. 螺旋桨 飞行器默认已安装好螺旋桨,如果您需要重新安装,请参考以下步骤。 • 安装螺旋桨 (1) 关闭飞行器。 (2) 按白色标记匹配螺旋桨和对应电机。 (3) 用力按下螺旋桨,然后沿锁定方向转动,使螺旋桨安装牢固。 • 拆卸螺旋桨 (1) 关闭飞行器。 (2) 用力按下螺旋桨,然后沿解锁方向转动,以拆下螺旋桨。 图例说明 锁定方向:按指示方向旋转以固定螺旋桨。 解锁方向:按照指示旋转螺旋桨以将其松开。 注意: 安装或拆卸螺旋桨之前,应先关闭飞行器电源开关。 • 飞行前请确保螺旋桨必须完好无损且稳固安装在飞行器上。 •...
- Page 37 9. 扩展配件 喊话器 探照灯 夜航灯 RTK 模块 1. 拆卸配件 (1) 确认飞行器电源已关闭。 (2) 拧松配件两侧的螺丝,取下配件。 (3) 将保护盖两端插入相应的插槽。 2. 安装配件 (1) 确认飞行器电源已关闭。 (2) 轻捻取下扩展配件接口保护盖。 (3) 将配件两侧螺丝对准螺丝孔,拧紧螺丝。...
- Page 38 10. 准备遥控器 (1) 展开天线,取下提手背部的摇 杆并分别旋入遥控器屏幕两侧 的对应螺孔中。 (2) 调整天线位置,当天线与遥控器背面呈 180°或 260°夹角,且天线平 面正对飞行器时,遥控器与飞行器的信号质量可达到最佳状态。 11. 开启设备 (1) 长按电源按键 2s 可开启遥控器 电源。...
- Page 39 (2) 长按电源按键 3 秒,开启飞行器。电池电量指示灯随之亮起,显示当 前的电量。 12. 起飞 (1) 以内倾或外倾方式扒动摇杆并停留 2 秒启动飞行器电机。 或者 (2) 慢慢向上推动左摇杆(美国手)使飞行器起飞。 注意: 遥控器出厂默认操控方式为“美国手”。其中左摇杆控制 • 飞行器的升降与航向,右摇杆控制飞行器的平移。 起飞前,将飞机放在平坦的水平面上,并使机尾朝向自己。 •...
- Page 40 13. 摇杆操控方法(美国手) 左摇杆 左视图 左视图 上升 下降 上推 下推 俯视图 俯视图 机头向左转 机头向右转 左推 右推 右摇杆 左视图 左视图 前进 后退 上推 下推 后视图 后视图 左移 右移 左推 右推...
- Page 41 14. 规格参数 飞 行 器 902 至 928 MHz(FCC) ; 2.4 至 2.4835GHz; 工作频率 5.725 至 5.850 GHz(非日本地区) ; 5.650 至 5.755GHz(日本) 900MHz: FCC/ISED<=31dBm 2.4GHz: FCC/ISED<=32dBm; 等效全向辐射功率 (EIRP) CE/MIC/SRRC/RCM<=20dBm 5.8GHz/5.7GHz: FCC/ISED/SRRC/MIC<=33dBm; CE/RCM<=14dBm 遥 控 器 902 至 928 MHz(FCC) ; 2.4 至...
- Page 42 1. 產品簡介 EVO II 行業版 V3 擁有卓越的飛行性能,輕鬆實現 20m/s 的最高速度, 最長達 42 分鐘的飛行時間、15 千米(FCC)的操作距離。並標配 Autel 智能遙控器 V3,集成 7.9 英寸 2048x1536 高清觸控屏,可實現 1080P 即時畫面回傳。 注意: 初次飛行之前查閱所有文檔說明。不當操作無人機將會帶來 傷害或損失,並失去所有適用的質保服務。 2. 飞行器部件 螺旋槳 起落架 電機 前視視覺系統 前 LED 指示燈 相機雲臺...
- Page 43 電源按鈕 後 LED 指示燈 後視視覺系統 左視視覺系統 SD 卡卡槽 右視視覺系統 USB-C 端口 飛行器電池 配對按鍵 / 風扇排風口 配對指示燈...
- Page 44 上視視覺系統 擴展配件介面 超聲波感測器 下視視覺系統 LED 補光燈...
- Page 45 3. 飛行指示燈 飛行器每個機臂的末端均有一個 LED 指示燈。前面的 LED 亮起後為穩定 的紅色,可以幫助您辨別機頭的方向。後面的 LED 將顯示飛行器當前的 飛行狀態。下表為每個狀態指示燈的含義。 指示燈: 顏色: 慢速閃爍:每 � 秒闪烁一次 R - 紅色 快速閃爍:每 � 秒闪烁两次 G - 綠色 交替閃爍:以不同的颜色交替闪烁 Y - 黃色 指示燈狀態定義 正常狀態 RGY - 交替閃爍 系統自檢 YG - 交替閃爍 預熱 G - 慢速閃爍 飛行器處於...
- Page 46 4. 遙控器 左搖杆 HDMI 介面 自定義鍵 C� 雲臺俯仰撥輪 TYPE-C 介面 拍照按鍵 錄影按鍵 USB 介面 * 變焦撥輪 自定義鍵 C� 電源按鍵 右搖杆 出風口 * 後續撥輪功能可能變更,請以實際使用效果為准 電量指示燈 觸摸顯示幕 自動起飛 / 返航按鍵 天線 暫停按鍵 麥克風...
- Page 47 喇叭孔 進風口 保護罩 標準 �/� 介面 下掛鉤 5. 充電 (1) 飛行器電池:將充電線一端插入電池的充電槽口,另一端通過適配器 連接至交流電源(100-240V)。 (1) 遙控器充電:將充電線的一端接入遙控器頂部的 USB 介面,另一端 通過適配器連接至交流電源(100-240V)。 注意: 請使用標配的充電器給電池和遙控器充電。 • • 飛行器電池充滿需要 90 分鐘,遙控器充滿需 120 分鐘。...
- Page 48 6. Autel Explorer App 請在 Google Play 搜索並下載 Autel Explorer。 7. 準備飛行器 (1) 開啟飛行器電源開關前,請先取下雲臺保護罩。 (2) 展開機臂和螺旋槳。 注意: 折疊機臂之前,應先關閉飛行器電源開關。先折疊後機臂和 螺旋槳,再折疊前機臂。...
- Page 49 8. 螺旋槳 飛行器默認已安裝好螺旋槳,如果您需要重新安裝,請參考以下步驟。 • 安裝螺旋槳 (1) 關閉飛行器。 (2) 按白色標記匹配螺旋槳和對應電機。 (3) 用力按下螺旋槳,然後沿鎖定方向轉動,使螺旋槳安裝牢固。 • 拆卸螺旋槳 (1) 關閉飛行器。 (2) 用力按下螺旋槳,然後沿解鎖方向轉動,以拆下螺旋槳。 圖例說明 鎖定方向:按指示方向旋轉以固定螺旋槳。 解鎖方向:按照指示旋轉螺旋槳以將其鬆開。 注意: • 安裝或拆卸螺旋槳之前,應先關閉飛行器電源開關。 • 飛行前請確保螺旋槳必須完好無損且穩固安裝在飛行器上。...
- Page 50 9. 擴展配件 喊話器 探照燈 夜航燈 RTK 模組 1. 拆卸配件 (1) 確認飛行器電源已關閉。 (2) 擰松配件兩側的螺絲,取下配件。 (3) 將保護蓋兩端插入相應的插槽。 2. 安裝配件 (1) 確認飛行器電源已關閉。 (2) 輕撚取下擴展配件介面保護蓋。 (3) 將配件兩側螺絲對準螺絲孔,擰緊螺絲。...
- Page 51 10. 準備遙控器 (1) 展開天線,取下提手背部的搖 杆並分別旋入遙控器螢幕兩側 的對應螺孔中。 (2) 調整天線位置,當天線與遙控器背面呈 180°或 260°夾角,且天線平 面正對飛行器時,遙控器與飛行器的信號品質可達到最佳狀態。 11. 開啟設備 (1) 長按遙控器電源鍵 2 秒,開啟 遙控器電源。...
- Page 52 (2) 長按電池電源鍵 3 秒,開啟飛行器。電池電量指示燈隨之亮起,顯示 當前的電量。 12. 起飛 (1) 以內傾或外傾方式扒動搖杆並停留 2 秒啟動飛行器電機。 或者 (2) 慢慢向上推動左搖杆(美國手)使飛行器起飛。 注意: • 遙控器出廠默認操控方式為“美國手”。其中左搖杆控 制飛行器的升降與航向,右搖杆控制飛行器的平移。 起飛前, 將飛機放在平坦的水平面上, 並使機尾朝向自己。 •...
- Page 53 13. 搖杆操控方法(美國手) 左搖杆 左視圖 左視圖 上升 下降 上推 下推 俯視圖 俯視圖 機頭向左轉 機頭向右轉 左推 右推 右搖杆 左視圖 左視圖 前进 后退 上推 下推 後視圖 後視圖 左移 右移 左推 右推...
- Page 54 14. 規格參數 飛 行 器 902 至 928 MHz(FCC); 2.4 至 2.4835GHz; 工作頻率 5.725 至 5.850 GHz(非日本地區); 5.650 至 5.755GHz(日本) 900MHz: FCC/ISED<=31dBm 2.4GHz: FCC/ISED<=32dBm; 等效全向輻射功率 (EIRP) CE/MIC/SRRC/RCM<=20dBm 5.8GHz/5.7GHz: FCC/ISED/SRRC/MIC<=33dBm; CE/RCM<=14dBm 遥 控 器 902 至 928 MHz(FCC); 2.4 至 2.4835GHz; 工作频率...
- Page 55 1. 개요 EVO II Enterprise V3 의 최대 속도는 72km/h , 비행 시간 42 분 및 작동거리 15km(FCC) 의니다 . 조종기는 2048x1536 픽셀 해상도를 자랑하는 7.9 인치 터치 스크린과 통합되어 있습니다 . 중요 : 첫 비행전에 검토가능한 모든 매뉴얼을 참조하십시오 . 항공기를...
- Page 56 전원 버튼 후면 LED 표시등 후방 비젼 시스템 좌측 비젼 시스템 SD Card 포트 우측 비젼 시스템 USB 포트 항공기 배터리 패어링 버튼 / 팬 배기 페어링 표시등...
- Page 57 탑 비젼 시스템 엑세서리 인터페이스 초음파 센서 하향 비젼 시스템 하향 비젼 조명 LED...
- Page 58 3. 비행 LED 표시등 LED 표시기는 항공기 각각의 암 끝에 있습니다 . 기체의 기수 방향을식별하는 데 도움이 되도록 전면 LED 가 빨간색으로 켜집니다 . 후면 LED 는기체의 현 재 비행 상태를 표시합니다 . 아래 차트는 각 상태 표시기의 의미를보여줍니 다 . 표시등...
- Page 59 4. 조종기 왼쪽 커맨드 스틱 HDMI 포트 사용자 정의 버튼 C2 짐벌 피치 앵글 휠 USB TYPE-C 포트 사진 셔터 버튼 동영상 녹화 버튼 USB TYPE-A 포트 * 줌 컨트롤 휠 사용자 정의 버튼 C1 전원 버튼 오른쪽 커맨드 스틱 공기...
- Page 60 스피커 구멍 에어 벤트 보호 케이스 삼각대 장착 구멍 하부 훅 5. 충전 (1) 배터리 : 충전 컨넥터를 배터리의 충전포트에 연결합니다 . (2) 조종기 : USB 포트에 제공된 충전케이블을 연결합니다 . 중요: • 항상 비행하기 전에 기체와 조종기 배터리를완전히 충전하십 시오...
- Page 61 6. Autel Explorer App Google Play 에서 Autel Explorer 다운로드 . 7. 항공기 준비 (1) 짐벌 홀더를 제거합니다 . (2) 팔 ( 암 ) 과 프로펠러를 펼칩니다 . 중요: 암과 프로펠러를 접기전에 반드시 전원을 끕니다 . 먼저 뛰쪽에 위치한 암과 프로펠러를 접은 다음 그 이후에 앞쪽의 암을 접습...
- Page 62 8. 프로펠러 프로펠러는 이미 기체이 부착되어 있기에 프로펠러를 다시 설치해야하는경우 는 다음의 지침이 적용됩니다 . 흰색표시된 프로펠러는 흰색으로 표시된 모터 에 설치해야만 합니다 . • 새 프로펠러 부착 (1) 기체의 전원이 꺼져있는지 확인합니다 . (2) 프로펠러를 각각의 모터에 위치합니다 . (3) 각...
- Page 63 9. 엔터프라이즈 엑세서리 라우드 스피커 스팟라이트 스트로브 RTK 모듈 1. 액세서리 분리 (1) 작업전 반드시 기체의 전원이 꺼져있는지 확인합니다 . (2) 양쪽의 나사를 풀고 , 액세서리를 제거합니다 . (3) 보호커버의 양쪽 끝을 해당 슬롯에 삽입합니다 . 2. 액세서리 장착 (1) 기체의 전원이 꺼져있는지 확인하세요 . (2) 양쪽...
- Page 64 10. 조종기 준비 (1) 스틱 보관용 슬롯은 조종기뒷 면에 있습니다 . 스틱을 꺼내 어 해당 베이스에 나사로 고정 하십시오 . (2) 안테나와 조종기 후면이 180° 또는 270° 각도이고 안테나 표면이 기체를 향하고 있을 때 기체와 조종기 사이의 신호 품질이 최적 의...
- Page 65 (2) 전원버튼을 3 초간눌러서 기체의전원을 켭니다 . 현재의 배터리잔량 이 . 표시됩니다 . 12. 이륙 (1) 아래의 그림과 같은 포지션중에서 하나를 선택하여 두개의 명령스 틱을 2 초간 밀면 모터가 작동을 시작합니다 . 또는 (2) 왼쪽 커맨드 스틱을 천천히윗 방향으로 누릅니다 (Mode 2). 중요:...
- Page 66 13. 커맨드 스틱 사용법(Mode 2) 좌측 커맨드 스틱 좌측 좌측 상승 하강 위로 아래로 평면도 평면도 왼쪽으로 회전 오른쪽으로 회전 왼쪽으로 이동 오른쪽으로 이동 우측 커맨드 스틱 좌측 좌측 앞으로 뒤로 위로 아래로 후면 후면 왼쪽으로 오른쪽으로 오른쪽으로 이동 왼쪽으로 이동...
- Page 67 14. 제품 사양 드론 902~928 MHz(FCC); 2.4~2.4835GHz; RF 수신기 작동 주파수 5.725~5.850 GHz( 일본 외 ); 5.650~5.755GHz( 일본 ) 900MHz: FCC/ISED<=31dBm 2.4GHz: FCC/ISED<=32dBm; 전송 전력 (EIRP) CE/MIC/SRRC/RCM<=20dBm 5.8GHz/5.7GHz: FCC/ISED/SRRC/MIC<=33dBm; CE/RCM<=14dBm 조종기 902~928 MHz(FCC); 2.4~2.4835GHz; RF 수신기 작동 주파수 5.725~5.850 GHz( 일본 외 ); 5.650~5.755GHz( 일본...
- Page 68 ©2022 Autel Robotics Co., Ltd. All Rights Reserved...
Need help?
Do you have a question about the EVO II Enterprise V3 and is the answer not in the manual?
Questions and answers