
Related Manuals for Autel EVO II Enterprise


Summary of Contents for Autel EVO II Enterprise
- Page 1 QUICK START GUIDE Enterprise Seattle 425-771-7776 | Tacoma 253-922-6087 Portland 503-641-3388 | Salt Lake City 801-878-9763 St. George 702-586-1152 | Las Vegas 702-586-1152 Boise 208-369-4388 www.KukerRanken.com...
-
Page 3: Table Of Contents
Contents ........� �. GETTING TO KNOW THE EVO II ENTERPRISE ......� �. AIRCRAFT FRONT, REAR, AND LEFT SIDE VIEWS ......� �. AIRCRAFT RIGHT SIDE, TOP, AND BOTTOM VIEWS ..............� �. FLIGHT LED INDICATIONS ............... � �. SMART CONTROLLER .... -
Page 4: Getting To Know The Evo Ii Enterprise
Inspection, Search and rescue, law enforcement, and firefight- ing. EVO II Enterprise comes with a �.� inch, ���� nit brightness Autel Smart Controller, which allows users to view the live feed at up to ����p. -
Page 5: Aircraft Front, Rear, And Left Side Views
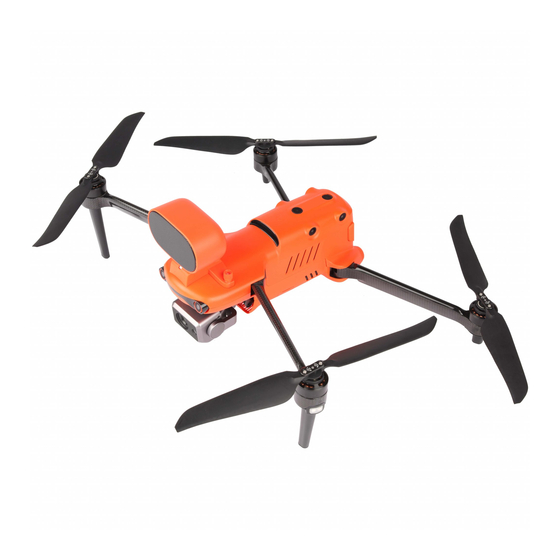
2. AIRCRAFT FRONT, REAR, AND LEFT SIDE VIEWS Front View Propellers Landing Gear Motors Forward Vision System Front LED Indicators Camera Gimbal Rear View Power Button Rear LED Indicators Rear Vision System Left Side View Left Side Vision System SD Card Slot... -
Page 6: Aircraft Right Side, Top, And Bottom Views
3. AIRCRAFT RIGHT SIDE, TOP, AND BOTTOM VIEWS 15 16 Right Side View Right Side Vision Sensor Aircraft Battery Air Vent USB-C Port Smart Controller Match Button / Match Indicator Top View Top View Vision System Enterprise Accessory Interface... - Page 7 Bottom View Ultrasonic Sensor Downward Vision Lighting LED Downward Vision System 4.FLIGHT INDICATION LIGHT A LED indicator is located on the end of each aircraft arm. The front LEDs will light up solid red to help you identify the direction of the aircraft's nose.
- Page 8 Definitions of Flight LED Indicator Status Normal Status RGY ‒ Alternate Flashing System self-test is activated The aircraft is warming up YG - Alternate Flashing G ‒ Slow Flashing The aircraft is in GPS mode Warning Y - Slow Flashing The aircraft is in ATTI mode No connection between the aircraft Y - Fast Flashing...
-
Page 9: Smart Controller
5. SMART CONTROLLER 9 10 Top View USB TYPE-A Port Left Command Stick Gimbal Pitch Dial Power Button Record Button Customizable Button C� Customizable Button C� Photo Shutter Button Air Vent * Zoom Control Wheel HDMI Port Right Command Stick USB TYPE-C Port * The function may alter, please take the practical effect as standard. -
Page 10: Charging The Aircraft And Smart Controller
⑭ Battery Indicator ⑰ Pause Button ⑮ Antennas ⑱ Go Home Button ⑯ Touch Screen ⑲ Microphone Rear View ⑳ Sound Speaker ㉓ Bottom Hook ㉑ Tripod Mount ㉔ Protection Case ㉒ Air Vent 6. CHARGING THE AIRCRAFT AND SMART CONTROLLER (�) Aircraft Battery: Plug the charging connector into the battery's charge port. -
Page 11: Autel Explorer Tm App
��� minutes to charge the smart controller. 7. Autel Explorer The Autel Explorer™ App is built in the smart controller, and it is used to control the aircraft. Autel Explorer™ App is optimized for EVO II Enterprise. The features are Intelligent Photography, Mission Flight, and Intelligent Flight Modes. -
Page 12: Preparing The Aircraft
8. PREPARING THE AIRCRAFT (�) Before powering on the aircraft, please remove the gimbal guard. Slowly pull it away from the aircraft as shown below. (�) Unfold the arms and propellers IMPORTANT Power off the aircraft before folding the arms. Fold in the rear arms and propellers first, and then the front ones. -
Page 13: Installing Propellers
9. INSTALLING NEW PROPELLERS Because the propellers come attached to the aircraft, the following instructions apply if you need to reinstall propellers. Propellers must be undamaged and firmly attached. · Attaching the Propellers (�) Verify that the aircraft is powered off. (�)... -
Page 14: Enterprise Accessories
Power off the aircraft before attaching or detaching propellers. IMPORTANT Wear protective gloves when attaching or detaching propellers. 10. ENTERPRISE ACCESSORIES The EVO II Enterprise can be equipped with accessories for different applications. Optional accessories: Spotlight, Loudspeaker, Strobe, and RTK module. Loudspeaker Spotlight... -
Page 15: Preparing The Smart Controller
· Detach the accessory (�) Please ensure the aircraft is powered off. (�) Lose the screws on both sides, and remove the accessory. (�) Insert both ends of the protective cover into the corresponding slots. · Attach the accessory (�) Please ensure the aircraft is powered off. (�)... -
Page 16: Powering Up
��� 12. POWERING UP (�) Press and hold the power button for � second to turn on the smart controller. (�) Press and hold the power button � seconds to turn on the aircraft. The current battery level will be clearly displayed. -
Page 17: Takeoff
13. TAKEOFF (�) Place aircraft on a level surface, Stand well clear of the rear of the aircraft. (�) Start the motors by holding both command sticks for two seconds in the one of these positions as shown below: (�) With the motors spinning, choose one of the following methods to take off: Hold the Takeoff/Landing Push the Left Command... - Page 18 14. COMMAND STICK CONTROLS (MODE 2) Left Command Stick Left Side View Left Side View Ascend Descend Downward Upward Top View Top View Nose Rotates Left Nose Rotates Right Move Left Move Right Right Command Stick Top View Top View Forward Backward Rear...
- Page 20 WWW.AUTELROBOTICS.COM ©����-���� AUTEL ROBOTICS CO., LTD. | ALL RIGHTS RESERVED...
Need help?
Do you have a question about the EVO II Enterprise and is the answer not in the manual?
Questions and answers