Alpitronic Hypercharger HYC 50 Operating And Installation Manual
Fast charging system for electric vehicles
Hide thumbs
Also See for Hypercharger HYC 50:
- Operation and installation manual (102 pages) ,
- Commissioning manual (30 pages) ,
- Configuration manual (81 pages)
Table of Contents
Advertisement
Quick Links
HYC_50 – Operation and Installation Guide
Hardware
Version 1-2
Operating and
Installation Guide
Hardware
hypercharger HYC_50
(50 kW)
Fast charging system for electric vehicles
for HW-Version 5.6
All rights reserved. Reproduction of this document, in whole or in part, is only permitted with the permission of alpitronic GmbH.
Advertisement
Table of Contents

Related Manuals for Alpitronic Hypercharger HYC 50


Summary of Contents for Alpitronic Hypercharger HYC 50
- Page 1 Version 1-2 Operating and Installation Guide Hardware hypercharger HYC_50 (50 kW) Fast charging system for electric vehicles for HW-Version 5.6 All rights reserved. Reproduction of this document, in whole or in part, is only permitted with the permission of alpitronic GmbH.
- Page 2 HYC_50 – Operation and Installation Guide Hardware Version 1-2 Content All rights reserved. Reproduction of this document, in whole or in part, is only permitted with the permission of alpitronic GmbH.
- Page 3 HYC_50 – Operation and Installation Guide Hardware Version 1-2 Content This page was intentionally left blank. All rights reserved. Reproduction of this document, in whole or in part, is only permitted with the permission of alpitronic GmbH.
- Page 4 MessEG/EV, the appendix A1 ("Technical documentation for the MessEG/EV") must be observed as further documentation. All rights reserved. Reproduction of this document, in whole or in part, is only permitted with the permission of alpitronic GmbH.
- Page 5 Ch. Leimegger First version Ch. Leimegger Dr.-Ing. M. Hörter September 2022 Extensive. Additions and adjustments M. Hofer A. Benetti All rights reserved. Reproduction of this document, in whole or in part, is only permitted with the permission of alpitronic GmbH.
-
Page 6: Table Of Contents
Authentication ....................47 6.1.2. Charging plug selection ...................51 6.1.3. Plugging in the charging cable ................53 6.2. During the charging process ...................54 All rights reserved. Reproduction of this document, in whole or in part, is only permitted with the permission of alpitronic GmbH. - Page 7 Plug contacts charging cable set ................71 8.8. Check overvoltage protection .................72 9. Repair and service ......................73 Disposal ......................... 74 Technical data ......................75 All rights reserved. Reproduction of this document, in whole or in part, is only permitted with the permission of alpitronic GmbH.
-
Page 8: Figures
Figure 44: Charging plug side view ...................71 Figure 45: Charging plug contactors .................72 Figure 46: Check of overvoltage protection ...............72 All rights reserved. Reproduction of this document, in whole or in part, is only permitted with the permission of alpitronic GmbH. -
Page 9: Tables
Table 16: Idle power dissipation at 400V according to the display brightness ....76 Table 17: Frequency bands and transmission levels of the HYC_50 .........76 All rights reserved. Reproduction of this document, in whole or in part, is only permitted with the permission of alpitronic GmbH. - Page 10 HYC_50 – Operation and Installation Guide Hardware Version 1-2 Content This page was intentionally left blank. All rights reserved. Reproduction of this document, in whole or in part, is only permitted with the permission of alpitronic GmbH.
-
Page 11: Safety Instructions
Before carrying out any work, these instructions must be read carefully by both the operator and the technical personnel in charge. All rights reserved. Reproduction of this document, in whole or in part, is only permitted with the permission of alpitronic GmbH. -
Page 12: Safety Instructions For Installation And Maintenance
Before dismantling, repairing or replacing components, ensure that all components have cooled down. All rights reserved. Reproduction of this document, in whole or in part, is only permitted with the permission of alpitronic GmbH. - Page 13 HYC_50. Please note possible discharge times of DC link capacitors. All rights reserved. Reproduction of this document, in whole or in part, is only permitted with the permission of alpitronic GmbH.
-
Page 14: Product Description
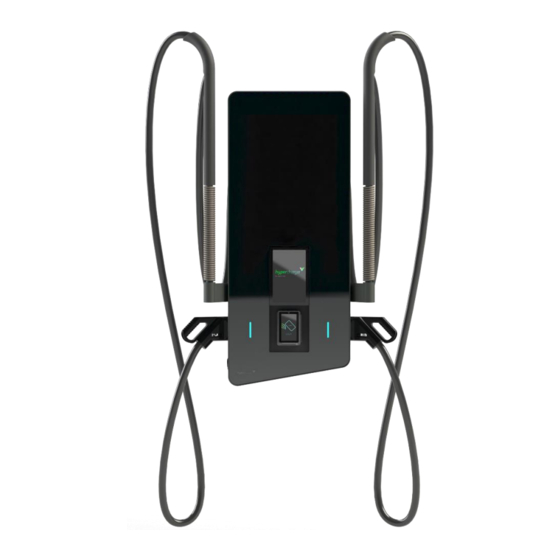
Figure 1 and Figure 2 show the HYC_50 which can be equipped with one or two DC charging cables. Figure 1: HYC_50 with open front door (Example with two DC charging cables) All rights reserved. Reproduction of this document, in whole or in part, is only permitted with the permission of alpitronic GmbH. -
Page 15: Figure 2: Hyc_50 With Two Dc Charging Cables
Customs tariff number of the HYC_50: 85044055 All rights reserved. Reproduction of this document, in whole or in part, is only permitted with the permission of alpitronic GmbH. -
Page 16: Charging Interfaces
Outlet (left) CCS1/2 CCS1/2 CHAdeMO CCS1/2 CCS1/2 CCS1/2 GB/T GB/T CCS1/2 CHAdeMO Table 3: Possible combinations of charging interfaces All rights reserved. Reproduction of this document, in whole or in part, is only permitted with the permission of alpitronic GmbH. -
Page 17: Dc-Power Unit / Power Outputs
(HYC_50 power stacks and different cable types (150 A GB/T, CCS1 and CCS2 cables, 125A CHAdeMO cable). Figure 3: DC power characteristics in different configurations All rights reserved. Reproduction of this document, in whole or in part, is only permitted with the permission of alpitronic GmbH. -
Page 18: Type Plate
I-39100 B olzano Figure 4: Example of a type of plate without calibration conformity for HYC_50 All rights reserved. Reproduction of this document, in whole or in part, is only permitted with the permission of alpitronic GmbH. -
Page 19: Exterior View
RFID card reader (optional position if I equipped with credit card reader) Charging plug holder 1 Charging plug holder 2 RFID card reader or credit card reader (optional) Type plate All rights reserved. Reproduction of this document, in whole or in part, is only permitted with the permission of alpitronic GmbH. -
Page 20: Opening The Hyc_50
After opening the locking lid, the front door lock can be released and the door opened. Figure 7: Front door locking mechanism All rights reserved. Reproduction of this document, in whole or in part, is only permitted with the permission of alpitronic GmbH. -
Page 21: Door Contactor
2.6. Door contactor To detect the opening of the HYC_50 front door, door contact switches are installed as standard. All rights reserved. Reproduction of this document, in whole or in part, is only permitted with the permission of alpitronic GmbH. -
Page 22: Interior View
Figure 8 shows the interior view of the HYC_50. Figure 9 shows the interior view of the front door. Figure 8: Interior view of the HYC_50 All rights reserved. Reproduction of this document, in whole or in part, is only permitted with the permission of alpitronic GmbH. -
Page 23: Figure 9: Interior View Front Hyc_50 (Backside)
Page 23 of 76 Figure 9: Interior view front HYC_50 (Backside) Table 4 describes the individual components marked in the above figures: All rights reserved. Reproduction of this document, in whole or in part, is only permitted with the permission of alpitronic GmbH. -
Page 24: Table 4: Components Of The Hyc_50
DC link connector -XF1 Ethernet network connector (service) -XF2 Ethernet network connector (client-LAN) Table 4: Components of the HYC_50 All rights reserved. Reproduction of this document, in whole or in part, is only permitted with the permission of alpitronic GmbH. -
Page 25: Additional Options
Figure 10: Contactless credit card terminal (model COR A20) All rights reserved. Reproduction of this document, in whole or in part, is only permitted with the permission of alpitronic GmbH. -
Page 26: Packaging, Transport, And Storage
The hypercharger must be stored in its original packaging in a dry environment from -40 °C to + 55 °C. 3.3. Unpacking the HYC_50 See attached Video. All rights reserved. Reproduction of this document, in whole or in part, is only permitted with the permission of alpitronic GmbH. -
Page 27: Hyc_50 Installation And Commissioning
However, the installation can also be carried out on any own foundation. The sufficient mechanical strength of the foundation plate must be taken into account. All rights reserved. Reproduction of this document, in whole or in part, is only permitted with the permission of alpitronic GmbH. -
Page 28: Charging Cable Lengths
HYC_50. Longer cable lengths can also be ordered as an option. Figure 13: Cable length for the two DC outputs of the HYC_50 with cable management All rights reserved. Reproduction of this document, in whole or in part, is only permitted with the permission of alpitronic GmbH. -
Page 29: Location Selection
The ground conditions should be as flat and level as possible in the areas shown. All rights reserved. Reproduction of this document, in whole or in part, is only permitted with the permission of alpitronic GmbH. -
Page 30: Figure 15: Installation Height (Barrier-Free) And Minimum Distances For Supply Air And Exhaust
For an easy replacement of the modules, the suggested dimensions should be adhered to. If HYC_50 is installed in a closed or even partially closed environment, the exhaust air must All rights reserved. Reproduction of this document, in whole or in part, is only permitted with the permission of alpitronic GmbH. -
Page 31: Positioning Of Mounting Frame Hyc_50
To fix the mounting plate to the wall, M6 screws anchors/dowels with a length of 65 mm are recommended. A suitable fastening system from Fischer is shown in Table 5. All rights reserved. Reproduction of this document, in whole or in part, is only permitted with the permission of alpitronic GmbH. -
Page 32: Mounting The Hyc_50
Figure 16: Cable gland All rights reserved. Reproduction of this document, in whole or in part, is only permitted with the permission of alpitronic GmbH. -
Page 33: Figure 17: Strain Relief For Different Cable Diameters
-TX20 Attachment for cordless screwdriver -TX30 Attachment for cordless screwdriver Alternative to cordless screwdriver -TX10 Screwdriver -TX20 Screwdriver -TX30 Screwdriver All rights reserved. Reproduction of this document, in whole or in part, is only permitted with the permission of alpitronic GmbH. -
Page 34: Installation Of The Connection Cable In The Cable Inlet
All rights reserved. Reproduction of this document, in whole or in part, is only permitted with the permission of alpitronic GmbH. - Page 35 The flexible cable for the PE connection can be recognized by the fact that a cable lug is mounted at the other end. All rights reserved. Reproduction of this document, in whole or in part, is only permitted with the permission of alpitronic GmbH.
- Page 36 In this step, care must be taken that the insulation of the cables is not pinched between plastic parts thus damaged. Required tool: TX10 All rights reserved. Reproduction of this document, in whole or in part, is only permitted with the permission of alpitronic GmbH.
- Page 37 Required tool: TX20 The unit can now be lifted onto the column or the back plate using the assembly crane. All rights reserved. Reproduction of this document, in whole or in part, is only permitted with the permission of alpitronic GmbH.
-
Page 38: Table 6: Assembly Steps Hyc_60
PE connection to the housing. The mounting of the touch guard finishes the mounting process. Table 6: Assembly steps HYC_60 All rights reserved. Reproduction of this document, in whole or in part, is only permitted with the permission of alpitronic GmbH. -
Page 39: Electrical Installation
The charger is not suitable for connection to the AC system via a plug for industrial use according to IEC 60309-1 and IEC 60309-2 or for private use according to IEC 60884-1. All rights reserved. Reproduction of this document, in whole or in part, is only permitted with the permission of alpitronic GmbH. -
Page 40: Circuit Diagram Hyc_50
CONNECTION Eichrecht Power signals Communication Power 24V / Ethernet Eichrecht signals (optional) Figure 18: Circuit diagram of the HYC_50 All rights reserved. Reproduction of this document, in whole or in part, is only permitted with the permission of alpitronic GmbH. -
Page 41: Connecting The Mains Cables
24 mm and 35 mm to ensure tightness at the cable entry seal. Diameters larger than cannot mechanically accommodated. All rights reserved. Reproduction of this document, in whole or in part, is only permitted with the permission of alpitronic GmbH. -
Page 42: Surge Protection
The requirements of IEC 60364-4-41, section 411 must be fulfilled. Low-voltage electrical The requirements of IEC 60364-7-722 must be fulfilled. installations Table 8: Checks before commissioning All rights reserved. Reproduction of this document, in whole or in part, is only permitted with the permission of alpitronic GmbH. -
Page 43: Commissioning Protocol
Remove and reinsert SIM cards ☐ ☐ OK ☐ deficient Is the interior of the charging pole clean and free All rights reserved. Reproduction of this document, in whole or in part, is only permitted with the permission of alpitronic GmbH. - Page 44 ☐ Type plate (badge outside at the bottom edge of the hypercharger) ☐ Cable connection area with recognizable connections ☐ Location photo All rights reserved. Reproduction of this document, in whole or in part, is only permitted with the permission of alpitronic GmbH.
- Page 45 If you have any problems of any kind, please feel free to contact our hypercharger support team at any time: +39 0471 096 333 Date, Signature: All rights reserved. Reproduction of this document, in whole or in part, is only permitted with the permission of alpitronic GmbH.
-
Page 46: Diagnosis And Parameterization
More information about the user interface is given in the software part of the HYC_50 operating and installation manual. All rights reserved. Reproduction of this document, in whole or in part, is only permitted with the permission of alpitronic GmbH. -
Page 47: Operation Of The Hyc_50
Credit card: If a credit card terminal is available, you can authenticate via credit card by holding it up to the credit card reader below the screen. NFC = “Near Field Communication” All rights reserved. Reproduction of this document, in whole or in part, is only permitted with the permission of alpitronic GmbH. -
Page 48: Figure 20: Overview Of The Authentication Options
Figure 20: Overview of the authentication options VID = “Vehicle Identification Device” EVCCID = “Electric Vehicle Communication Controller Identifier” EMAID = “E-Mobility Identifier Account” All rights reserved. Reproduction of this document, in whole or in part, is only permitted with the permission of alpitronic GmbH. -
Page 49: Figure 21: Authentication Process
In this case you can directly start a new session by pressing the button below the "New Session" text on the screen. All rights reserved. Reproduction of this document, in whole or in part, is only permitted with the permission of alpitronic GmbH. -
Page 50: Figure 22: Overview User Guide Per Authentication Option
Version 1-2 Page 50 of 76 6 Operation of the HYC_50 Figure 22: Overview user guide per authentication option All rights reserved. Reproduction of this document, in whole or in part, is only permitted with the permission of alpitronic GmbH. -
Page 51: Charging Plug Selection
When the connectors are free, the corresponding LED strips light up green. To access the language selection, press the screen at the very bottom in the middle. All rights reserved. Reproduction of this document, in whole or in part, is only permitted with the permission of alpitronic GmbH. -
Page 52: Figure 24: Language Selection
HYC_50 – Operation and Installation Guide Hardware Version 1-2 Page 52 of 76 6 Operation of the HYC_50 Figure 24: Language selection All rights reserved. Reproduction of this document, in whole or in part, is only permitted with the permission of alpitronic GmbH. -
Page 53: Plugging In The Charging Cable
Figure 25: Plugging in the charging cable Information For CHAdeMO cables, make sure that they lock correctly. All rights reserved. Reproduction of this document, in whole or in part, is only permitted with the permission of alpitronic GmbH. -
Page 54: During The Charging Process
Current state of charge (in % and kW) • Voltage (V) • Charging current (A) • Already charged energy (kWh) • Charging time (hh:mm:ss) All rights reserved. Reproduction of this document, in whole or in part, is only permitted with the permission of alpitronic GmbH. -
Page 55: Figure 27: Overview Of Charging Process
If you want to get additional information about the charging process, tap on the menu item "Details", an overview including charging curve will appear in the following. All rights reserved. Reproduction of this document, in whole or in part, is only permitted with the permission of alpitronic GmbH. -
Page 56: Figure 28: Detailed Loading Overview
Certain charging station operators hide this information. In this case, the charging status can be checked in the vehicle. All rights reserved. Reproduction of this document, in whole or in part, is only permitted with the permission of alpitronic GmbH. -
Page 57: Figure 29: Load Second Vehicle
It is possible to charge two vehicles at the same time. If a vehicle is already charging, you can select the free charging cable after you have successfully authenticated yourself. Figure 29: Load second vehicle All rights reserved. Reproduction of this document, in whole or in part, is only permitted with the permission of alpitronic GmbH. -
Page 58: Stop Charging Process
In the lower section of the charging overview, you have the option of stopping the charging process at any time by pressing "Stop". All rights reserved. Reproduction of this document, in whole or in part, is only permitted with the permission of alpitronic GmbH. -
Page 59: Figure 31: Stop Charging
HYC_50 – Operation and Installation Guide Hardware Version 1-2 6 Operation of the HYC_50 Page 59 of 76 Figure 31: Stop charging All rights reserved. Reproduction of this document, in whole or in part, is only permitted with the permission of alpitronic GmbH. -
Page 60: Figure 32: Authentication To Stop Charging Process
You must authenticate yourself again to cancel the charge. Figure 32: Authentication to stop charging process Figure 33: Process charging stop All rights reserved. Reproduction of this document, in whole or in part, is only permitted with the permission of alpitronic GmbH. -
Page 61: Figure 34: Unplug The Charging Connector
Plug it back in properly to the charging station's designated cable holder. Figure 34: Unplug the charging connector All rights reserved. Reproduction of this document, in whole or in part, is only permitted with the permission of alpitronic GmbH. -
Page 62: Procedure For Error Messages
Procedure for error messages 6.4.1 Authentication failed Figure 35: Authentication failed If this error message appears, try the authentication process again. All rights reserved. Reproduction of this document, in whole or in part, is only permitted with the permission of alpitronic GmbH. -
Page 63: Charging Plug Defective
When this message appears, the operator has already been informed about the defect and will rectify the fault as soon as possible. In the meantime, switch to another charging plug if possible. All rights reserved. Reproduction of this document, in whole or in part, is only permitted with the permission of alpitronic GmbH. -
Page 64: Error During Communication Setup
Try to start a charging process again. If this does not work, try driving the vehicle a few meters forwards and backwards to reset the charging technology and wake it up from a possible standby. All rights reserved. Reproduction of this document, in whole or in part, is only permitted with the permission of alpitronic GmbH. -
Page 65: Connector Locking Failed
Hold the cable to the socket with your hand until you hear the locking mechanism of the car and the charging process is started. All rights reserved. Reproduction of this document, in whole or in part, is only permitted with the permission of alpitronic GmbH. -
Page 66: The Vehicle Signals An Error
Information If you have any further questions or problems, please contact the column operator! All rights reserved. Reproduction of this document, in whole or in part, is only permitted with the permission of alpitronic GmbH. -
Page 67: Fault Description And Correction
Table 10: Fault description and correction All rights reserved. Reproduction of this document, in whole or in part, is only permitted with the permission of alpitronic GmbH. -
Page 68: Maintenance
To check the main switch for function, it must be turned from position On to position Off. The secondary side must be tested voltage-free. All rights reserved. Reproduction of this document, in whole or in part, is only permitted with the permission of alpitronic GmbH. -
Page 69: Review Of The Protective Measures
Check the resistance between the earth of the supply and all externally accessible, non- insulated cabinet parts (housing, attachments, screws). All rights reserved. Reproduction of this document, in whole or in part, is only permitted with the permission of alpitronic GmbH. -
Page 70: Checking Cleanliness And Condensation
+39 0471 1961 333 8.6. Replacing the air filter inserts Replace the air filter inserts regularly. Figure 42: Air filter inlet All rights reserved. Reproduction of this document, in whole or in part, is only permitted with the permission of alpitronic GmbH. -
Page 71: Plug Contacts Charging Cable Set
Also check that the insulation is intact and that all screws are tight. Figure 44: Charging plug side view All rights reserved. Reproduction of this document, in whole or in part, is only permitted with the permission of alpitronic GmbH. -
Page 72: Check Overvoltage Protection
Check the function display marked in the following figure. Green indicates proper function; red indicates a defect. Figure 46: Check of overvoltage protection All rights reserved. Reproduction of this document, in whole or in part, is only permitted with the permission of alpitronic GmbH. -
Page 73: Repair And Service
More information on hypercharger trainings can be requested at training@hypercharger.it. For spare parts orders you can contact sales@hypercharger.it. Repair instructions can be requested from the hypercharger support. All rights reserved. Reproduction of this document, in whole or in part, is only permitted with the permission of alpitronic GmbH. -
Page 74: Disposal
Information For more information, please contact the hypercharger support or check directly with a dedicated WEEE advice center. All rights reserved. Reproduction of this document, in whole or in part, is only permitted with the permission of alpitronic GmbH. -
Page 75: Technical Data
Contribution to the short-circuit current Overvoltage category OVC III Integrated surge protection (SPD) Type 1+2+3 Table 15: Electrical connection data HYC_50 All rights reserved. Reproduction of this document, in whole or in part, is only permitted with the permission of alpitronic GmbH. -
Page 76: Table 16: Idle Power Dissipation At 400V According To The Display Brightness
An I = 300 mA is recommended. N During operation, increased temperatures are to be expected at the air outlets All rights reserved. Reproduction of this document, in whole or in part, is only permitted with the permission of alpitronic GmbH.
Need help?
Do you have a question about the Hypercharger HYC 50 and is the answer not in the manual?
Questions and answers