Alpitronic hypercharger HYC 150 User Manual
Ultra-fast charging system for electric vehicles
Hide thumbs
Also See for hypercharger HYC 150:
- Operation instructions and installation manual (64 pages) ,
- Operation instructions and installation manual (105 pages) ,
- Configuration manual (81 pages)
Table of Contents
Advertisement
hypercharger - hypercharger User Guide
Version 1-5
Content
hypercharger User Guide
hypercharger HYC_150 / HYC_300
(75kW – 300kW)
ultra-fast charging system for electric vehicles
All rights reserved. The reproduction of this document, also partially, is allowed only with authorization by alpitronic s.r.l.
Advertisement
Table of Contents

Subscribe to Our Youtube Channel
Related Manuals for Alpitronic hypercharger HYC 150


Summary of Contents for Alpitronic hypercharger HYC 150
- Page 1 - hypercharger User Guide Version 1-5 Content hypercharger User Guide hypercharger HYC_150 / HYC_300 (75kW – 300kW) ultra-fast charging system for electric vehicles All rights reserved. The reproduction of this document, also partially, is allowed only with authorization by alpitronic s.r.l.
- Page 2 +39 0471 096450 Tel.: +39 0471 096333 Fax: +39 0471 096451 Fax: +39 0471 096451 Homepage: http://www.hypercharger.it Homepage: http://www.hypercharger.it E-Mail: info@hypercharger.it E-Mail: support@hypercharger.it All rights reserved. The reproduction of this document, also partially, is allowed only with authorization by alpitronic s.r.l.
-
Page 3: Table Of Contents
Failed to lock connector ..................23 5.6. The car signalized an error ..................23 5.7. Emergency Stop .....................24 5.8. Charging station temporarily unavailable ..............24 All rights reserved. The reproduction of this document, also partially, is allowed only with authorization by alpitronic s.r.l. - Page 4 List of tables Table 1: Overview DC power and options for the hypercharger product family ....5 Table 2: Charging interfaces ....................6 All rights reserved. The reproduction of this document, also partially, is allowed only with authorization by alpitronic s.r.l.
-
Page 5: Product Description
AC – if available – is in last place. Figure 1: Sequence of charging points HYC_150 and HYC_300 All rights reserved. The reproduction of this document, also partially, is allowed only with authorization by alpitronic s.r.l. -
Page 6: Charging Interfaces
DC at the same time, with one power stack being assigned to each vehicle and charging cable. If at least two power stacks are available, more than one power stack can be assigned to one vehicle. All rights reserved. The reproduction of this document, also partially, is allowed only with authorization by alpitronic s.r.l. -
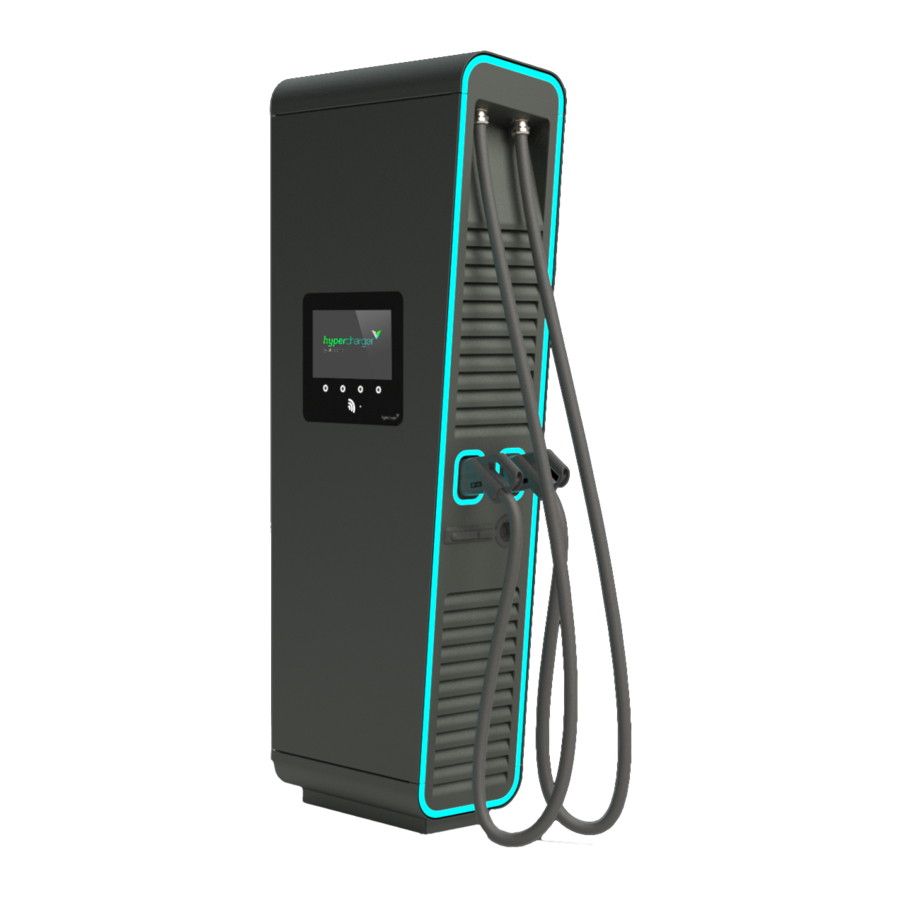
Page 7: Exterior View
AC charging socket | attached AC cable (optional) Air inlet Air outlet Display / HMI RFID card reader GSM / LTE antenna Door handle Nameplate Credit card terminal (optional) All rights reserved. The reproduction of this document, also partially, is allowed only with authorization by alpitronic s.r.l. -
Page 8: Nameplate
The nameplate is located opposite the display door in the lower right-hand corner. It includes the CE marking, serial number and electrical properties of the charger. Figure 3: Example of nameplate for hypercharger HYC_300 All rights reserved. The reproduction of this document, also partially, is allowed only with authorization by alpitronic s.r.l. -
Page 9: Start Charging Session
2 Start charging session Page 9 of 24 2. Start charging session 2.1. Authentication options Figure 4: Overview of the authentication options All rights reserved. The reproduction of this document, also partially, is allowed only with authorization by alpitronic s.r.l. -
Page 10: Authentication
Detailed user instructions for the charging process will appear on the charging station’s screen for the chosen authentication medium and charging cable. Figure 5: Authentication All rights reserved. The reproduction of this document, also partially, is allowed only with authorization by alpitronic s.r.l. -
Page 11: Figure 6: Position Of Rfid Reader
Version 1-5 2 Start charging session Page 11 of 24 Figure 6: Position of RFID reader Figure 7: Position of credit card terminal All rights reserved. The reproduction of this document, also partially, is allowed only with authorization by alpitronic s.r.l. -
Page 12: Figure 8: Kiosk Mode
In this case you can directly start a new charging process by pressing the buttons below the new session label on the screen. Figure 8: Kiosk Mode Figure 9: Checking ID All rights reserved. The reproduction of this document, also partially, is allowed only with authorization by alpitronic s.r.l. -
Page 13: Select The Charging Plug
Figure 10: Select plug Figure 11: Buttons for navigation All rights reserved. The reproduction of this document, also partially, is allowed only with authorization by alpitronic s.r.l. -
Page 14: Figure 12: Language Selection
If you want to change the language, press the button on the far left. You will then be taken to the language selection. Figure 12: Language selection All rights reserved. The reproduction of this document, also partially, is allowed only with authorization by alpitronic s.r.l. -
Page 15: Connect The Plug
Connect the charger cable, which begins to flash blue, to the socket provided on your vehicle. Figure 13: Plug connection Note When using CHAdeMO cables, make sure that they engage correctly. All rights reserved. The reproduction of this document, also partially, is allowed only with authorization by alpitronic s.r.l. -
Page 16: During The Charging Process
(80%) or full SoC (100%). In the upper area you can see the overlay to the German calibration law, which is described in chapter 4.3. All rights reserved. The reproduction of this document, also partially, is allowed only with authorization by alpitronic s.r.l. -
Page 17: Figure 15: Charge Overview With Two Active Charging Processes
Please note that the display may vary from operator to operator. Some operators hide this information. In this case you can check the SoC inside your vehicle. All rights reserved. The reproduction of this document, also partially, is allowed only with authorization by alpitronic s.r.l. -
Page 18: Terminate Charging Session
Once you’ve pressed the button, you need to unplug the charging cable from your car. Please reconnect it properly to the cable plug holder of the charging station. Figure 17: Disconnect Plug All rights reserved. The reproduction of this document, also partially, is allowed only with authorization by alpitronic s.r.l. -
Page 19: Write Down Public Key (German Calibration Law)
The “public key” overlay shows the public key of the AC adapter or DC meter. You should note this down so that you can check the readings later on. Figure 19: Public key overlay All rights reserved. The reproduction of this document, also partially, is allowed only with authorization by alpitronic s.r.l. -
Page 20: Figure 20: Error Overlay
The currently permissible and certified version of the transparency software by the S.A.F.E. initiative is version 1.0 (as of 1 June 2021). All rights reserved. The reproduction of this document, also partially, is allowed only with authorization by alpitronic s.r.l. -
Page 21: Error Messages
No connector available Figure 22: No connector available All charging points are currently occupied. Please wait until a charging plug becomes free again. All rights reserved. The reproduction of this document, also partially, is allowed only with authorization by alpitronic s.r.l. -
Page 22: Connector Damaged
It that won’t help, try to move the car forward and backwards a little, in order to wake it up from a possible Standby. All rights reserved. The reproduction of this document, also partially, is allowed only with authorization by alpitronic s.r.l. -
Page 23: Failed To Lock Connector
The car signalizes a charging error. Retry to start a charging session, otherwise try to move the car forward and backwards a little, in order to wake it up from a possible Standby. All rights reserved. The reproduction of this document, also partially, is allowed only with authorization by alpitronic s.r.l. -
Page 24: Emergency Stop
Please do not switch off the station! Note For further questions and problems please contact the charging station operator! All rights reserved. The reproduction of this document, also partially, is allowed only with authorization by alpitronic s.r.l. - Page 25 S.A.F.E. End User Manual Transparency Software 1.1.0 In this documentation you will find all relevant information required for the use of the S.A.F.E. transparency software. Please read the instructions carefully before using the software for the first time. 1. Access to the transparency software 1.1.System requirements To operate the transparency software, your system must meet at least the following system requirements:...
- Page 26 invoicing of the recharging point user are performed by a Mobility Service Provider (MSP). The invoice recipient receives access to this data tuple in the invoicing procedure. The data tuples are digitally signed so that no changes/manipulations of the attributes recorded in compliance with the calibration law occur when transferring the data tuples from the recharging point to the billing server and from there to the recharging point user for invoicing.
- Page 27 4. Checking the data tuple 4.1. User interface of Transparency Software 1.1.0 The following interface appears when opening the Transparency Software 1.1.0 application – initially without data tuple content. Figure 4.1.1: Transparency software interface without data tuple content The File menu offers the option of either opening a saved file or manually entering the dataset values in hexadecimal form to perform the check: Figure 4.1.2.: Data entry in the transparency software.
- Page 28 4.2. Loading a data tuple from a saved file Select File ➞ Open [Ctrl + O] to load the XML file or Porsche Charging Data file previously saved on the PC. If the live medium is used, external drives such as USB sticks are listed in the directory /run/media/root.
- Page 29 After opening the file, the following view appears: Figure 4.2.2.: Transparency software interface with open XML datasets (left). The content of the dataset for the first transaction as well as the public key are already presented to the user unchecked. The Transaction ID/Contract ID/Session ID enables the charging procedure in the data tuple to be uniquely associated with a charging location, charging date and invoice recipient.
- Page 30 Figure 4.2.3.: Transparency software interface with open XML datasets (left). The content of the hexadecimal data tuple is translated and shown to the user as the information relevant to the charging procedure, such as start/end time or quantity of the charging session. This information naturally includes the corresponding timestamps for the access time as well as the charging duration.
- Page 31 Figure 4.2.4.: Transparency software interface with additional information on the verified dataset. The Dataset tab again displays the hexadecimal representation of the data tuple as a complete string. Data tuple entry via manual input 4.3. File ➞ Manual data input [Ctrl + M] opens a dialogue window.
- Page 32 Figure 4.3.1: Dialogue window for manual data input – without data. The hexadecimal values for the data tuple can now be entered with the copy/paste function under "Raw data" and "Public key".
- Page 33 Figure 4.3.2.: Dialogue window for manual data input – with data. Clicking on Verify now initiates a signature verification and display of the translated signed data tuple – see Chapter 4.2. Error messages in the transparency software 4.4. If there are errors in the imported data, an error code and an error message with a red background are displayed.
- Page 34 Figure 4.4.: Display of error messages in the transparency software interface. If the signature could not be verified because of an incorrect key or changed data, a red X and the error "Your data has not been verified" is displayed instead of the green tick:...
- Page 35 Important: In this case, contact your EMP (biller) immediately and state the error code in the communication. The matter will then be clarified by a clearing office. Additional functions of the transparency software 4.5. Version information can be called up with the menu item "Help / About". There you can see which version of the software is currently being used, a checksum (SHA-256) for the software and a list of various libraries used in the software.
- Page 36 List of error codes: Error code Error text Error 1101 Invalid length for Alfen datasets Error 1102 Invalid data in Alfen format Error 1201 Output file %s cannot be created Error 1202 Output file %s could not be written Error 1203 Error when creating output format Error 1301 Invalid base 32 data...
- Page 37 Error 1404 Invalid OCMF version Error 1405 Invalid data in OCMF format Error 1204 Output file cannot be created because it already exists. Error 1406 User data could not be parsed Error 1407 The specified path does not point to a file Error 1501 The file cannot be read Error 1502...
- Page 38 Error 1518 <STX> missing Error 1519 Corrupt time information Error 1520 Time information length is invalid Error 1521 Time signal is invalid Error 1522 PCDF signature invalid Error 1601 The SML data is not complete for a check Error 1602 Invalid unit for measured value in SML dataset Error 1603 An invalid value was passed as server ID...
- Page 39 Error 1618 Invalid data in SML format Error 1701 Unknown encoding Error 1702 Validation error when processing the data Error 1703 The data entered does not contain a public key Error 1704 The data entered does not contain signed data Error 1705 Transaction start value does not contain any measured values Error 1706...
Need help?
Do you have a question about the hypercharger HYC 150 and is the answer not in the manual?
Questions and answers