Alpitronic hypercharger HYC 150 Operation Instructions And Installation Manual
Ultra-fast charging system for electric vehicles
Hide thumbs
Also See for hypercharger HYC 150:
- Operation instructions and installation manual (64 pages) ,
- User manual (39 pages) ,
- Configuration manual (81 pages)
Table of Contents
Advertisement
Quick Links
hypercharger - Operation Instructions and Installation Guide
Version 2-2
Hardware
Content
Operation Instructions and
Installation Guide - Hardware
hypercharger HYC_150 / HYC_300
(75 kW – 300 kW)
ultra-fast charging system for electric vehicles
for HW-Versions 4
All rights reserved. The reproduction of this document, also partially, is allowed only with authorization by alpitronic Srl
Advertisement
Table of Contents

Subscribe to Our Youtube Channel
Related Manuals for Alpitronic hypercharger HYC 150


Summary of Contents for Alpitronic hypercharger HYC 150
- Page 1 Installation Guide - Hardware hypercharger HYC_150 / HYC_300 (75 kW – 300 kW) ultra-fast charging system for electric vehicles for HW-Versions 4 All rights reserved. The reproduction of this document, also partially, is allowed only with authorization by alpitronic Srl...
- Page 2 - Operation Instructions and Installation Guide Hardware Version 2-2 Content This page was intentionally left blank. All rights reserved. The reproduction of this document, also partially, is allowed only with authorization by alpitronic Srl...
- Page 3 Via di Mezzo ai Piani, 33 39100 Bolzano (BZ) ITALY Tel.: +39 0471 096 333 Fax: +39 0471 096 451 Homepage: http://www.hypercharger.it E-Mail: support@hypercharger.it All rights reserved. The reproduction of this document, also partially, is allowed only with authorization by alpitronic Srl...
- Page 4 Cross references Linguistic and formal revision Linguistic revision Adding of: • February 2021 M. Hofer Figure 34 Correction/extension of: • Figure 3 All rights reserved. The reproduction of this document, also partially, is allowed only with authorization by alpitronic Srl...
- Page 5 Table 6 • Table 11 • Table 13 • Table 14 • Table 20 • Table 24 • Table 26 • Table 31 All rights reserved. The reproduction of this document, also partially, is allowed only with authorization by alpitronic Srl...
-
Page 6: Table Of Contents
HYC_150 ..............63 4.2.2. hypercharger schematic HYC_300 ..............64 4.2.3. Preparation mains power-supply cables ............65 4.2.4. Grid Connection ....................67 4.2.5. Overvoltage protection ..................70 All rights reserved. The reproduction of this document, also partially, is allowed only with authorization by alpitronic Srl... - Page 7 8.12. Close the hypercharger..................96 9. Repair and service ......................97 Disposal ......................... 98 Technical specifications ..................99 Declaration of Conformity ..................102 All rights reserved. The reproduction of this document, also partially, is allowed only with authorization by alpitronic Srl...
- Page 8 Figure 47: Alignment of the base and cable entry plates on the foundation .......60 Figure 48: Distances between the base and the outer dimensions of the HYC_150 (top view) ............................61 All rights reserved. The reproduction of this document, also partially, is allowed only with authorization by alpitronic Srl...
- Page 9 Figure 82: Replacement filter mats ...................94 Figure 83: Checking the cooling liquid level ..............95 Figure 84: Check the coolant concentration using a refractometer ........96 All rights reserved. The reproduction of this document, also partially, is allowed only with authorization by alpitronic Srl...
- Page 10 Table 30: Electrical connection for HYC_300_f ............... 100 Table 31: Standby power consumption ................101 Table 32: Frequency bands and transmission levels of HYC_150 / HYC_300 ....101 All rights reserved. The reproduction of this document, also partially, is allowed only with authorization by alpitronic Srl...
- Page 11 - Operation Instructions and Installation Guide Hardware Version 2-2 Content This page was intentionally left blank. All rights reserved. The reproduction of this document, also partially, is allowed only with authorization by alpitronic Srl...
-
Page 12: Safety Instructions
Prior to carrying out any work the operator and the responsible technical personnel must carefully read these instructions. All rights reserved. The reproduction of this document, also partially, is allowed only with authorization by alpitronic Srl... -
Page 13: Safety Instructions For Installation And Maintenance
The hypercharger cabinet doors must be properly closed and locked after installation, service or repair operations. All rights reserved. The reproduction of this document, also partially, is allowed only with authorization by alpitronic Srl... - Page 14 Figure 13 and Figure 14) in the cabinet, rotate the handle to position ‘0’. This will turn off all internal components of the hypercharger. All rights reserved. The reproduction of this document, also partially, is allowed only with authorization by alpitronic Srl...
-
Page 15: Product Description
2 DC charging cables and a 22 kW AC charging socket or AC cable: Figure 1: Configuration HYC_150 All rights reserved. The reproduction of this document, also partially, is allowed only with authorization by alpitronic Srl... -
Page 16: Figure 2: Configuration Hyc_300
AC - if available - is in last place. Figure 3: Order of charging points HYC_150 and HYC_300 Remark Customs tariff number of the hypercharger: 85044055 All rights reserved. The reproduction of this document, also partially, is allowed only with authorization by alpitronic Srl... -
Page 17: Charging Interfaces
Connector 1 Connector 2 Connector 3 Connector 4 HYC_150 CCS Combo 2* CHAdeMO CCS Combo 2* CCS Combo 2* CCS Combo 2* CHAdeMO All rights reserved. The reproduction of this document, also partially, is allowed only with authorization by alpitronic Srl... -
Page 18: Table 4: Possible Combinations Of Charging Interfaces
If at least two Power-Stacks are available, more than one Power- Stack can be assigned to a vehicle. All rights reserved. The reproduction of this document, also partially, is allowed only with authorization by alpitronic Srl... -
Page 19: Figure 4: Dc-Power Characteristic In Different Configurations
200 A not liquid cooled CCS1, CCS2 and CHAdeMO cable 125 A not liquid cooled CHAdeMO cable Figure 4: DC-Power characteristic in different configurations All rights reserved. The reproduction of this document, also partially, is allowed only with authorization by alpitronic Srl... -
Page 20: Figure 5: Cable Reach For The Two Dc Outlets Of The Hypercharger
Optionally, longer cable lengths can be ordered (max. 5 m for cooled and max. 7 m for uncooled cables). Please contact sales@hypercharger.it. Figure 5: Cable reach for the two DC outlets of the hypercharger All rights reserved. The reproduction of this document, also partially, is allowed only with authorization by alpitronic Srl... -
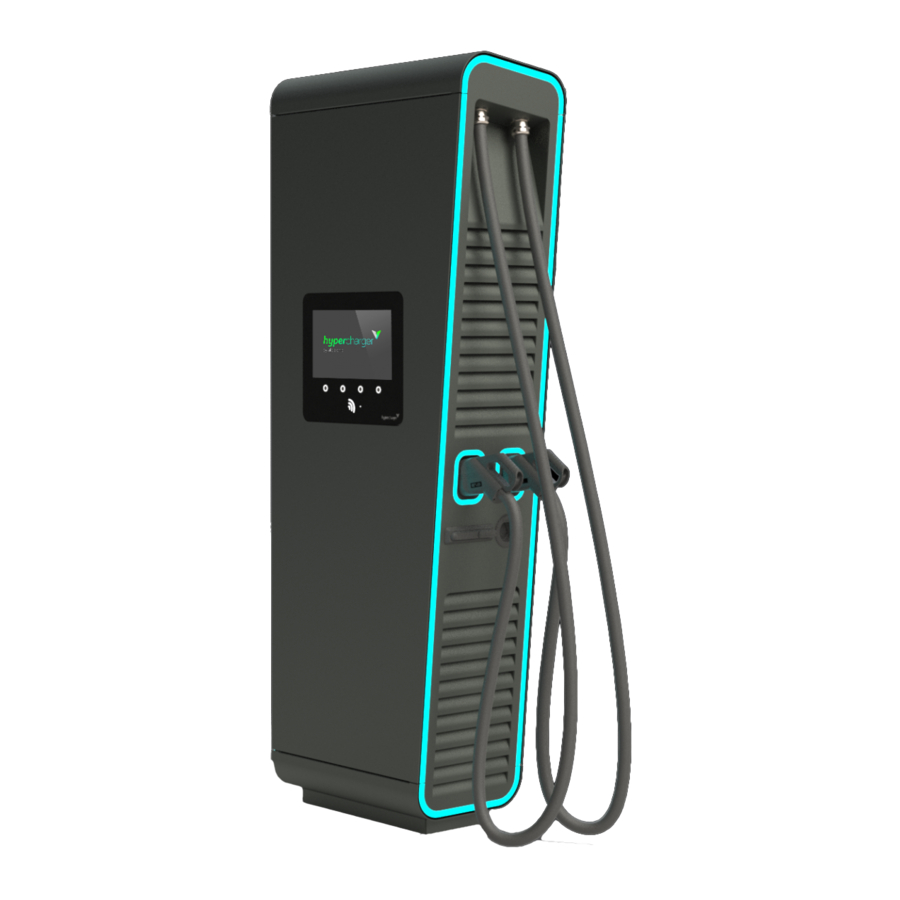
Page 21: Exterior View
DC charge outlet 4 (optional) AC charge socket (optional) Air inlet Air outlet Display / HMI RFID card reader GSM / LTE antenna Door handle Nameplate All rights reserved. The reproduction of this document, also partially, is allowed only with authorization by alpitronic Srl... -
Page 22: Figure 7: External Dimensions Hyc_150 (In Mm)
Version 2-2 Page 22 of 105 2 Product description Figure 7: External dimensions HYC_150 (in mm) Figure 8: External dimensions HYC_300 (in mm) All rights reserved. The reproduction of this document, also partially, is allowed only with authorization by alpitronic Srl... -
Page 23: 2.2.1. Nameplate
If you wish to replace the locking cylinder, please ensure that you only use half cylinders with a maximum construction length of 30/10. Otherwise, the existing cover can no longer be closed properly. All rights reserved. The reproduction of this document, also partially, is allowed only with authorization by alpitronic Srl... -
Page 24: Figure 11: Order For Opening The Hypercharger Doors
The display door can be opened by releasing the locking mechanism behind the charging cable door as shown in the following figure. Figure 12: Locking mechanism for the display door All rights reserved. The reproduction of this document, also partially, is allowed only with authorization by alpitronic Srl... -
Page 25: Internal View
-KF1, -KF2 CTRL_COM_HD control board, CTRL_COM Display -KF3 CTRL_IO control board -KF5 CTRL_EXT control board -QA1, -QA2 125 A circuit breaker / 3P All rights reserved. The reproduction of this document, also partially, is allowed only with authorization by alpitronic Srl... -
Page 26: Table 5: Hypercharger Hyc_150 Cabinet Components
Ethernet-network-socket (service) -XF2 Ethernet-network-socket (client-LAN) Table 5: hypercharger HYC_150 cabinet components Remark The Ethernet port XF1 can be used for load management. All rights reserved. The reproduction of this document, also partially, is allowed only with authorization by alpitronic Srl... -
Page 27: 2.4.2. Hyc_300 Internal View
Contactors for AC charging (optional, only when AC-socket is present) -SF2 Door contact switch (optional) -SF3 Door contact switch (optional) -TB1 Auxiliary 24 V power supply All rights reserved. The reproduction of this document, also partially, is allowed only with authorization by alpitronic Srl... -
Page 28: Table 6: Hypercharger Hyc_300 Cabinet Components
Ethernet-network-socket (service) -XF2 Ethernet-network-socket (client-LAN) Table 6: hypercharger HYC_300 cabinet components Remark The Ethernet port XF1 can be used for load management. All rights reserved. The reproduction of this document, also partially, is allowed only with authorization by alpitronic Srl... -
Page 29: Main Components
The Power-Stack is the power module that converts the AC voltage to an electrically isolated DC voltage. The following figure shows the dimensions of a Power-Stack. Figure 15: Dimensions of Power-Stack All rights reserved. The reproduction of this document, also partially, is allowed only with authorization by alpitronic Srl... -
Page 30: Figure 16: Ac Connection Block
The tightening torque is 15 Nm. Both DC+ and DC- connections must be used in parallel. Figure 17 shows the DC connection block at the upper end of the Power-Stack. Figure 17: DC connection block All rights reserved. The reproduction of this document, also partially, is allowed only with authorization by alpitronic Srl... -
Page 31: Figure 18: Status Indication Of Power-Stack
Table 7: Technical data Type Width [mm] Length [mm] Height [mm] Weight [kg] Power- 1505 Stack 75 kW Table 8: Mechanical data All rights reserved. The reproduction of this document, also partially, is allowed only with authorization by alpitronic Srl... -
Page 32: Table 9: Electrical Data Ac Connection
The Power-Stack is compatible with type B RCDs (residual current circuit breakers) During operation, increased temperatures must be expected at the air outlets All rights reserved. The reproduction of this document, also partially, is allowed only with authorization by alpitronic Srl... -
Page 33: Input Switchgear
Auxiliary 24 V power supply -XD1 Mains input busbars -XD2 Power socket 230 Vac for service Table 11: AC input switchgear components for hypercharger HYC_150 All rights reserved. The reproduction of this document, also partially, is allowed only with authorization by alpitronic Srl... -
Page 34: Figure 20: Ac Input Switchgear Of The Hyc_300
Table 12: AC input switchgear components for hypercharger HYC_300 Remark If a residual current device (RCD) is installed, a type B is recommended. All rights reserved. The reproduction of this document, also partially, is allowed only with authorization by alpitronic Srl... -
Page 35: Output Switchgear
The following two figures show the DC output switchgear of the HYC_150. Figure 22: DC output switchgear of the HYC_150 (bottom view) All rights reserved. The reproduction of this document, also partially, is allowed only with authorization by alpitronic Srl... -
Page 36: Figure 23: Dc Output Switchgear Of The Hyc_150 (Top View)
DC-busbar - pole for vehicle cable connection XD6 (DC-outlet 2) -XD4.2 DC-busbar + pole for vehicle cable connection XD6 (DC-outlet 2) Table 13: DC output switchgear components for hypercharger HYC_150 All rights reserved. The reproduction of this document, also partially, is allowed only with authorization by alpitronic Srl... -
Page 37: Figure 24: Dc Output Switchgear Of The Hyc_300 (Bottom View)
The following figure shows the DC-output switchgear of the HYC_300: Figure 24: DC output switchgear of the HYC_300 (bottom view) Figure 25: DC output switchgear of the HYC_300 (top view) All rights reserved. The reproduction of this document, also partially, is allowed only with authorization by alpitronic Srl... -
Page 38: Table 14: Dc Output Switchgear Components For Hypercharger Hyc_300
DC-busbar - pole for vehicle cable connection XD10 (DC-outlet 4) XD6.2 DC-busbar + pole for vehicle cable connection XD10 (DC-outlet 4) Table 14: DC output switchgear components for hypercharger HYC_300 All rights reserved. The reproduction of this document, also partially, is allowed only with authorization by alpitronic Srl... -
Page 39: Ctrl_Com
It contains the modems, the eight-port switch, the SOM and other interfaces to the individual sub-boards of the charger unit. Figure 26: Location of the CTRL_COM in the hypercharger All rights reserved. The reproduction of this document, also partially, is allowed only with authorization by alpitronic Srl... - Page 40 The SIM card slots are designed for mini SIM cards ("standard” size). The charging station is delivered with an alpitronic SIM card already installed. A customer SIM card can be inserted. All rights reserved. The reproduction of this document, also partially, is allowed only with authorization by alpitronic Srl...
-
Page 41: Display Incl. Rfid Reader
MIFARE Classic PCD encryption mechanism (MIFARE Classic 1K/4K) NFC Forum tag 1 to 5 (MIFARE Ultralight, Jewel, Open FeliCa tag, MIFARE DESFire) ISO/IEC 15693/ICODE VCD mode All rights reserved. The reproduction of this document, also partially, is allowed only with authorization by alpitronic Srl... -
Page 42: Ctrl_Ext
The CTRL_EXT is located in the display opening, the exact position is marked in the following figure. Figure 29: Location of the CTRL_EXT in the hypercharger All rights reserved. The reproduction of this document, also partially, is allowed only with authorization by alpitronic Srl... -
Page 43: Additional Options
Note that for proper operation, use only the original intended coolant! Orders can be sent to sales@hypercharger.it, the coolant is delivered in 1 liter bottles. All rights reserved. The reproduction of this document, also partially, is allowed only with authorization by alpitronic Srl... -
Page 44: Emergency Stop Button
CTRL_EXT board (see chapter 2.5.6), its cabling can be routed to the outside by the customer. Figure 31: Location of the relais in the hypercharger All rights reserved. The reproduction of this document, also partially, is allowed only with authorization by alpitronic Srl... -
Page 45: Figure 32: Connection Options External Emergency Stop
"0" or "1", but make sure to set it back to "auto" afterwards. Figure 32: Connection options external emergency stop Remark Detailed installation instructions can be requested from hypercharger support (support@hypercharger.it). All rights reserved. The reproduction of this document, also partially, is allowed only with authorization by alpitronic Srl... -
Page 46: Crash Sensors
The credit card terminal supports all common credit and bank cards, and the payments made can be viewed in the back end with a certain time delay. Figure 33: Contactless credit card terminal (model COR A20) All rights reserved. The reproduction of this document, also partially, is allowed only with authorization by alpitronic Srl... -
Page 47: Barrier-Free Hypercharger
The hypercharger product line offers barrier-free versions which are designed to be disabled-friendly. In this case, the screen is offset downward by 20 cm. Figure 34: Barrier-free hypercharger All rights reserved. The reproduction of this document, also partially, is allowed only with authorization by alpitronic Srl... -
Page 48: Packaging, Transport And Storage
Figure 35: Packaging of the hypercharger Type W [mm] D [mm] H [mm] HYC_150 1200 2340 HYC_300 1200 1120 2340 Table 16: Dimensions of the packaging All rights reserved. The reproduction of this document, also partially, is allowed only with authorization by alpitronic Srl... -
Page 49: Transport And Storage
All rights reserved. The reproduction of this document, also partially, is allowed only with authorization by alpitronic Srl... -
Page 50: Figure 37: Crane Eyelets On Top Of The Packaging
The hypercharger must be stored in its original packaging at a relative ambient humidity of 0-95% (non-fogging) and temperatures of -40 °C to + 55 °C. All rights reserved. The reproduction of this document, also partially, is allowed only with authorization by alpitronic Srl... -
Page 51: Unpacking
Remove the Open service door *Remove screws Open charging Open display door packaging on the base plate cable door material of the hypercharger All rights reserved. The reproduction of this document, also partially, is allowed only with authorization by alpitronic Srl... -
Page 52: Figure 38: Unpacking The Hypercharger
These screws can be reused during the installation. They are used to mount the hypercharger on the base plate (see chapter 4.1.4). All rights reserved. The reproduction of this document, also partially, is allowed only with authorization by alpitronic Srl... -
Page 53: Hypercharger Installation And Commissioning
The following figure shows the relevant components for the mechanical installation: hypercharger hypercharger- base Ground Concrete foundation Figure 39: Relevant components for the mechanical installation of the hypercharger All rights reserved. The reproduction of this document, also partially, is allowed only with authorization by alpitronic Srl... -
Page 54: Site Configuration
Pay attention to the cable radius (Figure 5). Remark The surrounding ground should ideally be completely flat. All rights reserved. The reproduction of this document, also partially, is allowed only with authorization by alpitronic Srl... -
Page 55: Figure 40: Recommended Distances For Site Configuration
All rights reserved. The reproduction of this document, also partially, is allowed only with authorization by alpitronic Srl... -
Page 56: Placement Of A Concrete Foundation
(wooden beam/double-T beam) in the central opening (visible in Figure 41), by means of which a crane can lift and position the foundation. All rights reserved. The reproduction of this document, also partially, is allowed only with authorization by alpitronic Srl... -
Page 57: Figure 42: Backfill Of The Foundation
Remark The foundation should be backfilled to the lower edge of the cable entry plate. Figure 42: Backfill of the foundation All rights reserved. The reproduction of this document, also partially, is allowed only with authorization by alpitronic Srl... -
Page 58: Mounting The Hypercharger Base On The Foundation
The following two figures show the hypercharger bases incl. cable entry plates and their dimensions. Figure 44: hypercharger base for the HYC_150 (dimensions in mm) All rights reserved. The reproduction of this document, also partially, is allowed only with authorization by alpitronic Srl... -
Page 59: Figure 45: Hypercharger Base For The Hyc_300 (Dimensions In Mm)
If the foundation was not ordered separately, stainless steel screws should be used to mount the base on the foundation. Attention The screws must be tightened with a torque of 90 Nm. All rights reserved. The reproduction of this document, also partially, is allowed only with authorization by alpitronic Srl... -
Page 60: Figure 46: Position Of The Hyc_150 (Blue) And Hyc_300 (Red) Base On The Foundation
Figure 46: Position of the HYC_150 (blue) and HYC_300 (red) base on the foundation Figure 47: Alignment of the base and cable entry plates on the foundation All rights reserved. The reproduction of this document, also partially, is allowed only with authorization by alpitronic Srl... -
Page 61: Figure 48: Distances Between The Base And The Outer Dimensions Of The Hyc_150 (Top View)
Table 19. Figure 49: Distances between the base and the outer dimensions of the HYC_300 (top view) All rights reserved. The reproduction of this document, also partially, is allowed only with authorization by alpitronic Srl... -
Page 62: Mounting The Hypercharger On The Base Plate
32 mm washers). You can also use 30 or 40 mm wah Attention The screws must be tightened with a torque of 90 Nm. All rights reserved. The reproduction of this document, also partially, is allowed only with authorization by alpitronic Srl... -
Page 63: Electrical Installation
Power socket (option) 230Vac CTRL_ 30mA-6kA -FB2 -BE5 DI<6mA -BC1 -QB9 AC Charge 30mA-6kA switchgear (option) Figure 50: hypercharger schematic for the HYC_150 All rights reserved. The reproduction of this document, also partially, is allowed only with authorization by alpitronic Srl... -
Page 64: Hypercharger Schematic Hyc_300
Figure 51: hypercharger schematic for the HYC_300 Remark The fuses marked in red in Figure 51 are only provided for the optional HYC_300_f variant (see chapter 2.5.2). All rights reserved. The reproduction of this document, also partially, is allowed only with authorization by alpitronic Srl... -
Page 65: Preparation Mains Power-Supply Cables
All rights reserved. The reproduction of this document, also partially, is allowed only with authorization by alpitronic Srl... - Page 66 The dimensioning is to be selected according to the locally prevailing regulations. All rights reserved. The reproduction of this document, also partially, is allowed only with authorization by alpitronic Srl...
-
Page 67: Grid Connection
Use M12 x 25 mm screws for this and tighten them with a torque of exactly 35 Nm. Figure 53: Connecting of the input busbars (HYC_150 left, HYC_300 right) All rights reserved. The reproduction of this document, also partially, is allowed only with authorization by alpitronic Srl... - Page 68 (label them to be able to reconnect them later correctly) and remove the cooling unit. Figure 55: Available installation space in the hypercharger for HYC_300 (1) All rights reserved. The reproduction of this document, also partially, is allowed only with authorization by alpitronic Srl...
-
Page 69: Table 21: Recommended Conductor Cross Sections
Especially with the HYC_300, one supply line for the neutral conductor is sufficient, the second cable gland can thus be closed. All rights reserved. The reproduction of this document, also partially, is allowed only with authorization by alpitronic Srl... -
Page 70: Overvoltage Protection
LPZ zone 0A. It is important to ensure connection to a suitable earthing system, taking into account country-specific legal requirements. All rights reserved. The reproduction of this document, also partially, is allowed only with authorization by alpitronic Srl... -
Page 71: Checks Before Initial Startup
Automatic shutdown of the The requirements of IEC 60364-4-41, section 411 must be met power supply Table 22: Checks to be carried out before commissioning All rights reserved. The reproduction of this document, also partially, is allowed only with authorization by alpitronic Srl... -
Page 72: Commissioning Protocol
Date of commissioning Existing charging outlets (please tick the box): CCS2 HPC (cooled) CCS2_400A CCS2_250A CCS2_200A CHAdeMO_200A CHAdeMO_125A GB/T CCS1 AC/Typ 2 All rights reserved. The reproduction of this document, also partially, is allowed only with authorization by alpitronic Srl... - Page 73 ☐ OK ☐ Deficient Checking the function of the screen ☐ ☐ OK ☐ Deficient Functional testing of the LED rings on the connectors Comments: All rights reserved. The reproduction of this document, also partially, is allowed only with authorization by alpitronic Srl...
- Page 74 Please send the commissioning protocol including photo documentation to the following e- mail address: support@hypercharger.it. For problems of any kind you can contact our hypercharger support team: +39 0471 096 333 Date, Signature: All rights reserved. The reproduction of this document, also partially, is allowed only with authorization by alpitronic Srl...
-
Page 75: Diagnosis And Parameterization
Table 23: Default Charging Station IP address Additional information on the user interface can be found in the software-edition of this operation and installation guide. All rights reserved. The reproduction of this document, also partially, is allowed only with authorization by alpitronic Srl... -
Page 76: Operating The Hypercharger
Please authenticate yourself with your user card by holding it against the RFID reader (contactless icon below the screen). Figure 57: Authentication Figure 58: Position of RFID reader All rights reserved. The reproduction of this document, also partially, is allowed only with authorization by alpitronic Srl... - Page 77 In this case you can directly start a new charging process by pressing the buttons below the “new session” label on the screen. Figure 59: Kiosk Mode Figure 60: Checking ID All rights reserved. The reproduction of this document, also partially, is allowed only with authorization by alpitronic Srl...
-
Page 78: Select The Charging Plug
Figure 61: Select plug Figure 62: Buttons for navigation All rights reserved. The reproduction of this document, also partially, is allowed only with authorization by alpitronic Srl... - Page 79 "HPC" refers to a liquid-cooled charging cable. To get to the language selection, press the button on the far left. Figure 63: Language selection All rights reserved. The reproduction of this document, also partially, is allowed only with authorization by alpitronic Srl...
-
Page 80: Connect The Plug
When using CHAdeMO cables, make sure that they engage correctly. For CCS cables, make sure that the vehicle locks the charging cable correctly. All rights reserved. The reproduction of this document, also partially, is allowed only with authorization by alpitronic Srl... -
Page 81: During The Charging Process
100% (full SoC) is reached, as well as the current state of charge, the energy already charged and the charging time. All rights reserved. The reproduction of this document, also partially, is allowed only with authorization by alpitronic Srl... - Page 82 Please note that the display may vary from operator to operator. Some operators hide this information. In this case you can check the SoC inside your vehicle. All rights reserved. The reproduction of this document, also partially, is allowed only with authorization by alpitronic Srl...
-
Page 83: Terminate Charging Session
Once you have pressed the button, you need to unplug the charging cable from your car (see Figure 68). Please reconnect it properly to the cable plug holder of the charging station. Figure 68: Disconnect Plug All rights reserved. The reproduction of this document, also partially, is allowed only with authorization by alpitronic Srl... -
Page 84: Procedure For Error Messages
No connector available Figure 70: No connector available All charging points are currently occupied. Please wait until a charging plug becomes free again. All rights reserved. The reproduction of this document, also partially, is allowed only with authorization by alpitronic Srl... -
Page 85: Connector Damaged
All rights reserved. The reproduction of this document, also partially, is allowed only with authorization by alpitronic Srl... -
Page 86: Failed To Lock Connector
The car signalizes a charging error. Retry to start a charging session on the charger. It that won’t help, try to drive the vehicle forward and backward a few meters to wake it up from a possible standby. All rights reserved. The reproduction of this document, also partially, is allowed only with authorization by alpitronic Srl... -
Page 87: Emergency Stop
Charging station temporarily unavailable Figure 76: Maintenance ongoing A software update is being carried out. After completion, the hypercharger will be available again. All rights reserved. The reproduction of this document, also partially, is allowed only with authorization by alpitronic Srl... -
Page 88: Error Description And Solution
Boot the charging station in charging station diagnostics mode and use the diagnostic tool for further fault localization Table 24: Error description and troubleshooting All rights reserved. The reproduction of this document, also partially, is allowed only with authorization by alpitronic Srl... -
Page 89: Maintenance
If the pH is below pH 7.7, replace the coolant liquid. Replacement of the majority of cooling liquid is sufficient to ensure protection. Table 25: Periodic maintenance work All rights reserved. The reproduction of this document, also partially, is allowed only with authorization by alpitronic Srl... -
Page 90: Function Test Of Circuit Breaker
Figure 77: Function test of the circuit breaker Attention If there is a second circuit breaker (FB1), execute the same function test! All rights reserved. The reproduction of this document, also partially, is allowed only with authorization by alpitronic Srl... -
Page 91: Function Test Of Main Switch
In order to execute this check, turn off the main switch (label QB1, see figure above) and keep a digital multimeter at hand. Attention Please turn off the main switch! Figure 79: Digital multimeter All rights reserved. The reproduction of this document, also partially, is allowed only with authorization by alpitronic Srl... -
Page 92: Check For Cleanliness And Condensation
If you have doubts respective torques you can ask the support team for the manual “overview torques”. support@hypercharger.it or +39 0471 096 333 All rights reserved. The reproduction of this document, also partially, is allowed only with authorization by alpitronic Srl... -
Page 93: Check Overvoltage Protection
Attention Make sure to insert the sim cards back into the correct slots! Figure 81: Compress the sim slot All rights reserved. The reproduction of this document, also partially, is allowed only with authorization by alpitronic Srl... -
Page 94: 8.10. Change Filter Mats
(Figure 82: Replacement filter matsFigure 82, left). Replace the old mats with new ones and reattach the brackets (Figure 82, right). Figure 82: Replacement filter mats All rights reserved. The reproduction of this document, also partially, is allowed only with authorization by alpitronic Srl... -
Page 95: 8.11. Check Coolant
If the serial number of the cooler starts with 18B or 19B, please inform the hypercharger support team in case you refill the liquid: support@hypercharger.it or +39 0471 096 333 All rights reserved. The reproduction of this document, also partially, is allowed only with authorization by alpitronic Srl... -
Page 96: Check Coolant Concentration
+39 0471 096 333 8.12. Close the hypercharger After completing the maintenance work, make sure to close all doors properly again. All rights reserved. The reproduction of this document, also partially, is allowed only with authorization by alpitronic Srl... -
Page 97: Repair And Service
The hypercharger support team is available from Monday to Friday from 08:00-12:00 and from 13:00-17:00. You can call +39 0471 096 333 or write a mail to support@hypercharger.it. All rights reserved. The reproduction of this document, also partially, is allowed only with authorization by alpitronic Srl... -
Page 98: Disposal
Remark For more information, please contact the hypercharger support or check directly with a dedicated WEEE advice center. All rights reserved. The reproduction of this document, also partially, is allowed only with authorization by alpitronic Srl... -
Page 99: Technical Specifications
Max. Rated peak withstand current I 17 kA (peak) Rated short-time withstand current I 4 kA (rms) Table 28: Electrical connection for HYC_150 All rights reserved. The reproduction of this document, also partially, is allowed only with authorization by alpitronic Srl... -
Page 100: Table 29: Electrical Connection For Hyc_300
65 W 45 W 2,8 kvar 100 W 60 W 2,8 kvar 135 W 75 W 2,8 kvar 170 W 90 W All rights reserved. The reproduction of this document, also partially, is allowed only with authorization by alpitronic Srl... -
Page 101: Table 31: Standby Power Consumption
LTE FDD B1, B3, B7, B8, B20, B28 23 dBm GSM 900 33 dBm GSM 1800 30 dBm Table 32: Frequency bands and transmission levels of HYC_150 / HYC_300 All rights reserved. The reproduction of this document, also partially, is allowed only with authorization by alpitronic Srl... -
Page 102: Declaration Of Conformity
- Operation Instructions and Installation Guide Hardware Version 2-2 Page 102 of 105 12 Declaration of Conformity Declaration of Conformity All rights reserved. The reproduction of this document, also partially, is allowed only with authorization by alpitronic Srl... - Page 103 - Operation Instructions and Installation Guide Hardware Version 2-2 12 Declaration of Conformity Page 103 of 105 All rights reserved. The reproduction of this document, also partially, is allowed only with authorization by alpitronic Srl...
- Page 104 - Operation Instructions and Installation Guide Hardware Version 2-2 Page 104 of 105 12 Declaration of Conformity All rights reserved. The reproduction of this document, also partially, is allowed only with authorization by alpitronic Srl...
- Page 105 - Operation Instructions and Installation Guide Hardware Version 2-2 12 Declaration of Conformity Page 105 of 105 All rights reserved. The reproduction of this document, also partially, is allowed only with authorization by alpitronic Srl...
Need help?
Do you have a question about the hypercharger HYC 150 and is the answer not in the manual?
Questions and answers
how heavy is the unit when packed for transporting
The packed weight of the Alpitronic hypercharger HYC 150 is approximately 462 kg, including the charger and its packaging.
This answer is automatically generated