Table of Contents
Advertisement
Quick Links
B270
Introduction
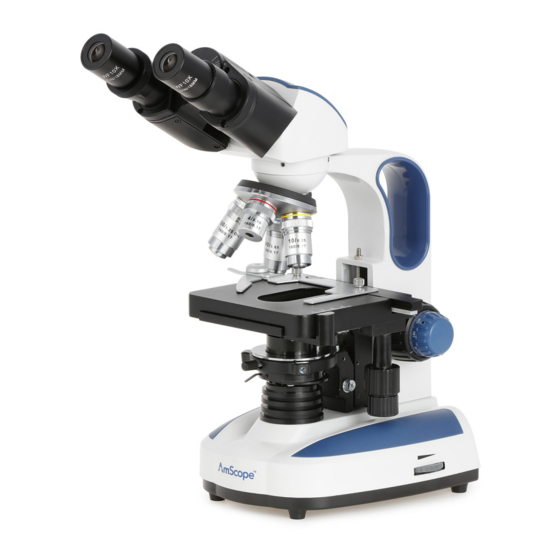
This manual will provide information pertaining to the setup and operation of the B270 biological compound microscope.
Please familiarize yourself with the necessary precautions and procedures prior to operating this instrument. Certain
features and specifications are subject to change.
v0.9.20220624
Advertisement
Table of Contents

Subscribe to Our Youtube Channel
Related Manuals for AmScope B270


Summary of Contents for AmScope B270
- Page 1 B270 Introduction This manual will provide information pertaining to the setup and operation of the B270 biological compound microscope. Please familiarize yourself with the necessary precautions and procedures prior to operating this instrument. Certain features and specifications are subject to change.
- Page 2 Other indicators can be a loud buzzing sound or crackling. Contact AmScope to report such behavior. Do not use around flammable liquids or gases. Electric instruments can ignite flammable substances which could result in an explosion or fire.
-
Page 3: Table Of Contents
Contents Specifications ................................4 What’s In The Box ..............................5 1. Assembly and Setup ............................6 1.1 The Head ................................ 6 1.1b The Eyepieces ................................7 1.1c Dioptric Adjustment ..............................7 1.1d Interpupillary Adjustment ............................8 1.2 Objective Lenses ............................. 9 1.3 Light Condenser ............................ - Page 4 B 2 7 0 User Gui de amscope.com...
-
Page 5: Specifications
NA1.25 Abbe condenser with iris diaphragm Sub-stage Condenser-holder Rack and pinion, centerable Power 100-240VAC 50/60Hz What’s In The Box The B270 standard outfit includes: • One microscope • Four objective lenses: 4X, 10X, 40X, 100X • One pair 10X eyepieces •... -
Page 6: Assembly And Setup
CAUTION: Never lift the microscope by the head. If the head is not properly seated, it can become separated, causing the body to fall, or otherwise damage the coupling mechanism. During transport, hold the microscope by the body in an upright position to prevent the head, eyepieces, or other parts from falling. amscope.com... -
Page 7: The Eyepieces
Begin the process by setting the dioptric adjuster on the left ocular tube to a neutral position. Next, use the focus knobs to bring the image to sharp focus for your right eye. Once the right eye attains sharp focus, rotate the dioptric adjuster until the left eye achieves sharp focus. amscope.com... -
Page 8: Interpupillary Adjustment
Attempt to look through both eyepieces, adjusting the interpu- pillary-adjustment mechanism accordingly until the eyepieces are aligned with your eyes, and an image can be seen with both eyes. This process should be repeated whenever viewing a specimen to ensure alignment. amscope.com... -
Page 9: Objective Lenses
• 20.32mm RMS mounting thread • 160mm mechanical tube-length • 45mm parfocal distance *DIN stands for Deutsches Institut für Normung which is a German standards organization. Microscopes and objective lenses which are DIN compliant will use the aforementioned specifications. amscope.com... -
Page 10: Light Condenser
Use one hand to hold the condenser in place to avoid dropping it, then turn the screw counter-clockwise until the condenser is released. Once the condenser has been removed, insert the desired condenser into the holder until it is fully seated, then tighten the locking screw. Once the condenser is secured, replace the illuminator’s field lens. amscope.com... -
Page 11: Specimen Stage
If the specimen was too far from the lens, and could not make contact, loosen the adjustment screw slightly, then continue to make fine focus adjustments until the specimen is high enough. Once the height is properly set, tighten the adjustment screw. amscope.com... -
Page 12: Power
1.6 Security Leash A security leash can be used with the B270 as a theft deterrent. The leash should be secured to an immobile object by guiding the leash around or through the object, then through the leash’s loop. Once the leash is secure, the lock portion of the leash can be attached to the microscope. -
Page 13: Operation
A prepared slide can be placed on the stage by pushing the caliper lever outward to open the caliper, then sliding the slide in place so the long edge is flush against the back edge of the tem- plate. Gently releasing the caliper will secure the slide in place. amscope.com... -
Page 14: Illumination
“–” (on) position. As magnification increases, more light will be necessary to view the specimen. Use the wheel on the right side of the microscope’s base to adjust the illuminator’s brightness as needed. Avoid using the microscope for long durations with excessive brightness, as this can strain the eyes. amscope.com... -
Page 15: Using The Condenser
This can negatively impact image quality due to diffraction, so it is recommended to use the condenser at its maximum height. amscope.com... -
Page 16: Adjusting The Aperture
Decreasing the aperture too much will result in diffraction artifacts which dete- riorate image quality. As objective magnification increases, more light will be requires to accommodate higher numerical apertures. The aperture should be increased accordingly. amscope.com... -
Page 17: Centering The Condenser
Loosening either screw will move the image of the iris in an opposite direction. Make gradual adjustments to both screws until the iris appears centered in the field of view. You can increase or decrease the aperture as needed to gauge the alignment. amscope.com... -
Page 18: Color Filters
The condenser may need to be rotated to allow the space needed to open the holder. Once the holder has been fully opened, a 32mm filter can be placed within the holder’s recess. Close the holder to engage the filter. amscope.com... -
Page 19: Locating The Specimen, And Focusing
When doing so, it is advisable to watch the lens as it is set in place to ensure it will not collide with the specimen. Slight adjustments to focus should be made at each mag- nification, as well as to the condenser’s aperture and the illuminator’s brightness. amscope.com... -
Page 20: Immersion Oil
This technique should only be used with specimens which have been properly prepared, such as being mounted on a glass slide. amscope.com...
Need help?
Do you have a question about the B270 and is the answer not in the manual?
Questions and answers