Advertisement
Quick Links
AU: 1800 029 701
N Z: 0800 466 444
DOWNLOAD
OUR APP FOR
ASSEMBLY
VIDEOS
Absco Industries
Assembly Instruction Manual
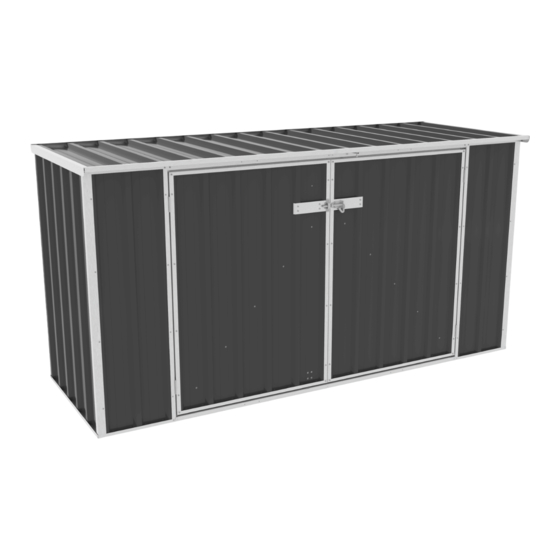
ABSCO BIN COVER
MODEL: 2308WBCK
2.27m W x 0.85m D x 1.15m H
admin@absco.com.au
www.abscosheds.com.au
Model: 2308WBCK
• Store up to three 240L garbage bins.
• Maximum internal height 1.11 m
PLEASE LEAVE A REVIEW
Tell us about your experience!
Visit www.abscosheds.com.au/review
21/09/2022
1.1
1
Advertisement

Related Manuals for ABSCO SHEDS 2308WBCK


Summary of Contents for ABSCO SHEDS 2308WBCK
- Page 1 ABSCO BIN COVER MODEL: 2308WBCK 2.27m W x 0.85m D x 1.15m H AU: 1800 029 701 admin@absco.com.au N Z: 0800 466 444 www.abscosheds.com.au • Store up to three 240L garbage bins. • Maximum internal height 1.11 m DOWNLOAD PLEASE LEAVE A REVIEW...
- Page 2 ABSCO BIN COVER MODEL: 2308WBCK 2.27m W x 0.85m D x 1.15m H GENERAL INSTRUCTIONS • Before commencing any assembly, read through these instructions in detail to gain a thorough understanding of assembly methods and associated details. • Unpack the carton and carefully identify and check off all the parts against the parts described and illustrated on "COMPONENTS PACKING LIST"...
- Page 3 ABSCO BIN COVER MODEL: 2308WBCK 2.27m W x 0.85m D x 1.15m H DESCRIPTION PART # DESCRIPTION PART # STEEL SHEET STEEL SHEET 852 x 773 mm 1130 x 773 mm STEEL SHEET STEEL SHEET 852 x 773 mm 1130 x 773 mm...
- Page 4 ABSCO BIN COVER MODEL: 2308WBCK 2.27m W x 0.85m D x 1.15m H DESCRIPTION PART # DESCRIPTION PART # CHANNEL CHANNEL C64L C64R 1132 mm 1132 mm CHANNEL CHANNEL C20L C20R 1132 mm 1132 mm CHANNEL CHANNEL L67L L67R 1132 mm...
- Page 5 ABSCO BIN COVER MODEL: 2308WBCK 2.27m W x 0.85m D x 1.15m H PRE-ASSEMBLY OF SPLICED CHANNELS Join together 12x channel sections using 6x channel joiners (CSJ) NOTE: Some channels may have holes in them - You will need to redrill holes where CSJ joining channel covers them.
- Page 6 ABSCO BIN COVER MODEL: 2308WBCK 2.27m W x 0.85m D x 1.15m H Guide on Joining Spliced Channels The text marked on all parts must be shown on the same side as each other JOIN>> JOIN>> <<JOIN JOIN>> Step 1.
- Page 7 ABSCO BIN COVER MODEL: 2308WBCK 2.27m W x 0.85m D x 1.15m H SNAPTiTE ASSEMBLY GUIDE The Snaptite Assembly System locks end channels to all roof and wall sheets without the need for tools and fasteners. To assemble each panel, the perimeter channels are secured to the top and bottom of each panel.
-
Page 8: Rear Panel Assembly
ABSCO BIN COVER MODEL: 2308WBCK 2.27m W x 0.85m D x 1.15m H REAR PANEL ASSEMBLY 1. Layout and overlap sheets by one rib as shown. Sheet Q32 must be on top. 2. Make sure the ends of the FAST096 sheets are flush at overlap before continuing. - Page 9 ABSCO BIN COVER MODEL: 2308WBCK 2.27m W x 0.85m D x 1.15m H REAR PANEL ASSEMBLY 4. Now both channels are attached, fasten their L&R pieces CONTINUED to the CSJ with a self drilling screw FAST096 in each top hole - four screws total.
-
Page 10: Side Panel Assembly
ABSCO BIN COVER MODEL: 2308WBCK 2.27m W x 0.85m D x 1.15m H SIDE PANEL ASSEMBLY 2 required 1. Orientate the Y81 sheet as shown. 2. Attach the top and bottom channels using the SNAP-TiTE method. Make sure you have the shorter,... - Page 11 ABSCO BIN COVER MODEL: 2308WBCK 2.27m W x 0.85m D x 1.15m H LID PANEL ASSEMBLY 1. Layout and overlap sheets by one rib as shown. Sheet C67 must be on top, and orientated so the middle hole is to the front.
- Page 12 ABSCO BIN COVER MODEL: 2308WBCK 2.27m W x 0.85m D x 1.15m H LID PANEL ASSEMBLY 4. Now both channels are CONTINUED attached, fasten their L&R pieces to the CSJ with a pop rivet FAST009 in each top hole. Drill out holes with supplied drill bit first.
- Page 13 ABSCO BIN COVER MODEL: 2308WBCK 2.27m W x 0.85m D x 1.15m H LID PANEL ASSEMBLY CONTINUED Flip the panel over, Check you This middle have the panel orientated as sheet hole shown for the next step. will be used in next step.
- Page 14 ABSCO BIN COVER MODEL: 2308WBCK 2.27m W x 0.85m D x 1.15m H LEFT DOOR PANEL ASSEMBLY 1. Orientate the DOORL sheet as shown. Sheet holes are 2. Attach the top and bottom exaggerated for channels using the SNAP-TiTE illustrative purposes method.
- Page 15 ABSCO BIN COVER MODEL: 2308WBCK 2.27m W x 0.85m D x 1.15m H LEFT DOOR PANEL ASSEMBLY CONTINUED 5. Attach the 12A door plate to the sheet with six self drilling screws FAST096. 6. Let’s attach the hinges. Use the supplied 3 mm drill bit...
- Page 16 ABSCO BIN COVER MODEL: 2308WBCK 2.27m W x 0.85m D x 1.15m H LEFT DOOR PANEL ASSEMBLY 8. Now we’ll fit the door brace 91A to the inside of the door. CONTINUED Align the holes in the brace with holes in the door.
- Page 17 ABSCO BIN COVER MODEL: 2308WBCK 2.27m W x 0.85m D x 1.15m H RIGHT DOOR PANEL ASSEMBLY 1. Orientate the DOORR sheet as shown. Sheet holes are 2. Attach the top and bottom exaggerated for channels using the SNAP-TiTE illustrative purposes method.
- Page 18 ABSCO BIN COVER MODEL: 2308WBCK 2.27m W x 0.85m D x 1.15m H RIGHT DOOR PANEL ASSEMBLY CONTINUED 5. First attach the 12A door Do these plate through the pair of holes two first in the sheet with two self drilling screws FAST096 at the location shown.
- Page 19 ABSCO BIN COVER MODEL: 2308WBCK 2.27m W x 0.85m D x 1.15m H RIGHT DOOR PANEL ASSEMBLY CONTINUED 8. Now we’ll fit the door brace 91S to the inside of the door. Align the holes in the brace with the three holes in the door.
-
Page 20: Front Panel Assembly
ABSCO BIN COVER MODEL: 2308WBCK 2.27m W x 0.85m D x 1.15m H FRONT PANEL ASSEMBLY 1. Take a narrow D64 sheet and carefully orientate it as shown with the raw edge to the left. A 91K jamb will cover this edge, with the face with six holes on top of the sheet. - Page 21 ABSCO BIN COVER MODEL: 2308WBCK 2.27m W x 0.85m D x 1.15m H FRONT PANEL ASSEMBLY 5. Next are the top-of-doorway jambs. CONTINUED Orientate the top jamb 90AR so the side jamb goes into the slot and slide it up into the top channel.
- Page 22 ABSCO BIN COVER MODEL: 2308WBCK 2.27m W x 0.85m D x 1.15m H FRONT PANEL ASSEMBLY CONTINUED 7. Be sure to fasten the L&R pieces of the top and bottom channels to the CSJ with a tek screw FAST096 in each top hole - four screws total.
-
Page 23: Door Panel Installation
ABSCO BIN COVER MODEL: 2308WBCK 2.27m W x 0.85m D x 1.15m H DOOR PANEL INSTALLATION Let’s attach the doors to the front panel. You’ll need to flip the front panel back over again. We’ll start with the right door panel. -
Page 24: Wall Panel Assembly
ABSCO BIN COVER MODEL: 2308WBCK 2.27m W x 0.85m D x 1.15m H WALL PANEL ASSEMBLY 1. Attach the front wall to the side walls. Open the doors to make the front panel stand up on its own. Side wall lip trim slide into front wall top and bottom channels, in front of sheet. - Page 25 ABSCO BIN COVER MODEL: 2308WBCK 2.27m W x 0.85m D x 1.15m H 61PR LID PROPS & CORNER BRACES Channel 61PR goes on the right side and 61PL goes on the left. Pivot hole 61PL 1. Align the existing pivot hole...
- Page 26 ABSCO BIN COVER MODEL: 2308WBCK 2.27m W x 0.85m D x 1.15m H LID PANEL INSTALLATION It’s critical that walls are square before proceeding. 1. Place lid on top of walls. Check you have the lid orientated so the bracing is as pictured.
- Page 27 ABSCO BIN COVER MODEL: 2308WBCK 2.27m W x 0.85m D x 1.15m H DOOR HASPS & LATCH Attach the two padbolt hasps 1. Take a hasp, place it on the edge of the left door and centre it over the padbolt shaft from the right door.
- Page 28 ABSCO BIN COVER MODEL: 2308WBCK 2.27m W x 0.85m D x 1.15m H Bin handle loops - Option Use these as a hitching point for a cord so when you open the cover the bin lids open too. 1. Find a location along the lid that is going to be close to your bin handles.
- Page 29 Lifetime Warranty Statement This warranty against defects is given by: Absco Industries (ABN: 77 869 708 678) Address: PO Box 119 Acacia Ridge QLD 4110 Ph: 1800 029 701 Fax: 07 3344 1191 Email: admin@absco.com.au Date of issue: 19 December 2018 Details of Manufacturer’s Warranty This product comes with a Lifetime structural warranty from the date of purchase.
- Page 30 IMPORTANT 1. Manufacturer’s Disclosure This warranty against defects shall not apply in the following situations: A) Where the product is not assembled in accordance with the instructions provided in the product kit; B) Where the product is used to store corrosive materials such as fertilizer, chlorine etc; C) The warranty does NOT cover damage caused by storms, wind, rain, snow or poor foundations;...
Need help?
Do you have a question about the 2308WBCK and is the answer not in the manual?
Questions and answers