Advertisement
AU: 1800 029 701
NZ: 0800 466 444
DOWNLOAD
OUR APP FOR
ASSEMBLY
VIDEOS
Absco Industries
Assembly Instruction Manual
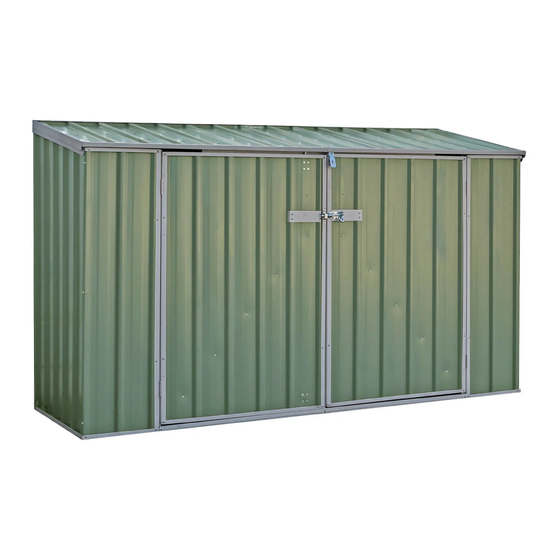
ABSCO BIKE SHED
MODEL: 230813BK
2.26mW x 0.78mD x 1.20mH, 1.31mH
admin@absco.com.au
www.abscosheds.com.au
WHEN LAYING YOUR CONCRETE
SLAB, ENSURE THERE IS A
REBATED EDGE 25mm DEEP
AROUND THE PERIMETER
THIS WILL HELP WATER EGRESS
FROM THE BASE OF THE SHED
We thank you for choosing an Australian made
shed. For further assistance please visit our detailed
instructional video library at
Http://www.abscosheds.com.au/watch-videos
At ABSCO Industries we are always looking to be
number ONE, so please let us know what you think
of our instructions. Feedback makes us better.
feedback@absco.com.au
ABSCO INDUSTRIES
ASSEMBLY INSTRUCTION MANUAL
Absco Industries
Premier Shed Model: 23151GK
When laying concrete slab, ensure there
is a rebated edge 25mm deep around
the perimeter. This will help water egress
from the base of the shed.
PLEASE LEAVE A REVIEW
SHED MODEL: 23151GK
Tell us about your experience!
Visit www.abscosheds.com.au/review
Model: 230813BK
07/02/2025
FRONT: 2.26m
SIDE:
1.52m
HEIGHT: 1.95m
BOTTOM CHANNEL
REBATED EDGE
75mm WIDE REBATE
CONCRETE SLAB
21-11-2017
1.1
PAGE 01
1
Advertisement
Table of Contents

Related Manuals for ABSCO SHEDS 230813BK


Summary of Contents for ABSCO SHEDS 230813BK
- Page 1 ABSCO BIKE SHED MODEL: 230813BK 2.26mW x 0.78mD x 1.20mH, 1.31mH AU: 1800 029 701 admin@absco.com.au NZ: 0800 466 444 www.abscosheds.com.au Absco Industries Premier Shed Model: 23151GK FRONT: 2.26m SIDE: 1.52m HEIGHT: 1.95m WHEN LAYING YOUR CONCRETE SLAB, ENSURE THERE IS A...
- Page 2 ABSCO BIKE SHED MODEL: 230813BK 2.26mW x 0.78mD x 1.20mH, 1.31mH GENERAL INSTRUCTIONS • Before commencing any assembly, read through these instructions in detail to gain a thorough understanding of assembly methods and associated details. • Unpack the carton and carefully identify and check off all the parts against the parts described and illustrated on "COMPONENTS PACKING LIST"...
-
Page 3: Component Description
ABSCO BIKE SHED MODEL: 230813BK 2.26mW x 0.78mD x 1.20mH, 1.31mH COMPONENT PACKING LIST Check off all components. COMPONENT PART COMPONENT PART CHK QTY DESCRIPTION DESCRIPTION STEEL SHEET STEEL SHEET DOOR 1310 x 773 mm 1130 x 773 mm STEEL SHEET... - Page 4 ABSCO BIKE SHED MODEL: 230813BK 2.26mW x 0.78mD x 1.20mH, 1.31mH COMPONENT PACKING LIST Check off all components. COMPONENT PART COMPONENT PART CHK QTY DESCRIPTION DESCRIPTION CHANNEL CHANNEL 54SL 54SR L = 1129 mm L = 1129 mm CHANNEL CHANNEL...
- Page 5 ABSCO BIKE SHED MODEL: 230813BK 2.26mW x 0.78mD x 1.20mH, 1.31mH COMPONENT PACKING LIST Check off all components. COMPONENT PART COMPONENT PART CHK QTY DESCRIPTION DESCRIPTION JAMB JAMB L = 1180 mm L = 1130 mm JAMB JAMB L = 1568 mm...
- Page 6 ABSCO BIKE SHED MODEL: 230813BK 2.26mW x 0.78mD x 1.20mH, 1.31mH SNAPTiTE ASSEMBLY GUIDE The Snaptite Assembly System locks end channels to all roof and wall sheets without the need for tools and fasteners. To assemble each panel, the perimeter channels are secured to the top and bottom of each panel.
- Page 7 ABSCO BIKE SHED MODEL: 230813BK 2.26mW x 0.78mD x 1.20mH, 1.31mH Guide on Joining Spliced Channels The text marked on all parts must be shown on the same side as each other JOIN>> JOIN>> <<JOIN JOIN>> Step 1. Step 2.
- Page 8 ABSCO BIKE SHED MODEL: 230813BK 2.26mW x 0.78mD x 1.20mH, 1.31mH PRE-ASSEMBLY OF SPLICED CHANNELS Join together 12x channel sections using 6x channel joiners (Part CSJ) NOTE: Some channels may have holes in them - You will need to redrill holes where CSJ joining channel covers them.
- Page 9 ABSCO BIKE SHED MODEL: 230813BK 2.26mW x 0.78mD x 1.20mH, 1.31mH OVERVIEW OF WALL AND ROOF COMPONENTS Absco Industries Assembly Instruction Manual Model: 230813BK 07/02/2025...
-
Page 10: Rear Panel Assembly
ABSCO BIKE SHED MODEL: 230813BK 2.26mW x 0.78mD x 1.20mH, 1.31mH REAR PANEL ASSEMBLY 1x required Absco Industries Assembly Instruction Manual Model: 230813BK 07/02/2025... - Page 11 ABSCO BIKE SHED MODEL: 230813BK 2.26mW x 0.78mD x 1.20mH, 1.31mH ROOF PANEL ASSEMBLY 1x required Absco Industries Assembly Instruction Manual Model: 230813BK 07/02/2025...
-
Page 12: Side Panel Assembly
ABSCO BIKE SHED MODEL: 230813BK 2.26mW x 0.78mD x 1.20mH, 1.31mH SIDE PANEL ASSEMBLY 2x required 1x Left side panel 1x Right side panel 1. Drill hole in 88M Lip as indicated in Detail C. 2. Fit 88M to 61B Channel once 61B Channel has been fitted to X3L/R Sheet. - Page 13 ABSCO BIKE SHED MODEL: 230813BK 2.26mW x 0.78mD x 1.20mH, 1.31mH FRONT PANEL ASSEMBLY 1x required 1. Ensure that 54R channels are secured to 39D sheets. 7. Place the 90A jamb into position by 2. Place the 89R jambs into position by nesting end nesting end notches around the notches around the high edges of 54R channels.
-
Page 14: Door Panel Assembly
ABSCO BIKE SHED MODEL: 230813BK 2.26mW x 0.78mD x 1.20mH, 1.31mH DOOR PANEL ASSEMBLY 1. Tuck the 20mm face of the 91A jamb into the bottom 58C channel. 2. Install 2x FAST001 screw to each 91A jamb from back. LEFT DOOR PANEL 3. - Page 15 ABSCO BIKE SHED MODEL: 230813BK 2.26mW x 0.78mD x 1.20mH, 1.31mH DOOR PANEL ASSEMBLY LEFT DOOR PANEL RIGHT DOOR PANEL Absco Industries Assembly Instruction Manual Model: 230813BK 07/02/2025...
- Page 16 ABSCO BIKE SHED MODEL: 230813BK 2.26mW x 0.78mD x 1.20mH, 1.31mH PANEL CONSTRUCTION 1x required Absco Industries Assembly Instruction Manual Model: 230813BK 07/02/2025...
- Page 17 ABSCO BIKE SHED MODEL: 230813BK 2.26mW x 0.78mD x 1.20mH, 1.31mH PANEL CONSTRUCTION 1. Holes for FAST007 are not pre-punched & will require drilling. FINAL CONSTRUCTION Absco Industries Assembly Instruction Manual Model: 230813BK 07/02/2025...
- Page 18 ABSCO BIKE SHED MODEL: 230813BK 2.26mW x 0.78mD x 1.20mH, 1.31mH FINAL CONSTRUCTION 1. Prior to anchoring, the Lid panel can be maneuvered to align with the front panel. 2. Look for a neat fit with respect to the lid panel fitting over side panels.
- Page 19 Absco Sheds Storage Guidelines • Absco Sheds are designed to be weatherproof for normal weather conditions. In the event of extreme weather conditions such as heavy rain, combined with high wind gusts, the ridge capping, sheeting joins, screw fi xings etc., may exhibit minor deformations which may allow some water entry. These areas should be checked regularly to ensure that maximum strength and protection is maintained.
- Page 20 Lifetime Warranty Statement 1. DEFINITIONS 3. WARRANTY CLAIM PROCEDURE In this document, capitalised terms have the following meaning: 3.1. If, during the Lifetime Warranty Period, You believe the Product has a “ABSCO” means John Scholtes Investments (No. 1) Pty Ltd trading Defect, You must comply with the procedure set out in this clause 3.
- Page 21 4. WARRANTY LIMITATIONS / EXCLUSIONS 4.1. To the extent permitted by law, this warranty will not apply where: the Product has been installed or used for a purpose that is not an Authorised Purpose; the Product has not been installed, assembled, maintained and/or special, indirect or consequential loss or damage of any nature operated in complete compliance with ABSCO’s Product Guide;...
Need help?
Do you have a question about the 230813BK and is the answer not in the manual?
Questions and answers