
Related Manuals for Yada BT532983


Summary of Contents for Yada BT532983
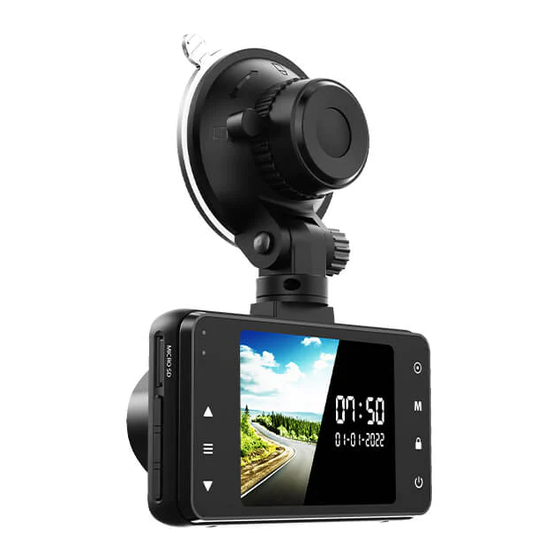
- Page 1 1080 P ROADCAM with 2.4” LCD Monitor BT532983 User Manual Important, retain for future reference: Read carefully...
- Page 2 QUICK INSTALLATION GUIDE Before you begin... Gather these items. TF Card 8 GB 1. Mount the Roadcam Mount the Roadcam on the windshield.
- Page 3 2. Insert the MicroSD Card 3. Connect to Power...
- Page 4 Consult an experienced technician if you are not comfortable installing the product. You can also contact YADA at 1.866.294.9244 to speak to one of our installation specialists if you have any specific questions regarding the 1080P Roadcam.
-
Page 5: Package Contents
PACKAGE CONTENTS 1. 1 x 1080P Roadcam 2. 1 x Windshield Mount 3. 1 x 12V/24V Power Adapter 4. 1 x 8GB MicroSD Card TF Card 8 GB... -
Page 6: Product Specifications
PRODUCT SPECIFICATIONS Display: 2.4 inch display Lens: 128 degrees diagonal Video Resolution: FHD (1920x1080), HD (1280x720) or VGA (640x480) Circular Video: Seamless loop recording Memory Card: MicroSD (maximum support 32GB) Microphone: Supported Built-in Audio: Supported Operating Temperature: 14°F~140°F (-10°C~60°C) Operating Voltage: Cigarette Charger - DC 12/24V / DC 5V (Mini USB) Battery: Built-in 150 mAh li-ion battery... -
Page 7: Product Overview
PRODUCT OVERVIEW 1. LED Indicator Lights 7. Mini USB Power Port Menu Button 2. LCD Screen 8. Mounting Socket Down Navigation Button OK / Record Button 9. Speaker 15. Power Reset Hole Mode Button 10. Camera Lens 16. Microphone Lock Video Button 11. -
Page 8: Installation
INSTALLATION Insert the windshield mount to the socket on the top of the Roadcam. Peel off the protective sticker from the LCD screen and insert the MicroSD card. Plug the Mini USB power cable into the DC input port. Note: Power on and test camera before mounting. - Page 9 INSTALLATION Route and hide the power cable in the headliner and pillars in your vehicle. Plug the cigarette charger cable into your vehicle’s 12/24V DC outlet. Mount the Roadcam on the windshield. You can turn on the Roadcam and check the live screen to determine the most suitable mounting position. Turn the adjustment knob clockwise while pressing the windshield mount onto the glass to secure the Roadcam on the windshield.
-
Page 10: Configuration & Menu Settings
CONFIGURATION & MENU SETTINGS Initial Setup Set the date & time before installing and using the Roadcam. This date & time is the time stamp for all recorded media files and digital clock. Switching Modes Press the button to cycle through the following modes: video mode > camera mode >... -
Page 11: Playback Mode
G-Sensor Setting The Roadcam’s integrated G-Sensor will automatically save and lock the recorded file if activated by an impact event or accident. Select to adjust the G-Sensor sensitivity level, or to turn it on or off. The default setting is low. Camera Mode •... -
Page 12: Parking Monitor
Motion Detection ON or OFF. Record Audio ON or OFF. Date Stamp ON or OFF. G-Sensor High, Medium, Low or OFF. Camera Settings Press the button on camera mode to open the camera settings page. Press the button to navigate through your selections and press button to confirm. -
Page 13: Screen Save
Date/Time Set the date and time. Screen Save 5 minutes, 3 minutes, 1 minute or OFF. (Screen will dim to a digital clock interface after the specified time you select. ) Beep Sound ON or OFF. Language Supports English only. Frequency 50Hz or 60Hz. -
Page 14: Additional Features
ADDITIONAL FEATURES Automatic ON / OFF When the Roadcam is connected to the vehicle’s power, it will power on and start recording when the vehicle engine starts. When the engine is off, the Roadcam will stop recording and turn off automatically. Gravity Induction Recording Protection System In a vehicle collision, the Roadcam will lock the video of the accident and save it as a special image. -
Page 15: Battery Indications
Battery Indications: Please refer to the diagram below for the battery indication. Fully charged Battery low Battery is empty Charging Note: The Roadcam is designed to be powered on while the vehicle is running. The built-in battery is only designed for storing documents when the vehicle’s engine is off. - Page 16 Help / FAQs 1) Problem: The Roadcam is unable to take pictures and record videos. Solution: Check if the MicroSD card has enough space and lock it. 2) Problem: The Roadcam stops automatically when it is recording a video. Solution: Because HD video data takes a lot of space, please use a high-speed MicroSD card compatible with SDHC, high-speed MicroSD cards will have a C10 logo.
-
Page 17: Safety Information
1. SAVE THESE INSTRUCTIONS – This manual contains important safety and operating instructions of the 12V/24V cigarette lighter adapter for Model BT532983. 2. Before using the product, read all instructions and cautionary markings. 3. Do not expose cigarette lighter adapter to rain, moisture, or snow. - Page 18 WARNING: A failure to read and follow these warnings and instructions may result in a serious accident, including damaged property or a serious injury, including loss of life. • The 1080P Roadcam is designed as an aid to the driver in detecting large stationary objects to help avoid damaging the vehicle.
- Page 19 • There is a plastic cover over the 1080P Roadcam. Do not scratch the cover when cleaning dirt or snow from it. • If the temperature changes rapidly, the system may not operate normally. • When strong light directly enters a camera, objects may not be displayed clearly.
-
Page 20: Maintenance And Warranty
YADA warrants, to the original purchaser, that its products are free from defects in material and workmanship for 1 year from the date of original purchase. Where permitted by law, YADA’s liability shall be limited to that set forth in this limited express warranty. This limited express warranty shall be the exclusive remedy of the purchaser and YADA makes no other warranty of any kind aside from the limited express warranty stated above. - Page 21 4. The replacement of parts is excluded from the warranty when replacement is necessary due to normal wear and tear. 5. Repair or replacement parts supplied by YADA under this warranty are protected only for the unexpired portion of the original warranty.
- Page 22 Return Authorization and instruct on how to get a new unit. YADA makes no other warranty of any kind aside from the limited express warranty stated herein. DISCLAIMER OF WARRANTIES, INCLUDING WARRANTY OF...
-
Page 23: General Information
Neither shall YADA and/or its affiliates have any liability for any decision, action or inaction taken by any person in reliance on the 1080P Roadcam, or for any delays, inaccuracies and /or errors in connection with the 1080P Roadcam and its functioning. - Page 24 (DEHP) and Diisononyl Phthalate (DINP), which are known to the State of California to cause cancer and birth defects or other reproductive harm. For more information go to www.P65Warnings.ca.gov. 1080P Roadcam with 2.4” LCD Monitor BT532983 Responsible Party: YADA 2975 Red Hill Ave., Ste. 100, Costa Mesa, CA 92626...
- Page 25 NOTES...
- Page 26 NOTES...
- Page 27 Product code / Code de produit / Código del producto : BT532983 Register this product within 30 days of purchase to receive one (1) additional year of warranty coverage (beyond the standard 1-year warranty), along with special product offers and announcements.
- Page 28 CONNECT @letsyada WITH US 2975 Red Hill Ave., Ste. 100, Costa Mesa, CA 92626 1.866.294.9244 | customercare@horizon-brands.com © 2022 ADC Solutions Auto, LLC. www.letsyada.com ML-532983_V1...
Need help?
Do you have a question about the BT532983 and is the answer not in the manual?
Questions and answers