Advertisement
- 1 SAFETY ISSUES
- 2 PRODUCT DESCRIPTION
- 3 INSTALLATION
- 4 NANO SIM CARD REQUIREMENTS
- 5 INSTALLING THE NANO SIM CARD
- 6 OPERATION
- 7 CHARGING
- 8 FIRST START-UP
- 9 INSTALLING THE GARETT TRACKER APP
- 10 REGISTERING IN THE APP
- 11 GARETT TRACKER APP
- 12 MAIN MENU
- 13 TROUBLESHOOTING
- 14 TECHNICAL SPECIFICATIONS
- 15 WARRANTY/CLAIMS
- 16 Documents / Resources
SAFETY ISSUES
Before use, read this user manual carefully and keep it for further reference. The manufacturer shall bear no liability for any damage/injuries caused by improper use. Depending on the smartwatch batch, certain functions may differ from the functions described in this user manual.
- Using this device in the vicinity of medical devices may disrupt their operation. Users should pay special attention when using the smartwatch in the vicinity of medical devices such as pacemakers, hearing aids and other electronic medical devices.
- Do not dispose of the device in fire. There is a risk of battery explosion and resulting threat to life and health.
- Protect the device from heat sources and direct sunlight.
- Do not store the device in damp places or high temperatures, because it may cause electric shock or fire.
- The device is not resistant to long-term immersion in water. Do not swim or dive while wearing the device.
- In case of failure/damage, please stop using the product and contact the Garett service centre. Any attempts to make your own repairs may damage the device and result in invalidation of the warranty.
- The device should only be cleaned with a soft, slightly damp cloth. Do not use strong detergents or any other stimulants to clean the product.
 Do not swim while wearing the device. The IP67 standard does not guarantee that the smartwatch will be waterproof while swimming. The forces acting on the device during swimming may cause it to become unsealed and damaged.
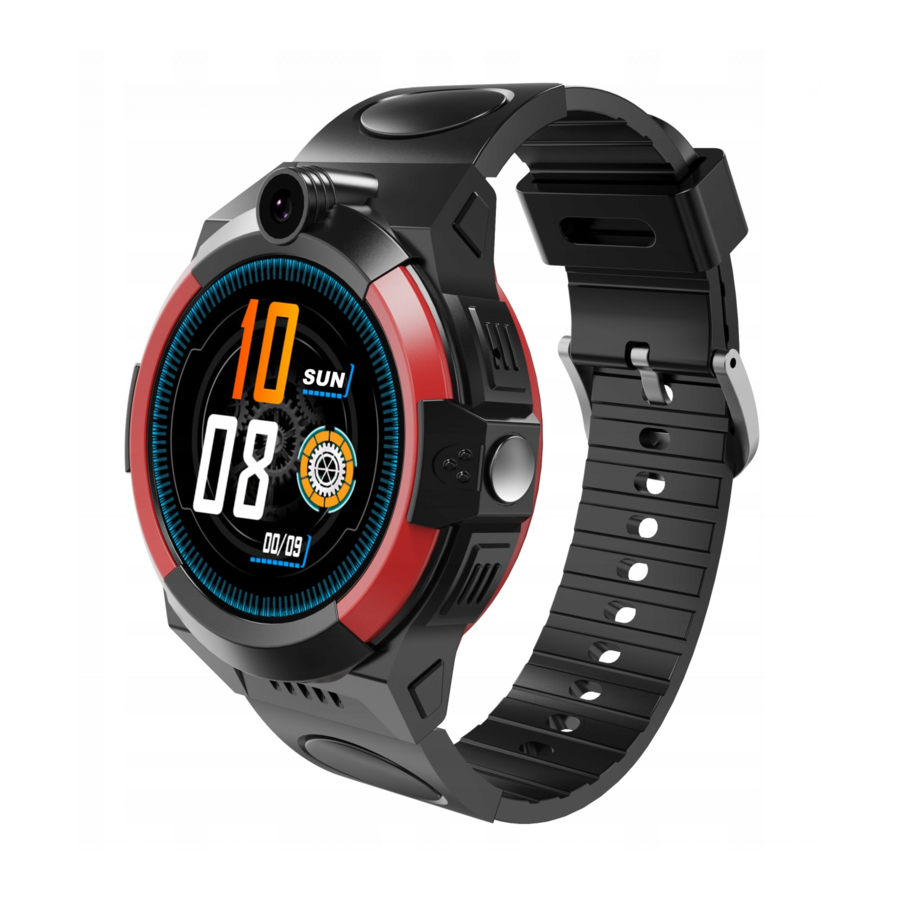
PRODUCT DESCRIPTION


- Touchscreen display
- Function button (on/off/wake/lock screen/SOS)
- Photo/video camera
- Nano SIM card slot
- Magnetic charging port
- Interchangeable strap
INSTALLATION
Put the watch on your wrist and adjust the strap length so as to ensure the device strap is not too loose.
NANO SIM CARD REQUIREMENTS
- The device requires the installation of a Nano SIM card.
- The SIM card must meet the following requirements:
- The card must be active (if it is a new card, you will need to activate it in a mobile phone by making an outgoing call),
- The card must be topped up (applies to prepaid cards),
- The card cannot have an active PIN code (to check whether the card has an active PIN lock, install it in a mobile phone and check whether a PIN code is required when starting up the phone - if so, the PIN lock is active and will need to be disabled in the phone settings or by contacting the operator),
- The card must support 2G/3G/4G modes, have an active internet service and caller ID function;
SIM cards offered by operators as data-only, e.g. those designed for tablets, may not function properly in the device.
Since the device uses an internet connection, we recommend purchasing an internet package from the operator to avoid additional costs. A 1 GB/month package is sufficient. The costs of internet connection, voice calls and text messages are specified in the price list of your mobile operator.
INSTALLING THE NANO SIM CARD

- First, remove the Nano SIM card port cover(4) on the left side of the watch.
- Then take out the tray and place the card on it according to the illustrative diagram in the picture, i.e. with the chip of the card facing towards the display and the cut corner of the card facing towards the slot.
- Insert the tray into the watch, ensuring that it fits properly.
Install the SIM card when the device is turned off.
OPERATION
Turning on/off

To start the device, press and hold the function button(2) for approx. 5 seconds. To turn it off, repeat the action and confirm that you want to turn it off (if a SIM card is installed, the function button(2) serves as the SOS button).
If the smartwatch does not start, try charging it.
After starting

The smartwatch is operated using the touchscreen and the function button.
Changing the watch face

Touch and hold the home screen to display the smartwatch face change menu. Swipe right/left to select the face, and then click anywhere on the screen to confirm your selection.
Navigation

Swipe left/right on the home screen to access the main menu. Touch the screen to enter the selected function. After entering the function, swiping right allows you to return to the previous screen, while pressing the function button(2) takes you to the home screen.

Swipe down on the home screen to access the settings bar. This allows you to view and quickly change selected functions of the smartwatch.

Swipe up on the home screen to access the pedometer. This allows you to view the number of steps taken (the function must be enabled in the Garett Tracker app under Activity>Pedometer>Measurement).
CHARGING

- The smartwatch is charged using the magnetic cable supplied with the device.
- Attach the end of the magnetic cable so that the contacts of the watch touch the contacts of the charging cable. Then connect the other end of the cable to the USB port of a computer or a USB power adapter. When it is connected properly, the charging animation will appear on the watch screen.
If there is no animation, make sure the watch is properly connected. When the battery is completely discharged, the animation may appear after several minutes. Before switching on the watch for the first time, it is recommended to charge it for about 2 hours.
The charging voltage should not exceed 5V.
The recommended maximum charging current is 1A.
FIRST START-UP
- When the Nano SIM card is properly installed in the watch and meets all the requirements described above, start the device by pressing and holding the function button(2) for approx. 5 seconds.
![]()
- After starting the watch, the home screen will appear, displaying the time and date. Swiping down on the home screen or menu will display: Wi-Fi signal, GSM signal, internet connection, battery level and quick menu (brightness, volume, settings).
- Wait until the GSM signal (icon –
![]() ) and internet connection (icon –
) and internet connection (icon – ![]() ) appear. They are necessary for the further configuration of the device. If the above mentioned icons do not appear after one minute, make sure that the SIM card meets all the requirements described above and that the watch is in a place where it can connect to the network. You should also turn off (Settings>Turn off) and restart the watch. If the GSM signal appears but internet connection continues to be unavailable (no icon –
) appear. They are necessary for the further configuration of the device. If the above mentioned icons do not appear after one minute, make sure that the SIM card meets all the requirements described above and that the watch is in a place where it can connect to the network. You should also turn off (Settings>Turn off) and restart the watch. If the GSM signal appears but internet connection continues to be unavailable (no icon – ![]() ), the problem may be due to an incorrect APN configuration. You can configure the APN via special configuration text messages, described later in the manual in the TROUBLESHOOTING section.
), the problem may be due to an incorrect APN configuration. You can configure the APN via special configuration text messages, described later in the manual in the TROUBLESHOOTING section. - When the internet connection is active, proceed to the next step, i.e. installing the Garett Tracker app on your phone. The main menu of the smartwatch is described later in the manual. The device will be fully functional after registration and configuration of the watch via the Garett Tracker app.


How do you use the Garett Tracker app?
If you want to learn more about configuring the device via the Garett Tracker app, we recommend checking out this video – scan the QR code or use the link.

https://youtu.be/1VJjvs1raaA
INSTALLING THE GARETT TRACKER APP
The smartwatch works with your smartphone using the Garett Tracker app. Before use, you must first download the app from the Google Play Store or the AppStore and install it on your phone. You can search for the app by entering the name "Garett Tracker" in the store search engine or by scanning the relevant QR code provided below.


Remember to grant the app the required consents and permissions before registration so that it works properly. If you refuse, selected functions of the app may not work properly or will be unavailable.
REGISTERING IN THE APP


- Launch the Garett Tracker app.
- After launching the app, a login screen will be displayed, where you can log in to your account (if already created), register a new account or change the app language.
- To register a new account, click the Registration option.
- In the first field, enter your e-mail address that will serve as your login to the app.
- Then retype the verification code from the image generated on the right.
- In the last field, enter your password which, together with the e-mail address, will be used to log in to the app. The password may consist of 6-12 characters. Polish characters and special characters are not allowed.
- After filling in all the details, click Registration.
Please remember or note down the e-mail address and password used to register the watch, because the account to which the device was first assigned is the administrator account. Re-registration will be possible only after obtaining permission from the administrator or after contacting our Technical Support Department: serwis@garett.pl
- Then press the Add Device button to add the watch to the previously created account.
- On the next screen, scan the QR code using the button
![]() from the sticker on the back of the watch (REG CODE) or in the watch settings. The code can be also entered manually.
from the sticker on the back of the watch (REG CODE) or in the watch settings. The code can be also entered manually. - Enter the device name, and it will be displayed as the name of the device associated with your account.
- The next step is to choose your relationship with the user of the smartwatch.
- Optionally, enter the phone number of the device, which will facilitate communication.
- After filling in all the details, click OK, and the device and Garett Tracker app will be fully functional.
In the event of any problems with registration of the device, please contact our Technical Support Department: serwis@garett.pl
GARETT TRACKER APP
After completing the registration and adding the device, the home screen of the app will be displayed, showing the map with the last watch location. The bubble over the pin specifying the location displays the source of location data (GPS/LBS/WiFi), address, time of the last location and watch battery level.
To ensure the most accurate location, the smartwatch must be in an open area, in order to have an accurate and stable GPS signal. When there is no GPS signal, e.g. because it is inside a building, the location is determined based on the nearest mobile network transmitter. In this case, the indicated position of the device may differ from its physical location.
NOTE:
When using any function of the Garett Tracker app or trying to configure the settings, the following message may appear: "The device is offline". This means that the smartwatch has no active internet connection or is out of Check whether your SIM card is properly installed and meets all the requirements described earlier in the manual. If the SIM card is properly installed and meets the criteria described, the lack of signal may be due to an incorrect APN configuration. The way to get the proper APN configuration is described later in the manual in the TROUBLESHOOTING section.
![]()
![]() - Chat: The ability to send short voice messages (max. 15 seconds), short text messages (max. 30 characters) and photos to the watch
- Chat: The ability to send short voice messages (max. 15 seconds), short text messages (max. 30 characters) and photos to the watch![]() - GEO-fence: This function lets you define the area in which the watch user may move around. The app will inform you when the user crosses the geofence. To define the area, click + and then select any location on the map – this will be the centre of the geofence. Enter the name and radius of the area (max. 2 km).
- GEO-fence: This function lets you define the area in which the watch user may move around. The app will inform you when the user crosses the geofence. To define the area, click + and then select any location on the map – this will be the centre of the geofence. Enter the name and radius of the area (max. 2 km).![]() - Locate: Clicking on this icon refreshes the data on the current location of the watch.
- Locate: Clicking on this icon refreshes the data on the current location of the watch.![]() - History: Displays the route travelled by the user of the watch from the previous days.
- History: Displays the route travelled by the user of the watch from the previous days.![]() - Pop-up menu: The ability to display and configure selected watch functions:
- Pop-up menu: The ability to display and configure selected watch functions:

![]() - Whitelist: Incoming call filtering – it means that only the numbers on the Whitelist and that have been previously saved in the phone book will be able to get through to the watch.
- Whitelist: Incoming call filtering – it means that only the numbers on the Whitelist and that have been previously saved in the phone book will be able to get through to the watch.![]() - Remote camera: Take a photo using the watch camera and send it to the app.
- Remote camera: Take a photo using the watch camera and send it to the app.![]() - Activity: Configuration and display of the activities performed by the watch user, up to several days back.
- Activity: Configuration and display of the activities performed by the watch user, up to several days back.![]() - Video chat: The ability to make video calls between the administrator and the associated watch.
- Video chat: The ability to make video calls between the administrator and the associated watch.
Due to the large amount of data transmitted during a video call, a high-bandwidth internet connection is required. LTE connection is recommended.
In locations with poor mobile network coverage, such as areas outside cities or towns, shopping malls or underground car parks, making video calls may not be possible, or the calls may be of poor quality with interruptions in video transmission.![]() - Device lock The ability to restrict the functionalities of the watch to SOS calls only.
- Device lock The ability to restrict the functionalities of the watch to SOS calls only.![]() - Alarms: View and configure the alarms active on the device (max. 3).
- Alarms: View and configure the alarms active on the device (max. 3).![]() - Notifications: History of recent notifications, e.g. SOS calls, low battery.
- Notifications: History of recent notifications, e.g. SOS calls, low battery.![]() - Rewards: Reward system – each reward is one heart. The total number of rewards is displayed on the home screen of the watch.
- Rewards: Reward system – each reward is one heart. The total number of rewards is displayed on the home screen of the watch.
![]() - Personal details: The ability to display and configure the user details:
- Personal details: The ability to display and configure the user details:

![]() - Profile: Configure the personal details of the account administrator.
- Profile: Configure the personal details of the account administrator.![]() - Device list: The ability to display and add/edit associated devices. By clicking on a device name, you can change its details.
- Device list: The ability to display and add/edit associated devices. By clicking on a device name, you can change its details.
The Switch option allows you to switch the active device, i.e. the one being currently tracked.
To remove a watch from the list, select Edit>Delete.![]() - Change password: Change the password used in the app.
- Change password: Change the password used in the app.![]() - Log out: Log out of the app.
- Log out: Log out of the app.
![]() - Change map view: The ability to change the map style.
- Change map view: The ability to change the map style.![]() - Phone location: Indicates the current location of the phone on which the app is launched.
- Phone location: Indicates the current location of the phone on which the app is launched.![]() - Device location: Indicates on the map the location of all associated devices in the app.
- Device location: Indicates on the map the location of all associated devices in the app.![]() - Switch: Quickly switch between associated devices.
- Switch: Quickly switch between associated devices.![]() Settings: The ability to display and configure the functions:
Settings: The ability to display and configure the functions:
![]() - SOS numbers: Configure SOS numbers (max. 3). Pressing and holding the SOS button on the watch will call the first number. If the call is unsuccessful, the watch will automatically dial the second and then the third number. If the SOS call is answered by the voicemail active on one of the SOS numbers, it will not be redirected to the next number. The SOS function is active only when the watch is within range of the network, has an internet connection, and the account is sufficiently topped up.
- SOS numbers: Configure SOS numbers (max. 3). Pressing and holding the SOS button on the watch will call the first number. If the call is unsuccessful, the watch will automatically dial the second and then the third number. If the SOS call is answered by the voicemail active on one of the SOS numbers, it will not be redirected to the next number. The SOS function is active only when the watch is within range of the network, has an internet connection, and the account is sufficiently topped up.![]() - Voice monitoring: Remote voice monitoring. Enter a phone number to activate the function. The watch will automatically call back the phone number entered within 30 seconds. The watch screen remains unchanged – it is completely discreet.
- Voice monitoring: Remote voice monitoring. Enter a phone number to activate the function. The watch will automatically call back the phone number entered within 30 seconds. The watch screen remains unchanged – it is completely discreet.
![information]() When configuring the functions SOS Numbers –
When configuring the functions SOS Numbers – ![]() and Voice monitor –
and Voice monitor – ![]() , enter the numbers without the country code (if necessary, add 0048 before the number for PL). Using the "+" symbol may prevent calls from being made.
, enter the numbers without the country code (if necessary, add 0048 before the number for PL). Using the "+" symbol may prevent calls from being made.![]() SMS messages: The ability to read text messages sent to the number on the watch.
SMS messages: The ability to read text messages sent to the number on the watch.![]() - Modes of operation: Select the refresh frequency of the watch location:
- Modes of operation: Select the refresh frequency of the watch location: - Tracking mode – refreshes every 1 minute (reduces the running time of the watch),
- Normal mode – refreshes every 10 minutes,
- Battery saving mode – refreshes every 1 hour,
- Sleep mode – manual positioning.
 - Personal details: The ability to display and configure the user details:
![]()
![]() - SMS notifications: Turn on/off and configure text message notifications on the phone number provided.
- SMS notifications: Turn on/off and configure text message notifications on the phone number provided.![]() - Family members: List of administrators who can manage the watch.
- Family members: List of administrators who can manage the watch.![]() Phone book: The ability to add contacts, which will be displayed in the phone book of the watch.
Phone book: The ability to add contacts, which will be displayed in the phone book of the watch.![]() Time zone: Configure the time zone of the watch (PL: East: GMT + 1:00).
Time zone: Configure the time zone of the watch (PL: East: GMT + 1:00).![]() - Language: The ability to change the language of the smartwatch.
- Language: The ability to change the language of the smartwatch.![]() - Management:
- Management: - Numeric keypad: The ability to turn on/off the numeric keypad function on the watch. Turning on this function allows the watch user to dial and make a call to any number (including those not entered in the phone book). If you do not want the watch user to be able to contact numbers not entered in the phone book, turn off this function.
- GPS positioning: The ability to turn on/off the GPS positioning function of the watch.
![]() - LBS: The ability to turn on/off the tracking function of the watch based on the nearest mobile network transmitter, in the event that the watch loses GPS signal.
- LBS: The ability to turn on/off the tracking function of the watch based on the nearest mobile network transmitter, in the event that the watch loses GPS signal.![]() - Watch finder: The ability to search for your watch – this function triggers an audible alarm.
- Watch finder: The ability to search for your watch – this function triggers an audible alarm.
![]()
![]() - Turn off watch: Turn off the watch remotely.
- Turn off watch: Turn off the watch remotely.![]() - Restart watch: Restart the smartwatch.
- Restart watch: Restart the smartwatch.![]() - Restore factory settings: The ability to reset the watch to
- Restore factory settings: The ability to reset the watch to- factory settings.
![]() - Delete account: Send a request to delete the account from the app server. The account should be deleted within one hour.
- Delete account: Send a request to delete the account from the app server. The account should be deleted within one hour.
Log out: Log out of the app.
Depending on the device model, the functions of the Garett Tracker app described above may vary. In the event of any problems, we encourage you to contact our Technical Support Department: serwis@garett.pl
MAIN MENU
![]() Phone: Numeric keypad function. Allows the user to dial any number(including those not entered in the phone book) and make a call. There is the ability to turn off this function via the Garett Tracker app under Management>Numeric keypad.
Phone: Numeric keypad function. Allows the user to dial any number(including those not entered in the phone book) and make a call. There is the ability to turn off this function via the Garett Tracker app under Management>Numeric keypad.![]() - Contacts: Phone book function. View contacts previously saved via the Garett Tracker application. Select a number and press the phone icon to make a call. You can terminate the call by pressing the red phone icon or the function button(2). You can accept incoming calls using the green phone icon, and reject calls using the red phone icon or the function button(2). There is the ability to adjust the volume during a call by clicking the speaker icon.
- Contacts: Phone book function. View contacts previously saved via the Garett Tracker application. Select a number and press the phone icon to make a call. You can terminate the call by pressing the red phone icon or the function button(2). You can accept incoming calls using the green phone icon, and reject calls using the red phone icon or the function button(2). There is the ability to adjust the volume during a call by clicking the speaker icon.![]() - Video call: Video calls function. The ability to make video calls between the administrator and the associated smartwatch, group chat is also available. Select a person and press the green phone icon to make a call. You can terminate the call by pressing the red phone icon or the function button(2). You can accept incoming calls using the green phone icon, and reject calls using the red phone icon or the function button(2). There is the ability to adjust the volume during a call – use the speaker icon.
- Video call: Video calls function. The ability to make video calls between the administrator and the associated smartwatch, group chat is also available. Select a person and press the green phone icon to make a call. You can terminate the call by pressing the red phone icon or the function button(2). You can accept incoming calls using the green phone icon, and reject calls using the red phone icon or the function button(2). There is the ability to adjust the volume during a call – use the speaker icon.
Due to the large amount of data transmitted during a video call, a high-bandwidth internet connection is required. LTE connection is recommended. In locations with poor mobile network coverage, such as areas outside cities or towns, shopping malls or underground car parks, making video calls may not be possible, or the calls may be of poor quality with interruptions in video transmission.![]() - Camera: Camera function. Take photos with the built-in camera on the watch (max. 3). To take a photo, click the camera icon at the bottom of the screen once. The photo will be saved in the device's gallery. There is the ability to send the photo to the administrator of the watch from the Gallery(
- Camera: Camera function. Take photos with the built-in camera on the watch (max. 3). To take a photo, click the camera icon at the bottom of the screen once. The photo will be saved in the device's gallery. There is the ability to send the photo to the administrator of the watch from the Gallery(![]() ) of the smartwatch. It will appear in the Garett Tracker app under Remote Camera.
) of the smartwatch. It will appear in the Garett Tracker app under Remote Camera.![]() - Gallery: The watch's gallery function. Press the photo, then
- Gallery: The watch's gallery function. Press the photo, then ![]() – to send or
– to send or ![]() – to delete the photo.
– to delete the photo.![]() - Chat: Voice/text messaging function. It displays the last voice memo (green field) or the last text message (purple field) sent from the Garett Tracker app to the watch. There is the ability to send voice messages from the smartwatch. To send a memo, press and hold the button at the bottom of the screen while dictating the message (max. 15 seconds). Release the button to send the message to the watch administrator. It will appear in the Garett Tracker app under Chat.
- Chat: Voice/text messaging function. It displays the last voice memo (green field) or the last text message (purple field) sent from the Garett Tracker app to the watch. There is the ability to send voice messages from the smartwatch. To send a memo, press and hold the button at the bottom of the screen while dictating the message (max. 15 seconds). Release the button to send the message to the watch administrator. It will appear in the Garett Tracker app under Chat.![]() - Settings:
- Settings: - Face gallery: The ability to change the watch face,
- Volume: Adjust the volume of the smartwatch,
- Brightness: Adjust the brightness of the display,
- Date and time: Set the date and time,
- Sleep: Configure the screen lock time (from 15 seconds to 1 minute),
- VoLTE: The ability to turn on/off VoLTE technology,
- Language: The ability to change the language of the smartwatch,
- Turn off: Turn off the device,
- Information: Displays the software version.
![]() - QR code: Displays the registration code (REG CODE) and the Garett Tracker app QR code.
- QR code: Displays the registration code (REG CODE) and the Garett Tracker app QR code.![]() - Alarm: The ability to view the alarm previously configured in the app.
- Alarm: The ability to view the alarm previously configured in the app.![]() - Stopwatch: Stopwatch function.
- Stopwatch: Stopwatch function.![]() - Calculator: Simple math calculator function.
- Calculator: Simple math calculator function.![]() - Game: Simple mathematical game.
- Game: Simple mathematical game.
 Phone: Numeric keypad function. Allows the user to dial any number(including those not entered in the phone book) and make a call. There is the ability to turn off this function via the Garett Tracker app under Management>Numeric keypad.
 - Contacts: Phone book function. View contacts previously saved via the Garett Tracker application. Select a number and press the phone icon to make a call. You can terminate the call by pressing the red phone icon or the function button(2). You can accept incoming calls using the green phone icon, and reject calls using the red phone icon or the function button(2). There is the ability to adjust the volume during a call by clicking the speaker icon.
 - Video call: Video calls function. The ability to make video calls between the administrator and the associated smartwatch, group chat is also available. Select a person and press the green phone icon to make a call. You can terminate the call by pressing the red phone icon or the function button(2). You can accept incoming calls using the green phone icon, and reject calls using the red phone icon or the function button(2). There is the ability to adjust the volume during a call – use the speaker icon.
 - Camera: Camera function. Take photos with the built-in camera on the watch (max. 3). To take a photo, click the camera icon at the bottom of the screen once. The photo will be saved in the device's gallery. There is the ability to send the photo to the administrator of the watch from the Gallery(
 - Gallery: The watch's gallery function. Press the photo, then
  - Chat: Voice/text messaging function. It displays the last voice memo (green field) or the last text message (purple field) sent from the Garett Tracker app to the watch. There is the ability to send voice messages from the smartwatch. To send a memo, press and hold the button at the bottom of the screen while dictating the message (max. 15 seconds). Release the button to send the message to the watch administrator. It will appear in the Garett Tracker app under Chat.
 - Settings:
  - QR code: Displays the registration code (REG CODE) and the Garett Tracker app QR code.
 - Alarm: The ability to view the alarm previously configured in the app.
 - Stopwatch: Stopwatch function.
 - Calculator: Simple math calculator function.
 - Game: Simple mathematical game.
Depending on the software version of the device, the functions of the smartwatch described above may vary. In the event of any problems, we encourage you to contact our Technical Support Department: serwis@garett.pl
TROUBLESHOOTING
The device does not turn on
- Connect the device to a wall charger for approx. 2 hours,
- Check whether the charging cable and charger are working,
- Check whether the device is properly connected.
No GSM signal
(icon – ![]() )
)
- Check whether the SIM card format is correct,
- Check whether the SIM card is inserted properly in the slot (as specified at the beginning of the manual),
- Check whether the SIM card meets all the requirements (described at the beginning of the manual).
- Turn the device off and on again,
- Check whether the watch works with another SIM card.
No internet connection
(no icon – ![]() or the following message in the Garett Tracker app: "The device is offline"):
or the following message in the Garett Tracker app: "The device is offline"):
- Check whether the SIM card meets all the requirements (described at the beginning of the manual).
- Enter the APN configuration:
Send a text message from any mobile phone to the number on the watch (the SIM card must be inserted and the watch must be on; the message is case-sensitive):
Content of the first text message: pw, 123456,ts#
After a while, you should receive a response to your phone containing detailed information about the watch, i.e. the software version, ID, IMEI, IP address and other information. For the watch to work properly, the ip_url field must contain: ip_url: 52.28.132.157; port: 8001;
If the ip_url field differs from the example provided, please contact our Technical Support Department: serwis@garett.pl
After receiving the response, send another message – its content depends on the operator of the SIM card in the watch:
Play, T-Mobile, Virgin Mobile: pw, 123456,apn, internet#
Correct response: apn: internet; user:;passwork:;userdata:.
Plus: pw, 123456,apn, plus#
Correct response: apn: plus; user:;passwork:;userdata:.
Orange, NJU Mobile: pw, 123456,apn, internet, internet, internet#
Correct response: apn: internet; user: internet; passwork: internet; userdata:.
After receiving the correct response, send a text message to the number on the watch:
Content of the text message:
pw, 123456,reset#
You will receive a message stating "reset..", and the smartwatch will restart in order to save the settings. After a few minutes, the watch should connect to the internet. If you do not receive responses to any of the messages, change the numbers "123456" to "523681" in the c ontent of the text message and then repeat the entire configuration.
Inaccurate GPS location
- Check whether the watch has a GPS signal (icon –
![]() ),
), - The watch must be in an open area (if the watch loses GPS signal, e.g. because it is inside a building, the location is determined based on the nearest mobile network transmitter).
 ),
),Calling the watch is impossible
(busy signal or user unavailable):
- Check whether the number you are calling from is topped up,
- Check that neither your number nor the number on the watch is blocked or restricted,
- Check whether the Whitelist option is turned on (if your number is not saved in the phone book and the Whitelist is on, the watch will reject the call).
Calling from the watch is impossible
- Check whether the watch has a GSM signal (icon –
![]() ),
), - Check whether the SIM card meets all the requirements (described at the beginning of the manual).
- Check that the numeric keypad function is turned on or that there are contacts saved in the phone book of the watch.
During calls, you cannot hear the other person in the smartwatch speaker:
- Check that the speaker on the watch has not been muted (you can adjust the sound volume in the watch settings).
Short battery life:
- Check that the watch charging time was not too short (the recommended charging time is approx. 2 hours),
- Check the current operating mode on the device (Normal mode or Battery saving mode are the recommended options).
In the event of any problems with using the device, we encourage you to visit the Technical Support section on our website (scan the QR code/use the link) or contact the Technical Support Department: serwis@garett.pl

TECHNICAL SPECIFICATIONS

More information about this device is available at www.garett.pl. Visit our website to see more products and accessories.
WARRANTY/CLAIMS
The product is covered by a 24-month manufacturer's warranty. The warranty does not cover: defects and damage caused by the user or as a result of improper use (misuse), mechanical damage and damage resulting from using accessories and/or consumables other than those provided with the device. When lodging a complaint, fill in the warranty card supplied with the device and send the device accompanied with proof of purchase to the address of the service centre provided on the warranty card.
Contact details are available on the website: www.garett.eu
Manufacturer:
GARETT sp. z o.o.
Targowa 18/1413
25 - 520 Kielce
www.garett.eu
 Proper disposal of the product (waste electric and electronic equipment)
As indicated by the marking on the product or in the related content, the device should not be disposed of with other household waste after the end of its service life. To avoid harm to the environment and human health as a result of uncontrolled waste disposal, please separate the product from other types of waste and recycle responsibly in order to promote reuse of material resources as a regular practice. For information about where and how to recycle this product in a way that is safe for the environment, household users should contact the retail outlet at which they purchased the product, or local authorities. Business users should contact their supplier and check the terms of the purchase agreement. Do not dispose of the product with other commercial waste.


Documents / Resources
References
![www.garett.pl]() Sprzedaż smartwatchy, produktów beauty, gogle VR, zegarek smartwach, GPS dla dzieci, damski, męski - Garett Electronics
Sprzedaż smartwatchy, produktów beauty, gogle VR, zegarek smartwach, GPS dla dzieci, damski, męski - Garett Electronics![www.garett.eu]() Smartwach - Garett Electronics
Smartwach - Garett Electronics![youtu.be]() Film instruktażowy - aplikacja Garett Tracker - YouTube
Film instruktażowy - aplikacja Garett Tracker - YouTube![play.google.com]() Google Play
Google Play![apps.apple.com]() Aplikacja Garett Tracker w App Store
Aplikacja Garett Tracker w App Store![garett.com.pl]() Pomoc techniczna - Garett Electronics
Pomoc techniczna - Garett Electronics
Download manual
Here you can download full pdf version of manual, it may contain additional safety instructions, warranty information, FCC rules, etc.
Advertisement


Need help?
Do you have a question about the Kids Cloud 4G and is the answer not in the manual?
Questions and answers