Advertisement
Quick Links
USER AND SAFETY GUIDE
1 CIRCUIT WI-FI RELAY SWITCH
SHELLY PRO 1
Read before use
This document contains important technical and safety information about the
device, its safety use and installation.
Before beginning the installation, please read this guide and any other
⚠CAUTION!
documents accompanying the device care fully and completely. Failure to follow the
installation procedures could lead to malfunction, danger to your health and life,
violation of the law or refusal of legal and/or commercial guarantee (if any). Allterco
Robotics EOOD is not responsible for any loss or damage in case of incorrect
installation or improper operation of this device due to failure of following the user
and safety instructions in this guide.
Product Introduction
Shelly® is a line of innovative microprocessor-managed devices, which allow remote
control of electric appliances through a
mobile phone, tablet, PC, or home
automation system. Shelly® devices can work standalone in a local Wi-Fi network or
they
can also be operated through cloud home automation services. Shelly®
devices can be accessed, controlled and monitored remotely from any place the
User has Internet connectivity, as long as the devices are connected to a Wi-Fi router
and the Internet. Shelly® devices have integrated web servers, through which the
user may adjust, control and monitor them. The cloud function could be used, if it is
activated through the web server of the device or the settings in the Shelly Cloud
mobile application. The user can register and access Shelly Cloud using either
Android
or
iOS
mobile
application,
or
with any internet browser
at
https://my.shelly.cloud/
Shelly® Devices have two Wi-Fi modes - Access Point (AP)
1
Advertisement

Related Manuals for Shelly PRO 1


Summary of Contents for Shelly PRO 1
- Page 1 The cloud function could be used, if it is activated through the web server of the device or the settings in the Shelly Cloud mobile application. The user can register and access Shelly Cloud using either...
- Page 2 * Can be reconfigured Installation Instructions The Shelly Pro 1 smart relay (the Device) by Allterco Robotics EOOD is intended to be mounted into a standard switchboard on DIN rail, next to the circuit breakers in order to control the electric power through it . Shelly can work as a standalone device or as an accessory to a home automation controller.
- Page 3 Danger of electrocution. Every change in the connections has to be done ⚠CAUTION! after ensuring there is no voltage present at the Device terminals. ⚠CAUTION! Do not connect the Device to appliances exceeding the given max load! ⚠CAUTION! Use the Device only with a power grid and appliances which comply with all applicable regulations.
- Page 4 Cloud service. Instructions on how to connect your device to the Cloud and control it through the Shelly App can be found in the “App Guide” included in the box. You can also familiarize yourself with the instructions for Management and Control through the embedded Web interface at 192.168.33.1 in the Wi-Fi network, created by the...
-
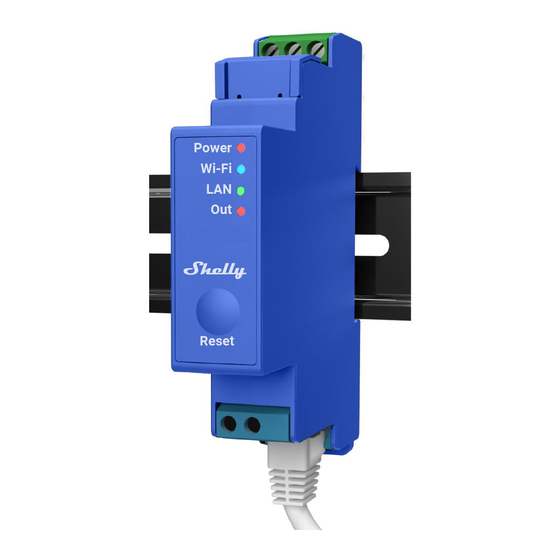
Page 5: Led Indicators
Wi-Fi network. Wi-Fi (yellow): Yellow light indicator will be on if the Device is in STA mode and connected to the local Wi-Fi network. Not con nected to Shelly Cloud or Shelly Cloud disabled. Wi-Fi (green): Green light indicator will be on if the Device is in STA mode and connected to the local Wi-Fi network and to the Shelly Cloud. -
Page 6: Declaration Of Conformity
DECLARATION OF CONFORMITY Hereby, Allterco Robotics EOOD declares that the radio equipment type Shelly Pro 1 is in compliance with Directive 2014/53/ EU, 2014/35/EU, 2014/30/EU, 2011/65/EU. The full text of the EU declaration of conformity is available at the following inter net address https://shelly.cloud/knowledge-base/devices/shelly-pro-1/... - Page 8 (with upcoming add-ons or available sensors on shelly.cloud. Shelly Cloud allows easy control and monitoring using a mobile phone, tablet, or PC. Shelly Pro 1 can be grouped with other devices in the application. It...
- Page 9 Device Inclusion: Step 1 When the installation of Shelly Pro 1 is done and the power is turned on, Shelly will create its own Wi-Fi Access Point (AP). Step 2 Make sure the Location and Local Network for the Shelly Cloud app are enabled in your phone settings.
- Page 10 Next, you will see listed all of the available devices. Choose your Shelly Pro 1 device from the list and click “Yes” when asked for inclusion. A message will pop up asking for your permission to connect to your Shelly Pro 1’s AP address (e.g. ShellyPro1-f008d1d8bd68). Click the “Yes” button.
- Page 11 “Discovered devices” on the home screen of the Shelly Cloud App. click the “Discovered devices” button and find your Shelly device in the list. If you do not see it, try again by clicking the “SCAN” button.
- Page 12 Step 4 You can choose which available device from the list to include. If a newer firmware update is available, the app will first let you update and then add the device. Click the “ADD DEVICE” button to move to the next step of the inclusion process. Step 5 Enter a name for the device in the “device name”...
- Page 13 “No”. Device settings Once your Shelly Pro 1 is added to the Shelly Cloud, you can control it, change its settings, and automate the way it works from any place where you have internet connection.
- Page 14 Upon clicking “Edit device”, you can change the room, name or image of the device. THE EMBEDDED WEB INTERFACE If your Shelly Pro 1 is in AP (Access Point) mode, connect your PC or mobile device to the Wi-Fi network with the name (SSID) such as ShellyPro1-f008d1d8bd68. Enter http://192.168.33.1...
- Page 15 Shelly Pro 1. If you can’t find the Shelly Pro 1 AP, it may already be connected to your home WI-Fi network and its AP mode disabled. Find your Device IP address in the Wi-Fi network. You can use a simple tool to find shelly devices in the local network: https://shelly.cloud/documen ts/device_finders/ ShellyFinderWindows.zip...
- Page 16 • Location: Set your city and time zone. • Device Reboot: Reboot your Shelly Pro 1. • Factory Reset: Remove Shelly Pro 1 from your account and return it to its factory settings. This will delete all set data. • Authentication: Set credentials to lock your device or change already existing credentials.
- Page 17 • Bluetooth: Enables or disables Bluetooth connectivity. • MQTT: Configure the Shelly device to communicate over MQTT. Scripts Shelly Pro devices feature scripting capabilities. Scripts enhance significantly the number of tasks that can be solved using Shelly devices. You can find more at https://shelly-api-docs.shelly.cloud/gen2/ Scripts/ShellyScriptLanguageFeatures/...
Need help?
Do you have a question about the PRO 1 and is the answer not in the manual?
Questions and answers