Advertisement
Quick Links
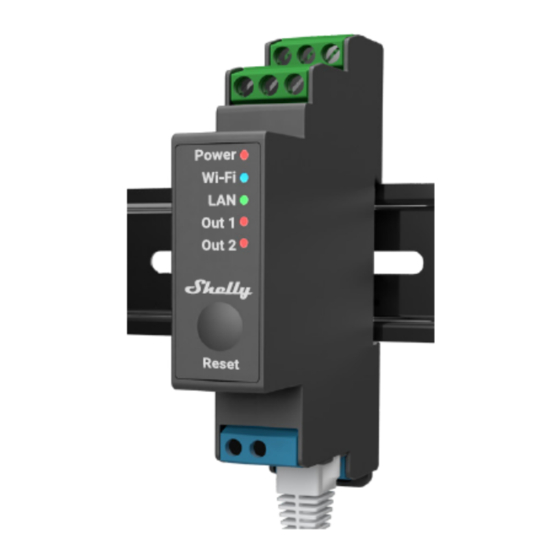
USER AND SAFETY GUIDE
2 CIRCUIT WI-FI RELAY SWITCH SHELLY PRO 2
Read before use
This document contains important technical and safety information about the
device, its safety use and installation.
Before beginning the installation, please read this guide and any other
⚠CAUTION!
documents accompanying the device care fully and completely. Failure to follow the
installation procedures could lead to malfunction, danger to your health and life,
violation of the law or refusal of legal and/or commercial guarantee (if any). Allterco
Robotics EOOD is not responsible for any loss or damage in case of incorrect
installation or improper operation of this device due to failure of following the user
and safety instructions in this guide.
Product Introduction
Shelly® is a line of innovative microprocessor-managed devices, which allow remote
control of electric appliances through a
mobile phone, tablet, PC, or home
automation system. Shelly® devices can work standalone in a local Wi-Fi network or
they
can also be operated through cloud home automation services. Shelly®
devices can be accessed, controlled and monitored remotely from any place the
User has Internet connectivity, as long as the devices are connected to a Wi-Fi router
and the Internet. Shelly® devices have integrated web servers, through which the
1
Advertisement

Related Manuals for Shelly PRO 2


Summary of Contents for Shelly PRO 2
- Page 1 Shelly® is a line of innovative microprocessor-managed devices, which allow remote control of electric appliances through a mobile phone, tablet, PC, or home automation system. Shelly® devices can work standalone in a local Wi-Fi network or they can also be operated through cloud home automation services. Shelly®...
- Page 2 The cloud function could be used, if it is activated through the web server of the device or the settings in the Shelly Cloud mobile application. The user can register and access Shelly Cloud using either...
- Page 3 Installation Instructions The Shelly Pro 2 smart relay (the Device) by Allterco Robotics EOOD is intended to be mounted into a standard switchboard on DIN rail, next to the circuit breakers. Shelly can work as a standalone device or as an accessory to a home automation controller.
- Page 4 For inductive loads, which cause voltage spikes during ⚠RECOMMENDATION switching, such as electrical motors, fans, vacuum cleaners, refrigerators and similar ones, RC snubber (0.1µF/ 100Ω / 1/2W / 600V AC) should be wired in parallel with the load. snubbers purchased shop.shelly.cloud/rc-snubber-wifi-smart-home-automation...
- Page 5 Cloud service. Instructions on how to connect your device to the Cloud and control it through the Shelly App can be found in the “App Guide” included in the box. You can also familiarize yourself with the instructions for Management and Control through the embedded Web interface at 192.168.33.1 in the Wi-Fi network, created by the...
- Page 6 Wi-Fi network. Wi-Fi (yellow): Yellow light indicator will be on if the Device is in STA mode and connected to a local Wi-Fi network. Not connected to Shelly Cloud or Shelly Cloud disabled. Wi-Fi (green): Green light indicator will be on if the Device is in STA mode and connected to a local Wi-Fi network and to the Shelly Cloud.
- Page 9 See details at https://shelly.cloud/compatibility/. Registration The first time you load the Shelly Cloud mobile app, you have to create an account which can manage all your Shelly devices. You need to use an actual e-mail because that e-mail will be used in case of а forgotten password! Forgotten password In case you forget or lose your password, click the “Forgot Password?”...
- Page 10 Shelly Cloud allows easy control and monitoring using a mobile phone, tablet, or a PC. Shelly Pro 2 can be grouped with other devices in the application, as well as be set to trigger actions on other Shelly devices. Setting parameters for lights, controlling blinds, etc., is also supported.
- Page 11 Step 2 Please keep in mind that Shelly devices’ inclusion is different on iOS and Android devices. iOS inclusion - On your iOS device, open the Settings menu > WLAN and connect to the Wi-Fi network created by your Shelly device, i.e.
- Page 12 - From the hamburger menu on the main screen of your Shelly App choose “Add device”. Then choose your home network and type in your password (fig.3). After that, pick the Shelly device you want to include. The name of the device will be similar to: ShellyPro2-F008D1DB58A0 (fig. 4)
- Page 13 Step 3 Approximately 30 sec. after discovering any new devices оn the local Wi-Fi network, а list will be displayed in the “Discovered Devices” room by default. Step 4 Select “Discovered devices” and choose the device you want to include in your account.
- Page 14 To control Shelly devices only through the local network, press “No”. Device settings After your Shelly device is added in the application, you can control it, change its settings, and automate the way it works. To switch the device on and off, use the ON/OFF button.
- Page 15 • Wi-Fi Mode AP: The mode in which the device creates its own Wi-Fi connection point with the respective name (SSID). • Ethernet: Connect the Shelly device to a network using an ethernet cable. This requires a device reboot! Here, you can also set a static IP address.
- Page 16 If you don’t see the AP, please fоllow step 1 from the “Device Inclusion” section of this guide. Step 2 Shelly Pro 2 has created its own Wi-Fi network (AP), with a name (SSID) such as ShellyPro2-F008D1DB58A0. Connect it with your phone, tablet, or PC. Step 3 Type 192.168.33.1 into the address field of your browser to load the web...
- Page 17 ‘invert’ is set to ‘true’. • Channel Name: Set a name for the chosen channel • PIN lock - Restrict control of the Shelly device through the web interface by setting a PIN code. After typing the details in the respective fields, press...
Need help?
Do you have a question about the PRO 2 and is the answer not in the manual?
Questions and answers