
Related Manuals for Nordson RV Series


Summary of Contents for Nordson RV Series
- Page 1 RV Series Automated Dispensing Systems Operating Manual ™ Electronic pdf files of Nordson EFD manuals are also available at www.nordsonefd.com...
- Page 2 Thank You! You have just purchased the world’s finest precision dispensing equipment. I want you to know that all of us at Nordson EFD value your business and will do everything in our power to make you a satisfied customer.
-
Page 3: Table Of Contents
Camera Screen, Tab Bar, and Icons .........................37 Camera Properties Window ............................38 Template Match and Area Windows..........................39 Camera Setup Screen ...............................40 Keypad ..................................40 Continued on next page www.nordsonefd.com info@nordsonefd.com +1-401-431-7000 Sales and service of Nordson EFD dispensing systems are available worldwide. - Page 4 Pre-Configured Output Cables ..........................91 Fixture Plates ................................92 Start / Stop Box .................................92 Tip Detection Kits ..............................92 OptiSure Software Key ..............................93 Mounting Brackets ..............................93 Continued on next page www.nordsonefd.com info@nordsonefd.com +1-401-431-7000 Sales and service of Nordson EFD dispensing systems are available worldwide.
-
Page 5: Introduction
They are specifically designed and configured for use with Nordson EFD industrial syringe barrel and valve systems. Automated dispensing systems offer the flexibility of working either as a stand-alone system or as a key part of an automated solution and are easily integrated into in- line transfer systems, rotary tables, and pallet assembly lines. -
Page 6: Nordson Efd Product Safety Statement
Hot surfaces! Avoid contact with the hot metal surfaces of heated components. If contact can not be avoided, wear heat-protective gloves and clothing when working around heated equipment. Failure to avoid contact with hot metal surfaces can result in personal injury. www.nordsonefd.com info@nordsonefd.com +1-401-431-7000 Sales and service of Nordson EFD dispensing systems are available worldwide. -
Page 7: Halogenated Hydrocarbon Solvent Hazards
Qualified personnel are those employees or contractors who are trained to safely perform their assigned tasks. They are familiar with all relevant safety rules and regulations and are physically capable of performing their assigned tasks. www.nordsonefd.com info@nordsonefd.com +1-401-431-7000 Sales and service of Nordson EFD dispensing systems are available worldwide. -
Page 8: Intended Use
Make sure all equipment is rated and approved for the environment in which it is used. Any approvals obtained for Nordson EFD equipment will be voided if instructions for installation, operation, and service are not followed. If the equipment is used in a manner not specified by Nordson EFD, the protection provided by the equipment may be impaired. -
Page 9: Fire Safety
• Test: Verify the operation of features and the performance of equipment using the appropriate sections of this manual. Return faulty or defective units to Nordson EFD for replacement. • Use only replacement parts that are designed for use with the original equipment. Contact your Nordson EFD representative for information and advice. -
Page 10: Important Disposable Component Safety Information
Disconnect and lock out system electrical power. If using hydraulic and pneumatic shutoff valves, close and relieve pressure. For Nordson EFD air-powered dispensers, remove the syringe barrel from the adapter assembly. For Nordson EFD electro-mechanical dispensers, slowly unscrew the barrel retainer and remove the barrel from the actuator. -
Page 11: Equipment-Specific Safety Information
Nordson EFD Product Safety Statement (continued) Equipment-Specific Safety Information The following safety information is specific to Nordson EFD automated dispensing systems. European Community To meet the requirements of the European Community (CE) safety directives, the robot must be placed in an enclosure. -
Page 12: Specifications
Included software Tip detection / Optional Optional Optional alignment system Approvals CE, RoHS, WEEE, China RoHS *Repeatability results may vary depending on the method of measurement. www.nordsonefd.com info@nordsonefd.com +1-401-431-7000 Sales and service of Nordson EFD dispensing systems are available worldwide. - Page 13 WEEE Directive This equipment is regulated by the European Union under WEEE Directive (2012/19/EU). Refer to www.nordsonefd.com/WEEE for information about how to properly dispose of this equipment. www.nordsonefd.com info@nordsonefd.com +1-401-431-7000 Sales and service of Nordson EFD dispensing systems are available worldwide.
-
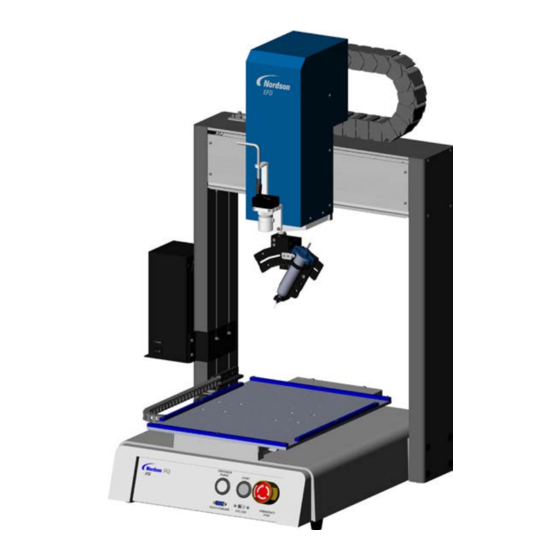
Page 14: Operating Features
(fixed-mount Z axis camera shown) DispenseMotion controller Tip detector (optional) R axis Monitor and keyboard (mouse R Series not shown) accessory bracket Robot Fixture plate (optional) www.nordsonefd.com info@nordsonefd.com +1-401-431-7000 Sales and service of Nordson EFD dispensing systems are available worldwide. -
Page 15: Rv Front Panel
/ output (for dispenser / Switch device, if present) connections) controller initiation) RS232-1 port Ext. Control port Power Inlet (for the I/O safety plug) www.nordsonefd.com info@nordsonefd.com +1-401-431-7000 Sales and service of Nordson EFD dispensing systems are available worldwide. -
Page 16: Camera
Your system includes a smart-vision CCD camera, allowing you to view the work surface or fixture plate and to obtain a very sharp focus. Two types of CCD camera are used with RV Series systems: fixed-mount and rotating- mount (R-mount). A fixed-mount camera is stationary. An R-mount camera is installed on the R axis, so it moves and rotates with the R axis. -
Page 17: Installation
Remove the protective foam covers and tape. Double-check the shipping box to ensure you have removed everything. www.nordsonefd.com info@nordsonefd.com +1-401-431-7000 Sales and service of Nordson EFD dispensing systems are available worldwide. -
Page 18: Position The Robot And Install And Connect Components
‡ Install the tip detector or tip aligner. aligner (optional) ‡ Connect the cable to the Tactile port on the back of the robot. Continued on next page www.nordsonefd.com info@nordsonefd.com +1-401-431-7000 Sales and service of Nordson EFD dispensing systems are available worldwide. - Page 19 ‡ Refer to the dispensing equipment manuals for all other dispensing system installation steps. www.nordsonefd.com info@nordsonefd.com +1-401-431-7000 Sales and service of Nordson EFD dispensing systems are available worldwide.
-
Page 20: Prepare The Work Surface Or Fixture Plate
There are several ways to use the system inputs / outputs. Refer to “Setting Up Inputs / Outputs” on page 58 for additional information on inputs / outputs. www.nordsonefd.com info@nordsonefd.com +1-401-431-7000 Sales and service of Nordson EFD dispensing systems are available worldwide. -
Page 21: Power On The System
Refer to the following sections to set up the system and to create programs for your applications: • “Concepts” on page 22 • “Overview of the DispenseMotion Software” on page 25 • “Setup” on page 41 • “Programming” on page 62 www.nordsonefd.com info@nordsonefd.com +1-401-431-7000 Sales and service of Nordson EFD dispensing systems are available worldwide. -
Page 22: Concepts
Several examples are provided below. Setup commands dictate how dispense commands will be executed. Nordson EFD recommends inserting setup commands at the beginning of a program. The following setup commands are the most commonly used: Backtrack Setup, Dispense Dot Setup, Dispense End Setup, Line Dispense Setup, Line Speed, and Z Clearance Setup. -
Page 23: About Offsets
(Z clearance) (Z clearance) Illustration of camera-to-tip offset (also referred to as XY offset) and tip-to-workpiece offset (also referred to as tip height or Z clearance) www.nordsonefd.com info@nordsonefd.com +1-401-431-7000 Sales and service of Nordson EFD dispensing systems are available worldwide. -
Page 24: About Marks
Secondary View screen (refer to “Secondary View Screen” on page 30 for more information). These marks are stored as files on the DispenseMotion controller under D:\ever_sr\mark. Location of mark image files on the DispenseMotion controller www.nordsonefd.com info@nordsonefd.com +1-401-431-7000 Sales and service of Nordson EFD dispensing systems are available worldwide. -
Page 25: Overview Of The Dispensemotion Software
Screen, Tab Bar, Setup Screen” on Screen and Tab Bar” on Dispense Command and Jogging and Icons” on page 36. page 27. Icons” on page 33. Window” on page 37. page 34. www.nordsonefd.com info@nordsonefd.com +1-401-431-7000 Sales and service of Nordson EFD dispensing systems are available worldwide. -
Page 26: Command Windows
Command window: Enter parameters for the command in this window. Refer to “Appendix A, Command Function Reference” on page 98 for detailed information on all commands. www.nordsonefd.com info@nordsonefd.com +1-401-431-7000 Sales and service of Nordson EFD dispensing systems are available worldwide. -
Page 27: Primary View Screen And Tab Bar
Pauses the program that is currently running. When you click on Pause, Pause or the button changes to Continue. Continue Click Continue to stop the pause. www.nordsonefd.com info@nordsonefd.com +1-401-431-7000 Sales and service of Nordson EFD dispensing systems are available worldwide. -
Page 28: Primary View Screen Right-Click Functions
How to Reflect (Mirror) a Pattern 1. Select the lines to reflect, right-click to select REFLECT X or Y 2. The system mirrors the selected pattern www.nordsonefd.com info@nordsonefd.com +1-401-431-7000 Sales and service of Nordson EFD dispensing systems are available worldwide. - Page 29 1. Select the command to rotate, then right-click and select ROTATE POINT 2. Enter the desired degrees of rotation 3. The system rotates the selected command www.nordsonefd.com info@nordsonefd.com +1-401-431-7000 Sales and service of Nordson EFD dispensing systems are available worldwide.
-
Page 30: Secondary View Screen
Mark Library: Stores up to 240 mark files. System Path view and keypad: The keypad is used to enter Setup numeric values. Refer to “Keypad” on page 40. www.nordsonefd.com info@nordsonefd.com +1-401-431-7000 Sales and service of Nordson EFD dispensing systems are available worldwide. -
Page 31: Secondary View Screen In Path View
• Offset Length (mm) enlarges the pattern relative to the original pattern. Fill Closed Area Fills an area of the pattern. • Brush Width (mm): The distance between each fill area spiral. www.nordsonefd.com info@nordsonefd.com +1-401-431-7000 Sales and service of Nordson EFD dispensing systems are available worldwide. -
Page 32: Horizontal And Vertical Toolbar Icons
Path Switches the Secondary view Pico Touch Opens the Pico Touch Remote screen from the Camera view Control window to the Grid view (Path mode) www.nordsonefd.com info@nordsonefd.com +1-401-431-7000 Sales and service of Nordson EFD dispensing systems are available worldwide. -
Page 33: Setup And Dispense Command Icons
Sets up Step & Repeat X Goto Label Skips to the specified Label in a Repeat X parameters program Step & Sets up Step & Repeat Y Repeat Y parameters www.nordsonefd.com info@nordsonefd.com +1-401-431-7000 Sales and service of Nordson EFD dispensing systems are available worldwide. -
Page 34: Navigation And Jogging Window
Coordinates are displayed the time resets to 0:0:0. When next to the button. you select Run, the stopwatch starts counting and then stops counting when the program finishes. www.nordsonefd.com info@nordsonefd.com +1-401-431-7000 Sales and service of Nordson EFD dispensing systems are available worldwide. - Page 35 - Z Fixed: When selected, locks out the Z axis so only X and Y coordinates can be entered. • Click MOVE. The tip moves to the specified location. • Close the window. www.nordsonefd.com info@nordsonefd.com +1-401-431-7000 Sales and service of Nordson EFD dispensing systems are available worldwide.
-
Page 36: System Setup Screen
Auto Purge Refer to “How to Set Up Auto Purge, Program Cycle Limits, Run Limit or Fluid Working Life Limits” on Fluid Working page 84. Life www.nordsonefd.com info@nordsonefd.com +1-401-431-7000 Sales and service of Nordson EFD dispensing systems are available worldwide. -
Page 37: Camera Screen, Tab Bar, And Icons
Z axis to the focus position Properties Window” on established during Robot page 38 for details. Initial Setup (Step 5 or 6), or as defined in the camera setup window (under Offset) www.nordsonefd.com info@nordsonefd.com +1-401-431-7000 Sales and service of Nordson EFD dispensing systems are available worldwide. -
Page 38: Camera Properties Window
Shutter) locks that property so that it cannot be edited using the slider. However, these settings can be adjusted by the system when you click the AUTO button regardless of whether they are locked. www.nordsonefd.com info@nordsonefd.com +1-401-431-7000 Sales and service of Nordson EFD dispensing systems are available worldwide. -
Page 39: Template Match And Area Windows
The image above Erosion shows how much white is filtered from the image. Tolerance Sets the tolerance for how similar other mark images can be to the selected image, allowing the system to eliminate similar marks. www.nordsonefd.com info@nordsonefd.com +1-401-431-7000 Sales and service of Nordson EFD dispensing systems are available worldwide. -
Page 40: Camera Setup Screen
Regardless of how numbers are entered, you must select Enter (on the keypad or the keyboard) for the system to accept the input. www.nordsonefd.com info@nordsonefd.com +1-401-431-7000 Sales and service of Nordson EFD dispensing systems are available worldwide. -
Page 41: Continued On Next Page
The robot automatically adjusts its speed depending on the complexity of the pattern. Forcing the robot to run at higher speeds can compromise accuracy and may disrupt system operation. Continued on next page www.nordsonefd.com info@nordsonefd.com +1-401-431-7000 Sales and service of Nordson EFD dispensing systems are available worldwide. - Page 42 Robot Initial Setup wizard. Refer to “Appendix B, Non-Wizard Setup Procedures” on page 124. Version Shows the current version of the software. Continued on next page www.nordsonefd.com info@nordsonefd.com +1-401-431-7000 Sales and service of Nordson EFD dispensing systems are available worldwide.
- Page 43 NOTE: The fiducial mark must still fit within the camera’s field of view, which means there is a limit to how much stretching or shrinking the system can accommodate. Continued on next page www.nordsonefd.com info@nordsonefd.com +1-401-431-7000 Sales and service of Nordson EFD dispensing systems are available worldwide.
-
Page 44: Setting Password Protection
NOTES: • The default is no password protection. • If the password is forgotten, contact your Nordson EFD representative for assistance. • A password is limited to 16 numbers or characters. Click Step •... -
Page 45: Setting Up And Calibrating The System (Required)
• If you made changes, close and reopen the DispenseMotion software for the changes to take effect. • Continue to “Setting the Optional Tip Aligner Selection” on page 46. www.nordsonefd.com info@nordsonefd.com +1-401-431-7000 Sales and service of Nordson EFD dispensing systems are available worldwide. -
Page 46: Setting The Optional Tip Aligner Selection
• Click OK to save the setting. The system automatically exits the software to allow the change to take effect. • Continue to “Verifying the 4-Axis Selection” on page 47. www.nordsonefd.com info@nordsonefd.com +1-401-431-7000 Sales and service of Nordson EFD dispensing systems are available worldwide. -
Page 47: Verifying The 4-Axis Selection
The system automatically exits the software to allow the change to take effect. • Continue to “Setting Up the System Using the Robot Initial Setup Wizard” on page 48. www.nordsonefd.com info@nordsonefd.com +1-401-431-7000 Sales and service of Nordson EFD dispensing systems are available worldwide. -
Page 48: Setting Up The System Using The Robot Initial Setup Wizard
• Continue to “Robot Initial Setup (Step 1 Tab): Setting Up Tip Detection and Tool Centering Calibration” on page 49. www.nordsonefd.com info@nordsonefd.com +1-401-431-7000 Sales and service of Nordson EFD dispensing systems are available worldwide. - Page 49 NOTE: If your system does not include the tip detector/aligner, steps 1–2 are disabled. Sensor on the Crosshairs on optional tip the optional tip detector aligner Continued on next page www.nordsonefd.com info@nordsonefd.com +1-401-431-7000 Sales and service of Nordson EFD dispensing systems are available worldwide.
- Page 50 • Click ROTATE next to step 3. The tip rotates 180°. • Jog the tip to the same calibration point used in step 3. • Click SET. > Continued on next page www.nordsonefd.com info@nordsonefd.com +1-401-431-7000 Sales and service of Nordson EFD dispensing systems are available worldwide.
- Page 51 Moves the tip to the test deposit location. to A CCD to A Centers the camera over the test deposit location. Reset the Resets the tool centering calibration calculation. 4 Axis www.nordsonefd.com info@nordsonefd.com +1-401-431-7000 Sales and service of Nordson EFD dispensing systems are available worldwide.
- Page 52 The camera should center its crosshairs over the test dot dispensed in step 5. • Click NEXT. • Continue to “Robot Initial Setup (Step 3 Tab): Setting a Mark” on page 53. www.nordsonefd.com info@nordsonefd.com +1-401-431-7000 Sales and service of Nordson EFD dispensing systems are available worldwide.
- Page 53 A lower value results in less precise matching. • Click NEXT. • Continue to “Robot Initial Setup (Step 4 Tab): Setting the Camera Scale” on page 54. www.nordsonefd.com info@nordsonefd.com +1-401-431-7000 Sales and service of Nordson EFD dispensing systems are available worldwide.
- Page 54 The camera scale is now set. • Click NEXT. • Continue to “Robot Initial Setup (Step 5 Tab): Setting the Tip-to-Workpiece Offset” on page 55. www.nordsonefd.com info@nordsonefd.com +1-401-431-7000 Sales and service of Nordson EFD dispensing systems are available worldwide.
- Page 55 The tip moves to the correct focus height. • Click NEXT. • Continue to “Robot Initial Setup (Step 6 Tab): Testing the System Setup and Calibration” on page 56. www.nordsonefd.com info@nordsonefd.com +1-401-431-7000 Sales and service of Nordson EFD dispensing systems are available worldwide.
- Page 56 Needle Z Detect selection. • Click SAVE. > • Click FINISH. The system is now properly set up and calibrated. Refer to “Programming” on page 62 to create programs. www.nordsonefd.com info@nordsonefd.com +1-401-431-7000 Sales and service of Nordson EFD dispensing systems are available worldwide.
-
Page 57: How The System Responds To Needle Z Detect Or Needle Xy Adjust
Reference Image • Click SYSTEM SETUP > OPEN > EXPERT. > > • Enter 11111111, then click OK. 11111111 > • Click CONTROL. Continued on next page www.nordsonefd.com info@nordsonefd.com +1-401-431-7000 Sales and service of Nordson EFD dispensing systems are available worldwide. -
Page 58: Setting Up Inputs / Outputs
The IO Pin Function feature provides a set of user-configurable conditions that affect the operation of the robot. Refer to “Appendix F, I/O Pin Function Setup” on page 142. www.nordsonefd.com info@nordsonefd.com +1-401-431-7000 Sales and service of Nordson EFD dispensing systems are available worldwide. -
Page 59: Setting How The System Finds Marks (Optional)
(set under Range). If Search Detail is checked, the camera overrides the range settings and performs a full-screen search for the mark. This increases the chances of finding the mark, but is slower. www.nordsonefd.com info@nordsonefd.com +1-401-431-7000 Sales and service of Nordson EFD dispensing systems are available worldwide. -
Page 60: Sharing Offset Values Across Multiple Programs
Save or Save As. The system automatically opens the D:\auto directory. NOTE: When Offset All Program is disabled, the system automatically returns to saving programs in the default D:\save directory. www.nordsonefd.com info@nordsonefd.com +1-401-431-7000 Sales and service of Nordson EFD dispensing systems are available worldwide. -
Page 61: Setting The Units Of Measure
Restoring the System to the Factory Default Settings To restore all settings to their factory default values, open and then close the following file located on the D:\ drive: D:\ever_sr\Initial Setup. www.nordsonefd.com info@nordsonefd.com +1-401-431-7000 Sales and service of Nordson EFD dispensing systems are available worldwide. -
Page 62: Programming
Create and Run a Program” on page 65 for an example of how to use the dispensing software to create a complete program. If you have difficulty creating a program for your application, contact your Nordson EFD representative. Before using this section: •... -
Page 63: Setting The Tip Rotation Angle In The Tip Mode
In addition, the values in column 4 of the command address lines show the tip rotation angle. Refer to “DispenseMotion Screen Elements Used to Show Tip Rotation” on page 62 for an illustration. www.nordsonefd.com info@nordsonefd.com +1-401-431-7000 Sales and service of Nordson EFD dispensing systems are available worldwide. -
Page 64: Setting The Tip Rotation Angle In The Ccd Mode
In addition, the values in column 4 of the command address lines show the tip rotation angle. Refer to “DispenseMotion Screen Elements Used to Show Tip Rotation” on page 62 for an illustration. www.nordsonefd.com info@nordsonefd.com +1-401-431-7000 Sales and service of Nordson EFD dispensing systems are available worldwide. -
Page 65: How To Create And Run A Program
• Click A NEW FILE. • Click SAVE. If the file is not already named, enter a name for the file. > • Click YES/OK when prompted for confirmations. www.nordsonefd.com info@nordsonefd.com +1-401-431-7000 Sales and service of Nordson EFD dispensing systems are available worldwide. -
Page 66: How To Add Comments To A Program
• Enter your comment in the Enter Comment > window. • Click OK to save. > • To delete a comment, select the comment and then click DELETE. > www.nordsonefd.com info@nordsonefd.com +1-401-431-7000 Sales and service of Nordson EFD dispensing systems are available worldwide. -
Page 67: How To Lock Or Unlock A Program
• To measure the diameter of a circle, click the MEASURE CIRCLE DIAMETER icon. • To remove the measuring tool, right click the center of Measure Length or Measure Circle and then click DELETE. www.nordsonefd.com info@nordsonefd.com +1-401-431-7000 Sales and service of Nordson EFD dispensing systems are available worldwide. -
Page 68: How To Create Patterns
DispenseMotion software. Dispense Dot Sample Program Lines and Arcs Sample Program Line Start Line Passing point point Arc Point Line End Line Passing point point www.nordsonefd.com info@nordsonefd.com +1-401-431-7000 Sales and service of Nordson EFD dispensing systems are available worldwide. -
Page 69: Circle Sample Program
A selection of pre-programmed sets of commands are available when you click the Example icon. You can use these programs as a starting point for any program. www.nordsonefd.com info@nordsonefd.com +1-401-431-7000 Sales and service of Nordson EFD dispensing systems are available worldwide. -
Page 70: How To Dispense On Multiple Workpieces In An Array
• Click END PROGRAM to end the program. • Test the program and make adjustments until the program runs correctly. www.nordsonefd.com info@nordsonefd.com +1-401-431-7000 Sales and service of Nordson EFD dispensing systems are available worldwide. -
Page 71: How To Disable Dispensing For Specific Workpieces In An Array
Entity Cancel Cancels any selections Select Toggle Toggles a selected block between Select enabled and disabled. Run Block Runs the currently selected and Select enabled blocks. www.nordsonefd.com info@nordsonefd.com +1-401-431-7000 Sales and service of Nordson EFD dispensing systems are available worldwide. -
Page 72: How To Create A Mark
• Click CENTER to center the red cross mark on the target. Continued on next page www.nordsonefd.com info@nordsonefd.com +1-401-431-7000 Sales and service of Nordson EFD dispensing systems are available worldwide. -
Page 73: How To Improve The Accuracy Of Mark Searches
• Refer to “Template Match and Area Windows” on page 39 to use the Area window to fine-tune how the camera searches for and evaluates the image against other similar areas on the workpiece. www.nordsonefd.com info@nordsonefd.com +1-401-431-7000 Sales and service of Nordson EFD dispensing systems are available worldwide. -
Page 74: How To Use Marks Or Fiducial Marks In A Program
• If the program includes a Step & Repeat command, use the Mark Adjust or Fiducial Mark Adjust commands. • Refer to the sample program below as a guideline. www.nordsonefd.com info@nordsonefd.com +1-401-431-7000 Sales and service of Nordson EFD dispensing systems are available worldwide. -
Page 75: How To Use Marks To Dispense Onto A Plain Workpiece
• Setting up the search range for each mark. • Correctly using the Find Mark and Edge Adjust commands in the dispense program. Horizontal marks 1 and 2 Vertical marks 3 and 4 www.nordsonefd.com info@nordsonefd.com +1-401-431-7000 Sales and service of Nordson EFD dispensing systems are available worldwide. - Page 76 Width specified previously (20 in this example). • Click OK. • Click RANGE again to save. > > • Click CENTER. Continued on next page www.nordsonefd.com info@nordsonefd.com +1-401-431-7000 Sales and service of Nordson EFD dispensing systems are available worldwide.
- Page 77 • Insert an Edge Adjust command after the Find Mark commands. Refer to the sample program provided below as a guideline. Example program using Edge Adjust and four Find Mark commands www.nordsonefd.com info@nordsonefd.com +1-401-431-7000 Sales and service of Nordson EFD dispensing systems are available worldwide.
-
Page 78: How To Use Mark Follow To Dispense Along A Curved Line
Width and Height (20 and 60 in this example). • Click OK to save the values. > Continued on next page www.nordsonefd.com info@nordsonefd.com +1-401-431-7000 Sales and service of Nordson EFD dispensing systems are available worldwide. - Page 79 Find Mark, Mark Follow, and Mark Follow Adjust commands” on page 83 for the complete example program. NOTE: The Camera Trigger command can be used if needed. Continued on next page www.nordsonefd.com info@nordsonefd.com +1-401-431-7000 Sales and service of Nordson EFD dispensing systems are available worldwide.
- Page 80 Line Passing command. > • Enter the same coordinates used in the Find Mark command (line 4 in this example). Continued on next page www.nordsonefd.com info@nordsonefd.com +1-401-431-7000 Sales and service of Nordson EFD dispensing systems are available worldwide.
- Page 81 • After the last Line Passing command (line 51 in this example), insert another MARK FOLLOW command. > • Enter 0 to set the command to OFF. Continued on next page www.nordsonefd.com info@nordsonefd.com +1-401-431-7000 Sales and service of Nordson EFD dispensing systems are available worldwide.
- Page 82 Y values set to 0. - If you are testing this example using a slight curve, you might need to recreate it using a deeper curve. www.nordsonefd.com info@nordsonefd.com +1-401-431-7000 Sales and service of Nordson EFD dispensing systems are available worldwide.
- Page 83 To Use Mark Follow and / or Mark Follow Adjust in a Program (continued) Example program using Find Mark, Mark Follow, and Mark Follow Adjust commands www.nordsonefd.com info@nordsonefd.com +1-401-431-7000 Sales and service of Nordson EFD dispensing systems are available worldwide.
-
Page 84: How To Set Up Auto Purge, Program Cycle Limits, Or Fluid Working Life Limits
• Lock the program (refer to “How to Lock or Unlock a Program” on page 67). • To restart a program cycle after Run Limit or Fluid Working Life values are exceeded, repeat steps1–2, enter the password, and click RESET. www.nordsonefd.com info@nordsonefd.com +1-401-431-7000 Sales and service of Nordson EFD dispensing systems are available worldwide. -
Page 85: How To Use Point Offset To Adjust All Points In A Program
5, so you enter “5” in the X, Y, and Z fields in the Offset window. NOTE: “Unit: mm” indicates the unit of measure used in commands. This item is not editable. • Click OK. www.nordsonefd.com info@nordsonefd.com +1-401-431-7000 Sales and service of Nordson EFD dispensing systems are available worldwide. -
Page 86: How To Adjust Pico Parameters Using Dispensemotion
- The first time you save, the system prompts for a file name. PICO files are saved on the DispenseMotion controller as *.pico files under D:\Save\PICO. You can use any allowable file name, but Nordson EFD recommends using a numeric name to make it easier to enter the file name in a PicoTouch Parameter Update command. - Page 87 • To use the PICO Toµch settings in a program, continue to “To Use the PicoTouch Parameter Update Command in a Program” on page 88. PICO Toµch Controller settings editable through the DispenseMotion software www.nordsonefd.com info@nordsonefd.com +1-401-431-7000 Sales and service of Nordson EFD dispensing systems are available worldwide.
- Page 88 Toµch Controller screen updates as well. Note that delays can occur when switching programs, for both the running program and the update of the Toµch Controller screen. www.nordsonefd.com info@nordsonefd.com +1-401-431-7000 Sales and service of Nordson EFD dispensing systems are available worldwide.
-
Page 89: Operation
Press the START button on the front of the robot, or click RUN on the monitor. The system jogs to the predefined location where a QR code is located, scans the QR code, opens the associated program, and executes the program. www.nordsonefd.com info@nordsonefd.com +1-401-431-7000 Sales and service of Nordson EFD dispensing systems are available worldwide. -
Page 90: Pausing During A Dispense Cycle
7727235 (keyboard and 7727235 (keyboard and mouse) mouse) mouse) *Order all part numbers listed. Vision kit includes camera, PC, and monitor. **Complies with European safety regulations. www.nordsonefd.com info@nordsonefd.com +1-401-431-7000 Sales and service of Nordson EFD dispensing systems are available worldwide. -
Page 91: Accessories
RobotMaintenanceGuide. Safety Enclosures Nordson EFD guarded safety enclosures integrate seamlessly with our complete line of automated dispensing systems. Featuring external dispensing controls, a safety light curtain, and an internal electrical control box and wireways for faster, safer setup, these CE-compliant enclosures also fully comply with EU Machinery Directive 2006/42/EC. -
Page 92: Fixture Plates
This kit allows you to mount the tip detector in the center of the robot 7363940 fixture plate, either on top of the plate or under the plate, to facilitate multi-needle or other applications. www.nordsonefd.com info@nordsonefd.com +1-401-431-7000 Sales and service of Nordson EFD dispensing systems are available worldwide. -
Page 93: Optisure Software Key
Accessories (continued) OptiSure Software Key Nordson EFD’s OptiSure Automated Optical Inspection (AOI) software is available within the current DispenseMotion software as an optional add-on. The AOI feature inspects fluid deposit widths and diameters with exceptional certainty and determines if dispense requirements have been met. The OptiSure feature also includes advanced functions for augmenting mark images to make them easier for the system find. -
Page 94: Technical Data
Use these dimensions to drill mounting holes for the robot feet. 4 x M5 tapped holes Dimension 400 mm 500 mm 500 mm (15.75") (19.69") (19.69") 410 mm 510 mm 510 mm (16.14") (20.08") (20.08") www.nordsonefd.com info@nordsonefd.com +1-401-431-7000 Sales and service of Nordson EFD dispensing systems are available worldwide. -
Page 95: Wiring Diagrams
• The optional start / stop box accessory facilitates input / output connections to this port. Refer to “Start / Stop Box” on page 92 for part numbers. Description Ground Start signal Motor power Motion idle Run / Teach Emergency stop Emergency stop www.nordsonefd.com info@nordsonefd.com +1-401-431-7000 Sales and service of Nordson EFD dispensing systems are available worldwide. -
Page 96: I/O Port
Output 3 +24 VDC Input 8 Output 4 Not connected Output 5 +24V +24V Pin 25 Input X Output X Pin 13 Input schematic Output schematic www.nordsonefd.com info@nordsonefd.com +1-401-431-7000 Sales and service of Nordson EFD dispensing systems are available worldwide. -
Page 97: Example Input / Output Connections
Start and Emergency Stop (ESTOP) Connections to Ext. Control Ext. Control port Pin 2 Start signal Pin 1 Ground Ext. Control port Pin 6 Emergency ESTOP stop Pin 7 Emergency stop www.nordsonefd.com info@nordsonefd.com +1-401-431-7000 Sales and service of Nordson EFD dispensing systems are available worldwide. -
Page 98: Appendix A, Command Function Reference
Backtrack Length and Backtrack Gap. 4 (Square Forward) The dispensing tip moves up and then forward for the distance and height entered for Backtrack Length and Backtrack Gap. www.nordsonefd.com info@nordsonefd.com +1-401-431-7000 Sales and service of Nordson EFD dispensing systems are available worldwide. - Page 99 Length 2 (Square Back) Backtrack Gap Backtrack Length 3 (Forward) Backtrack Gap Backtrack Length 4 (Square Forward) Backtrack Gap Backtrack Length Example illustrations of Backtrack Setup www.nordsonefd.com info@nordsonefd.com +1-401-431-7000 Sales and service of Nordson EFD dispensing systems are available worldwide.
- Page 100 End Pattern command. drop-down menu Example of a program that includes a Call Pattern command www.nordsonefd.com info@nordsonefd.com +1-401-431-7000 Sales and service of Nordson EFD dispensing systems are available worldwide.
- Page 101 To dispense in a counterclockwise direction, enter a negative value. NOTE: You can enter a value greater than 360. For example, if you enter 720, the Z axis head will loop twice. www.nordsonefd.com info@nordsonefd.com +1-401-431-7000 Sales and service of Nordson EFD dispensing systems are available worldwide.
- Page 102 NOTE: You can enter a value greater than 360. For example, if you enter 720, the Z axis head will loop twice. Dispense Dot Click Function Registers the current XYZR location as a Dispense Dot point. www.nordsonefd.com info@nordsonefd.com +1-401-431-7000 Sales and service of Nordson EFD dispensing systems are available worldwide.
- Page 103 The distance (in mm) the tip raises after dispensing. Retract High Speed to Z Clearance height Z Clearance Retract Distance at Retract Low Speed Example illustration of Dispense End Setup www.nordsonefd.com info@nordsonefd.com +1-401-431-7000 Sales and service of Nordson EFD dispensing systems are available worldwide.
- Page 104 Parameter Description Speed The speed (in mm/s) at which the tip moves toward the dummy point. Range: 0–150 mm/s www.nordsonefd.com info@nordsonefd.com +1-401-431-7000 Sales and service of Nordson EFD dispensing systems are available worldwide.
- Page 105 Used in tandem with Call Subroutine to return the program to the address that occurs just after a Call Subroutine address and command. select from drop-down menu www.nordsonefd.com info@nordsonefd.com +1-401-431-7000 Sales and service of Nordson EFD dispensing systems are available worldwide.
- Page 106 • Two Fiducial Mark commands must be present in a program for the system to perform this adjustment function correctly. • Refer to “About Marks” on page 24 for more information on marks. www.nordsonefd.com info@nordsonefd.com +1-401-431-7000 Sales and service of Nordson EFD dispensing systems are available worldwide.
- Page 107 NOTE: In any Fill Area command, the Z and R values for Line Start and Line End must match. Line Start Fill Area Line End EXAMPLE: if a Width of 5 mm is entered, the tip makes the following path: Width = 5 mm www.nordsonefd.com info@nordsonefd.com +1-401-431-7000 Sales and service of Nordson EFD dispensing systems are available worldwide.
- Page 108 NOTE: In any Fill Area command, the Z and R values for Line Start and Line End must match. Line Start Fill Area Line End EXAMPLE: If a Width of 5 mm is entered, the tip makes the following path: Width = 5 mm www.nordsonefd.com info@nordsonefd.com +1-401-431-7000 Sales and service of Nordson EFD dispensing systems are available worldwide.
- Page 109 Line End EXAMPLE: If a Width of 5 mm and a Band of 15 mm are entered, the tip makes the following path: Width = 5 mm Band = 15 mm www.nordsonefd.com info@nordsonefd.com +1-401-431-7000 Sales and service of Nordson EFD dispensing systems are available worldwide.
- Page 110 Start point. Then jog the tip directly across to the outside of the circle and enter that location as a Line End point. Fill Area Line Start Line End EXAMPLE: If a Width of 5 mm is entered, the tip makes the following path: Width = 5 mm www.nordsonefd.com info@nordsonefd.com +1-401-431-7000 Sales and service of Nordson EFD dispensing systems are available worldwide.
- Page 111 • A Find Mark is different from a Fiducial Mark. A Find Mark is used only to check the XY position of a workpiece whereas a Fiducial Mark is used to check the orientation of a workpiece. • Refer to “About Marks” on page 24 for more information on marks. www.nordsonefd.com info@nordsonefd.com +1-401-431-7000 Sales and service of Nordson EFD dispensing systems are available worldwide.
- Page 112 Turns the input OFF or ON. Address or Causes the program to check the input at the specified address or label. Click Change to Label toggle between Address and Label. www.nordsonefd.com info@nordsonefd.com +1-401-431-7000 Sales and service of Nordson EFD dispensing systems are available worldwide.
- Page 113 Sets the luminance of the light source at a specified point in the program between 0 (no luminance) and 255 address and (brightest). select from NOTE: This command is present only if an optional light accessory is installed. drop-down menu www.nordsonefd.com info@nordsonefd.com +1-401-431-7000 Sales and service of Nordson EFD dispensing systems are available worldwide.
- Page 114 • The correct sequence of commands for a line is as follows: (1) Line Start, (2) Line Passing, (3) Line End. • Also use a Line Passing point before and after an Arc Point command. www.nordsonefd.com info@nordsonefd.com +1-401-431-7000 Sales and service of Nordson EFD dispensing systems are available worldwide.
- Page 115 Mark Follow to Dispense Along a Curved Line” on page 78 for an example of how to use this command in down menu a program. Setting Description Turns Mark Follow ON. Turns Mark Follow OFF. www.nordsonefd.com info@nordsonefd.com +1-401-431-7000 Sales and service of Nordson EFD dispensing systems are available worldwide.
- Page 116 The system asks if you want to update the camera-to-tip offset. 1.Continue 1.Continue The system automatically accepts the camera-to-tip offset (unless out of range) and then continues to the next command. www.nordsonefd.com info@nordsonefd.com +1-401-431-7000 Sales and service of Nordson EFD dispensing systems are available worldwide.
- Page 117 Sets the acceleration (as a percentage) of the robot from point to point at the location in the program where this address and command is inserted, thus overriding the default system point-to-point speed setting. select from drop-down menu www.nordsonefd.com info@nordsonefd.com +1-401-431-7000 Sales and service of Nordson EFD dispensing systems are available worldwide.
- Page 118 Example of saved QA Capture images Rectangle Adjust Click Function Double-click This command is not used on RV Series systems. address and select from drop-down menu www.nordsonefd.com info@nordsonefd.com +1-401-431-7000 Sales and service of Nordson EFD dispensing systems are available worldwide.
- Page 119 Allows you to turn on multiple output ports at the same time. For example, to turn on ports 1, 2, and 3, enter address and “1.2.3” (with periods between the port numbers, no spaces). The default setting is port 0. select from drop-down menu www.nordsonefd.com info@nordsonefd.com +1-401-431-7000 Sales and service of Nordson EFD dispensing systems are available worldwide.
- Page 120 Example of X and Y offsets in a Step & Repeat command Step & Repeat X, S Path Step & Repeat X, N Path Difference between the “1.S Path” and “2.N Path” selections www.nordsonefd.com info@nordsonefd.com +1-401-431-7000 Sales and service of Nordson EFD dispensing systems are available worldwide.
- Page 121 Label The address where the Step & Repeat Z command begins. Tier Z Offset (in mm) Y Offset (in mm) Diagram of the Z Offset and Tier Parameters www.nordsonefd.com info@nordsonefd.com +1-401-431-7000 Sales and service of Nordson EFD dispensing systems are available worldwide.
- Page 122 Registers a Wait Point to occur immediately after the previous command. When this command occurs, the dispensing tip waits at the end point of the previous command for the specified Wait Time (in seconds). www.nordsonefd.com info@nordsonefd.com +1-401-431-7000 Sales and service of Nordson EFD dispensing systems are available worldwide.
- Page 123 Z axis zero position to which the tip raises regardless of the Z-axis value of the taught point location. Nordson EFD recommends inserting a Z Clearance command at the beginning of a program. Parameter Description (see illustrations below) Value The distance (in mm) the tip raises after dispensing.
-
Page 124: Appendix B, Non-Wizard Setup Procedures
• Jog the camera again until the same reference point is located in the upper left quadrant of the camera screen, then click the point. The camera scale is now set. www.nordsonefd.com info@nordsonefd.com +1-401-431-7000 Sales and service of Nordson EFD dispensing systems are available worldwide. -
Page 125: Setting Up The Optional Tip Detector Or Tip Alignment Device
• Click YES/OK when prompted for confirmations. The robot raises the tip to Z = 0, then lowers the tip onto the sensor to detect the tip offset. www.nordsonefd.com info@nordsonefd.com +1-401-431-7000 Sales and service of Nordson EFD dispensing systems are available worldwide. -
Page 126: Setting The Tip-To-Workpiece Offset (Z Clearance) Using The Camera Focus
• Focus the camera until the image of the dispense dot is clear. Refer to “Camera” on page 16 as needed for instructions on focusing the camera. www.nordsonefd.com info@nordsonefd.com +1-401-431-7000 Sales and service of Nordson EFD dispensing systems are available worldwide. -
Page 127: Appendix C, Dxf File Import
DXF image Refer to “Setting DXF Selects all the points in Select All Option Import Preferences” on the DXF file page 128. www.nordsonefd.com info@nordsonefd.com +1-401-431-7000 Sales and service of Nordson EFD dispensing systems are available worldwide. -
Page 128: Setting Dxf Import Preferences
Source Dxf Unit Toggles the display of units between millimeters, inches, and mils NOTE: A mil is one-thousandth of an inch, or 0.001 inch. www.nordsonefd.com info@nordsonefd.com +1-401-431-7000 Sales and service of Nordson EFD dispensing systems are available worldwide. -
Page 129: Importing A Dxf File
• Click POINT DISPENSE (for dispense dots) or LINE DISPENSE (for lines, arcs, and circles). The system generates the program commands that will create the selected pattern. Continued on next page www.nordsonefd.com info@nordsonefd.com +1-401-431-7000 Sales and service of Nordson EFD dispensing systems are available worldwide. - Page 130 • Click on a point at the far left side of the points shown in the Secondary View screen, then click the top SET button under Program. Continued on next page www.nordsonefd.com info@nordsonefd.com +1-401-431-7000 Sales and service of Nordson EFD dispensing systems are available worldwide.
- Page 131 SET button under Table. • Click CHANGE. The system updates all XY locations in the program so they align with same XY locations on the actual workpiece. www.nordsonefd.com info@nordsonefd.com +1-401-431-7000 Sales and service of Nordson EFD dispensing systems are available worldwide.
-
Page 132: Using The Sort Path By Option
• Select OK. The commands for the imported DXF appear in the Program screen based on the selected Sort Path By options. www.nordsonefd.com info@nordsonefd.com +1-401-431-7000 Sales and service of Nordson EFD dispensing systems are available worldwide. - Page 133 11 12 13 14 15 8 9 10 3 4 5 DXF array import: Sort By Path X enabled DXF array import: Sort By Path Y enabled www.nordsonefd.com info@nordsonefd.com +1-401-431-7000 Sales and service of Nordson EFD dispensing systems are available worldwide.
-
Page 134: Appendix D, Qr Code Scanning Setup
SETUP at the top of the Camera screen. > The camera setup fields appear. • Click the 2D CODE tab to open the code > setup fields, then check ENABLE THE FUNCTION. www.nordsonefd.com info@nordsonefd.com +1-401-431-7000 Sales and service of Nordson EFD dispensing systems are available worldwide. - Page 135 • Select the dispense program to associate with the QR code, the click OPEN. > The dispense program is now associated with the QR code. Continued on next page www.nordsonefd.com info@nordsonefd.com +1-401-431-7000 Sales and service of Nordson EFD dispensing systems are available worldwide.
- Page 136 1. Clicking PROGRAM and then RUN to test the program. 2. The system moves to the QR code and scans it. The system opens the program and executes it. www.nordsonefd.com info@nordsonefd.com +1-401-431-7000 Sales and service of Nordson EFD dispensing systems are available worldwide.
-
Page 137: Appendix E, Multi-Needle Setup And Use
PREREQUISITES ‡ The required additional dispensers are installed on the robot. Contact your Nordson EFD representative for assistance as needed. ‡ The system is properly set up. Refer to “Setting Up and Calibrating the System (Required)” on page 45. - Page 138 Camera Move and Set. • Click SAVE. The system populates the Needle 1 data fields. Continued on next page www.nordsonefd.com info@nordsonefd.com +1-401-431-7000 Sales and service of Nordson EFD dispensing systems are available worldwide.
- Page 139 The system populates the Needle 2 data fields. The system is now set up for multiple dispenser operation. Continue to the next procedure in this section to use this capability. www.nordsonefd.com info@nordsonefd.com +1-401-431-7000 Sales and service of Nordson EFD dispensing systems are available worldwide.
- Page 140 MULTI NEEDLE • Double-click the address row where you want to insert the second Multi Needle command and select MULTI NEEDLE. Continued on next page www.nordsonefd.com info@nordsonefd.com +1-401-431-7000 Sales and service of Nordson EFD dispensing systems are available worldwide.
- Page 141 Dispenser 2 (for example, create arc or fills). • Click END PROGRAM to end the program. The system will dispense from Dispenser 1 or Dispenser 2 as programmed. www.nordsonefd.com info@nordsonefd.com +1-401-431-7000 Sales and service of Nordson EFD dispensing systems are available worldwide.
-
Page 142: Appendix F, I/O Pin Function Setup
A signal indicating an over-limit warning after a general over-limit warning from program execution occurs. In Home A signal indicating that the tip is in the Park Position. www.nordsonefd.com info@nordsonefd.com +1-401-431-7000 Sales and service of Nordson EFD dispensing systems are available worldwide. - Page 143 Refer to “IO Pin Function Configurations” on > page 142 for a description of the configuration selections. • Click OK. www.nordsonefd.com info@nordsonefd.com +1-401-431-7000 Sales and service of Nordson EFD dispensing systems are available worldwide.
-
Page 144: Appendix G, System Setup For Installing Software Updates
To lock the main drive after installing software, open the Command Prompt window, type ENABLE > SAVE, and then reboot the system. www.nordsonefd.com info@nordsonefd.com +1-401-431-7000 Sales and service of Nordson EFD dispensing systems are available worldwide. - Page 145 RV Series Automated Dispensing Systems Notes www.nordsonefd.com info@nordsonefd.com +1-401-431-7000 Sales and service of Nordson EFD dispensing systems are available worldwide.
- Page 146 NORDSON EFD ONE YEAR LIMITED WARRANTY This Nordson EFD product is warranted for one year [two years, five years] from the date of purchase to be free from defects in material and workmanship (but not against damage caused by misuse, abrasion, corrosion, negligence, accident, faulty installation, or by dispensing material incompatible with equipment) when the equipment is installed and operated in accordance with factory recommendations and instructions.
Need help?
Do you have a question about the RV Series and is the answer not in the manual?
Questions and answers