Table of Contents
Advertisement
Quick Links
Advertisement
Table of Contents

Related Manuals for NARDA FieldMan


Summary of Contents for NARDA FieldMan
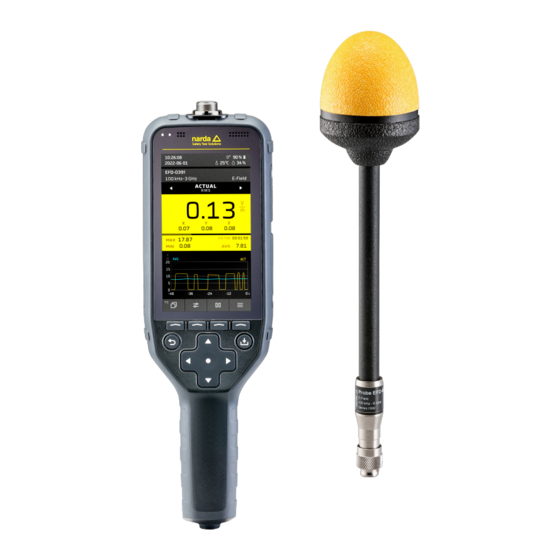
- Page 1 FieldMan Measurement Device for Electromagnetic Fields User manual...
- Page 2 Narda Safety Test Solutions GmbH Sandwiesenstraße 7 72793 Pfullingen, Deutschland ® Names and Logo are registered trade- marks of Narda Safety Test Solutions GmbH - Trade names are trademarks of the owners. © 2022 Order no.: 2460/98.21 Issue: 01/10.2022, A ...
-
Page 3: Table Of Contents
About the measurement of electromagnetic fields ..8 About the Narda FieldMan ......8 Supported probes . - Page 4 Spectrum ........78 Shaped Time Domain ......83 FieldMan Narda...
- Page 5 PC software and updates ..... . 109 11.1 Narda-TSX PC software ......110 11.2 Firmware update.
- Page 6 FieldMan Narda...
-
Page 7: About This Product
In this chapter you will find some useful information about measuring electromagnetic fields, about the Narda FieldMan and about the probes. About the measurement of electromagnetic fields (page 8) About the Narda FieldMan (page 8) Supported probes (page 9) Narda FieldMan... -
Page 8: About The Measurement Of Electromagnetic Fields
It is Narda's new software platform that will support other Narda products in the future in addi- tion to FieldMan. The firmware update is also performed via the PC software (see 11 PC software and updates on page 109). -
Page 9: Supported Probes
(EMC) Supported probes A variety of isotropic field probes are available for the FieldMan. All of them transmit their information and measurement data as a digital signal to the FieldMan, either via an elec- trical USB interface or via an optical COM interface. In this way, interference is almost completely eliminated compared to high-impedance analog interfaces. - Page 10 1 About this product FieldMan Narda...
-
Page 11: General Safety Instructions
General safety instructions This chapter contains important information on the safe use of the FieldMan. You should therefore read this chapter carefully and follow the instructions given. Using these operating instructions (page 12) Intended use (page 12) Non-intended use (page 12) -
Page 12: Using These Operating Instructions
⇒ The device may only be operated by appropriately qualified and trained personnel. Non-intended use The Narda FieldMan is not a warning device that actively warns of the existence of dangerous fields by means of visual or acoustic signals. ⇒... -
Page 13: Correct Handling Of Rechargeable Batteries
(see accessories in the data sheet) can also be used for checking. ⇒ If a malfunction is suspected, take the unit out of operation and contact your Narda service center. Addresses can be found at the end of these operating instructions and on the Internet at www.narda-sts.com. - Page 14 2 General safety instructions FieldMan Narda...
-
Page 15: About This Operating Manual
About this operating manual This chapter contains information on the structure and layout of the operating instructions. Structure of the operating instructions (page 16) Language of the user interface (page 16) Characters and symbols used (page 17) Narda FieldMan... -
Page 16: Structure Of The Operating Instructions
These functions are described here. Language of the user interface In these operating instructions, screen contents are presented in English. However, the user interface of the FieldMan can also be displayed in other languages (see “Select the language”). ⇒ Please note that in this case the displayed terms differ from those described. -
Page 17: Characters And Symbols Used
Indicates a danger that will result in immediate death or DANGER severe injury. Structure of the warning instructions All warnings are structured as follows: WARNING WORD Type and source of the danger Consequences resulting from non-observance ⇒ Action for danger avoidance Narda FieldMan... - Page 18 The device starts a self-test. Bold text Controls and display elements Identifies controls and display elements, e.g.: ⇒ Press ENTER key. 3.3.3 Terms and abbreviations Term Meaning Rechargeable Rechargeable battery battery Battery Non-rechargeable battery SK1 – SK4 Softkey 1 – Softkey 4 FieldMan Narda...
-
Page 19: Connection And Commissioning
Connection and commissioning This chapter provides information about the connection options of the Narda FieldMan, gives instructions for commissioning and describes the connection options. Unpacking (page 20) Equipping the case (page 21) Device overview (page 22) Power supply/rechargeable battery operation (page 24) -
Page 20: Unpacking
⇒ In case of damage to the device or components, contact your Narda service center. The addresses of your Narda service center can be found at the end of these operating instructions manual and on the Internet at www.narda-sts.com. 4.1.1... -
Page 21: Equipping The Case
The following diagrams show the distribution in the top and bottom of the case. Fig. 1: Case with equipment 1 FieldMan 9 Country adapter for FieldMan charging power supply 2 Small parts and bag with marking rings 10 EHP-50 table-top tripod (2404/ 3 Shoulder strap (2244/90.49) -
Page 22: Device Overview
4 Connection and commissioning Device overview Fig. 2: Device overview FieldMan FieldMan Narda... - Page 23 For distance measurement in conjunction with the GNSS/Range Finder option Tripod connection With thread for horizontal mounting on a tripod Battery compartment ⇒ To change the rechargeable battery (see 12.2 Replacing/removing recharge- able batteries on page 115 ). 1) 1/4-inch 20-thread UNC female thread Narda FieldMan...
-
Page 24: Power Supply/Rechargeable Battery Operation
This means that compliance with the technical data is no longer guaranteed. With the above restriction, the FieldMan can be powered from any USB interface that supplies a current of at least 1 A. Operation is then also possible without a built-in rechargeable battery. -
Page 25: Connect And Test Probe
⇒ Activate the display again by pressing any key. Connect and test probe Probes can be connected directly to the probe connector on the top of the FieldMan or to the optical input: • Connection at the probe connector: All digital HF and LFFieldMan probes •... - Page 26 Connecting the probe to the optical input The HP-01 and EHP-50F/GF field analyzers are connected to the optical input of the FieldMan. A suitable optical cable is included with the probes. Connecting a probe: 1. Go to GENERAL SETTINGS > CONNECTIVITY > OPTICAL INTERFACE and select Probe.
-
Page 27: Initial Commissioning
1. Press SK4 to open the device settings. 2. Under POSITION AND TIME > DATE / TIME > Time, set the time, under... > Time Zone, set the time zone (see 7.6.3 DATE / TIME on page 49). Narda FieldMan... - Page 28 1. Press SK4 to open the device settings. 2. Perform the reset under GENERAL SETTINGS > DEVICE > Factory Reset (see 7.3.5 DEVICE on page 47). 3. On the start screen, select the country of use from the drop-down menu and confirm with OK. FieldMan Narda...
-
Page 29: Controls And Display Elements
Controls (page 30) LED display (page 32) Display overview (page 33) Display of probe info on the display (page 34) Status bar symbols (page 35) Symbols of function keys (page 36) Narda FieldMan... -
Page 30: Controls
5 Controls and display elements Controls FieldMan Narda... - Page 31 Cross key Confirmation of a selection (OK key). Save key A short key press saves the displayed measurement results, if desired also with a screen copy. A long key press saves a screen copy as a PNG file. Narda FieldMan...
-
Page 32: Led Display
✓ The status LED immediately lights up red and signals the device response. ✓ The screen remains dark. ✓ Shortly after, the boot screen is displayed with the Narda logo and FieldMan lettering. ✓ After the operating system is loaded, the status LED lights up according to the... -
Page 33: Display Overview
Measurement sequence Graphical display of measured values in the time or or measurement graphic frequency range, bar display, or information on the measurement process Function keys (softkeys) SK1 – SK4 Narda FieldMan... -
Page 34: Display Of Probe Info On The Display
EHP-50F/G and HP-01 1 Probe model 3 Probe rechargeable battery charge 2 Configured span 4 Field type and range BFD-400 1 Probe model 3 Field type and range 2 Configured span incl. low-pass filter 4 Pass or stop filter setting FieldMan Narda... -
Page 35: Status Bar Symbols
GNSS switched GNSS position battery charge on, no position found Rechargeable Speaker muted GNSS signal battery charge lost, position fro- critical Rechargeable Alarm switched Memory card battery is missing charging Ambient tem- Relative humid- Distance mea- perature surement Narda FieldMan... -
Page 36: Symbols Of Function Keys
Jump to previous on/off time record Zoom Record voice Restart on/off comment audio/video Zoom in or add Edit voice com- Stand-by (only ment for TIMER LOG- GING) 1) Initials indicate the active operating mode (e.g. FS = FIELD STRENGTH) FieldMan Narda... -
Page 37: General Operation
General operation In this chapter you will find information on the general operation of the FieldMan. Operating mode-specific operating instructions can be found in the descriptions of the respective operating mode. The operating concept (page 38) Basic operating steps (page 39) -
Page 38: The Operating Concept
6 General operation The operating concept The combination of the context-dependent softkeys (SK1 - SK4) and the permanently assigned keys (cross key, Back, Save) enables intuitive and fast operation of the Narda FieldMan. 6.1.1 Basic functions of the softkeys The softkeys SK1 - SK4 provide access to all instrument and measurement settings as well as to all measurement functions. -
Page 39: Basic Operating Steps
6.2.3 Selecting an operating mode ⇒ ● Press SK1 , use the ▲▼ keys to highlight an entry, and use the key to select ⇒ For information on the operating modes, see 8 Operating modes on page 57. Narda FieldMan... - Page 40 6.2.7 Exiting a submenu ⇒ Press key. 6.2.8 Saving a measurement ⇒ Briefly press the key. ↳ A message confirms that the measurement has been saved. ⇒ To manage stored measurements, see 9 DATA LOGGER on page 91. FieldMan Narda...
- Page 41 6.2 Basic operating steps 6.2.9 Taking a screenshot ⇒ Press the key for approx. 2 s. ↳ A message confirms that the screenshot has been taken. ⇒ To manage saved screenshots see 9 DATA LOGGER on page 91. Narda FieldMan...
-
Page 42: The Display In Measuring Mode
Evaluations Supplementary field MAX, MIN, MAXAVG, AVG and the current averaging time until the set time is reached. • Temporal or spectral display of the measurement results Graphic display • Bar graph of the instantaneous value. FieldMan Narda... -
Page 43: Device Settings
Setting types (page 44) Personalizing device settings (page 45) GENERAL SETTINGS (page 45) LEGAL NOTICES (page 47) EXPERT SETTINGS (page 47) POSITION AND TIME (page 48) CONNECTIVITY (page 50) INFORMATION (page 51) SETUPS (page 53) 7.10 DATA LOGGER (page 56) Narda FieldMan... -
Page 44: Setting Types
Information on the measurement settings can be found in the description of the respec- tive operating modes. 7.1.3 Resetting settings Via Factory Reset (see 7.3 GENERAL SETTINGS on page 45), both setting types can be reset to the delivery state. FieldMan Narda... -
Page 45: Personalizing Device Settings
7.2 Personalizing device settings Personalizing device settings Measuring instruments are often used by several people. The FieldMan offers a quick and easy way to personalize settings, setups and measurement results through its removable memory card. We therefore recommend every user to use their own personal memory card. - Page 46 Unit of E-field E-Field Unit 61 V/m Limit of E-field E-Field Limit Unit of B/H field B/H-Field Unit 0.16 A/m Limit of B/H field B/H-Field Limit 100% For evaluating probes and SHAPED Limit for Results in % TIME DOMAIN FieldMan Narda...
-
Page 47: Legal Notices
% relative to a safety standard (see 10.1 Post-Processing on page 98). HF probes are broadband probes and cannot measure selectively at the set frequency. In the case of incorrect frequency specification or multifrequency fields, these settings can therefore lead to incorrect results. Narda FieldMan... -
Page 48: Position And Time
In this submenu, settings are made which affect the position determination by means of the satellite receiver and the integrated ultrasonic distance sensor. The system time of the device can also be set or synchronized with the very accurate satellite time. The results of the GNSS position determination are also displayed. FieldMan Narda... - Page 49 Date format Date Format 2022-08-18 Current date Date 24 h Time format Time Format 13:30:59 Current time Time UTC+01:00 Time zone Time Zone Daylight saving time on/off Daylight Saving Time SYNC Synchronization of time with GNSS Sync with GNSS Narda FieldMan...
-
Page 50: Connectivity
Port for TCP Remote TCP Remote Port fieldman_<S/N> Predefined host name Host Name 7.7.3 WIRELESS INTERFACE (optional) This group only appears if the chargeable WiFi/BT option has been activated. Parameter Default Description WiFi on/off WiFi Bluetooth on/off Bluetooth FieldMan Narda... -
Page 51: Information
7.8.1 DEVICE INFORMATION Parameter Default Description START Starts self-test to be performed in Device Self-Test separate window (also performed at each restart) FieldMan Product name Product Name 2461-01 Article number Part Number A-0051 Serial number Serial Number V1.0.0 Firmware version... - Page 52 V1.0.0 Bootloader version of the probe Bootloader Version 15.7 °C Probe temperature Temperature Sensor 2022-12-15 Last calibration by Narda Narda Calibration Date – Calibration date of other suppliers Third-Party Calibration can be entered here by the user. Date Number can be edited here by the Recalibration after user.
-
Page 53: Setups
7.9 SETUPS The information under Narda Calibration Date or Third-Party Calibration Date (most recent date counts) and Recalibration after (months) are used as a reminder function for an upcoming calibration. The values are stored in the EEPROM of the connected probe. No values can be changed for the EHP-50F/G and HP-01 probes. - Page 54 Last Settings for this probe type. When reconnecting the same probe type, the same Last Settings will be used. If another probe type is detected instead, the Last Set- tings for this probe type will be loaded. FieldMan Narda...
- Page 55 Setups can only be deleted individually in the device. ⇒ To delete multiple setups, remove the SD card and edit the setup directories exter- nally. ⇒ Alternatively, format the SD card. This will cause all stored data to be lost. ATTENTION! Narda FieldMan...
-
Page 56: Data Logger
7 Device settings 7.10 DATA LOGGER ⇒ For a description of the settings for the DATA LOGGER, see 9 DATA LOGGER on page 91. FieldMan Narda... -
Page 57: Operating Modes
Overview of operating modes and probe types (page 58) FIELD STRENGTH (page 60) SPATIAL AVERAGE (page 67) TIMER LOGGING (page 71) SPECTRUM (page 78) Shaped Time Domain (page 83) Narda FieldMan... -
Page 58: Overview Of Operating Modes And Probe Types
8 Operating modes Overview of operating modes and probe types Depending on the connected and recognized probe type, the following operating modes are available for selection in the FieldMan: Operating mode (abbre- HF probes HP-01 EHP-50F/G BFD-400-1 viation (DC/LF) (LF) - Page 59 Whether the peak or RMS detector is used is defined in the measure- ment method standards IEC/EN 62233 for household appliances (Weighted RMS) or IEC/EN 62311 for other appliances (Weighted Peak). ⇒ See 8.6 Shaped Time Domain on page 83. Narda FieldMan...
-
Page 60: Field Strength
Short integration time for HF measurement, e.g. for more Pulse Detection accurate measurement of short radar pulses (only visible with suitable HF probes) Time for moving averaging Averaging Time 1) The available parameters depend on the selected operating mode and the connected probe type. FieldMan Narda... - Page 61 Display in supple- Evaluation mentary field Current measured value ACTUAL Smallest value MINIMUM Highest value MAXIMUM Averaged value AVERAGE Highest averaged value MAX AVERAGE MAXAVG Current measured value Peak ACTUAL Smallest peak value MINIMUM Highest peak value MAXIMUM Narda FieldMan...
- Page 62 Press and hold key (> 2 s). – oder – 1. Press SK2. ↳ Reset Results is already selected as the first entry. ● 2. Press key. ↳ The measured values are reset and the menu is closed. FieldMan Narda...
- Page 63 Start and stop the measurement: ⇒ Press SK3. The display in detail Fig. 4: Bar display in the FIELD STRENGTH operating mode 1 Current measured value 2 MIN value 3 MAX value 4 Overall bar scaled to measuring range Narda FieldMan...
- Page 64 3 Yellow curve: Time curve of the current measured values (ACTUAL) 4 Blue curve: Time curve of the averaged measured values (AVG) The display of the AVG curve is omitted if the peak detector was selected instead of the RMS detector for LF probes. FieldMan Narda...
- Page 65 As soon as the display is restarted, there is therefore continuous recording and updating of the time curve display. Using the peak marker The peak values can be evaluated via the peak marker. ⇒ For information on the peak marker, see 10.7 Peak marker on page 106. Narda FieldMan...
- Page 66 When activated, the results memory is deleted and a measurement sequence is performed over the set time period. After the time period is reached, the measure- ment is stopped completely. The measurement sequence can be restarted at any time via a reset. FieldMan Narda...
-
Page 67: Spatial Average
Filter for suppression of low frequencies (low cut filter) Low Cut Filter Detector type Detector Stop measurements: Measurement Time • Manual: The measurement must be ended manually. • 5 s, 10 s...: The measurement stops after the preselected time. Narda FieldMan... - Page 68 2. Select the desired setting and press the key: – No delay: The measurement starts immediately – Time: The measurement starts after the selected time. A countdown shows the time until the start. 3. Exit the menu with the Back key. FieldMan Narda...
- Page 69 3 Current measured values of the three axes 4 Number of the position and current time over which averaging is currently being performed 5 Evaluations: – AVG: Average value of the displayed position – SPATIAL AVG: Spatial average of all measured positions Narda FieldMan...
- Page 70 In the supplementary field: The position as well as the associated measured value (AVG) is displayed. Up to 13 bars can be displayed simultaneously in the graph. If there are more than 13 positions, the bar display can be scrolled using the ◄ ► keys. FieldMan Narda...
-
Page 71: Timer Logging
A maximum of 32,000 storage intervals can be recorded. If a short storage interval is set with a long runtime, one of the values is automatically corrected. Example: With a storage interval of 1 s, the maximum possible runtime is 8 h 53 min 20 s. Narda FieldMan... - Page 72 (see 7.3.5 DEVICE on page 47). The following actions are possible during this time: Start recording immediately: ⇒ Press SK3. Deactivate timer again: ⇒ Press SK1. ↳ In this case, previously recorded voice or text comments will be deleted. FieldMan Narda...
- Page 73 (regardless of the setting for Automatic Shutdown). Automatic shutdown does not take place in the following cases: • The user has ended the measurement prematurely. • A key was pressed directly after the measuring period (Timer Duration) elapsed. Narda FieldMan...
- Page 74 The selection option depends on the selected detector: Detector Selection via Main field Supplementary cross key field Bottom ACTUAL ACTUAL X Y Z MAX, MIN, (all probes) MAXAVG, AVG MINIMUM ACTUAL MAXIMUM ACTUAL AVERAGE ACTUAL MAX AVERAGE MAXAVG ACTUAL FieldMan Narda...
- Page 75 – Right: Other result type, here as an example AVERAGE. The selected result type is displayed and ACTUAL is always displayed as well 4 Supplementary field The measured values are always displayed, regardless of whether data is being recorded. Narda FieldMan...
- Page 76 The time axis displayed on the device is labeled with the total measurement duration in the format hh:mm:ss. When the marker is switched on, the maximum value that occurred in the (condensed) measurement interval is displayed as ACT value together with the time of the interval end. FieldMan Narda...
- Page 77 2. Use the ◄ ► keys to move the marker. 3. Press SK1 to turn the marker off again. Using the peak marker The peak values can be evaluated via the peak marker. ⇒ For information on the peak marker, see 10.7 Peak marker on page 106. Narda FieldMan...
-
Page 78: Spectrum
(see 8.5 SPECTRUM on page 78). Number of spectra over which averaging is performed Number of Averages 1) The available parameters depend on the selected operating mode and the connected probe type. FieldMan Narda... - Page 79 In SPECTRUM mode, the control pad is used for the marker. The selection of the result type is therefore made in the measurement settings. Select a result type: ⇒ MEASUREMENT SETTINGS: Select the desired result type under Result Type. ↳ The selection option depends on the detector and the probe. Narda FieldMan...
- Page 80 – Right: Current isotropic value and the three axes for the highest line of the normalized spectrum with frequency indicated Reset the measured values: ⇒ ● MEASUREMENT SETTINGS > Reset Results > key. ↳ The measured values are reset and the menu is closed. FieldMan Narda...
- Page 81 • % unit selected: Spectrum is displayed normalized, related to the selected standard. • If no standard is selected (Standard = None): A message prompts to select a standard. Narda FieldMan...
- Page 82 The highest spectral lines can be evaluated via the peak marker. ✓ The peak marker can only be selected after the display has been stopped. ⇒ For information on the peak marker, see 10.7 Peak marker on page 106. FieldMan Narda...
-
Page 83: Shaped Time Domain
WRM-TD (IEC/EN 62233): Weighted RMS Method Displays a selection list of standards according to whose Weighting limits the evaluation is performed. Graphic display: Time Curve • Bar display: Time Curve = Off • Time curve graph: Time Curve = On Narda FieldMan... - Page 84 RMS + ACTUAL ACTUAL X Y Z MAX, MIN Peak MINIMUM ACTUAL MAXIMUM ACTUAL 1) In this mode of operation, the EHP-50F/G probe has only the Peak detector type, on the EHP-50G the WPM option must be enabled. FieldMan Narda...
- Page 85 The current isotropic value and the three axes are displayed. – Right: Other result type, here as an example MAXIMUM. The selected result type is displayed and ACTUAL is always displayed as well 5 Supplementary field: – Statistical values MIN and MAX Narda FieldMan...
- Page 86 Fig. 14: Bar display in the SHAPED TIME DOMAIN operating mode 1 MIN value numerical and graphical 2 MAX value numerical and graphical 3 Current measured value (ACTUAL) 4 Overall bar scaled to measuring range 5 Measurement method and weighting standard FieldMan Narda...
- Page 87 Fig. 15: Time curve display in the SHAPED TIME DOMAIN operating mode 1 Selected standard 2 Measured values in % of standard 3 Result type 4 Time curve of the measurement 5 Time axis Narda FieldMan...
- Page 88 Using the peak marker The peak values can be evaluated via the peak marker. ⇒ For information on the peak marker, see 10.7 Peak marker on page 106. FieldMan Narda...
- Page 89 When activated, the results memory is deleted and a measurement sequence is performed over the set time period. After the time period is reached, the measure- ment is stopped completely. The measurement sequence can be restarted at any time via a reset. Narda FieldMan...
- Page 90 8 Operating modes FieldMan Narda...
-
Page 91: Data Logger
Viewer. All acquired data is stored on the SD card of the device, organized by projects. Structure of the DATA LOGGER (page 92) Managing projects (PROJECT) (page 93) Managing measurements (MEASUREMENTS) (page 94) Managing screenshots (SCREENSHOTS) (page 96) Managing media (MEDIA) (page 96) Narda FieldMan... -
Page 92: Structure Of The Data Logger
2 Number of saved measurements in the selected project 3 Number of saved screenshots in the selected project 4 Number of stored media in the selected project 5 Selection to display the project at startup 6 Free storage space FieldMan Narda... -
Page 93: Managing Projects (Project)
Move one character to the right in the title window Functions of the keys SK1 to SK4: Cancel input Toggle upper/lower case Delete last character Save changes 9.2.3 Deleting a project 1. Select the project and press SK1. 2. Confirm the deletion. Narda FieldMan... -
Page 94: Managing Measurements (Measurements)
2. Use the ◄ ► keys to move the marker to the desired position on the measuring curve. 3. Press SK1 to turn the default marker off again. ⇒ For more information on the marker functions, see the descriptions in the operating modes. FieldMan Narda... - Page 95 1. Press SK4. ↳ The recording starts immediately. 2. Press SK4 to stop the recording. ↳ The recording is played back. 3. After that, the following functions of the keys SK1 to SK4 are available: Delete recording Repeat recording Narda FieldMan...
-
Page 96: Managing Screenshots (Screenshots)
2. Confirm deletion with SK4 or cancel with SK1. Managing media (MEDIA) In conjunction with a smartphone and the associated app, images and videos can be stored and accessed in the media area. This function is not available at the moment. FieldMan Narda... -
Page 97: Cross-Mode Functions
Offset correction – Zero (page 102) 10.4 Commenting on measurement results (page 103) 10.5 Alarm function (page 104) 10.6 Acoustic intensity display (HF probes only) (page 105) 10.7 Peak marker (page 106) 10.8 Display of overdriven measured values (page 107) Narda FieldMan... -
Page 98: Post-Processing
Only when the calibration factor or the display in % of the standard are activated is the frequency list updated by reading from the probe data and set to the lowest value. FieldMan Narda... - Page 99 The reference to the lowest limit value of a standard (Lowest Limit) is recommended when the frequency of the field source is not known. The Lowest Limit setting is not available if the use of the correction factor is switched Narda FieldMan...
-
Page 100: Selection Of A Standard
They can differ in frequency range and range of effect (influ- ence on the body). The standards (limit value curves) to be available for selection on the FieldMan can be configured via the Narda-TSX PC software. Predefined standards are available, which can be extended by self-created standards. - Page 101 10.2 Selection of a standard 10.2.1 Standards for HF probes The HF probes of the FieldMan measure broadband frequencies and cannot be set to a specific frequency. The measurement result can be displayed as the percentage of the limit value that has been reached if the frequency of a field source is known or in relation to the lowest limit value above the frequency of a standard.
-
Page 102: Offset Correction - Zero
3. Continue with SK4 or cancel with SK1. ↳ The progress and completion of the offset correction are displayed. 4. Follow the instructions in the dialog box. 5. Press the Back key to return to the measuring mode. FieldMan Narda... -
Page 103: Commenting On Measurement Results
For simplified text input, a predefined text (Default Text) can be used and added to during input. Activate text comments: 1. Add Text Comment = On 2. Edit Default Text if necessary. 3. Return to the measuring interface. Enter a text comment: ⇒ See 9.3.2 Adding a text comment on page 95. Narda FieldMan... -
Page 104: Alarm Function
When the alarm threshold is exceeded, a conspicuous acoustic signal sounds with a visual alarm message. If the mute function is activated (Mute = On), only the visual alarm is available. Fig. 18: Display of alarm function FieldMan Narda... -
Page 105: Acoustic Intensity Display (Hf Probes Only)
Up to 20 V/m or 20% High Gain Up to 80 V/m or 80% Normal Gain Up to 240 V/m or 240% Low Gain If another unit of measurement is used, the specified values must be converted into V/ m accordingly. Narda FieldMan... -
Page 106: Peak Marker
Use the ▲▼ keys to move the marker to the next higher or next lower peak. ↳ The selected peak value is displayed within the cross key symbol. 3. Press SK4 to turn the peak marker off again. FieldMan Narda... -
Page 107: Display Of Overdriven Measured Values
Due to previous overdriving, the statistical measured values of MAX, MAXAVG and AVG are also undervalued and are therefore displayed in red after overdriving has occurred. In this case, the values in the measurement settings should be reset. Narda FieldMan... - Page 108 10 Cross-mode functions FieldMan Narda...
-
Page 109: Pc Software And Updates
10.8 Display of overdriven measured values PC software and updates In this chapter you will find instructions for using the Narda- TSX PC software as well as for updating the firmware of the Narda FieldMan. 11.1 Narda-TSX PC software (page 110) 11.2... -
Page 110: Narda-Tsx Pc Software
2. Connect the device using a suitable Ethernet cable at the Ethernet port (see Fig. 2: 9) to a router or network hub. 3. Instructions for further use of the device can be found in the online help for the Narda- TSX PC software. -
Page 111: Firmware Update
The first time the device is connected, it is automatically set up on the PC. ↳ After the setup, the device can be used. 3. For information on remote control of the device, refer to the online help for the Narda- TSX PC software. 11.2... - Page 112 11 PC software and updates FieldMan Narda...
-
Page 113: Care, Maintenance And Disposal
11.2 Firmware update Care, maintenance and disposal This chapter describes how to clean the device and replace the rechargeable batteries. 12.1 Cleaning the device (page 114) 12.2 Replacing/removing rechargeable batteries (page 115) 12.3 Disposal (page 116) Narda FieldMan... -
Page 114: Cleaning The Device
1. Clean the device with a soft cloth. As cleaning agent, we recommend the use of lukewarm water to which a drop of liquid detergent has been added. 2. To avoid streaks and stains, wipe the still damp parts of the device with a dry cloth. FieldMan Narda... -
Page 115: Replacing/Removing Rechargeable Batteries
Replace a defective rechargeable battery immediately. ⇒ Replace the rechargeable battery when the capacity noticeably decreases. You can obtain a replacement rechargeable battery as a spare part from your Narda sales partner (order number 2460/90.07). Replace the rechargeable battery: ✓ The device is switched off. -
Page 116: Disposal
Batteries must not be disposed of in household waste, but must be disposed of sepa- rately from the product in accordance with the applicable regulations. Batteries can be returned for free at the corresponding collection points, your dealer or directly via Narda. ⇒... -
Page 117: Conformity
In this chapter you will find important information on declarations of conformity and approvals. 13.1 EU Declaration of Conformity (page 118) 13.2 UKCA Declaration of Conformity (page 118) 13.3 Regulatory Compliance Mark (RCM) (page 118) 13.5 Radio approval (page 119) Narda FieldMan... -
Page 118: Eu Declaration Of Conformity
13 Conformity 13.1 EU Declaration of Conformity Narda STS hereby declares that this equipment is in compliance with Directives 2014/53/ 2014/35/EU and 2011/65/EU, as well as product standards EN 301 489-1 V2.2.3, EN 301 489-17 V3.2.4, EN 61326-1:2021, EN 61010-1:2010. -
Page 119: Radio Approval
For initial setup and country configuration, see 4.6 Initial commissioning on page 27. Country Approval number CMIIT ID: China Japan FCC ID: 2A77Y-246001A IC: 28882-246001A Canada 13.6 Technical data Parameter Value Frequency range 2.4 GHz – 2.495 GHz Bandwidth 20 MHz Max. transmitting power ≤ 17.5 dBm (56.2 mW) Narda FieldMan... - Page 120 13 Conformity FieldMan Narda...
- Page 121 Probe info 34 Controls 30 Status bar symbols 35 Correction factor Distance measurement 49 Apply 98 Settings 47 Create, setup 55 Electromagnetic fields 8 Create/manage setups 55 Equip case 21 Ethernet 51 Exit submenu 40 Dangers Measurement error 13 Narda FieldMan...
- Page 122 Spatial Average 67 Spectrum 78 Keys Timer Logging 71 Fixed 38 Operating steps, basic 39 Softkeys 38 Operation with rechargeable battery 24 Optical connection 111 Optical interface 50 Language, user interface 16 Overdriven measured values 107 Latitude 49 FieldMan Narda...
- Page 123 Strong fields 12 Reference frequency 47 Subnet mask 51 Reset, settings 44 Switching on, commissioning 27 Resetting settings 44 Switching on/off, basic operation 39 Symbols 18 Function keys 36 Status bar 35 Symbols and signs 17 Synchronization with GNSS 49 Narda FieldMan...
- Page 124 Unpacking 20 Update 111 USB connection 110 USB on/off 50 Intended 12 Unintended 12 User interface, language 16 Voice comment Activate 103 Set 46 Volume 46 Warnings Structure 17 Warning words 17 WiFi, wireless interface 50 Zero 102 FieldMan Narda...
- Page 126 Narda Safety Test Solutions GmbH Sandwiesenstrasse 7 72793 Pfullingen, Germany Phone +49 7121 97 32 0 info@narda-sts.com Narda Safety Test Solutions North America Representative Office 435 Moreland Road Hauppauge, NY11788, USA Phone +1 631 231 1700 info@narda-sts.com Narda Safety Test Solutions S.r.l.
Need help?
Do you have a question about the FieldMan and is the answer not in the manual?
Questions and answers
Моля да ми изпратите цена
The price of the NARDA FieldMan is ₹19,750 per piece.
This answer is automatically generated