Table of Contents
Advertisement
Quick Links
Advertisement
Table of Contents

Related Manuals for NARDA SignalShark


Summary of Contents for NARDA SignalShark
- Page 1 User Manual Version 2018-9b...
-
Page 3: Table Of Contents
Locking the touchscreen ....................14 Button bar .......................... 14 Types of buttons in the button bar ..................14 Introduction ................17 About the SignalShark user documentation ................17 About this device ........................18 The Real Time Spectrum Analyzer ..................18 The Monitoring Receiver ....................19 The RF Direction Finding &... - Page 4 Connecting non-directional Narda antennas ................32 Connecting a Narda antenna directly to the device ............32 Connecting a Narda antenna to the device using a Narda cable ........33 Connecting cables and antennas from other manufacturers ..........34 Connecting cables and antennas directly to the device ............. 34 Connecting third party antennas to the handle ..............
- Page 5 Quick Start Screen Overview..............49 System information area ......................50 Progress bar ........................51 Toolbar ........................... 51 Button bar ..........................52 Types of buttons in the button bar ..................52 Measurement info bar ......................54 Measurement settings ....................... 54 Status of running measurement ..................54 Using Markers .................55 Setting markers individually ....................
- Page 6 SignalShark User Manual Selecting traces (Traces) ....................... 70 Changing general display settings (Display) ................71 Lmax ..........................72 Lrange..........................73 Normal Range ........................73 Unit ............................ 73 Level Meter View..............75 Available buttons ........................75 Setting the reference level / attenuation value (Ref. Level / Attenuator) ........ 76 Setting the reference level (Ref.
- Page 7 Quick Start Setting the measurement frequency (Fcent / Fspan, Fstart / Fstop) ........88 Selecting the entry mode (Entry Mode) ................88 If Entry Mode is set to Fcent ....................88 If Entry Mode is set to Fstart ....................88 Setting the resolution / EMC bandwidth (RBW / EBW) ............
- Page 8 SignalShark User Manual Defining the stop behavior (Stop Mode) ................101 Setting the detectors (Detectors) ..................102 Changing general display settings (Display) ................ 103 Lmax ..........................103 Lrange..........................104 Normal Range ........................104 Unit ..........................104 Peak Table View..............105 Available buttons ......................105 Setting the reference level / attenuation value (Ref.
- Page 9 Related documents ......................121 Installing Options ........................122 Updating the firmware ......................122 Remote Control ..............123 Legal Disclosure ..............125 Narda Safety Test Solutions Software License Agreement ..........125 Acknowledgements ......................128 General Acknowledgements .................... 128 Open Source Acknowledgements ................... 128 Glossary ................135...
-
Page 11: Quick Start
The AC connection is not recommended for general use, as the measurement characteristics can be significantly affected by the presence of the power supply cable in the electromagnetic field when the SignalShark is operated with the AC adapter / charger connected to it. -
Page 12: Connecting The Antenna To The Handle
Connecting the antenna to the handle Narda directional antennas can be attached to the handle in positions that are at angles of 90 degrees to each other. This makes it quick and easy for you to change the polarization plane of the antenna. -
Page 13: Screen Details
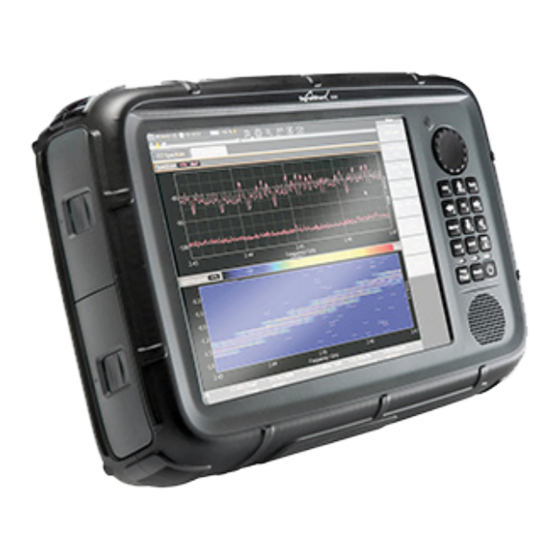
Quick Start Screen Details Basic measurement screen with night color scheme and two views (RT Spectrum, Spectrogram). System information This area shows system information like date, time and battery status. Tapping the dropdown icon opens the full system information menu. ⇒... -
Page 14: Touchscreen Functions
SignalShark User Manual Touchscreen Functions The SignalShark provides a resistive touchscreen allowing an easy and fast access. Touch gestures The following types of gestures can be used on the touchscreen of the device. • Tap: Tap for < 1 s. - Page 15 Quick Start These buttons have two modes: ⇒ Long tap the button to open a context menu. ⇒ Short tap the button to change settings only. Buttons with a filled triangle (e.g. Configure) These buttons show a submenu when tapped. Some buttons even may have several submenus.
-
Page 17: Introduction
The device can be remote controlled by SCPI commands. All remote commands can be found in the Command Reference Guide which is available as a PDF document. ⇒ To download the PDF from the Narda web site (customer login needed), tap www.narda-... -
Page 18: About This Device
SignalShark User Manual About this device SignalShark is a flexible platform up to 8 GHz which can be converted by options into three application oriented solutions. The Real Time Spectrum Analyzer • 40 MHz Real-time Bandwidth (RTBW) • POI: 3.125 μs, FFT overlap 75% •... -
Page 19: The Monitoring Receiver
Introduction The Monitoring Receiver • High sensitivity with a wide intermodulation-free dynamic range • 100 % Probability of Intercept (POI) for signals longer than 3.125 μs • Analog demodulation (available from July 2018) • Two digital down converters (DDC) for simultaneous measurement and demodulation •... -
Page 20: The Rf Direction Finding & Localization System
SignalShark User Manual The RF Direction Finding & Localization System Available from October 2018: • Smart manual DF Antennas • Full automatic DF Antennas Features • Windows 10 based • Illuminated keypad (usable in dark environments) • Touchscreen • Microphone to record voice comments •... -
Page 21: Rf Parameters
Additionally, it comes with a 100 V to 240 V external power supply. Overview of options The table below shows all the options available for the SignalShark. Your particular device may not be equipped with all the options listed here and described in this online help. -
Page 22: Antenna Handle
* = option Antenna handle The antenna handle is designed for attaching to the Narda directional antennas, providing an ergonomic grip for the antenna. An electronic 3-axis compass, a 16 dB preamplifier, and a button for starting measurements are all built in to the handle. The snap fixing allows you to quickly and easily adjust the antennas by 90°... -
Page 23: Narda Directional Antennas
Antenna handle with arm support Narda directional antennas Three Narda directional antennas that are specially matched to the SignalShark and which fit the antenna handle are available. They cover the frequency range from 20 MHz to 8 GHz. A highly sensitive loop antenna is also available as an accessory for covering the lower frequency range from 9 kHz to 30 MHz. - Page 24 SignalShark User Manual Figure: Directional antenna 2, frequency range 200 MHz to 500 MHz Figure: Directional antenna 3, frequency range 400 MHz to 8 GHz Figure: Loop antenna, frequency range 9 kHz to 30 MHz...
-
Page 25: About This Online Help
Introduction About this online help User interface language This operating manual uses English terminology to describe the user interface. Typographical conventions Various elements are used in this operating manual to draw attention to special meanings or important points in the text. Requirement ... -
Page 26: User Actions
SignalShark User Manual User actions Press When a key is operated < 1 s Long press When a key is operated > 2 s When a button on the touchscreen is tapped < 1 s Long tap When a button on the touchscreen is tapped > 2 s Double tap When a button on the touchscreen is tapped twice. -
Page 27: Device Overview
Device Overview Display and control panels No. Description Large 10.4‘‘ high-resolution liquid crystal touchscreen. Microphone for recording voice comments. Rotary knob and keypad for navigation, changing settings, entering values, confirming or cancelling entries. Keypad is illuminated for operation in dark surroundings. LEDs showing the charge status of both batteries and operating status. -
Page 28: Top Side Panel With Connectors
3 x RF SMA (f) input N-connector: RF N (f) socket for connecting the antenna 10 Control connector: 12-pole socket for connecting the antenna control cable (for automatic recognition of Narda antennas and cables). 11 10 MHz Ref SMA (f) input... -
Page 29: Left Side With Battery Compartment
Device Overview Left side with battery compartment Figure: Battery compartments with closed lids and packs pulled out partly. Bottom side panel with connectors No. Description USB 2.0 host Display port... -
Page 31: Connecting Antennas And Cables
Connecting Narda Directional Antennas Directional Narda antennas are connected to the device via the Narda antenna handle. Full use of all the functions of the SignalShark is only possible when you use the Narda antenna handle. ⇒ For information about connecting other than directional Narda antennas and non-Narda... -
Page 32: Connecting The Antenna To The Handle
Connecting the antenna to the handle Narda directional antennas can be attached to the handle in positions that are at angles of 90 degrees to each other. This makes it quick and easy for you to change the polarization plane of the antenna. -
Page 33: Connecting A Narda Antenna To The Device Using A Narda Cable
Connecting Antennas and Cables Connecting a Narda antenna to the device using a Narda cable To connect a Narda cable to the SignalShark: 1. Place the device in a vertical position. 2. Plug the N-connector on the cable onto the N-connector of the device. -
Page 34: Connecting Cables And Antennas From Other Manufacturers
SignalShark User Manual Connecting cables and antennas from other manufacturers In contrast with the use of Narda components, automatic detection of the cable or antenna connected does not work if you use third party products (commercially available cables or antennas). - Page 35 Connecting Antennas and Cables To connect the antenna: The configuration data for the antenna have been uploaded. 1. Connect the handle to the SignalShark (see Connecting the handle to the device). 2. Connect the N-connector of the third party antenna to the antenna adapter. When you do this, make sure that the antenna is screwed on to correspond with the polarization direction shown on the adapter (i.e.
-
Page 37: Basic Operation
Basic Operation This chapter describes the general operation of the device. The use of specific functions and features is explained in the view descriptions accordingly. Operation from battery When using both, fully charged batteries, you have an operating time of approx. 3 hours. The batteries are supplied in a pre-charged state and must be fully charged before being used for the first time. -
Page 38: Charging The Batteries
The AC line voltage must be the same as the operating voltage of the AC adapter / charger. 1. Connect the AC adapter / charger to the DC input / charge socket of the SignalShark. 2. Connect the AC adapter / charger to the AC line. -
Page 39: Operation From Ac Adapter / Charger
However, this is not recommended for general use, as the measurement characteristics can be significantly affected by the presence of the power supply cable in the electromagnetic field when the SignalShark is operated with the AC adapter / charger connected to it. Keypad and keyboard Integrated keypad The device will be operated mainly via the touchscreen and the integrated keypad. -
Page 40: Switching The Device On And Off
SignalShark User Manual Strg + Enter = double press Cancel the current operating step (changes in values are rejected), move back to a higher menu level Shift + F11 Open the Tasks menu Shift + F7 Open the Marker menu... -
Page 41: Touchscreen Control
10 seconds to switch off the device immediately without shutting down the operating system properly. Touchscreen control The SignalShark provides a resistive touchscreen allowing an easy and fast access by three basic touch gestures. • Tap: Tap for < 1 s. -
Page 42: Displaying Detailed System Information
In the system information menu, the current settings can be viewed only. To change settings, see Changing general settings. Device Information about the SignalShark firmware Options Overview of installed options Batteries Information about the condition of each battery GNSS... -
Page 43: Changing General Settings
Basic Operation Changing general settings ⇒ In the toolbar tap the button. Settings Change general device parameters like date, time or display brightness. All Tasks Set listed measurement parameters related to all tasks. Network Set network parameters. Antennas Set antenna configuration parameters. External Device Set configuration parameters for external devices. -
Page 44: Using Tasks And Views
SignalShark User Manual Using Tasks and Views The design and GUI layout of SignalShark is based on customer applications. This can be seen most clearly in the concept of Tasks and Views. Tasks The measurement task of a customer application often consists of several measurements, like finding a signal in the spectrum, measuring its level and drawing it into a map. -
Page 45: Views
Basic Operation Views A view is a window containing a specific visual representations of measurement data. Up to six views can be added to a task and arranged to you personal needs and taste. Figure: This example shows the two horizontally split views Spectrum and Spectrogram assigned to the RT Spectrum task. -
Page 46: Managing Tasks And Views
SignalShark User Manual Managing tasks and views After adding a task you may add additional views to that task and rearrange them to your needs. As default each new task opens with a Spectrum view. Adding a task 1. On the keypad press the Tasks key. - Page 47 Basic Operation Changing the position of a view 1. In the Button bar tap the Configure Task Views button. The ConfigTaskViews menu opens and the already added views are displayed. 2. Tap the move view button of the view you want to move. 3.
-
Page 49: Screen Overview
Screen Overview Basic measurement screen with night color scheme and two views (RT Spectrum, Spectrogram). System information This area shows system information like date, time and battery status. Tapping the dropdown icon opens the full system information menu. ⇒ For showing detailed system information, see Displaying detailed system information. -
Page 50: System Information Area
SignalShark User Manual System information area System information is displayed in the left panel of the upper status bar. Tapping the panel opens the full menu. The displayed icons depend on the current running measurements and device status: Shows the current date. -
Page 51: Progress Bar
Screen Overview Progress bar The progress of a measurement is displayed in the progress bar above the graph: ⇒ For displaying detailed system information, see Displaying detailed system information. Toolbar In the toolbar the general settings menu and other frequently used functions are grouped.ddd Last / next action in history. -
Page 52: Button Bar
SignalShark User Manual Button bar The Button bar is your main access to change measurement settings, to configure the current active view and to adapt the display settings to your needs. The Button bar is context sensitive. Thus, the available buttons depend on the active view. - Page 53 Screen Overview ⇒ Short tap the button to change settings only. Buttons with a filled triangle (e.g. Configure) These buttons show a submenu when tapped. Some buttons even may have several submenus. ⇒ To close the submenus, tap the header of the Button bar or press the Esc key until Main is displayed.
-
Page 54: Measurement Info Bar
SignalShark User Manual Measurement info bar The measurement info bar on the bottom of the screen gives information about the current measurement. The contents of the display may vary, depending on the operating mode. Measurement settings The displayed parameters depend on the selected application. -
Page 55: Using Markers
Using Markers The Marker function is very useful for marking and comparing specific individual frequencies in the display: • Eight independent markers • Individual display of each marker or display of the delta between the markers • Automatic location of peak values •... -
Page 56: Setting Markers Individually
SignalShark User Manual Trace Specify on which trace the marker is to be used. Demod (Not yet implemented.) Add Trans Allows to add the signal selected by the active marker to the transmitter table. (Not yet implemented.) Table Choose, how the active markers are displayed in the marker table: •... -
Page 57: Using The Marker Configuration Menu
Using Markers Using the Marker Configuration menu Using the Marker Configuration menu Instead of setting markers individually from the button bar markers can also be configured fast and easily via the Marker Config menu. Changing the configuration: 1. Press the Marker key. 2. -
Page 58: Markers
SignalShark User Manual Markers Shows the eight markers and their current settings. Marker No. Marker 1 to 8. Enabled Marker is enabled/disabled. Type M = Single marker, D = Delta marker Ref. Referenced marker if marker is set to delta. -
Page 59: Fxd Marker
Using Markers FXD Marker The FXD Marker menu allows to set a marker to a fixed frequency, time, or value. Frequency Enter a frequency as marker position. Time Enter a time as marker position. Value Enter an absolute power level as marker position. Search The Search menu allows to set various parameters for setting markers to a peak, e.g. -
Page 60: Functions
SignalShark User Manual Auto peak Search Marker 1 always shows highest peak. for M1 Exclude LO Only frequencies higher than 4 x RBW are evaluated. Low frequencies, DC portion, and mirror frequencies are excluded. Peak Excursion Peak Excursion determines what is considered a peak in contrast to noise. -
Page 61: Working With Delta Markers
Using Markers Working with delta markers All markers can be set to show values according to their position or to display deltas to another marker. The settings can be changed directly from the Button bar or from the Marker Configuration menu. Setting a marker to delta from the Button bar A delta marker can be defined directly from the Button bar. -
Page 63: Spectrum View
Spectrum View The spectrum view shows the level over the frequency. All the field components in the selected range can be recorded to give an overview of the detected spectrum or to determine the maximum values in Spectrum view. The extended functions of the device enable you to perform optimum evaluation of the measured values directly on site. -
Page 64: Setting The Reference Level / Attenuation Value (Ref. Level / Attenuator)
SignalShark User Manual Setting the reference level / attenuation value (Ref. Level / Attenuator) Here you can do the following: • Set the Reference Level (RL) or Attenuator value (depends on the Entry Mode setting). • Select the RF input •... -
Page 65: Setting The Attenuator Value (Attenuator)
Spectrum View Setting the attenuator value (Attenuator) You selected the desired view. Attn is selected as entry mode. 1. Tap the Attenuator button. The settings menu opens. 2. Enter the required value and tap the unit button. ... -
Page 66: Setting The Measurement Frequency (Fcent / Fspan, Fstart / Fstop)
SignalShark User Manual Setting the measurement frequency (Fcent / Fspan, Fstart / Fstop) Here you can set the measurement frequency. Depending on the Entry Mode setting the frequency can be entered in two modes: • Entry Mode = Fcent: Define a center frequency and a frequency span. -
Page 67: Setting The Resolution / Emc Bandwidth (Rbw / Ebw)
Spectrum View Setting the stop frequency (Fstop) 1. Tap the Fstop button. 2. Enter the required value and select a unit. The setting is accepted immediately and the dropdown list is closed. Setting the step width (Fstep) 1. Long tap the Fstart button. ... -
Page 68: Setting The Resolution / Emc Bandwidth (Rbw / Ebw)
SignalShark User Manual Setting the resolution / EMC bandwidth (RBW / EBW) You selected the desired view. To set the resolution / EMC bandwidth: 1. Tap the RBW / EBW button. 2. Enter the required value and select a unit. -
Page 69: Setting The Measurement Time (Meas. Time)
Spectrum View Setting the measurement time (Meas. Time) Here you can set the measurement time. The measurement or detector time defines the time range used by the internal detectors to calculate their values (+Pk, RMS, -Pk, ...). To set the measurement time: ... -
Page 70: Defining The Stop Behavior (Stop Mode)
SignalShark User Manual Defining the stop behavior (Stop Mode) The stop mode value changes the behavior of the measurement engine, after the Run key is pressed. • Hold: Measurement continues in the background. • Stop: Measurement stops and runs again. -
Page 71: Changing General Display Settings (Display)
Spectrum View • Detector 2: RMS • Detector 3: The function of the third detector can be set via the context menu as follows: – -Pk (Minus Peak) – Avg (Average) – Smp (Sample) In order to be able to view very fast signals with the naked eye (the measurement time is partly 10 ms), there is a downstream compression for these detectors, which the user can display as an additional trace. -
Page 72: Lmax
SignalShark User Manual Lmax Here you can do the following: • Set the zero level of the y-axis • Set the Entry Mode: Absolute or Relative • Set the Coupling: On / Off (not available in Level Meter view) When coupling is set to On, the views of a task are coupled (e.g. the axis). -
Page 73: Lrange
Spectrum View Lrange The Lrange button allows you to set the range of the y-axis. To set the y-axis range: 1. Tap the Display button. 2. Tap the Lrange button. 3. Enter the required value and tap the unit button. ... -
Page 75: Level Meter View
Level Meter View The Level Meter view allows you to make selective measurements at a defined frequency (Fcent) e.g. for monitoring the field strength of a communications channel. The channel bandwidth (CBW) for this can be set in the range 25 Hz to 40 MHz (zero span mode). Steep filters enable precise separation of adjacent channels. -
Page 76: Setting The Reference Level / Attenuation Value (Ref. Level / Attenuator)
SignalShark User Manual Setting the reference level / attenuation value (Ref. Level / Attenuator) Here you can do the following: • Set the Reference Level (RL) or Attenuator value (depends on the Entry Mode setting). • Select the RF input •... -
Page 77: Setting The Attenuator Value (Attenuator)
Level Meter View Setting the attenuator value (Attenuator) You selected the desired view. Attn is selected as entry mode. 1. Tap the Attenuator button. The settings menu opens. 2. Enter the required value and tap the unit button. ... -
Page 78: Setting The Tuner Frequency (Ftune)
SignalShark User Manual Setting the tuner frequency (Ftune) Here you can set the tuner frequency and step width. Setting the tuner frequency (Ftune) You selected the desired view. 1. Tap the Ftune button. 2. Enter the required value and select a unit. -
Page 79: Selecting A Filter Type
Level Meter View Selecting a filter type You selected the desired view. 1. Long tap the CBW / EBW button. (The displayed button label depends on the currently selected filter type.) The context menu opens. 2. Tap the Filter Type button and select the desired filter type from the dropdown list. 3. -
Page 80: Configuring The Measurement Performance (Config)
SignalShark User Manual Configuring the measurement performance (Config) Here you can define how measurements are performed. You selected the desired view. 1. Tap the Config button. 2. Then you can do the following: Setting the number of measurements (Scan. No) Sets the number of measurements for a single run measurement until the measurement stops. -
Page 81: Setting The Detectors (Detectors)
Level Meter View To change these parameters: 1. Tap the toggle button to select Hold or Stop. 2. Press the Esc key or tap the header to close the menu. Setting the detectors (Detectors) With the Detectors button, the three detectors can be set to a detector type or switched off. Open the Detectors menu: ... -
Page 82: Changing Display Settings
SignalShark User Manual Changing display settings Lmax Here you can do the following: • Set the zero level of the y-axis • Set the Entry Mode: Absolute or Relative • Set the Coupling: On / Off (not available in Level Meter view) When coupling is set to On, the views of a task are coupled (e.g. - Page 83 Level Meter View Lrange The Lrange button allows you to set the range of the y-axis. To set the y-axis range: 1. Tap the Display button. 2. Tap the Lrange button. 3. Enter the required value and tap the unit button. ...
-
Page 84: Using Tone Search (Display And Tone)
Using tone search (Display and Tone) Basic steps for using tone search: 1. Connect the antenna handle with an appropriate antenna to the SignalShark. 2. Add a RT Spectrum task (if not already available) and add a Level Meter view to the task... -
Page 85: Persistence View
Persistence View The Persistence View displays the signal level over time using a color spectrum. The colors from blue to green to red indicate the frequency of the occurrence, whereby blue is the lowest and red the most frequent value. Available buttons For information about the different types of buttons and how to select them see Button... -
Page 86: Setting The Reference Level / Attenuation Value (Ref. Level / Attenuator)
SignalShark User Manual Setting the reference level / attenuation value (Ref. Level / Attenuator) Here you can do the following: • Set the Reference Level (RL) or Attenuator value (depends on the Entry Mode setting). • Select the RF input •... -
Page 87: Setting The Attenuator Value (Attenuator)
Persistence View Setting the attenuator value (Attenuator) You selected the desired view. Attn is selected as entry mode. 1. Tap the Attenuator button. The settings menu opens. 2. Enter the required value and tap the unit button. ... -
Page 88: Setting The Measurement Frequency (Fcent / Fspan, Fstart / Fstop)
SignalShark User Manual Setting the measurement frequency (Fcent / Fspan, Fstart / Fstop) Here you can set the measurement frequency. Depending on the Entry Mode setting the frequency can be entered in two modes: • Entry Mode = Fcent: Define a center frequency and a frequency span. -
Page 89: Setting The Resolution / Emc Bandwidth (Rbw / Ebw)
Persistence View Setting the stop frequency (Fstop) 1. Tap the Fstop button. 2. Enter the required value and select a unit. The setting is accepted immediately and the dropdown list is closed. Setting the step width (Fstep) 1. Long tap the Fstart button. ... -
Page 90: Setting The Resolution / Emc Bandwidth (Rbw / Ebw)
SignalShark User Manual Setting the resolution / EMC bandwidth (RBW / EBW) You selected the desired view. To set the resolution / EMC bandwidth: 1. Tap the RBW / EBW button. 2. Enter the required value and select a unit. -
Page 91: Configuring The Measurement Performance (Config)
Persistence View Configuring the measurement performance (Config) Here you can define how measurements are performed. You selected the desired view. 1. Tap the Config button. 2. Then you can do the following: Selecting the persistence type (Pers. Type) The persistence can be displayed as average or maximum. To select the persistence type: 1. -
Page 92: Changing The General Display Settings
SignalShark User Manual Changing the general display settings Here you can change general display settings such as the zero point of the Y-axis, the range of the Y-axis or the axis unit (the available settings depend on the current view). -
Page 93: Lrange
Persistence View Lrange The Lrange button allows you to set the range of the y-axis. To set the y-axis range: 1. Tap the Display button. 2. Tap the Lrange button. 3. Enter the required value and tap the unit button. ... -
Page 94: Limits
SignalShark User Manual Limits The Limits button allows you to select how limits are handled: • Clip: Signals below the Min. Probability limit (marked in dark blue) are displayed. • Omit: Signals below the Min. Probability limit (marked in dark blue) are hidden. This improves the clarity of the graph. -
Page 95: Spectrogram View
Spectrogram View The spectrogram allows the display of the signal strength over time of a spectrum while colors represent the signal level. RMS, +Pk and -Pk are available as detectors. Detectors compress the high-speed real time spectra to the selected time resolution. Available buttons For information about the different types of buttons and how to select them see Button... -
Page 96: Setting The Reference Level / Attenuation Value (Ref. Level / Attenuator)
SignalShark User Manual Setting the reference level / attenuation value (Ref. Level / Attenuator) Here you can do the following: • Set the Reference Level (RL) or Attenuator value (depends on the Entry Mode setting). • Select the RF input •... -
Page 97: Setting The Attenuator Value (Attenuator)
Spectrogram View Setting the attenuator value (Attenuator) You selected the desired view. Attn is selected as entry mode. 1. Tap the Attenuator button. The settings menu opens. 2. Enter the required value and tap the unit button. ... -
Page 98: Setting The Measurement Frequency (Fcent / Fspan, Fstart / Fstop)
SignalShark User Manual Setting the measurement frequency (Fcent / Fspan, Fstart / Fstop) Here you can set the measurement frequency. Depending on the Entry Mode setting the frequency can be entered in two modes: • Entry Mode = Fcent: Define a center frequency and a frequency span. -
Page 99: Setting The Resolution / Emc Bandwidth (Rbw / Ebw)
Spectrogram View Setting the stop frequency (Fstop) 1. Tap the Fstop button. 2. Enter the required value and select a unit. The setting is accepted immediately and the dropdown list is closed. Setting the step width (Fstep) 1. Long tap the Fstart button. ... -
Page 100: Setting The Resolution / Emc Bandwidth (Rbw / Ebw)
SignalShark User Manual Setting the resolution / EMC bandwidth (RBW / EBW) You selected the desired view. To set the resolution / EMC bandwidth: 1. Tap the RBW / EBW button. 2. Enter the required value and select a unit. -
Page 101: Configuring The Measurement Performance (Config)
Spectrogram View Configuring the measurement performance (Config) Here you can define how measurements are performed. You selected the desired view. 1. Tap the Config button. 2. Then you can do the following: Setting the number of spectrogram frames (Sgram Frames) Here you can set the number of measured and displayed spectrogram lines. -
Page 102: Setting The Detectors (Detectors)
SignalShark User Manual To change these parameters: 1. Tap the toggle button to select Hold or Stop. 2. Press the Esc key or tap the header to close the menu. Setting the detectors (Detectors) Here you can do the following: •... -
Page 103: Changing General Display Settings (Display)
Spectrogram View Changing general display settings (Display) Here you can change general display settings such as the zero point of the Y-axis, the range of the Y-axis or the axis unit (the available settings depend on the current view). To open the Display menu: ... -
Page 104: Lrange
SignalShark User Manual Lrange The Lrange button allows you to set the range of the y-axis. To set the y-axis range: 1. Tap the Display button. 2. Tap the Lrange button. 3. Enter the required value and tap the unit button. -
Page 105: Peak Table View
Peak Table View Available buttons For information about the different types of buttons and how to select them see Button bar. ⇒ Tap a button to change setting or to open the submenu. Ref. Level / Attenuator Fcent/Fspan, Fstart/Fstop RBW / EBW Meas. -
Page 106: Setting The Reference Level / Attenuation Value (Ref. Level / Attenuator)
SignalShark User Manual Setting the reference level / attenuation value (Ref. Level / Attenuator) Here you can do the following: • Set the Reference Level (RL) or Attenuator value (depends on the Entry Mode setting). • Select the RF input •... -
Page 107: Setting The Attenuator Value (Attenuator)
Peak Table View Setting the attenuator value (Attenuator) You selected the desired view. Attn is selected as entry mode. 1. Tap the Attenuator button. The settings menu opens. 2. Enter the required value and tap the unit button. ... -
Page 108: Setting The Measurement Frequency (Fcent / Fspan, Fstart / Fstop)
SignalShark User Manual Setting the measurement frequency (Fcent / Fspan, Fstart / Fstop) Here you can set the measurement frequency. Depending on the Entry Mode setting the frequency can be entered in two modes: • Entry Mode = Fcent: Define a center frequency and a frequency span. -
Page 109: Setting The Resolution / Emc Bandwidth (Rbw / Ebw)
Peak Table View Setting the stop frequency (Fstop) 1. Tap the Fstop button. 2. Enter the required value and select a unit. The setting is accepted immediately and the dropdown list is closed. Setting the step width (Fstep) 1. Long tap the Fstart button. ... -
Page 110: Setting The Resolution / Emc Bandwidth (Rbw / Ebw)
SignalShark User Manual Setting the resolution / EMC bandwidth (RBW / EBW) You selected the desired view. To set the resolution / EMC bandwidth: 1. Tap the RBW / EBW button. 2. Enter the required value and select a unit. -
Page 111: Setting The Lower And Upper Frequency Limits (Lower Freq. Lim. / Upper Freq. Lim.)
Peak Table View Setting the lower and upper frequency limits (Lower Freq. Lim. / Upper Freq. Lim.) 1. Tap the button to set the lower or upper frequency limit. 2. Enter the required value and select a unit. 3. Press the OK key. Setting the threshold (Threshold) 1. -
Page 112: Editing The Peak Excursion Value (Peak Excursion)
SignalShark User Manual Editing the peak excursion value (Peak Excursion) Peak excursion defines the minimum level by which a signal must fall or rise in order to be recognized as a maximum. ⇒ Tap the button and enter the Peak Excursion value. -
Page 113: Changing General Display Settings (Display)
Peak Table View • Detector 2: RMS • Detector 3: The function of the third detector can be set via the context menu as follows: – -Pk (Minus Peak) – Avg (Average) – Smp (Sample) In order to be able to view very fast signals with the naked eye (the measurement time is partly 10 ms), there is a downstream compression for these detectors, which the user can display as an additional trace. -
Page 115: Administration
Administration Operating System This chapter describes the handling of the Windows operating system of the SignalShark. Please note, that only features are described which are special to the SignalShark. For general information about the Windows operating system see Related documents. -
Page 116: Updating The Operating System
SignalShark User Manual Auto Logon To disable Auto Logon: 1. On the desktop click the Disable_AutoLogon button. A Registry Editor warning opens. 2. Click Yes to continue. A Registry Editor message opens. 3. Click OK. To enable Auto Logon: 1. -
Page 117: Activating Windows
• The SignalShark was connected to an external storage medium such as an SD card or a USB memory card. • The SignalShark was made available to other people as a demo unit or as an exhibit at a trade fair, for example. -
Page 118: Narda Recovery Environment
Following menu is displayed: • Continue: Windows will start normal • Shutdown: System will shutdown • Boot from USB: This can be used to boot from the Narda Recovery Stick • USB Backup and Recovery: This is the backup and recovery tool... -
Page 119: Narda Recovery Stick
We recommend making a backup of the device system partition using the “Narda Recovery Environment”. With this toolset, you can recover the system image in case of malfunctions. If you missed to make a backup image or you cannot reach the “Narda Recovery Environment” anymore, Narda offers a bootable, ready-to-use USB recovery stick. - Page 120 SignalShark User Manual To use the Narda Recovery Stick If the operating system fails to start, the system will automatically boot into the Narda Recovery Environment. If so, please follow the steps below to restore the device system from USB stick: 1.
-
Page 121: Related Documents
Administration 5. To apply the image to the system, press the Start Recovery button. The system image will now be restored. The progress is shown in the progress bar. After the image recovery process is executed successfully, the system will reboot and show the measurement application. -
Page 122: Installing Options
2. Tap the Options tab. The installed options are displayed. Updating the firmware To update the SignalShark firmware: 1. Start the locally stored exe file. 2. Enter the Admin password. The default password is changeme. 3. Select Local installation (default) and click the arrow on the upper right corner to proceed. -
Page 123: Remote Control
The device can be remote controlled by SCPI commands. All remote commands can be found in the Command Reference Guide which is available as a PDF document. ⇒ To download the PDF from the Narda web site (customer login needed), tap www.narda-... -
Page 125: Legal Disclosure
This Software License Agreement is issued by Narda STS. Possession of a license entitles the user to use the software within the following provisions: 1. Narda Safety Test Solutions reserves all rights (including IP rights) in relation to the Software and Materials that are not expressly granted to you in this Software License Agreement. - Page 126 • Resulting from the product safety / liability law; • Resulting from, at least, a gross negligent breach of duty by Narda or its explicit agent. Furthermore, the limitation of liability is not valid for damages resulting from, at least, a gross negligent breach of the fundamental duties of this Agreement.
- Page 127 Convention on the International Sale of Goods shall not apply to this Agreement. 7.2 The Place of Jurisdiction for any dispute between the Parties shall be Tuebingen (Germany). Address: Narda Safety Test Solutions GmbH Sandwiesenstr. 7 D-72793 Pfullingen Managing director: Dipl.-Ing.
-
Page 128: Acknowledgements
General Acknowledgements SignalShark® 3310 – Firmware ® Names and logo are registered trademarks of Narda Safety Test Solutions GmbH and L3 Communications Holdings, Inc. Trade names are trademarks of the owners. Copyright © 2018 Narda Safety Test Solutions GmbH. All rights reserved. - Page 129 Legal Disclosure HDF5-Licence Copyright Notice and License Terms for HDF5 (Hierarchical Data Format 5) Software Library and Utilities HDF5 (Hierarchical Data Format 5) Software Library and Utilities Copyright (c) 2006, The HDF Group. NCSA HDF5 (Hierarchical Data Format 5) Software Library and Utilities Copyright (c) 1998-2006, The Board of Trustees of the University of Illinois.
- Page 130 SignalShark User Manual Portions of HDF5 were developed with support from the University of California, Lawrence Livermore National Laboratory (UC LLNL). The following statement applies to those portions of the product and must be retained in any redistribution of source code, binaries,...
- Page 131 Legal Disclosure Revocable, royalty-free, nonexclusive sublicense to use SZIP compression software routines and underlying patents for non-commercial, scientific use only is hereby granted by ICs, LLC, to users of and in conjunction with HDF data storage and retrieval file format and software library products.
- Page 132 SignalShark User Manual "Original Version" refers to the collection of Font Software components as distributed by the Copyright Holder(s). "Modified Version" refers to any derivative made by adding to, deleting, or substituting – in part or in whole – any of the components of the Original Version, by changing formats or by porting the Font Software to a new environment.
- Page 133 Legal Disclosure The above copyright notice and this permission notice shall be included in all copies or substantial portions of the Software. THE SOFTWARE IS PROVIDED "AS IS", WITHOUT WARRANTY OF ANY KIND, EXPRESS OR IMPLIED, INCLUDING BUT NOT LIMITED TO THE WARRANTIES OF MERCHANTABILITY, FITNESS FOR A PARTICULAR PURPOSE AND NONINFRINGEMENT.
-
Page 135: Glossary
Glossary Glossary -Pk: Trace showing negative peaks +Pk: Trace showing positive peaks Attn: Attenuation Avg: Trace showing average values AvR: Trace showing average of RMS CBW: Channel bandwidth DF: Direction Finding EBW: EMC bandwidth Fcent: Center frequency Fspan: Frequency span FXD: Fixed -->... - Page 136 SignalShark User Manual MxR: Trace showing maximum of RMS MxS: Trace showing maximum of Smp (Sample) NBW: Noise bandwidth RBW: Resolution bandwidth RL: Reference level RMS: Root mean square RT: Real time --> see "Real-Time Spectrum Mode" RTBW: Real-time bandwidth SCPI: Standard Commands for Programmable Instruments.
-
Page 137: Index
Index Index Spectrogram 103 Adapter / charger operation 39 Spectrum 68 Antenna handle 22 Entry Mode Level Meter 76 Battery Peak Table Changing 38 Fcent / Fspan, Fstart / Fstop 114 Charging 37 Ref. Level / Attenuator 112 Compartment 29 Persistance Operation 37 Display 95... - Page 138 SignalShark User Manual General settings 43 Peak Table View Configuration 117 Display 121 Installing Options 130 Persistance View Internet security 125 Configuration 94 Display 95 Keypad and keyboard 39 Power supply 20 Protection against malware 125 Level Meter View Configuration 81...
- Page 139 User management 123 Update Firmware 130 Views and Tasks 44 Windows 124 User actions 25 Windows activation 125 User documentation 17 Windows Update 124...
Need help?
Do you have a question about the SignalShark and is the answer not in the manual?
Questions and answers