Advertisement
Safety
Please read the entire instruction manual before using the product and then save it for future reference. We reserve the right for any errors in text or images and any necessary changes made to technical data. If you have any questions concerning technical problems please contact our Customer Services.
 Read and observe all safety information in order to ensure safe use of the product. If the product is not used in accordance with these instructions, the built-in safety mechanisms might not work correctly. Ensure that all safety and warning labels on the product remain legible.
SAVE THESE INSTRUCTIONS AND LET THE MANUAL ACCOMPANY THE METER IN THE EVENT OF A CHANGE IN OWNERSHIP.

Use of other equipment or use of the product in a different way than that described in this instruction manual can lead to the user being exposed to hazardous laser radiation.
The product has a warning label.

If the text on the warning label is not in your mother tongue, stick the included label with the correct language over the warning label before using the product for the first time.
 Do not direct the laser beam towards other people or animals and never look directly into the beam or a reflection of the beam. Laser beams can blind others, cause accidents or damage your eyes.
- If the laser is directed towards your eye, close your eye immediately and avert your gaze away from the beam.
- Laser viewing glasses must not be used as safety glasses. Laser viewing glasses are intended to help laser beams to be more visible, they do not protect eyes from direct laser radiation.
- Do not use the laser viewing glasses as sunglasses or for driving a vehicle. They do not protect against UV-radiation and impair colour perception.
- The product must only be repaired by qualified service technicians using original spare parts. This will ensure that the product can be used in a safe way.
- Never permit children to use the product without constant supervision.
If children are permitted to use the product on their own they could accidentally blind themselves or others. - Never use the product in areas where explosive or flammable gases or substances are stored. Avoid using the product in dusty environments. The product may produce sparks which might cause dust or explosive/ flammable substances to ignite or explode.
- Never open the casing or attempt to modify the product in any way.
Laser classification

This meter produces a visible laser beam from the front of the instrument: it is a Class 2 laser in accordance with: IEC60825-1: 2014 Safety of laser products.
Laser class 2 products

Do not stare into the laser beam or direct it towards other people or animals. Risk of serious damage to eyes.
Do not look directly into the beam with optical aids such as binoculars or telescopes. Risk of serious damage to eyes.
Product safety symbols

Read the entire instruction manual.

Laser class 2
- Make sure not to remove or damage the safety symbols and warnings found on the distance meter.
- Never try to open the housing, repair or modify the distance meter in any way.
- Only use accessories that are recommended by the manufacturer or retailer.
- Never use the distance meter where flammable or explosive substances are used or stored.
- Do not use the distance meter on or near highly reflective surfaces since the laser beam can be reflected back into your own or someone else's eyes.
- Keep the laser distance meter out of children's reach.
- Labelling: Subject to change (drawings, descriptions and technical data) without prior notice.
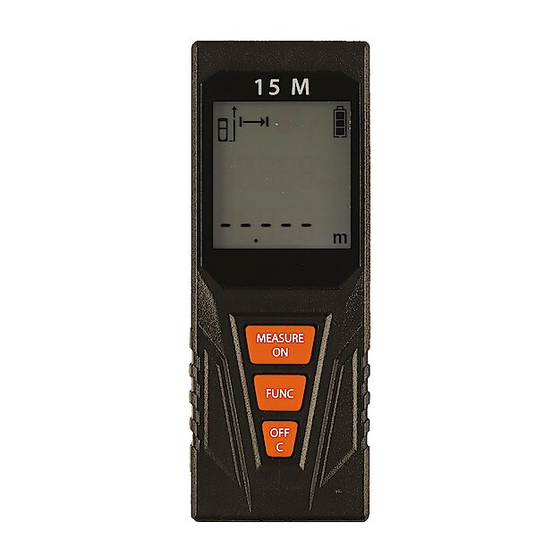
Product description
The distance meter is designed for measuring distances, lengths, heights and calculating area and volume. The distance meter is designed for both indoor and outdoor use.

- [ MEASURE/ON ] Turns on the distance meter. Turns on the laser. Measures distance.
- [ FUNC ] Function selector: Single length, area or volume measuring.
- [ OFF/C ] Clears measurements, turns off distance meter
- Battery compartment release latch
- Battery cover
- Laser transmission lens
- Laser reception lens
Display a – h
- Laser ON
- Length measurement
- Displays selected function: Area or volume measurement
- Malfunction - service required
- Battery symbol
- Measurement reference point - front or back edge of the meter
- Measurement values
- Unit of measure: m (metres), ft (feet), in (inches) or - - -' - -' (feet, inches).
Operating instructions
Batteries
- Open the battery compartment (5) on the back of the meter and insert 2 × AAA/ LR03 batteries. Refer to the markings in the battery compartment to ensure correct polarity. Never mix old and new batteries. Never mix rechargeable and non-rechargeable batteries.
Note:
Using rechargeable batteries (1.2 V) will shorten the usage time. - Refit the battery cover.
- Change the batteries whenever the battery symbol (e) shows that the batteries are flat.
Selecting measuring units
- When the distance meter is turned on it will display the default measuring units, which are in m (metres).
- Hold in [ FUNC ] and press [ MEASURE/ON ] to change measuring units: m
- (metres), ft (feet), in (inches) or - - -' - -' (feet, inches).
- Whenever the distance meter is restarted it will automatically revert back to the default display units which are in m (metres).
Selecting the measuring reference point, front or back edge of the meter
 The default reference point is from the rear edge of the meter when the meter is turned on. Hold in [ FUNC ] and press [ OFF ] to toggle between measuring from the rear of the meter to the front and vice-versa.
Selecting a measuring function
Select the desired mode by pressing [ FUNC ] until the desired function is reached.
The chosen function will now be shown on the display.
 for single length measuring,
  for area or
  for volume.
Note:
Measuring errors may occur when measuring against colourless liquids, glass, soft plastic, or semi-transparent or high-gloss surfaces. Against very dark surfaces the time taken to display the measurement may increase.
Note:
The distance meter must be held completely still during the entire measuring process (except when in continuous measurement mode).
- Never leave the meter switched on unattended and always switch it off when it is not in use. Other persons can be blinded by the laser radiation.
- Do not expose the meter to moisture or prolonged sunlight.
- Do not expose the meter to extreme temperatures or changes in temperature. Example: Do not leave the meter in your car for an extended period. If the meter is subjected to significant changes in temperature, let it acclimatise to the ambient temperature before switching it on. Large changes in temperature can have a negative effect on the accuracy of the meter.
- Do not subject the meter to impacts or shocks. The accuracy of the meter should be checked if it has been subjected to impacts or shocks.
- Remember never to obstruct the laser beam or reception lens when measuring is in progress.
Single distance measurement
- Press [ MEASURE/ON ] to switch the distance meter on.
- The distance meter starts in default mode: Length measured and from the rear edge of the device. Change modes if needed.

- Press [ MEASURE/ON ] again to activate the laser (its symbol will then show on the display). Aim the laser beam at the target surface.
- Press [ MEASURE/ON ] again to complete the measurement. After a few seconds, the reading will appear on the display.
- Press [ MEASURE/ON ] again, the previous measurement moves upwards on the display and the meter is ready for a new measurement.
- Press [ MEASURE/ON ]. The new measurement will then appear below the original measurement on the display and so on.
- Press [ OFF/C ] to clear the measurements.
- Hold in for 2 seconds to turn the distance meter off.

Do not direct the laser beam towards other people or animals and never look directly into the beam.
Continuous length measurement
Continuous measuring means that you can move the distance meter towards and away from the target surface and the distance will be continuously shown on the display.
- Press [ MEASURE/ON ] to activate the laser.
- Aim the laser beam at the target surface.
- Hold in [ MEASURE/ON ] until the measurement is shown on the display. You can now move the distance meter towards and away from the target surface and the distance will be continuously shown on the display.
- Press [ MEASURE/ON ] to interrupt the continuous measurement function.
- Press [ OFF/C ] to clear the measurement.
- Hold in [ OFF/C ] for a few seconds to turn the distance meter off.
Measuring area

- Press [ MEASURE/ON ] to switch the distance meter on.
- Change the measuring function to area measuring by pressing [ FUNC ].
- Press [ MEASURE/ON ] again to activate the laser (its symbol will then show on the display). Aim the laser beam at the target surface.
- Press [ MEASURE/ON ] again to complete the measurement. After a few seconds, the reading will appear on the display.
- Press [ MEASURE/ON ] again, the previous measurement moves upwards on the display and the meter is ready for the next measurement.
- Aim the laser beam at the target surface (perpendicular to the previous measurement) and press [ MEASURE/ON ] to complete measuring.
- After a few seconds, the result will appear on the display. The resulting area reading will appear at the bottom of the display in m² (or other set measuring unit).
- Press [ OFF/C ] to clear the measurements.
- Hold in [ OFF/C ] for a few seconds to turn the distance meter off.
Measuring volume

- Press [ MEASURE/ON ] to switch the distance meter on.
- Change the measuring function to volume measuring by pressing [ FUNC ].
- Press [ MEASURE/ON ] again to activate the laser (its symbol will then show on the display). Aim the laser beam at the target surface 1.
- Press [ MEASURE/ON ] again to complete the measurement. After a few seconds, the reading will appear on the display.
- Press [ MEASURE/ON ] again, the previous measurement moves upwards on the display and the meter is ready for the next measurement.
- Aim the laser beam at the target surface 2 (perpendicular to the previous measurement) and press [ MEASURE/ON ] to complete measuring.
- After a few seconds, the result will appear on the display.
- Press [ MEASURE/ON ] again to activate the laser (its symbol will then show on the display). Aim the laser beam at the target surface 3.
- Press [ MEASURE/ON ] again to complete the measurement. After a few seconds, the result will appear on the display.
- The resulting volume reading will appear at the bottom of the display in m³ (or other set measuring unit).
- Press [ OFF/C ] to clear the measurements.
- Hold in [ OFF/C ] for a few seconds to turn the distance meter off.
Error messages
| Error code | Cause | Correction |
| Error 10 | The batteries are flat. | Change the batteries. |
| Error 15 | Measurement is outside the measuring range. | Move meter closer to target area. |
| Error 16 | The received signal is too weak, measuring time too long. | Change target surface (to e.g. white paper). |
| Error 18 | The background is too bright. | Aim the laser beam towards a darker measuring target. |
| Error 26 | The measuring value is beyond the display's range. |
Care and maintenance
- Clean the product using a lightly moistened cloth. Use only mild cleaning agents, never solvents or corrosive chemicals.
- Never immerse the distance meter in water or other liquid.
- Whenever the distance meter is not to be used for an extended period, the batteries should be removed and it should be stored in a dry, dust-free environment, out of children's reach.
- Make sure that the reception lens is clean and undamaged.
Responsible disposal

This symbol indicates that this product should not be disposed of with general household waste. This applies throughout the entire EU. In order to prevent any harm to the environment or health hazards caused by incorrect waste disposal, the product must be handed in for recycling so that the material can be disposed of in a responsible manner. When recycling your product, take it to your local collection facility or contact the place of purchase. They will ensure that the product is disposed of in an environmentally sound manner.
Specifications
Batteries 2 × AAA/LR03 (sold separately)
Measuring range 0.05–15 m
Accuracy ±3.0 mm
Laser class 2
Laser type 650 nm, < 1 mW
Operating temperature −10 to 40°C (32–104°F)
Size 97 × 36 × 25 mm
Weight 80 g
Area, volume, single and continuous measurement
Automatic laser beam shut-off after approximately 30 sec
Automatic distance meter shut-off after approximately 180 sec of inactivity

Documents / ResourcesDownload manual
Here you can download full pdf version of manual, it may contain additional safety instructions, warranty information, FCC rules, etc.
Advertisement


Need help?
Do you have a question about the NLT05 and is the answer not in the manual?
Questions and answers