Advertisement
Available languages
Available languages
Quick Links
Digital Tyre Pressure Gauge
Art.no 40-8486
Model EM6083
Please read the entire instruction manual before use and save
it for future reference. We reserve the right for any errors in text
or images and for making any necessary technical changes to
this document. If you should have any questions concerning
technical problems please contact our Customer Services.
Safety
• The electronics and other components contained within
the pressure gauge cannot be adjusted or repaired.
Do not dismantle the pressure gauge.
• Never subject the pressure gauge to pressures exceeding
its rated upper limit.
• When changing the batteries, take care not to short-
circuit them.
• The tyre pressure gauge must not be exposed to extreme
temperatures, moisture, vibrations or direct sunlight for
an extended period of time.
Product description
• Digital tyre gauge with backlit LCD display.
• Measuring range: 0.3–6.8 bar.
• Readings in bar, PSI, kPa or kg/cm².
• Extendable tread depth gauge.
• Automatic shut-off.
• 2 × SR44/V357 batteries included.
Care and maintenance
Clean the product using a soft, moist cloth. Use a mild detergent
and never use solvents or strong, abrasive cleaning agents for
cleaning as these can damage the product.
Disposal
This product should be disposed of in accordance with local
regulations. If you are unsure how to proceed, contact your
local authority.
GREAT BRITAIN • customer service tel: 08545 300 9799 e-mail: customerservice@clasohlson.co.uk internet: www.clasohlson.com/uk
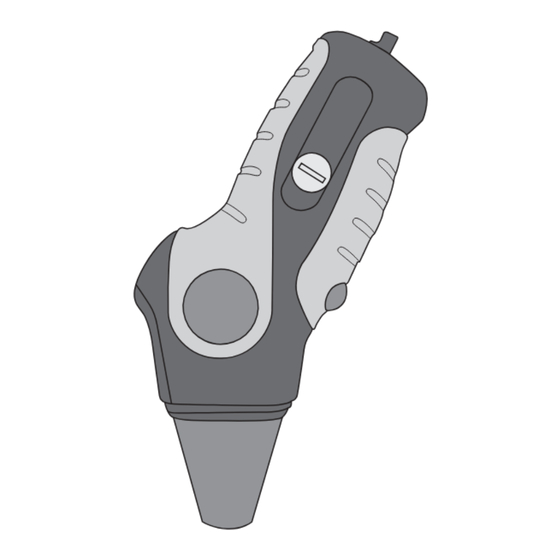
Buttons and functions
1. On/off button – press
and release to turn
2
on, press and hold to
turn off.
2. Nozzle.
3. LCD display – shows
3
the reading and selected
1
unit of measurement.
4
4. Battery compartment
(on the back).
5
5. Tread depth gauge
extend/retract control
button.
6. Tread depth gauge.
6
Operation
1. Turn the gauge on using the on/off button. The display will
come on and after about 2 seconds "0.0." will appear, to
indicate that the gauge is ready for use.
2. The gauge sets automatically to the unit of measurement
that was used last. The unit of measurement can be
changed by pressing the on/off button. Each press changes
the unit in the following sequence: PSI → bar → kPa →
kg/cm² → PSI, etc.
3. Press the nozzle over the valve of
the tyre. Make sure that the nozzle
forms an airtight seal over the valve.
Listen for any air escaping. If you hear
a hissing sound, move the nozzle
a little until the air stops escaping.
4. Wait for 2 seconds until the reading
on the display has stabilized. Double-
check the unit of measurement and
take the reading.
5. The reading will be displayed for
85 seconds before the pressure
gauge shuts off automatically. If you
measure the pressure of another tyre
within 85 seconds, the new reading
will be displayed.
6. Turn the pressure gauge off by
holding in the on/off button until
the display turns off.
Battery replacement
The batteries should be changed when the display is dim.
1. Turn the battery cover anticlockwise and remove it.
2. Remove the old batteries.
3. Insert 2 new SR44/V357 batteries with their negative
terminals facing downwards and then refit the battery cover.
Note: When changing the batteries, take care not to short-
circuit them.
General advice
• It is wise to check your tyre pressure regularly. The correct
tyre pressure will help ensure optimum fuel consumption,
improve road handling and reduce tyre wear.
• Always follow the manufacturer's recommended tyre pressures
which are based on the measurement of cold tyres.
• A tyre's rated maximum pressure is often stated on its wall.
• On some models of car the recommended tyre pressures
can be found on the fuel filler cap.
Measuring the depth of tread
• Press the depth gauge button.
• The depth gauge has two fixed positions, one at 5 mm and
the other at 27 mm.
• Insert the gauge into the shallowest groove of the tread and
measure the depth.
Specifications
3.0–99.5 PSI
Measuring range
0.3–6.8 bar
20.7–686 kPa
0.3–7 kg/cm²
Accuracy
± 1.5 PSI
Resolution
0.5 PSI
Units
PSI, bar, kPa and kg/cm²
Automatic shut-off
After 85 seconds
Batteries
2 × SR44/V357, 1.5 V
Operating temperature
0–50 °C
Storage temperature
-10–55 °C
135 × 80 × 32 mm
Size
Weight
60 g (incl. batteries)
Advertisement

Related Manuals for Clas Ohlson EM6083


Summary of Contents for Clas Ohlson EM6083
-
Page 1: Product Description
Buttons and functions Battery replacement The batteries should be changed when the display is dim. 1. On/off button – press Art.no 40-8486 Model EM6083 1. Turn the battery cover anticlockwise and remove it. and release to turn 2. Remove the old batteries. on, press and hold to Please read the entire instruction manual before use and save... - Page 2 Knappar och funktioner Byt batterier så här Byt batterier när displayen lyser svagt. 1. Strömbrytare – Tryck kort Art.nr 40-8486 Modell EM6083 1. Vrid batterilocket moturs och ta bort det. för att starta, håll in för 2. Ta ur de gamla batterierna.
- Page 3 Batterier skiftes på følgende måte Skift batterier når lyset på skjermen begynner å bli svakt. 1. Strømbryter – Trykk kort Art.nr. 40-8486 Modell EM6083 1. Drei batterilokket moturs og ta det av. for å starte og hold inne 2. Ta ut de gamle batteriene. for å slukke.
- Page 4 Painikkeet ja toiminnot Vaihda paristot näin Vaihda paristot, kun numerot näkyvät heikosti. 1. Virtakytkin – Käynnistä Tuotenro 40-8486 Malli EM6083 1. Kierrä paristolokeron kantta vastapäivään ja avaa lokero. painamalla nopeasti, 2. Poista vanhat paristot. sammuta painamalla 3. Aseta kaksi uutta SR44/V357-paristoa miinusnavat alaspäin Lue käyttöohjeet ennen tuotteen käyttöönottoa ja säilytä...
-
Page 5: Technische Daten
Tasten und Funktionen Batterieaustausch Die Batterie austauschen, wenn das Display schwach leuchtet. 1. Ein-/Ausschalter – zum Art.Nr. 40-8486 Modell EM6083 1. Die Batterieabdeckung gegen den Uhrzeigersinn drehen Einschalten kurz drücken, und abnehmen. zum Abschalten gedrückt 2. Die alten Batterien herausnehmen.
Need help?
Do you have a question about the EM6083 and is the answer not in the manual?
Questions and answers