Bender COMTRAXX CP9-I Series Manual
Condition monitor with display and integrated gateway, software version: v4.3.x
Hide thumbs
Also See for COMTRAXX CP9-I Series:
- Quick start manual (8 pages) ,
- Quick start manual (8 pages)

Related Manuals for Bender COMTRAXX CP9-I Series


Summary of Contents for Bender COMTRAXX CP9-I Series
- Page 1 COMTRAXX® CP9…-I Series Condition Monitor with display and integrated gateway Software version: V4.3.x Manual EN CP9xx-I_D00418_02_M_XXEN/04.2021...
- Page 2 Bender GmbH & Co. KG © Bender GmbH & Co. KG PO Box 1161 • 35301 Grünberg • Germany All rights reserved. Londorfer Straße 65 • 35305 Grünberg • Germany Reprinting only with permission Tel.: +49 6401 807-0 • Fax: +49 6401 807-259 of the publisher.
-
Page 3: Table Of Contents
Table of Contents 1. Important information ................... 7 How to use this manual ......................7 Technical support: service and support ................8 1.2.1 First level support ......................8 1.2.2 Repair service ........................8 1.2.3 Field service ........................9 Training courses ........................9 Delivery conditions ......................... - Page 4 Table of Contents Relay ............................24 Commissioning of the CP9…-I device ................25 Software products used ...................... 25 Browser configuration ......................25 5. Web user interface ....................26 Functions of the web user interface ................26 Software products used ...................... 27 Browser configuration ......................
- Page 5 Responses for function code 0x10 ................ 58 8.2.3 Exception code ......................58 Modbus system image ......................59 Bender Modbus image V1 (one address range for all interfaces) ................60 8.4.1 Querying data with Modbus function code 0x03 ..........60 8.4.2 Querying data with Modbus function code 0x04 ..........
- Page 6 Table of Contents 8.7.4 Modbus example for control commands ............. 82 9. SNMP ........................83 Data access using SNMP ..................... 83 Device assignment for SNMP .................... 83 10. Troubleshooting ....................84 10.1 Malfunctions ..........................84 10.1.1 What should be checked? ..................84 10.1.2 Frequently asked questions ..................
-
Page 7: Important Information
COMTRAXX® is a registered trademark of Bender GmbH & Co. KG. Terms used This manual explains Bender-specific terms and functions in detail. Familiarisation with general spe- cialist IT and network terminology is considered a prerequisite. These terms are therefore only ex- plained briefly in this manual. -
Page 8: Technical Support: Service And Support
This manual has been compiled with great care. It may nevertheless contain errors and mistakes. Bender cannot accept any liability for injury to persons or damage to property resulting from errors or mistakes in this manual. -
Page 9: Field Service
**Mo-Thu 7.00 am - 8.00 pm, Fr 7.00 am - 13.00 pm Training courses Bender is happy to provide training regarding the use of test equipment. The dates of training cours- es and workshops can be found on the Internet at www.bender.de > Know-how > Seminars. -
Page 10: Warranty And Liability
introduced to the market after 13th August 2005 must be taken back by the manufacturer and disposed of properly. For more information on the disposal of Bender devices, refer to our homepage at www.bender.de > Service & support. CP9xx-I_D00418_02_M_XXEN/04.2021... -
Page 11: Safety Instructions
CP9…-I show alarms, measured values and states of devices. These include, for example: All Bender devices with BMS bus or BCOM interface Bender devices (PEM, energy meters,…) with Modbus RTU or Modbus TCP interface Other devices with Modbus RTU or Modbus TCP interface ... -
Page 12: Product Description
Screwless mounted front plate Condition monitor for Bender systems Integrated modular gateway between Bender systems and TCP/IP Remote access via LAN, WAN or Internet Support of devices that are connected to the internal BMS bus, via BCOM, Modbus RTU or Mod- ... - Page 13 Product description Selectable display content – System overview with all devices, measured values, parameters and alarms – Individually configurable visualisation Ethernet interface with 10/100 Mbit/s for remote access via LAN, WAN or Internet Time synchronisation for all assigned devices ...
-
Page 14: Applications
In this way, all important system information is directly available. Verified web browsers: Microsoft IE, Mozilla Firefox, Google Chrome. BMS interface The majority of Bender devices communicate via the internal BMS bus. CP9…-I can be operated as a master or as a slave. CP9…-I is to be operated as a master if:... -
Page 15: Functional Description
The devices can only be operated on the internal BMS bus. BCOM (Ethernet) for new and future Bender systems, such as ISOMETER® iso685-D. Modbus RTU (RS-485) CP9…-I when operated as a master for Bender devices PEM… with restricted functionality (full functionality of PEM…5 only via Modbus TCP). -
Page 16: Process Image
Product description 3.7.2 Process image The CP9…-I prepares and saves a process image from the communication with the devices assigned. This process image contains alarms, status information and measured values from the devices as- signed. The CP9…-I combines the information from the different interfaces and makes it available for: Display and configuration via the system overview on the display or web interface ... -
Page 17: Mounting, Connection And Commissioning
Mounting, connection and commissioning 4. Mounting, connection and commissioning Only qualified personnel are permitted to carry out the work necessary to in- stall, commission and run a device or system. Functional ground The device must be earthed. Without connection of the functional earth, the device function is not guaranteed. -
Page 18: Flush-Mounting Enclosure Cp907-I
Mounting, connection and commissioning 4.1.2 Flush-mounting enclosure CP907-I Mounting of flush-mounting enclosures The supplied flush-mounting enclosures are only suitable for mounting in cavity walls. In drywall and stud frame constructions, the enclosures must be screwed at right angles to battens or to the stud frame structure. The enclosure must not warp during mounting. -
Page 19: Flush-Mounting Enclosure Cp915
Mounting, connection and commissioning TX20 0,8…1,0 Nm Dimensions in mm Fig. 4.3: Door mounting 4.1.4 Flush-mounting enclosure CP915 Mounting of flush-mounting enclosures The supplied flush-mounting enclosures are only suitable for mounting in cavity walls. In drywall and stud frame constructions, the enclosures must be screwed at right angles to battens or to the stud frame structure. - Page 20 Mounting, connection and commissioning Removing the CP915 front plate The front plate is removed from the enclosures of the CP915-I devices using a suction lifter. For this purpose, the suction lifter must be placed on the points marked below one after the other and the front plate must be removed until it clicks into place for the first time.
-
Page 21: Connection Of The Cp9
Mounting, connection and commissioning Connection of the CP9…-I device The CP9…-I is integrated into existing LAN structures, but can also be operated via a single PC. Configuration of computer networks If you are familiar with the configuration of computer networks, you can carry out the connection of the CP9…-I yourself. -
Page 22: Connect The Cp9
Mounting, connection and commissioning 4.2.1 Connect the CP9…-I device as follows: 1. Modbus RTU connection (7): Connect terminals AMB and BMB to the Modbus RTU (A to A, B to B). 2. BMS bus connection (7): Connect terminals ABMS and BBMS to the BMS bus (A to A, B to B). AMB BMB SMB ABMS BBMS SBMS... - Page 23 Mounting, connection and commissioning 7. Connect power supply Functional ground The device must be earthed. Without connection of the functional earth, the de- vice function is not guaranteed. CAUTION Electrostatic sensitive devices Observe precautions for handling electrostatic sensitive devices. Damage to components Do not remove the device from the enclosure during ongoing operation.
-
Page 24: Digital Inputs
Mounting, connection and commissioning 11. Connect the voltage supply to the power supply unit via the pre-assembled wiring. Connect the earth- ing to the front plate. Pre-assembled voltage supply 12. Attach the front plate to the built-in flush-mounting enclosure. Digital inputs CP9…-I devices feature 12 configurable digital inputs. -
Page 25: Commissioning Of The Cp9
Graphical display with scaling of the time axis for the data loggers of the gateway and compati- ble Bender devices. Software products used Select Tools > Information > Copyright to display the used software products. -
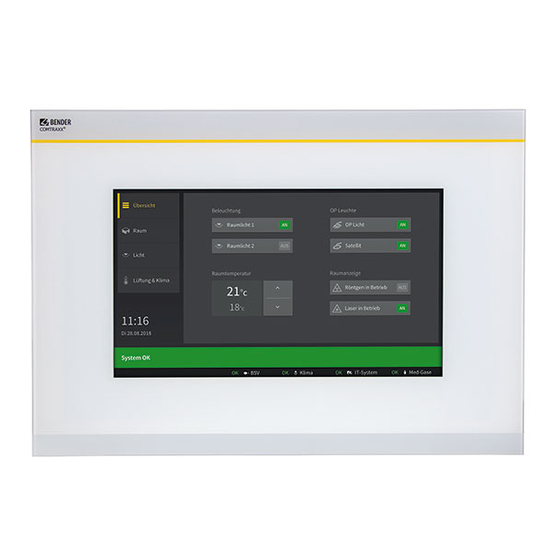
Page 26: Web User Interface
Web user interface 5. Web user interface The web user interface of the device enables access via LAN, WLAN or the Internet. It provides a uni- form display of Bender devices that are connected to: The internal BMS bus ... -
Page 27: Software Products Used
Graphical display with scaling of the time axis for the data loggers of the gateway and compati- ble Bender devices. Software products used Select Tools > Information > Copyright to display the used software products. -
Page 28: Headline
Web user interface 5.4.1 Headline Legend Clicking the logo: Return to home page Used device: Device type Used device: System name > Subsystem > Device address Date and time of the device The symbol indicates that the web user interface is protected by a password. Click the symbol and then click Login to enter the user name and password Language selection Open/close navigation (button only available in small browser window) -
Page 29: Subnavigation
Web user interface 5.4.4 Subnavigation The system overview is displayed in the subnavigation. Legend 1Full text search in the system for device names or menu entries. Matches are highlighted in yellow. 2Close unfolded tree in the subnavigation 3Fold out automatically: When enabled (= yellow), the displayed contents of the content area are shown in the subnavigation with automatically unfolding device tree in addi-... -
Page 30: Overview Of Pending Alarms
Web user interface 5.4.6 Overview of pending alarms Clicking the alarm overview List of pending alarms Clicking on the list Details about the alarms in the content area Making settings on the device Changes must be saved before leaving the respective mask. Otherwise they are discarded. 5.5.1 Digital input Menu >... -
Page 31: Relay
Web user interface 5.5.2 Relay Menu > Settings > Relay Setting options Options Explanation Normally Open Relay mode Normally Closed Cont. Relay remains permanently energised. Mode Imp. Relay is energised for one pulse. Flash Relay switches several times between active and inactive. "Imp."... -
Page 32: E-Mail
Web user interface 5.5.5 E-mail Menu > Settings > E-mail > Profile The following is set for 5 different profiles: Setting options Setting for…/Description Profile Active Server Timeout Settings Port Encryption Check certificate User Password Language Sender To (= addressee) Subject E-mail Messager header... -
Page 33: Clock
Web user interface 5.5.7 Clock Menu > Settings > Clock Setting options Setting for…/Description off, on, CEST, DST Summer time UTC offset off, on NTP server 5.5.8 Display Menu > Settings > Display Setting options Setting for…/Description Resolution Display Rotation Observe mounting direction of display Standard view System overview... -
Page 34: Buzzer
Web user interface The default user names and authorisations ("admin, read and write" and "user, read only") cannot be changed. Setting options for role Setting for…/Description Status enabled, disabled A…Z a…z Password 0…9 5.5.10 Buzzer Menu > Settings > Buzzer Volume (High, Normal, Low) ... -
Page 35: Visualisation
Visualisation 6. Visualisation The data from the Bender system can be displayed in a separate visualisation. It provides access to all measuring channel information, alarms and other data. The application is shown in a separate browser tab of the connected device and does not require any further plug-ins. The visualisation is configured in an editor. -
Page 36: The Headline
Visualisation The headline Project name File German 6.1.1 Drop-down menu "File" File Create a new project New project Create a new dashboard New dashboard Import project from PC Import existing project from PC Import current project from the device to PC Import active project from device Export created project to PC Export project to PC... -
Page 37: Language Selection
Visualisation 6.1.4 Language selection English Select the operating language of the editor. This is not necessarily the language of the automatically generated messages displayed on the device ( = export language) Czech German Greek English GB English US Spanish Finnish French Hebrew Croatian... -
Page 38: Widget Library
Visualisation In the "Selection" tab (right side) the dash- board can be named and also password protected ("Protected" yes/no). Password-protected dashboards are marked with a lock symbol in the dash- board list. Widget library All available widgets are included in a library. Use the scroll bar (right) to navigate to further widgets. -
Page 39: Widget List
Visualisation 6.4.1 Widget list Icon Labelling Explanation Alarm overview Syst. OK Display alarm messages in an alarm line. Settings are made at "Alarm addresses" in the COMTRAXX® user interface in the browser. Alarm Bar If several alarm messages are pending, the alarms are dis- played one after another. - Page 40 Visualisation Icon Labelling Explanation History memory Logger Table Display the history memory content of the device. The content to be displayed can be configured. Display measured value Voltage Measurement Display the measured value of a channel of a connected 20 V device.
-
Page 41: Placing Widgets In The Work Area
Visualisation 6.4.2 Placing widgets in the work area click drag & drop Clicking on the icon of an active widget in the widget library inserts it into the upper left corner of the work area. The widget can also be placed directly and freely on the work area with the mouse using "drag & drop". -
Page 42: Project Settings
Visualisation 6.5.1 Project settings Make individual project settings here. Set home page (dashboard list house icon) Time after which the system jumps back in case of inactiv- only relevant if return to home page is enabled Automatic return to home page ON/OFF Project name in the title bar Dashboard dimensions in pixels (the dimensions should be based on the size of the visual-... - Page 43 Visualisation 6.5.2.1 Predefined icon symbols and units Icon symbols One of 45 predefined icons can be selected from a selection menu. After selection, it is displayed on the left side of the respective widget. Radiation Attention Settings ...
- Page 44 Visualisation 6.5.2.2 "General" area The "General" area contains parameters which apply to all widgets. Labelled widgets have the additional parameter "Label". Position on the work area (in pixels) Default position in the work area is top/left Widget dimensions (in pixels) Position on the z level and angle of rotation Assigned automatically or by user Labelling widgets in the work area...
- Page 45 Visualisation 6.5.2.4 "Miscellaneous" area Select link destination from existing dashboards For "iFrame" widget Only for "Current state/Target state" and "Up/Down Button" widgets: Set limits and step size For "Cleaning Mode" widget in s CP9xx-I_D00418_02_M_XXEN/04.2021...
- Page 46 Visualisation 6.5.2.5 "Communication" area This function can be disabled. The source that does this is assigned here. Setting options depend on the widget Add new link When enabled, values can also be written back to a source by pressing and holding the button. Widgets RGB Color Picker and RGB Display: relative: 0…100 % absolute: 0…255...
- Page 47 Visualisation 6.5.2.6 "Appearance" area For selection options, see Table 6.1 Normal, Dashboard, Transparent, Tab Menu Alignment of the labelling on the element For selection options, see Table 6.2 Set indication accuracy 2.70000 is displayed as 2.7 For the "Label" and "Multiple Labels" widgets Add an additional line Standard labelling For the "Image", "Multiple Images"...
- Page 48 Visualisation "Logger Table appearance" area Number of the record Timestamp of the record Path of the measuring point Type of record (Alarm start, Alarm end, Device restart, Acknowledge, …) Value at occurrence of the alarm Maximum value for the duration of an alarm (only for "Alarm end") Description of the measuring point Type of alarm...
- Page 49 Visualisation "Clock appearance" area Numerical or interactive colour specification Mode Hour marker ON/OFF Seconds ON/OFF Display date ON/OFF Display time ON/OFF Display seconds ON/OFF Analogue mode Digital mode "Background appearance" area Colour specification filling colour (numerical or interac- tive) Colour specification frame (numerical or interactive) Frame thickness (in pixels) Shadow ON/OFF Colour specification shadow (numerical or interactive)
- Page 50 Visualisation 6.5.2.7 "Value display" area Display state ON/OFF Source, whose state is to be displayed Colour specification TRUE Colour specification FALSE Text to be displayed Display text Text for TRUE Text for FALSE Additional parameters are shown when the option is activated. Colour selection Numerical input using 8-digit hexadecimal value with leading number sign (hashtag).
-
Page 51: Widget Alignment
Visualisation Widget alignment This section provides help for easy arrangement and alignment of the widgets on the display of the device. Horizontal options: left-aligned, centred, right-aligned. The fourth button formats selected widgets to the largest common width. Vertical options: align to top, centre, bottom The fourth button formats selected widgets to the largest common height. -
Page 52: Used Widgets
Visualisation Used widgets The list shows all widgets of the displayed dashboard. By clicking on an entry, the corresponding el- ement is highlighted in yellow and can be edited. It can be deleted by clicking on the in the re- spective widget. -
Page 53: Virtual Devices
"virtual" measuring point. Each of these measuring points uses one channel. A virtual device consists of a maximum of 16 channels. Virtual devices are treated like real devices and are fully integrated into the Bender system: All calcu- lated values –... -
Page 54: Managing Virtual Devices
Virtual devices Managing virtual devices Path: Tools > Device management > Virtual devices 7.2.1 Virtual devices: Overview list/Main page Address Device addresses: 1…255 Alarm Current operating state of the virtual device (prewarnings are displayed as alarms) No alarm Alarm Device name Virtual devices are always named "VD700…". -
Page 55: Adding A Virtual Device
Virtual devices 7.2.5 Adding a virtual device Use the button in the footer to add virtual devices. The number of virtual devices that can be created depends on the COMTRAXX device used or its active function modules. Device address Select a free bus address from the drop-down menu. Virtual devices are treated like real devices. -
Page 56: Modbus Tcp Server
The Modbus TCP server generates a function-related response to requests and sends it back to the Modbus TCP client. For details on the Bender Modbus images, see Chapter 8.3. Similarities and differences for read and write operations are explained in the following examples. - Page 57 BMS device on BMS interface with address 2 Task Write value = 100 to register 0x05 10 of the BMS device Byte Name Bender Modbus image V1 Bender Modbus image V2 Byte 0, 1 Transaction identifier 0x00 00 0x00 00...
-
Page 58: Modbus Responses
Modbus TCP server Modbus responses The responses consist of 2 bytes per register. The byte sequence is MSB (Most Significant Bit, Big En- dian) first. 8.2.1 Responses for function code 0x03 and 0x04 Byte Name Example Byte 1…6 Identical with request Byte 7 Modbus function code 0x03 or 0x04... -
Page 59: Modbus System Image
The COMTRAXX® device stores a system image in the internal memory. This shows the present values and states of all devices that are connected via the device. The system image depends on which Bender Modbus image (V1 or V2) is active on the COMTRAXX® device. -
Page 60: Bender Modbus Image V1
Modbus TCP server Bender Modbus image V1 (one address range for all interfaces) If the Bender Modbus image is set to V1, the Modbus data are provided as follows: 8.4.1 Querying data with Modbus function code 0x03 The parameters and measured values of all devices in the subsystem can be read using the Modbus function code 0x03 (Read Holding Registers). -
Page 61: Memory Scheme Of The System Image
Modbus TCP server 8.4.5 Memory scheme of the system image 8.4.5.1 Structure of the system image As illustrated in the table, the Modbus start address for the respective system image is derived from the device address. 256 (0x100) words or 512 bytes are reserved for each device. They contain all information requested and transmitted on the interface. - Page 62 Modbus TCP server 8.4.5.3 Example: Determine start address Channel 2 of the device with address 3 is to be queried. How is the start address determined to send the query for the channel? In our example, the relevant cells in the table are marked in bold. 1.
-
Page 63: Data Formats
Modbus TCP server 8.4.6 Data formats 8.4.6.1 Device type The device type is set using a bus scan. Word 0x01 0x02 0x03 0x04 0x05 0x06 0x07 0x08 0x09 0x00 ASCII text, 10 words/20 bytes Tab. 8.5: Data format device type 8.4.6.2 Timestamp The timestamp is set according to a datagram received from a transmitting device. - Page 64 Modbus TCP server 8.4.6.5 Float = Floating point value of the channels Word 0x00 0x01 Byte HiByte LoByte HiByte LoByte S E E E E E E E E M M M M M M M M M M M M M M M M M M M M M M M Tab.
- Page 65 Modbus TCP server 8.4.6.7 R&U = Range and unit The unit is coded in the bits 0 to 4. The bits 6 and 7 describe the range of validity of a value. Bit 5 is reserved. The complete byte is calculated from the sum of the unit and the range of validity. Description Invalid (init) No unit...
- Page 66 Modbus TCP server 8.4.6.8 Channel description A code with the associated descriptive text is available for each channel. For a complete list of the available codes or texts refer to Page 76. Channel 33 to 64 The channels 33 to 64 only provide digital information. The information is coded as alarm or message type as well as test type (internal/external).
-
Page 67: Modbus Example For Reading Data (V1)
Modbus TCP server 8.4.7 Modbus example for reading data (V1) Example: Reading out from ATICS channel 1 (voltage line 1) The COMTRAXX® device has address 1 in subsystem 1. ATICS channel 1 of internal address 3 is to be read out. The content is the voltage of line 1 as floating point value. Modbus request 00 01 00 00 00 06 01 04 03 10 00 02 00 01 Transaction ID (is generated automatically) -
Page 68: Address Assignment Of The Reference Data Record
Modbus TCP server 8.4.9 Address assignment of the reference data record As shown in the following table, the Modbus start address for access to the reference data record is derived from device address 0. Word LoByte Virtual device address HiByte 0x00 Device type Common alarm... -
Page 69: Explanation Of How To Access Floating Point Values
Bender Modbus image V2 (one address range for each interface) If the Bender Modbus image is set to V2, the Modbus data are provided as follows. Function code 0x03 (Read Holding Registers): Querying data from the Modbus device assignment table Reading the parameters and measured values of all devices in the system ... - Page 70 Modbus TCP server Function code 0x10 (Write Multiple Registers): Writing data Writing the parameters of all devices in the subsystem For the Modbus request, the unit ID refers to the interface via which the corresponding device is in- tegrated. (see Table 8.2) To set parameters for devices via Modbus TCP, a device assignment must first be made in order to obtain unique unit IDs: Tools >...
- Page 71 Modbus TCP server Distribution of the memory areas (V2) COMTRAXX® device infor- 8880 1 / 8880 8879 mation Internal BMS 150 / 40800 40799 0 (per unit 14895 20…28 Modbus RTU 2128 30 / 63840 7 / 14896 (unit ID 28) 0 (per unit 14895 40…48...
-
Page 72: Memory Scheme Of The System Image (V2)
Modbus TCP server 8.5.1 Memory scheme of the system image (V2) Structure of the system image As illustrated in the table, the Modbus start address for the respective system image is derived from the device address. It contains all information requested and transmitted on the interface. Example: Internal BMS Modbus address ranges of the data in the memory Unit ID... -
Page 73: Memory Scheme Of A Device (V2)
Modbus TCP server 8.5.2 Memory scheme of a device (V2) Each device is managed via an individual device image in the memory. Its first block provides the de- vice information. Afterwards, the individual measured value/channel information is displayed. The size of the block depends on how many measured values a device provides. Device (V2) Default values in case no values are available for the requested register: UINT16: 65.535 (all bits are set) - Page 74 Modbus TCP server Measured value (V2) Length in Offset Hex Type Extended description words UINT32 2 Time stamp in seconds since 01.01.1970 Float Measured value (NAN if not valid) Response value (not available for every device; if not available, Float NAN) Response value for prewarning (not available for every device;...
-
Page 75: Modbus Example For Reading Data (V2)
Modbus TCP server 8.5.3 Modbus example for reading data (V2) Example: Reading out from ATICS channel 1 (voltage line 1) The COMTRAXX® device has address 1 in subsystem 1. Channel 1 of an ATICS is to be read out at the internal BMS with address 3. The content is the voltage of line 1 as floating point value. -
Page 76: Channel Descriptions For The Process Image (V1 And V2 )
Modbus TCP server Channel descriptions for the process image (V1 and V2 ) Measured value description Alarm Value Description message Operating message 1 (0x01) Insulation fault 2 (0x02) Overload 3 (0x03) Overtemperature 4 (0x04) Failure line 1 5 (0x05) Failure line 2 6 (0x06) Insul. - Page 77 Modbus TCP server Measured value description Alarm Value Description message Operating message 41 (0x29) … Reserved 66 (0x42) 67 (0x43) Function test until: Date 68 (0x44) Service until: Date 69 (0x45) Ins.fault locat Insulation fault location 70 (0x46) Peak Fault EDS system Insulation resistance in Ω...
- Page 78 Modbus TCP server Measured value description Alarm Value Description message Operating message 115 (0x73) Device error Fault ISOMETER 116 (0x74) Manual mode K1/2 manual mode 117 (0x75) Open circuit K1on Line to K1 interrupted on 118 (0x76) Open circ. K1off Line to K1 interrupted off 119 (0x77) Open circuit K2 on...
- Page 79 Modbus TCP server Measured value description Alarm Value Description message Operating message 213 (0xD5) Channel disabled 214 (0xD6) Switch-back lock Switch-back lock enabled 215 (0xD7) Phase sequ. right 216 (0xD8) Switch. el. pos.0 217 (0xD9) Line BPS on 218 (0xDA) SMO48x: Alarm, relay Tab.
-
Page 80: Modbus Control Commands
Modbus TCP server Modbus control commands Commands can be sent to BMS devices by an external application (e.g. a visualisation software). This functionality can be activated or deactivated via the web user interface. Command structure Write Read Word 0xFC00 0xFC01 0xFC02 0xFC03 0xFC04... -
Page 81: Control Commands For The (Internal/External) Bms Bus
Modbus TCP server 8.7.3 Control commands for the (internal/external) BMS bus int/ext Register Register Register Register Menu text/ Channel Command Function 1-150 Test Isometer 1-99 Test change over unit (PRC487) / 1-150 Test Umschalteinrichtung PRC 1-99 1-150 Test changeover unit (ATICS)/ Start automatic test changeover 1- >2 End after time T(test) -
Page 82: Modbus Example For Control Commands
Modbus TCP server 8.7.4 Modbus example for control commands Example: Changeover of ATICS to line 1 The COMTRAXX® device has address 1 in subsystem 1. An ATICS of internal address 3 is to be changed over to line 1. Modbus control command 00 02 00 00 00 0F 01 10 FC 00 00 04 08 00 01 00 03 00 00 00 05 00 02 Transaction ID (is generated automatically) 00 00 Protocol ID... -
Page 83: Snmp
9. SNMP Data access using SNMP The COMTRAXX® device makes all measured values of the Bender system available via the SNMP in- terface. The SNMP versions V1, V2c and V3 are supported. The trap function can also be used. When an event occurs in the system, a message is automatically generated and sent to the SNMP manager. -
Page 84: 10. Troubleshooting
Use the backup function to save all settings of the device (see Chapter "3.2 Device features"). Frequently asked questions on the Internet You will find FAQs on many Bender devices at: https://www.bender.de > Service & support > Rapid assistance > FAQ 10.2 Maintenance The device does not contain any parts that must be maintained. -
Page 85: 11. Technical Data
Technical data 11. Technical data 11.1 Tabular data Insulation coordination acc. to IEC 60664-1 CP907-I Rated voltage ..............................50 V Overvoltage category............................... III Pollution degree............................... 2 Rated impulse voltage............................800 V CP915-I Rated voltage ............................... AC 250 V Overvoltage category............................... III Pollution degree............................... 2 Rated impulse voltage............................ - Page 86 Bender Modbus image...........................V1, V2 (V2)* Modbus TCP Interface/protocol ........................Ethernet/Modbus TCP Operating mode ..........client for Bender Modbus TCP devices and "third-party devices" Operating mode ........Server for access to process image and for Modbus control commands Parallel data access from different clients ......................max. 8 Modbus RTU Interface/protocol ........................RS-485/Modbus RTU...
- Page 87 Technical data Number ..................................2 Operating mode ......................USB 2.0 host (5 V, 500 mA) Data rate ..............................480 Mbit/s Connection type..........................USB 2 Standard-A Used ports 53 ...............................DNS (UDP/TCP) 67, 68 ..............................DHCP (UDP) 80................................HTTP (TCP) 123 ................................NTP (UDP) 161 .................................
- Page 88 Technical data Device connections Terminal block (L1; N; PE) (for CP915-I only) Conductor sizes ............................AWG 20-12 Stripping length ............................10…11 mm rigid/flexible ............................0.5…4 mm² flexible with ferrule with/without plastic sleeve .................0.5…4 mm² Multiple conductor, flexible with TWIN ferrule with plastic sleeve.............0.5…4 mm² Plug-in terminal (A1/+;A2/) (11;12;14) Conductor sizes ............................
-
Page 89: Standards, Approvals And Certifications
Technical data 11.2 Standards, approvals and certifications only CP907-I B95061031 11.3 Ordering information Complete devices Device dimen- Display sions Type Supply Weight Enclosure Display unit Art. No. size (W x H x D), Flush-mounting 226 x 144 x 78 1.1 kg B95061031 enclosure 7"... -
Page 90: Document Revision History
Technical data 11.4 Document revision history Valid from Document Date software State/Changes version version 10.2020 First edition Editorial revision V4.1.x Chapter 4.: Notes for connection PoE; Enclosure for control cabinet door 11.2020 Added Chapter 11.2: UKCA logo Editorial revision Chapter 11.1: Cable recommendations and lengths; 04.2021 V4.3.x Modbus RTU switchable Master/Slave... -
Page 91: Index
Index Modbus - Bender image V1 60 Address 25 - Bender image V2 69 Applications 14 - Control commands 80 Approvals 89 - requests 56 - responses 58 Modbus TCP server 56 BMS bus - address setting 12 Browser Ordering information 89... - Page 92 Bender GmbH & Co. KG PO Box 1161 • 35301 Grünberg • Germany Londorfer Straße 65 • 35305 Grünberg • Germany Tel.: +49 6401 807-0 • Fax: +49 6401 807-259 E-Mail: info@bender.de • www.bender.de BENDER Group Photos: Bender Archive...
Need help?
Do you have a question about the COMTRAXX CP9-I Series and is the answer not in the manual?
Questions and answers