Advertisement
Quick Links
Advertisement

Related Manuals for Bartscher 3010


Summary of Contents for Bartscher 3010
- Page 1 3010 500308...
- Page 2 Bartscher GmbH Phone: +49 5258 971-0 Franz-Kleine-Str. 28 Fax: +49 5258 971-120 Service hotline: +49 5258 971-197 D-33154 Salzkotten Germany www.bartscher.com Version: 1.0 Date of preparation: 2022-02-02 Original instruction manual...
- Page 3 Safety Indications This appliance has been manufactured in accordance with technical standards currently in force. However, the appliance may be a source of hazards if used improperly or contrary to its intended purpose. All persons using the appliance must consider information included in this instruction manual and observe safety instructions.
- Page 4 Technical Data Name: Chip cutter 3010 500308 Art. No.: Material: stainless steel Die/stamp material: stainless steel Number of dies/stamps: Dimensions (W x D x H), in mm: 425 x 155 x 335 Weight, in kg: We reserve the right to implement technical modifications.
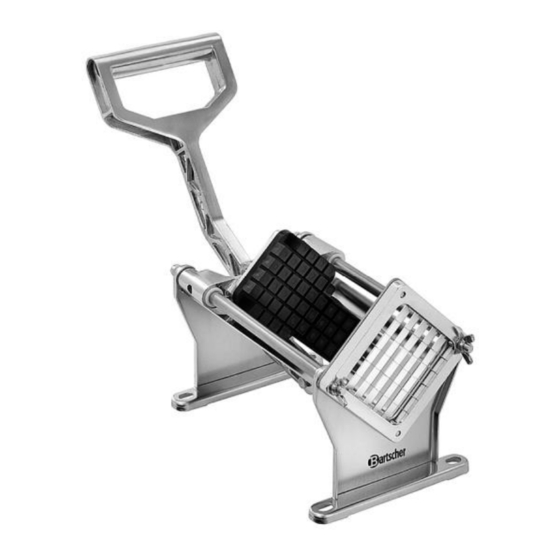
- Page 5 List of Components of the Appliance Fig. 1 1. Operating lever 2. Stud (long) with C clamp 3. Feeding frame (guiding frame) 4. Slide rail 5. Stamp 6. Frame 7. Connection plate 8. Stud (short) with C clamp 9. Die 10.
- Page 6 Equipment (included in delivery) Die/stamp 6 mm chips Fig. 2 Die/stamp 9 mm chips Fig. 3 Die/stamp 13 mm chips Fig. 4 6 / 12 500308...
- Page 7 Die/stamp Potato wedges Fig. 5 Assembly Fig. 6 1. Remove C clamp from the long stud (2) at the back of the pusher. Remove C clamp from the short stud (8), which is located at the free end of the connection plate (7).
- Page 8 3. Align the bottom opening of the handle with opening in the connection plate (7), which is already assembled at the bottom of the frame. Insert the short stud (8) and secure it with C clamp. To place the C clamp on the stud and fix the stud, use tweezers with slim tips and press the clamp until it engages.
- Page 9 2. For wall mounting use 4 M8x60 anchor bolts with expansion sleeves (Fig. to the left). Fig. 8 3. Hold the chip cutter against the wall and use openings in the frame to mark boring points in a selected location. 4.
- Page 10 Operation WARNING Injury hazard due to sharp die blades! Exercise caution so that you hands and fingers are not in the area of the die. 1. Before each use, clean the appliance thoroughly, especially the parts that come into contact with food. Follow indications in section 'Cleaning'. 2.
- Page 11 Stamp/Die Replacement By factory default, there is the 9 mm die and stamp assembled on the appliance's frame. If needed, they may be replaced at any time with the 6 mm or 13 mm stamp/die, or with the stamp/die for potato wedges. When replacing, proceed as described below.
- Page 12 Cleaning WARNING Injury hazard due to sharp die blades! Exercise extreme caution when replacing dies. Wear safety gloves, resistant to cutting. ATTENTION! Abrasive, solvent, caustic or alkaline cleaning agents may damage the surface of components, cause pittings or blunt die blades. Use only mild washing agents.
Need help?
Do you have a question about the 3010 and is the answer not in the manual?
Questions and answers