Table of Contents
Advertisement
Quick Links
Advertisement
Table of Contents

Related Manuals for Bartscher 420/20L


Summary of Contents for Bartscher 420/20L
- Page 1 420/20L 300746...
- Page 2 Bartscher GmbH Phone: +49 5258 971-0 Franz-Kleine-Str. 28 Fax: +49 5258 971-120 Technical Support Hotline: +49 5258 971-197 D-33154 Salzkotten Germany www.bartscher.com Version: 3.0 Date of preparation: 2024-01-09...
-
Page 3: Table Of Contents
Original instruction manual Safety ......................2 Explanation of Signal Words ..............2 Safety instructions..................3 Intended Use ................... 5 Unintended Use ..................5 General information ..................6 Liability and Warranty ................6 Copyright Protection ................6 Declaration of Conformity ................ 6 Transport, Packaging and Storage .............. -
Page 4: Safety
Safety Diese Bedi enungsanlei tung besc hrei bt di e Installation, Bedi enung und Wartung des Geräts und gilt als wic htige Infor mationsquelle un d N achschl agewer k. Di e Kenntnis aller enthaltenen Sic herheits hinweis e und H andlungs anweisungen schafft die Vorauss etz ung für das sichere und s ac hger echte Ar beiten mit dem Gerät. D arüber hi naus müs sen die für den Ei ns atz ber eic h des Geräts geltenden ör tlichen Unfall verhütungs vorsc hriften und allgemeinen Sicherheits besti mmungen eing ehalten wer den. Dies e Bedi enungs anleitung is t Bes tandteil des Produkts und muss i n unmi ttelbarer N ähe des Ger äts für das In¬s tall ations-, Bedi enungs-, Wartungs- und R einigungspers onal jederzeit z ugänglich auf¬bewahrt werden. Wenn das Ger ät an eine dritte Pers on weiterg egeben wird, muss die Bedi enungsanlei tung mit ausgehändigt wer den. -
Page 5: Safety Instructions
Safety CAUTION! The signal word CAUTION warns against hazards that may lead to light or moderate injuries if the hazards are not avoided. , di e IMPORTANT! The signal word IMPORTANT indicates possible property damages, which may occur if safety instructions are not observed. NOTE! The symbol NOTE indicates subsequent information and guidelines for the user on usage of the appliance. - Page 6 Safety • Check the power cord regularly for damage. Do not use the appliance if the power cord is damaged. If this cable is damaged, it must be replaced by customer service or a qualified electrician in order to avoid dangers. Supervised Usage only •...
-
Page 7: Intended Use
Safety Intended Use As described below, every use of the appliance for a purpose differing and/or diverging from its intended standard use, is prohibited and considered to be an unintended use. The following is an intended use: – Vacuum sealing and marinating of suitable food products or vacuum sealing of other objects. -
Page 8: General Information
General information General information Liability and Warranty All information and instructions in this instruction manual account for legal regulations in force, current level of technical engineering knowledge as well as our expertise and experience, developed over the years. If special models or additional options are ordered, or state-of-the-art technical solutions were implemented, the actual scope of delivery of the appliance may, in some circumstances, differ from descriptions and numerous drawings in this instruction manual. -
Page 9: Transport, Packaging And Storage
Transport, Packaging and Storage Transport, Packaging and Storage Delivery Check Immediately upon reception, check the delivery for completeness and possible shipping damage. In the case of visible transport damage refuse to accept the appliance or accept it conditionally. Mark and note the scope of damage in shipping documents/consignment list of the shipping company and lodge a complaint. -
Page 10: Technical Data
Technical Data Technical Data Technical Specifications Vacuum packaging machine Name: 420/20L 300746 Art. No.: Material: stainless steel, plastic Number of seal seams: Sealing rod length, in mm: Vacuum pump, l/min (m /hour): 20 (1,2) Maximum vacuum, in mbars: -900 Sealing time adjustment, levels:... -
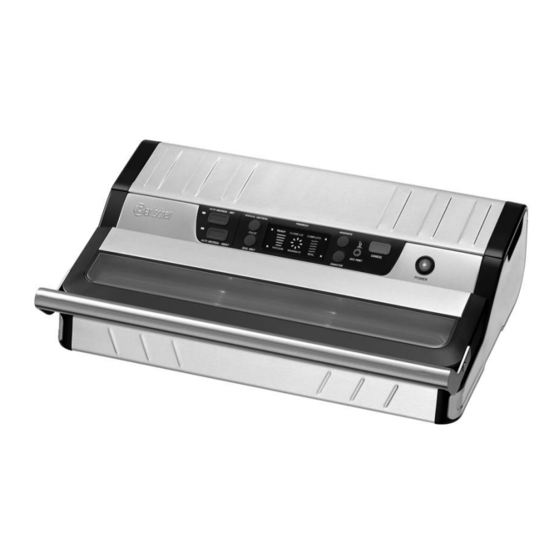
Page 11: List Of Components Of The Appliance
Technical Data List of Components of the Appliance Fig. 1 300746 9 / 32... - Page 12 Technical Data Description for Fig. 1 2. ON/OFF switch 1. Front cover with handle 3. Blade 4. Cutting rail 5. Rear cover 6. Sealing bar 7. Upper + lower gasket 8. Sealing strip 10. Vacuum bag clamps 9. Vacuum chamber 12.
-
Page 13: Functions Of The Appliance
Technical Data Vacuum bags G1,2L Volume: 1.2 litres Dimensions: 160 x 250 mm Art. No. 300411 Vacuum bags G2,5L Volume: 2.5 litres Dimensions: 200 x 300 mm Art. No. 300412 Vacuum bags G7,5L Volume: 7.5 litres Dimensions: 300 x 400 mm Art. -
Page 14: Installation And Operation
Installation and operation Installation and operation Installation Unpacking / Positioning • Unpack the appliance, remove all external and internal packaging elements and shipment safeguards. CAUTION! Choking hazard! Prevent children from accessing package materials, for instance: plastic bags and EPS. • If the appliance is covered with a protective film, remove it. -
Page 15: Benefits Of Vacuum Sealing
Installation and operation Power supply connection • Verify if technical data of the appliance (see rating plate) correspond with the local electric power grid specification. • Connect the appliance to a single, properly grounded mains socket with protective contact. Do not connect the appliance to a multi-socket. •... - Page 16 Installation and operation NOTE! All information provided in the table below are for reference purposes only and depend on impeccable condition of a packaging, and on primary quality characteristics of food products. CAUTION! Perishable food products should be stored in a freezer or refrigerator. Vacuum sealing extends the fastness of food products, but does not make them canned food, that is a product that is lasting in room temperature.
-
Page 17: Rules Of Vacuum Sealing
Installation and operation Storage Food products Temperature Standard Vacuum preservation sealed At room Bread 25 ± 2 °C 1-2 days 6-8 days temperature Cookies 25 ± 2 °C 4-6 months > 1 year Rice/ flour 25 ± 2 °C 3-5 months >... - Page 18 Installation and operation • In order to re-seal vacuum-sealed food products that were removed from a vacuum-sealed packaging, observe recommendations for cold storing after opening for the re-storage be safe. • Consume immediately easily perishable food products, which have been heated up, thawed or taken out of a refrigerator.
- Page 19 Installation and operation Vacuum packing for the refrigerator • The meals may be prepared earlier in appropriate portions and stored as vacuum packed in the refrigerator, and then heat as required. Vacuum packing for the food storage • The vacuum packing may also be advantageous in case of foodstuffs which may be stored in the room temperature (coffee, flour, flour products, sugar, etc.).
-
Page 20: Operation
Installation and operation • Vacuum-sealing provides for protection of various objects. At camping site, you may preserve stocks, like matches or clothing, clean and dry. Pipe tobacco may be preserved for a long time. Also, blooming or tarnishing of silver and other collectable items may be eliminated through vacuum-sealing. - Page 21 Installation and operation Functions of control buttons / indicators Fig. 2 A. AUTO VAC/SEAL-DRY Automatic vacuum packaging/ dry sealing: by pressing this button the device automatically starts the vacuum packaging process, shrinking the vacuum bag until reaching the maximum vacuum and finally seals the bag during a short sealing time.
- Page 22 Installation and operation D. SEAL ONLY Sealing only: Vacuum is generated for a short time to ensure that the sealing strip and sealing bar are clean and will lay on top of each other. Finally, the bag is sealed during a long sealing time. Press this button to select the following functions: –...
- Page 23 Installation and operation During this process the lid does not need to be locked. G. CANISTER Container function: Using the connecting hose the vacuum is produced in the container as long as the ‘CANISTER’ button on the control panel is pressed down.
- Page 24 Installation and operation For vacuum packaging use only special vacuum bags (one-side corrugated, extruded bags for vacuum packaging). Ensure that the length of the packaging bag is at least 4-5 cm longer than the food product to be preserved and include further 2 cm for each subsequent use of the vacuum packaging bag.
- Page 25 Installation and operation 11. Firmly press down the front handle to lock the cover. The acoustic signal sounds. The digital display shows 'READY’. The appliance is ready to carry out the the function. 12. Press the ‘SEAL ONLY’ button to seal the vacuum bag. The progress of the sealing process is shown on the digital display.
- Page 26 Installation and operation During vacuum packaging the device produces a very high vacuum in the vacuum bag. Supervise the process of vacuum packaging to avoid grinding or crushing of delicate food products. 9. To stop the process, after reaching the desired vacuum, immediately press the ‘MANUAL SEAL’...
- Page 27 Installation and operation Vacuum packaging in a vacuum bag with ‘Manual vacuum packaging’ / PULSE function This function is used for vacuum packaging of delicate food products (such as tomatoes, chips and similar products), using low vacuum. 1. Place the food product to be packed in the vacuum bag. 2.
- Page 28 Installation and operation 7. To make sure that air was evacuated from between the lid and the vacuum container, press the lid down at the beginning of the sealing process. The device stops automatically when the sufficient vacuum has been reached in the vacuum container.
-
Page 29: Cleaning
Cleaning WARNING! During the marinating process do not press any buttons, not to interrupt the entire process. After the marinating process is complete, the ‘Complete’indicator lights up on the digital display. 8. To check the vacuum, simply pull the container lid. It must not move. 9. -
Page 30: Cleaning
Cleaning Cleaning External Side of the Appliance 1. Clean the appliance daily after each use, or more frequently if needed. 2. Clean external surfaces of the appliance before use or after use, using a cloth or sponge and a mild washing agent. 3. -
Page 31: Possible Malfunctions
Possible Malfunctions WARNING! Vacuum container and the lid are not suitable for use in a microwave oven or a freezer. Possible Malfunctions Mögliche The table below contains descriptions of possible causes and solutions to malfunctions or errors during operation of the appliance. When malfunction cannot be removed, contact the technical service. - Page 32 Possible Malfunctions Malfunction Possible cause Solution During vacuum Air-suction hole is Properly position the vacuum bag packaging process, covered with the vacuum bag the appliance does not automatically Too many products in Remove some food products, switch to sealing the vacuum bag clean the edge of the vacuum bag and restart the vacuum packaging process...
- Page 33 Possible Malfunctions Malfunction Possible cause Solution Expanded vacuum The packaged food is a All perishable products must be bag after the perishable product frozen or refrigerated after the vacuum packaging vacuum packaging process, to be process suitable for consumption longer Sealed fruit or Please, remember that fresh fruit vegetables are not fresh...
-
Page 34: Disposal
Disposal Disposal Electrical Appliance Electric appliances are marked with this symbol. Electrical appliances must be disposed of and recycled in a correct and environmentally friendly manner. You must not dispose of electric appliances with household waste. Disconnect the appliance from the power supply and remove power cord from the appliance.
Need help?
Do you have a question about the 420/20L and is the answer not in the manual?
Questions and answers