
Subscribe to Our Youtube Channel
Related Manuals for Next Level Racing ELITE FLIGHT PACK


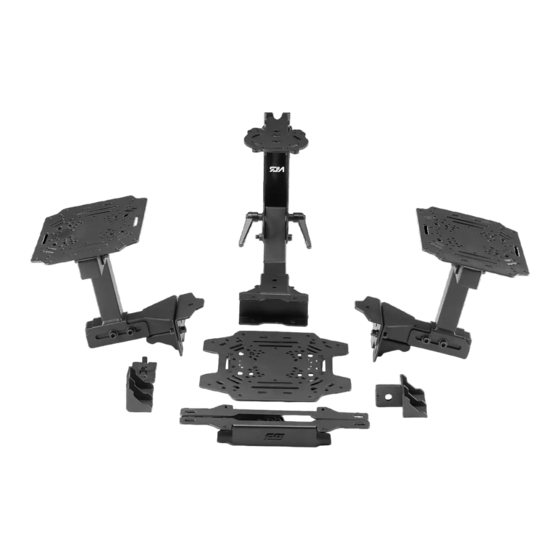
Summary of Contents for Next Level Racing ELITE FLIGHT PACK
- Page 1 T A K E I T T O T H E S K I E S Video Instruction: bit.ly/nlrbuild ELITE SERIES FLIGHT PACK INSTRUCTION MANUAL...
- Page 2 We know you’re eager to start flying! Take your time with the instructions and follow this guide to assemble your product. You’ll be setting yourself up for success by following the instruction booklet to fully optimize your product. ASSEMBLY VIDEO bit.ly/nlrbuild @next_level_racing @nextlevelracingOfficial @nextlvlracing Next Level Racing FOLLOW support@nextlevelracing.com...
- Page 3 Video Instruction: bit.ly/nlrbuild T A K E I T T O T H E S K I E S N E X T L E V E L R A C I N G . C O M...
- Page 4 support@nextlevelracing.com PRE-FLIGHT CHECKS WARNING • Please do not use power tools for assembly as over tightening can damage parts. • If you require further support, consult the installation video or contact us at support@nextlevelracing.com • Please ensure T-Nuts are correctly placed within the extrusion. •...
- Page 5 Video Instruction: bit.ly/nlrbuild IN THE *NOT TO SCALE 1 x YOKE PLATE 2 x FLIGHT PLATES 1 x SPACER PLATE 1 x HOTAS PLATE 1 x CENTRE POLE BRACKET 1 x CENTRE POLE MOUNTING ARM 1 x CENTRE POLE ADAPTOR 1 x HOTAS ANGLE BRACKET 2 x FLIGHT ARM MOUNTS 2 x FLIGHT ARM MOUNTING PLATES...
- Page 6 support@nextlevelracing.com IN THE *NOT TO SCALE 2 x M8 (20mm) WASHERS 3 x M8 20mm BOLTS 8 x M8 FLANGE NUTS 38 x M8(16mm) WASHERS 38 x M8 16mm BOLTS 20 x M6 FLANGE NUTS 16 x M6 WASHERS 16 x M6 16mm BOLTS 8 x M5 FLANGE NUTS 8 x M5 WASHERS 16 x M4 16mm BOLTS...
-
Page 7: Table Of Contents
Video Instruction: bit.ly/nlrbuild TABLE OF CONTENTS MOUNTING LOCATION DIAGRAMS Hotas Plate page 8 Yoke Plate page 9 Flight Plate page 10 YOKE PLATE INSTALLATION For Wheel Plate cockpits page 11 For Side Mount cockpits page 11 SIDE ARMS & HOTAS POLE INSTALLATION Side Arms page 12 Centre Hotas Pole... -
Page 8: Hotas Plate
support@nextlevelracing.com how to use SHOULDER BOLTS HOW TO: Using an allen key, turn the Shoulder Bolt until the thread is exposed. Adjust to the desired position and tighten the Bolt to lock in place. HOTAS PLATE Mounting Locations PRODUCT LEGEND: TM HOTAS Warthog Stick / Winwing Orion 2 HOTAS Virpil Mongoos T-50CM2 Base/ Warbird Base Winwing Super Libra... -
Page 9: Yoke Plate
YOKE PLATE Mounting Locations PRODUCT LEGEND: Logitech G X56 Throttle/HOTAS Logitech X52 Throttle/HOTAS TM 16000M / TCA Airbus Sidestick TM HOTAS Warthog Stick / Winwing Orion 2 HOTAS TM HOTAS Warthog Throttle / Winwing Orion 2 Throttle TM TCA Quadrant Airbus Edition Throttle TM TCA Throttle Quadrant Boeing Edition Thrustmaster TWCS Throttle Turtle Beach VelocityOne Flightstick... -
Page 10: Flight Plate
support@nextlevelracing.com FLIGHT PLATE Mounting Locations PRODUCT LEGEND: Logitech G X56 Throttle/HOTAS Logitech X52 Throttle/HOTAS TM 16000M / TCA Airbus Sidestick TM HOTAS Warthog Stick / Winwing Orion 2 HOTAS TM HOTAS Warthog Throttle / Winwing Orion 2 Throttle TM TCA Quadrant Airbus Edition Throttle TM TCA Throttle Quadrant Boeing Edition Thrustmaster TWCS Throttle Turtle Beach VelocityOne Flightstick... -
Page 11: Yoke Plate Installation
Video Instruction: bit.ly/nlrbuild PARTS: SPACER PLATE INSTALLATION (Wheel Plate) • • 1 x Spacer Plate (Recommended for Yokes with • • 4 x M8 35mm Low Profile Bolts Mounting Clamps) • • 4 x M8 Washers • • 4 x M8 Flange Nuts Align the slots on the Spacer Plate with the mounting holes on the Wheel Plate. - Page 12 support@nextlevelracing.com PARTS: YOKE PLATE INSTALLATION (Side Mount) • • 1 x Yoke Plate (Recommended for Bottom Mounted Yokes) • • 4 x Nylon Spacers • • 4 x M6 Flange Nuts Install Spacers on the Yoke Plate’s pressed studs and align the assembly with the holes on the Spacer Plate.
- Page 13 Video Instruction: bit.ly/nlrbuild PARTS: • • NIL A) Uninstall the Bolts and Washers securing the left Seat Brackets to the Seat Sliders. B) Remove the Seat Brackets. PARTS: • • 4 x T-Nuts (Use T-Nuts compatible with the channel of your cockpit) (T-Nut Locations) A) Uninstall the Bolts securing the End Plate to the front Seat Sliders and remove the End Plate.
- Page 14 support@nextlevelracing.com PARTS: • • NIL A) Install the Ratchet Handles previously uninstalled in Step 5(b). B) Install the Bolts and Washers previously uninstalled in Step 5(a). PARTS: • • 1 x Flight Arm Mount Repeat on Other Side • • 4 x M8 16mm Bolts •...
-
Page 15: Centre Hotas Pole
Video Instruction: bit.ly/nlrbuild PARTS: Repeat on Other • • 4 x M8 16mm Bolts Side • • 4 x M8 Washers Repeat on Other Side A) Align the slots on the Flight Arm assembly with the threaded inserts on the Flight Arm Mount. B) Bolt through and secure with 4 x M8 Bolts and Washers. - Page 16 support@nextlevelracing.com PARTS: • • 1 x Centre Pole Bracket • • 1 x M8 60mm Bolt • • 1 x M8 Washer • • 1 x M8 Nyloc Nut A) Align the mounting holes on the Centre Pole Bracket with the hole on the Centre Pole Mounting Arm. B) Bolt through and secure with 1 x M8 Bolt, Washer and Nyloc Nut.
-
Page 17: Support Blocks (For A Stronger Hotas Pole Setup)
Video Instruction: bit.ly/nlrbuild PARTS: • • 1 x Hotas Plate • • 2 x M8 Shoulder Bolts • • 2 x M8 Countersunk Bolts A) Bolt through and secure with 2 x M8 Shoulder bolts. B) Align the holes on the HOTAS Plate with the threaded inserts on the HOTAS Angle Bracket. Bolt through and secure with 2 x M8 Countersunk Bolts. - Page 18 support@nextlevelracing.com PARTS: • • 2 x T-Nuts T-Nut Location (Use T-Nuts compatible with the channel of your cockpit) T-Nut Location A) Install 2 x T-Nuts into the side channel and slide them to the marked locations. B) Uninstall the End Caps from the back of the Base Members. PARTS: •...
-
Page 19: Raised Seat (For Setups With Rudders)
Video Instruction: bit.ly/nlrbuild PARTS: Repeat on Other • • 2 x Corner Blocks Side Repeat on Other Side • • 4 x M8 16mm Bolts Repeat on Other Side • • 4 x M8 Washers A) Align the slots on the corner brackets with T-Nuts previously installed in Step 22(a) & Step 23(a). B) Bolt through and secure with 1 x M8 Bolt and Washer. - Page 20 support@nextlevelracing.com PARTS: • • 6 x T-Nuts (Use T-Nuts compatible with the channel of your cockpit) T-NUTS LOCATION REAR VIEW - Front Seat Slider BOTTOM VIEW - Front and Back Seat Sliders A) Remove the Seat Sliders. B) Install 2 x T-Nuts into the bottom channel of both Seat Slider Members and 2 x T-Nuts into the side channel of the front Seat Slider member.
- Page 21 Video Instruction: bit.ly/nlrbuild PARTS: • • 2 x Locking Corner Blocks • • 6 x M8 16mm Bolts • • 6 x M8 Washers • • 2 x M8 Flange Nuts A) Align the holes on the Locking Corner Blocks with the threaded holes on the Seat Slider members. Bolt through and secure with 2 x M8 Bolts and Washers.
- Page 22 support@nextlevelracing.com PARTS: • • 1 x Centre Pole Mounting Arm • • 4 x M8 16mm Bolts • • 4 x M8 Washers Align the holes on the Centre Pole Mounting Arm with the holes on the Centre Pole Adaptor. Bolt through and secure with 4 x M8 Bolts and Washers.
-
Page 23: Motion V3 Setup
Video Instruction: bit.ly/nlrbuild PARTS: • • 1 x Hotas Plate • • 1 x Hotas Angle Bracket • • 2 x M8 20mm Shoulder Bolts • • 2 x M8 Countersunk Bolts • • 1 x M8 60mm Bolts • • 1 x M8 Washer •... - Page 24 • • 2 x M8 16mm Bolts • • 2 x M8 Washers Align the Rear Seat Slider assembly with the mounting slots on the Next Level Racing Motion V3 platform. Bolt through and secure with 2 x M8 Bolts and Washers.
- Page 25 • • 2 x M8 16mm Bolts • • 2 x M8 Washers Align the Front Seat Slider assembly with the mounting slots on the Next Level Racing Motion V3 platform. Bolt through and secure with 2 x M8 Bolts and Washers.
- Page 26 support@nextlevelracing.com PARTS: Repeat • • 4 x M8 16mm Bolts on Other Side • • 4 x M8 Washers A) Align the slots on the Flight Arm assembly with the threaded inserts on the Mounting Arm. B) Bolt through and secure with M8 Bolts and Washers. PARTS: •...
- Page 27 Video Instruction: bit.ly/nlrbuild PARTS: • • 1 x Centre Pole Bracket • • 1 x M8 60mm Bolt • • 1 x M8 Nyloc Nut • • 1 x M8 Washer • • 2 x M8 (20mm) Washers • • 2 x Ratchet Handles A) Align the mounting holes on the Centre Pole Bracket with holes on the Centre Pole Mounting Arm.
- Page 28 support@nextlevelracing.com WARNING Please do not use power tools for assembly as over tightening can damage your frame. If you require further support, consult the installation video or contact us at support@nextlevelracing.com Please ensure T-Nuts are correctly placed within the extrusion. Do not force parts together.
- Page 29 Video Instruction: bit.ly/nlrbuild...
- Page 30 support@nextlevelracing.com ELITE SERIES FLIGHT PACK Gebruiksaanwijzing We weten dat je staat te popelen om te gaan vliegen! Neem de tijd met de instructies en volg deze handleiding om uw product in elkaar te zetten. U bereidt uzelf voor op succes door het instructieboekje te volgen om uw product volledig te optimaliseren. Scan QR-code voor montagevideo. bit.ly/nlrbuild. Volg ons. Scan de QR-code CONTROLES VOOR DE VLUCHT WAARSCHUWING •...
- Page 31 Video Instruction: bit.ly/nlrbuild 08 – Zie afbeelding. (T-Nut-locaties). A) Verwijder de bouten waarmee de eindplaat aan de voorste stoelschuiven is bevestigd en verwijder de eindplaat. B) Installeer 2 x T-moeren in het bovenste en onderste kanaal van de voorste stoelschuif. Schuif de T-moeren naar de gemarkeerde locatie. 09 –...
- Page 32 42 – Zie afbeelding. Lijn de schuifregelaar voor de achterbank uit met de montagesleuven op het Next Level Racing Motion V3-platform. Bout door en zet vast met 2 x M8 bouten en ringen. 43 – Zie afbeelding. Lijn de schuifregelaar voor de voorstoel uit met de montagesleuven op het Next Level Racing Motion V3-platform. Bout door en zet vast met 2 x M8 bouten en ringen.
- Page 33 Video Instruction: bit.ly/nlrbuild Manuel d’instructions ELITE SERIES FLIGHT PACK Nous savons que vous êtes impatient de commencer à voler ! Prenez votre temps avec les instructions et suivez ce guide pour assembler votre produit. Vous vous préparerez au succès en suivant le livret d’instructions pour optimiser pleinement votre produit. Pour la vidéo d’assemblage, scannez le code QR. bit.ly/nlrbuild. Suivez- nous.
- Page 34 support@nextlevelracing.com 08 – Reportez-vous à l’image. (Emplacements des écrous en T). A) Désinstallez les boulons fixant la plaque d’extrémité aux glissières du siège avant et retirez la plaque d’extrémité. B) Installez 2 écrous en T dans les canaux supérieur et inférieur de l’ensemble de glissière de siège avant. Faites glisser les écrous en T jusqu’à l’emplacement marqué.
- Page 35 2 boulons à tête fraisée M8. 42 – Reportez-vous à l’image. Alignez l’ensemble de glissière de siège arrière avec les fentes de montage sur la plate-forme Next Level Racing Motion V3. Boulonnez et fixez avec 2 boulons et rondelles M8.
- Page 36 support@nextlevelracing.com ELITE SERIES FLIGHT PACK Manuale di istruzioni Sappiamo che non vedi l’ora di iniziare a volare! Prenditi il tuo tempo con le istruzioni e segui questa guida per assemblare il tuo prodotto. Ti preparerai al successo seguendo il libretto di istruzioni per ottimizzare completamente il tuo prodotto. Per il video di assemblaggio, scansiona il codice QR. bit.ly/nlrbuild. Seguici. Scansiona il codice QR CONTROLLI PRE-VOLO AVVERTIMENTO...
- Page 37 Video Instruction: bit.ly/nlrbuild 08 – Fare riferimento all’immagine. (Posizioni dei dadi a T). A) Disinstallare i bulloni che fissano la piastra terminale ai cursori del sedile anteriore e rimuovere la piastra terminale. B) Installare 2 dadi a T nel canale superiore e inferiore del gruppo scorrevole del sedile anteriore. Far scorrere i dadi a T nella posizione contrassegnata. 09 –...
- Page 38 Imbullonare e fissare con 2 bulloni a testa svasata M8. 42 – Vedi immagine. Allineare il gruppo del dispositivo di scorrimento del sedile posteriore con le fessure di montaggio sulla piattaforma Next Level Racing Motion V3. Imbullonare e fissare con 2 bulloni e rondelle M8.
- Page 39 Video Instruction: bit.ly/nlrbuild PACK DE VUELO SERIE ELITE Manual de instrucciones ¡Sabemos que estás ansioso por empezar a volar! Tómese su tiempo con las instrucciones y siga esta guía para ensamblar su producto. Se estará preparando para el éxito siguiendo el folleto de instrucciones para optimizar completamente su producto. Para el video de montaje, escanee el código QR. bit.ly/nlrbuild. Síganos. Escanear código QR COMPROBACIONES PREVIAS AL VUELO ADVERTENCIA...
- Page 40 support@nextlevelracing.com 08 – Consulte la imagen. (Ubicaciones de las tuercas en T). A) Desinstale los pernos que sujetan la placa de extremo a los deslizadores del asiento delantero y retire la placa de extremo. B) Instale 2 tuercas en T en el canal superior e inferior del conjunto del deslizador del asiento delantero. Deslice las tuercas en T hasta la ubicación marcada.
- Page 41 2 pernos avellanados M8. 42 – Consulte la imagen. Alinee el conjunto del deslizador del asiento trasero con las ranuras de montaje en la plataforma Next Level Racing Motion V3. Atornille y asegúrelo con 2 pernos y arandelas M8.
- Page 42 support@nextlevelracing.com ELITE SERIE FLIGHT PACK Bedienungsanleitung Wir wissen, dass Sie gespannt darauf sind, mit dem Fliegen zu beginnen! Nehmen Sie sich Zeit für die Anweisungen und befolgen Sie diese Anleitung, um Ihr Produkt zusammenzubauen. Sie werden sich auf den Erfolg einstellen, indem Sie der Anleitung folgen, um Ihr Produkt vollständig zu optimieren. Für Montagevideo QR-Code scannen.
- Page 43 Video Instruction: bit.ly/nlrbuild 07 – Siehe Bild. A) Entfernen Sie die Schrauben und Unterlegscheiben, mit denen die linken Sitzhalterungen an den Sitzgleitern befestigt sind. B) Entfernen Sie die Sitzhalterungen. 08 – Siehe Bild. (Positionen der T-Muttern). A) Entfernen Sie die Schrauben, mit denen die Endplatte an den vorderen Sitzgleitern befestigt ist, und entfernen Sie die Endplatte.
- Page 44 41 – Siehe Bild. Richten Sie die Senklöcher an den Extrusions-Endplatten mit den Gewindelöchern am hinteren Sitzgleiter aus. Durchschrauben und mit 2 x M8 Senkkopfschrauben sichern. 42 – Siehe Bild. Richten Sie die Rücksitz-Slider-Baugruppe mit den Montageschlitzen auf der Next Level Racing Motion V3-Plattform aus. Durchschrauben und mit 2 x M8 Schrauben und Unterlegscheiben sichern.
- Page 45 Video Instruction: bit.ly/nlrbuild ELITE SERIES FLIGHT PACK取扱説明書 フライトを始めたいと思っていることはわかっています。 時間をかけて説明書を読み、 このガイドに従って製品を組み立ててください。 取扱説明書に従って製品を完全に最適化することで、 成功への準備を整えることができます。 組み立て動画は、 QRコード をスキャンしてください。 bit.ly/nlrbuild. フォローする。 QRコードをスキャン 飛行前チェック 警告 • 締めすぎると部品が損傷する可能性があるため、 組み立てに電動工具を使用しないでください。 • さらにサポートが必要な場合は、 取り付けビデオを参照するか、 support@nextlevelracing.com までお問い合わせください。 • T ナットが押し出し内に正しく配置されていることを確認してください。 • 部品を無理に組み立てないでください。 • クロススレッドボルトは避けてください。 • 押し出し部分の鋭いエッジに注意してください。 製品に関するサポートが必要な場合は、 support@nextlevelracing.com のフレンドリーなチームにご連絡ください。 警告...
- Page 46 41 – 画像を参照してください。 押し出しエンド プレートの皿穴を後部シート スライダーのネジ穴に合わせます。 ボルトで固定し、 2 x M8 皿ボルトで固定します。 42 – 画像を参照してください。 リア シート スライダー アセンブリを Next Level Racing Motion V3 プラットフォームの取り付けスロットに合わせます。 ボルトで固定し、 2 x M8 ボルトとワッシャーで固定します。 43 – 画像を参照してください。 フロント シート スライダー アセンブリを Next Level Racing Motion V3 プラットフォームの取り付けスロットに合わせます。 ボルトで固定し、 2 x M8 ボルトとワッシャーで固定します。...
- Page 47 Video Instruction: bit.ly/nlrbuild ELITE SERIES FLIGHT PACK Manual de Instruções Sabemos que você está ansioso para começar a voar! Não se apresse com as instruções e siga este guia para montar seu produto. Você estará se preparando para o sucesso seguindo o livreto de instruções para otimizar totalmente o seu produto. Para vídeo de montagem, digitalize o código QR. bit.ly/nlrbuild. Siga-nos. Escanear código QR VERIFICAÇÕES PRÉ-VOO AVISO...
- Page 48 support@nextlevelracing.com 07 – Consulte a imagem. A) Desinstale os parafusos e arruelas que prendem os suportes do assento esquerdo aos controles deslizantes do assento. B) Remova os suportes do assento. 08 – Consulte a imagem. (Locais da Porca T). A) Desinstale os parafusos que prendem a placa final aos controles deslizantes do assento dianteiro e remova a placa final. B) Instale 2 porcas em T nos canais superior e inferior do conjunto deslizante do assento dianteiro.
- Page 49 Aparafuse e prenda com 2 parafusos escareados M8. 42 – Consulte a imagem. Alinhe o conjunto deslizante do banco traseiro com os slots de montagem na plataforma Next Level Racing Motion V3. Aparafuse e prenda com 2 parafusos M8 e arruelas.
- Page 50 support@nextlevelracing.com ELITE SERIES FLIGHT PACK Инструкция по эксплуатации Мы знаем, что вы хотите начать летать! Не торопитесь с инструкциями и следуйте этому руководству, чтобы собрать свой продукт. Вы настроите себя на успех, следуя буклету с инструкциями, чтобы полностью оптимизировать свой продукт. Для видео сборки отсканируйте QR-код. bit.ly/nlrbuild. Подписывайтесь на нас. Сканировать...
- Page 51 Video Instruction: bit.ly/nlrbuild 07 – См. изображение. A) Снимите болты и шайбы, крепящие левые кронштейны сиденья к направляющим сиденья. Б) Снимите кронштейны сиденья. 08 — См. изображение. (Местоположения Т-образных гаек). A) Открутите болты, крепящие концевую пластину к ползункам переднего сиденья, и снимите концевую...
- Page 52 41 – См. изображение. Совместите отверстия с потайной головкой на торцевых пластинах экструзии с резьбовыми отверстиями на заднем ползунке сиденья. Вкрутите и закрепите двумя болтами с потайной головкой M8. 42 – См. изображение. Совместите ползунок заднего сиденья с монтажными пазами на платформе Next Level Racing Motion V3. Вкрутите и закрепите двумя болтами M8 с шайбами.
- Page 53 Video Instruction: bit.ly/nlrbuild ELITE SERİSİ UÇUŞ PAKETİ Kullanım Kılavuzu Uçmaya başlamak için can attığınızı biliyoruz! Talimatlarla zaman ayırın ve ürününüzü monte etmek için bu kılavuzu izleyin. Ürününüzü tamamen optimize etmek için talimat kitapçığını takip ederek kendinizi başarıya hazırlayacaksınız. Montaj videosu için QR kodunu tarayın. bit.ly/nlrbuild. Bizi takip et. QR kodunu tarayın UÇUŞ...
- Page 54 41 – Resme bakın. Ekstrüzyon Uç Plakalarındaki havşalı delikleri arka Koltuk Kaydırıcısındaki dişli deliklerle hizalayın. 2 x M8 Havşa Başlı Cıvata ile cıvatalayın ve sabitleyin. 42 – Resme bakın. Arka Koltuk Kaydırıcı tertibatını Next Level Racing Motion V3 platformundaki montaj yuvalarıyla hizalayın. 2 x M8 Cıvata ve Pullarla cıvatalayın ve sabitleyin.
- Page 55 Video Instruction: bit.ly/nlrbuild 45 – Resme bakın. A) Uçuş Kolu Montaj Plakasındaki yuvaları, Uçuş Kolu Montaj Plakasındaki dişli ek parçalarla hizalayın. B) M8 Cıvatalar ve Pullarla cıvatalayın ve sabitleyin. 46 – Resme bakın. A) Uçuş Kolu düzeneği üzerindeki yuvaları Montaj Kolu üzerindeki dişli ekler ile hizalayın. B) M8 Cıvatalar ve Pullarla cıvatalayın ve sabitleyin. 47 –...
- Page 56 support@nextlevelracing.com Návod k použití LETOVÉHO BALENÍ ŘADY ELITE Víme, že toužíte začít létat! Udělejte si čas s pokyny a podle tohoto průvodce sestavte svůj produkt. Postupem podle návodu k plné optimalizaci vašeho produktu se připravíte na úspěch. Pro montážní video naskenujte QR kód. bit.ly/nlrbuild. Následuj nás. Naskenujte QR kód PŘEDLETOVÉ...
- Page 57 Video Instruction: bit.ly/nlrbuild 07 – Viz obrázek. A) Odmontujte šrouby a podložky zajišťující levé držáky sedadla k jezdcům sedadla. B) Demontujte držáky sedadel. 08 – Viz obrázek. (Umístění T-nut). A) Odmontujte šrouby zajišťující koncovou desku k posuvníkům předního sedadla a sejměte koncovou desku. B) Nainstalujte 2 x T-matice do horního a spodního kanálu sestavy jezdce předního sedadla.
- Page 58 41 – Viz obrázek. Vyrovnejte zapuštěné otvory na vytlačovacích koncových deskách se závitovými otvory na jezdci zadního sedadla. Prošroubujte a zajistěte pomocí 2 x M8 zápustných šroubů. 42 – Viz obrázek. Zarovnejte sestavu jezdce zadního sedadla s montážními drážkami na platformě Next Level Racing Motion V3. Prošroubujte a zajistěte pomocí 2 x M8 šroubů a podložek.
- Page 59 Video Instruction: bit.ly/nlrbuild ELITE SERIES FLIGHT PACK Instrukcja obsługi Wiemy, że nie możesz się doczekać latania! Nie spiesz się z instrukcjami i postępuj zgodnie z tym przewodnikiem, aby złożyć swój produkt. Ustawisz się na sukces, postępując zgodnie z instrukcją, aby w pełni zoptymalizować swój produkt. W przypadku montażu wideo zeskanuj kod QR. bit.ly/nlrbuild. Podążaj za nami. Skanowania QR code KONTROLE PRZED LOTEM OSTRZEŻENIE...
- Page 60 support@nextlevelracing.com 08 – Patrz obraz. (Lokalizacje nakrętek teowych). A) Odkręć śruby mocujące płytę końcową do prowadnic przednich siedzeń i zdejmij płytę końcową. B) Zamontuj 2 nakrętki teowe w górnym i dolnym kanale zespołu prowadnicy przedniego siedzenia. Wsuń nakrętki teowe w zaznaczone miejsce. 09 –...
- Page 61 41 – Patrz ilustracja. Wyrównaj otwory z łbem stożkowym na płytach końcowych wyciskania z gwintowanymi otworami na suwaku tylnego siedzenia. Przykręć i zabezpiecz 2 śrubami z łbem stożkowym M8. 42 – Patrz obraz. Dopasuj zespół suwaka tylnego siedzenia do otworów montażowych na platformie Next Level Racing Motion V3. Przykręć i zabezpiecz 2 śrubami M8 i podkładkami.
- Page 62 support@nextlevelracing.com ةعومجمل تاميلعتلا ليلدELITE SERIES FLIGHT PACK .ةعيرسلا ةباجتسالا زمر حسما ، ويديفلا عيمجتل .لماكلاب كجتنم نيسحتل تاميلعتلا بيتك عابتاب حاجنلل كسفن دادعإب موقتس .كجتنم عيمجتل ليلدلا اذه عبتاو تاميلعتلا عم كتقو ذخ !ناريطلا ءدب ىلع صيرح كنأ ملعن نحنbit. ly/nlrbuild.
- Page 63 41 - × 2 عم ماكحإب اهطب ر ا .يفلخلا دعقملا قلزنم ىلع ةدوجوملا ةبلولملا تاحتفلا عم قثبلا ةياهن تاحول ىلع ةدوجوملا ةسطاغلا تاحتفلا ةاذاحمب مق .ةروصلا ىلإ عوجرلاM8 .ةسطاغ يغارب 42 - ةصنم ىلع بيكرتلا تاحتف عم يفلخلا دعقملا قلزنم ةعومجم ةاذاحمب مق .ةروصلا ىلإ عوجرلاNext Level Racing Motion V3. تالاسغو ريماسم مادختساب نمآو ماكحإب اهطب ر اM8 × 2.
- Page 64 support@nextlevelracing.com ريذحت • .كب صاخلا راطإلا فلت ىلإ يدؤي نأ نكمي طبرلا ماكحإ يف طارفإلا نأ ثيح عيمجتلل ةيئابرهكلا تاودألا مادختسا مدع ىجري • ىلع انب لصتا وأ تيبثتلا ويديف عطقم رشتساف ، معدلا نم ديزم ىلإ ةجاحب تنك اذإsupport@nextlevelracing.com •...
- Page 65 Video Instruction: bit.ly/nlrbuild ELITE SERIES FLIGHT PACK 使用手册 我们知道您渴望开始飞行!花点时间阅读说明并按照本指南组装您的产品。 按照说明手册全面优化您的产品, 您将为成功做好准备。 装配视频, 扫描二维码。 bit.ly/nlrbuild。 跟 着我们。 扫描二维码 飞行前检查 警告 • 请勿使用电动工具进行组装, 因为拧得过紧会损坏零件。 • 如果您需要进一步的支持, 请参阅安装视频或通过support@nextlevelracing.com 联系我们 • 请确保T 形螺母正确放置在挤压件内。 • 不要强行将零件放在一起。 • 避免交叉螺纹螺栓。 • 小心挤压件上的锋利边缘。 可选设置 如果您的产品需要任何支持, 请通过以下方式联系我们友好的团队:support@nextlevelracing.com 警告 窒息危险 小零件不适用于...
- Page 66 M8 螺栓和垫圈固定。 41 – 参考图像。 将挤压端板上的埋头孔与后座滑块上的螺纹孔对齐。 使用 2 个 M8 沉头螺栓螺栓穿过并固定。 42 – 参考图像。 将后座滑块组件与 Next Level Racing Motion V3 平台上的安装槽对齐。 使用 2 个 M8 螺栓和垫圈螺栓穿过并固定。 43 – 参考图像。 将前排座椅滑块组件与 Next Level Racing Motion V3 平台上的安装槽对齐。 使用 2 个 M8 螺栓和垫圈螺栓穿过并固定。...
- Page 67 Video Instruction: bit.ly/nlrbuild NOTES...
- Page 68 support@nextlevelracing.com support@nextlevelracing.com...
Need help?
Do you have a question about the ELITE FLIGHT PACK and is the answer not in the manual?
Questions and answers