Table of Contents
Advertisement
Quick Links
Advertisement
Table of Contents

Related Manuals for rtd ECAN1000HR


Summary of Contents for rtd ECAN1000HR
- Page 1 ECAN1000HR Isolated CAN interface board User’s Manual BDM-610020026 Rev. B...
- Page 2 ECAN1000HR I SOLATED INTERFACE BOARD ’ ANUAL RTD Embedded Technologies, INC. 103 Innovation Blvd. State College, PA 16803-0906 Phone: +1-814-234-8087 FAX: +1-814-234-5218 E-mail sales@rtd.com techsupport@rtd.com Web site http://www.rtd.com ECAN1000 User’s Manual BDM-610020026 rev B...
- Page 3 Copyright 1999, 2002, 2003, 2007 by RTD Embedded Technologies, Inc. All rights reserved The RTD Logo is a registered trademark of RTD Embedded Technologies. cpuModule and utilityModule are trademarks of RTD Embedded Technologies. PC/104 is a registered trademark of PC/104 Consor- tium.
-
Page 4: Table Of Contents
CHAPTER 3 BOARD INSTALLATION......................13 ..............................13 OARD NSTALLATION General installation guidelines: ..........................13 Installation integrated with a PC/104 module stack....................13 3U rack or enclosure installation with a EUROCARD CPU containing an ECAN1000HR .......14 J12 G .....................15 ALVANICALLY ISOLATED BUS CONNECTOR J34 G ................15... - Page 5 IGURE INTEGRATED IN A ODULE STACK 5: 19” E PC/104 ....14 IGURE UROCARD RACK INSTALLATION WITH AN INTEGRATED DATA ODULE AND 6: ECAN1000HR B ......................16 IGURE LOCK DIAGRAM TABLES 1: F ....................9 ABLE ACTORY CONFIGURED JUMPER SETTINGS 2: JP1 B ....................11...
-
Page 6: Chapter 1 Introduction
NTRODUCTION Chapter 1 This user’s manual describes the operation of the ECAN1000HR CAN bus Interface board. Features Some of the key features of the ECAN1000HR include: SJA1000 CAN-network controller, Electrically compatible with the • PCA82C200 stand-alone CAN controller chip 1 Mb/s maximum data rate (fully programmable) •... -
Page 7: Physical Interface
(For more information on CAN bus please visit the CAN in Auto- mation Website at: http://www.can-cia.de.) Mechanical description The ECAN1000HR is designed on a PC/104 form factor. An easy me- chanical interface to both PC/104 and EUROCARD systems can be achieved. Stack your ECAN1000HR directly on a PC/104 compatible computer using the onboard mounting holes. -
Page 8: Board Accessories
Using this manual This manual is intended to help you install your new ECAN1000HR card and get it working quickly, whilst also providing enough detail about the board and its functions so that you can obtain maximum use of its fea- tures even in the most demanding applications. -
Page 9: Chapter 2 Board Settings
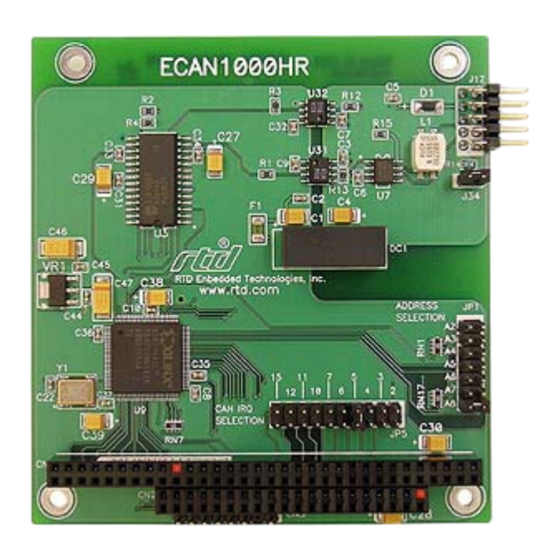
Factory-Configured Jumper Settings Table 1 below illustrates the factory jumper setting for the ECAN1000HR. Fig- ure 1 shows the board layout of the ECAN1000HR and the locations of the jumpers. The following paragraphs explain how to change the factory jumper settings to suit your specific application. -
Page 10: Base Address Jumpers (Factory Setting: 300H)
Figure 1: Component Locations Base Address Jumpers (Factory setting: 300h) The ECAN1000HR is I/O mapped into the memory space of your host XT/AT. This board occupies two I/O addresses starting from the base address. The most common cause of failure when you are first setting up your module is address contention: Some of your computers I/O space is already occupied by other devices and memory resident programs. -
Page 11: Table 2: Jp1 Base Addressj
"0", connecting the jumper to a "1". When you set the base address of the board, record the setting inside the back cover of this manual BASE ADDRESS JUMPER SETTINGS ECAN1000HR Base address Hex Jumper Settings... -
Page 12: Interrupt Channel (Factory Setting: Irq5)
Figure 3: Interrupt set to IRQ 5. Note: The ECAN1000HR does not support interrupt sharing! This feature is some- times regarded as a part of the PC/104 special features. After extensive software and hardware tests we have found that error free interrupt per- formance can not be guaranteed when sharing interrupts. -
Page 13: Chapter 3 Board Installation
OARD INSTALLATION Chapter 3 The ECAN1000HR CAN bus interface board is very easy to connect to your industrial distributed control system. Direct interface to PC/104 sys- tems as well as EUROCARD boards is possible. This chapter gives step- by-step instructions on how to install the ECAN1000HR into your system. -
Page 14: 3U Rack Or Enclosure Installation With A Eurocard Cpu Containing An Ecan1000Hr
Figure 4: ECAN1000HR integrated in a PC/104 RTD cpuModule stack 3U rack or enclosure installation with a EUROCARD CPU containing an ECAN1000HR The PC/104 system can be easily inserted into a 19” rack installation us- ing the CPU as a “form factor adaptor”. Assemble your PC/104 data mod- ules on an RTD single board EUROCARD computer and install the sys- tem in a 19”... -
Page 15: J12 Galvanically Isolated Can Bus Connector
N.C. BUS_H I_GND Table 4: Physical interface connector J12 pinout of the ECAN1000HR J34 Galvanically isolated CAN bus termination jumper The jumper marked as J34 is the CAN bus termination jumper. Only two termination jumpers should be closed at the endpoints of the CAN bus. -
Page 16: Chapter 4 Hardware Description
ARDWARE DESCRIPTION Chapter 4 This chapter describes in detail the major features of the ECAN1000HR: The Philips SJA1000 CAN bus controller • Galvanic isolation of the CAN bus • Figure 6: ECAN1000HR Block diagram ECAN1000 User’s Manual BDM-610020026 rev B... -
Page 17: The Can Bus Controller
The CAN bus controller The SJA1000 CAN bus controller uses a 16 MHz base oscillator. This must be taken into account when performing settings in the CAN bus tim- ing registers that set the baud rate and sampling times of the CAN net- work. -
Page 18: Galvanic Isolation Of The Can Bus
Galvanic isolation of the CAN bus The galvanic isolation of the ECAN1000HR is implemented using the following: Optocouplers for reliable data transmission • DC/DC converter to supply power to the CAN bus and the physical in- • terface circuitry. The high-speed optocouplers are directly connected to the SJA1000. The opto- couplers drive the CAN bus transceiver. -
Page 19: Board Operation And Programming
SJA1000 CAN controller chip. Defining the Memory Map The memory map of the ECAN1000HR occupies 2 bytes of host PC I/O memory space. This 3-byte window is freely selectable by the user as de- scribed in Chapter 2, Table 2. After setting the base address you have access to the internal resources of the SJA1000 CAN controller chip. -
Page 20: Interrupts
Other common devices that use interrupts are A/D boards, network boards, serial ports etc. Your ECAN1000HR can interrupt the main processor when a message is received or transmitted if interrupts are enabled on the ECAN1000HR board. -
Page 21: 8259 Programmable Interrupt Controller
Understanding the sequence of events when an interrupt is triggered is necessary to correctly write interrupt handlers. When an interrupt request line is driven high by a peripheral device (such as the ECAN1000HR), the interrupt controller checks to see if interrupts are enabled for that IRQ. It then checks to see if other interrupts are active or requested and deter- mines which interrupt has priority. -
Page 22: Using Interrupts In Your Program
Second, just before exiting the routine, you must clear the interrupt on the ECAN1000HR by writing to the SJA1000 CAN controller, and write the EOI command to the interrupt controller. Finally, when exiting the inter- rupt routine the processor registers must be popped from the system stack and you must execute the IRET assembly instruction. - Page 23 Put the body of your routine here • Read interrupt status register of the SJA1000 chip on your • ECAN1000HR board Clear the interrupt bit by writing to the SJA1000 CAN control- • Issue the EOI command to the 8259 by writing 20h to address •...
-
Page 24: Saving The Startup Interrupt Mask Register (Imr) And Interrupt Vector
The vectors for the hardware interrupts on the XT-bus are vectors 8-15, where IRQ0 uses vector 8 and IRQ7 uses vector 15. Thus if your ECAN1000HR is using IRQ5 it corre- sponds to vector number 13. -
Page 25: Common Interrupt Mistakes
With the startup IMR saved and the interrupts temporarily disabled, you can assign the interrupt vector to point to your ISR. Again you can over- write the appropriate entry in the vector table with a direct memory write, but this is not recommended. Instead use the DOS function 25h (Set In- terrupt Vector) or, if your compiler provides it, the library routine for set- ting up interrupt vectors. -
Page 26: Example On Interrupt Vector Table Setup In C-Code
Example on Interrupt vector table setup in C-code: void far _interrupt new_IRQ1_handler(void ); /* ISR function proto- type */ #define IRQ1_VECTOR /* Name for IRQ */ void (interrupt far *old_IRQ1_dispatcher) (es,ds,di,si,bp,sp,bx,dx,cx,ax,ip,cs,flags); /* Variable to store old IRQ_Vector */ void far _interrupt new_IRQ1_handler(void ); /*---------------------------------------------------------------------- | Function: init_irq_handlers... -
Page 27: Chapter 6 Ecan1000Hr Specifications
Operating temperature range -40 to +85 C Supply voltage +5V, +-8% Power consumption 1,0W typical The ECAN1000HR is CE certified in the IDAN Enclosure System. Please consult the factory for more information on the system. ECAN1000 User’s Manual BDM-610020026 rev B... -
Page 28: Return Policy And Warranty
Carefully package the product, using proper anti-static packaging. Write the RMA number in large (1") letters on the outside of the package. Return the package to: RTD Embedded Technologies, Inc. 103 Innovation Blvd. State College PA 16803-0906 ECAN1000 User’s Manual... -
Page 29: Limited Warranty
RTD Embedded Technologies, INC. This warranty is limited to the original purchaser of product and is not transferable. During the one year warranty period, RTD Embedded Technologies will repair or replace, at its option, any defective products or parts at no additional charge, provided that the product is returned, shipping prepaid, to RTD Embedded Technologies.
Need help?
Do you have a question about the ECAN1000HR and is the answer not in the manual?
Questions and answers