
Related Manuals for K&F Concept DQ201

Summary of Contents for K&F Concept DQ201
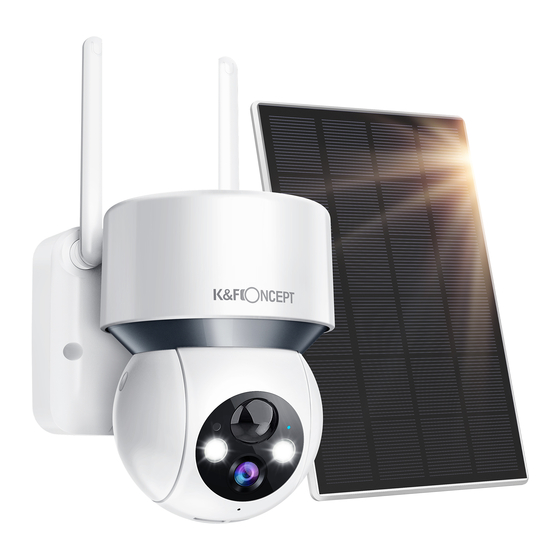
- Page 1 Solar Powered Wireless Security Camera DQ201 QUICK START GUIDE E-mail: service@kfconcept.com...
-
Page 2: Table Of Contents
ITALIANO CATALOGO 1. SERVIZIO ARDENTE ..............02 2.Cosa Incluso ................03 3.Introduzione Al Prodotto ............04 4.Installazione Del'app E Registrazione Dell'accoun ....07 4.1 Scarica I'app "Cloudedge"............07 4.2 Registra Account ..............08 5.Come Aggiungere La Telecamera All'app ........09 5.1 Accendi La Telecamera ............09 5.2 Collega La Telecamera............09 6.Montare La Telecamera .............12 7.Impostazioni Di Rilevamento Del Movimento PIR ....14 8.Specifiche Di Prodotto ...............15... -
Page 3: Servizio Ardente
1. SERVIZIO ARDENTE A causa del continuo aggiornamento del prodotto e del software, potrebbe esserci una discrepanza tra questa guida per l'utente e l'interfaccia dell'applicazione. Tutte le istruzioni sono soggette all'inter- faccia operativa effettiva. Il contenuto del manuale è soggetto a modifiche senza preavviso in conformità... -
Page 4: Cosa Incluso
2.COSA È INCLUSO Camera Pannelli solari Pacchetto di viti Cavo di ricarica Manuale d'uso Micro-USB E-mail: service@kfconcept.com... -
Page 5: Introduzione Al Prodotto
3.INTRODUZIONE AL PRODOTTO P I R Componenti fotosensibili IR LED Spia luminosa Lente della macchina Microfono fotografica Potenza RESET Fessura per Altoparlante scheda Micro SD Interfaccia di Indicatore alimentazione di carica E-mail: service@kfconcept.com... - Page 6 Premere il pulsante di accensione per accendere la Pulsante di telecamera accensione Tenere premuto RESET per 5 secondi per Pulsante di ripristinare il attrezzatura (se si modificano le reset impostazioni, verranno ripristinate le impostazioni predefinite di fabbrica) Slot per Supporta l'archiviazione su scheda SD locale scheda SD (massimo 128 G) Supporta la risoluzione FHD 1080P...
- Page 7 Scegliere un posto adatto Di fronte al sole (angolo suggerito 45°) Caricare la batteria della telecamera Pannelli solari Caratteristiche 1.Ideale per la telecamera di sicurezza a batteria. 2.Connettere questo pannello solare con la fotocamera aiuterà a ottenere potenza non-stop. 3.Non c'è bisogno di rimuovere e caricare la fotocamera quando è...
-
Page 8: Installazione Del'app E Registrazione Dell'accoun
4.INSTALLAZIONE DEL'APP E REGISTRA- ZIONE DELL'ACCOUNT 4.1 SCARICA I'APP "CLOUDEDGE" Metodo 1: Scarica I'APP "CloudEdge" da APP Store (iOS) o Play Store (Android): Metodo 2: Scansiona il codice QR dell'APP “CloudEdge” per scaricarlo. Suggerimenti: Attiva le 2 autorizzazioni di seguito quando usi questa APP per la prima volta. -
Page 9: Registra Account
4.2 REGISTRA ACCOUNT I nuovi utenti devono registrarsi tramite e-mail, fare clic su "Registrati" e seguire i passaggi per completare la registrazione dell'account, e poi accedere. Nota: •Quando registri un nuovo account, per favore scegliere la regione in cui ti trovi (le diverse regioni registrate non possono condividere la telecam- era). -
Page 10: Come Aggiungere La Telecamera All'app
5.COME AGGIUNGERE LA TELECAMERA ALL'APP Suggerimento per il riscaldamento: Inserire la scheda Micro SD prima dell'accensione, altrimenti la scheda SD non può essere rilevata. 5.1 ACCENDI LA TELECAMERA •Si prega di premere a lungo il pulsante di accen- sione per 5 secondi per alimentare la fotocamera. - Page 11 Passaggi per la connessione Wi-Fi E-mail: service@kfconcept.com...
- Page 12 E-mail: service@kfconcept.com...
-
Page 13: Montare La Telecamera
6.MONTARE LA TELECAMERA SELEZIONA L'ALTEZZA E LA POSIZIONE Appendere la camera a 2-3 m dal suolo. Questa altezza massimizza il campo di rilevamento del sensore di movimento di camera. NOTA: Evitare di posizionare la camera sotto la luce diretta del sole. camera field of view motion detection zone... - Page 14 CONSIGLI PER L'INSTALLAZIONE DEL PANNELLO SOLARE 1.Quando si installa nell'emisfero settentrionale, rivolgere il pannello verso il sud, e quando si installa nell'emisfero meridionale, rivolgere il pannello verso il nord. 2.Si prega di installare il pannello solare nella giusta posizione, evitare che sia bloccato da tipi di cose come grondaie e rami.
-
Page 15: Impostazioni Di Rilevamento Del Movimento Pir
7.IMPOSTAZIONI DI RIEVAMENTO DEL MOVIMENTO PIR Accedere all'applicazione - Interfaccia "Impostazione parametri" - "Rilevamento movimento" . Rilevamento della Distanza Sensibilità (per Oggetti in Movimento) Livello 1-3 (Basso) Fino a 4-5 metri Livello 4-7 (Med) Fino a 5-8 metri Livello 8-10 (Alto) Fino a 8-13 metri Suggerimenti Caldi: •Quando si riscontra frequentemente I'allarme mancato o ritardato... -
Page 16: Specifiche Di Prodotto
8.SPECIFICHE DI PRODOTTO Risoluzione 1920x 1080@ 12-15fps Scheda Micro SD (max. 128 Conservazione GB), archiviazione cloud Wi-Fi Solo 2,4 GHz LED a Infrarossi 850nm Wi-Fi Standards IOS (>8); Android (>4.2) IEEE 802.1 Ib/g/n Wi-Fi Estándares Alimentazione 5V 2A Elettrica -20°C - 50 °C (-4 °F -122 °F) Temp e Umidità... -
Page 17: Faqs
9.PREGUNTAS FRECUENTES 1)Il dispositivo richiede offline? •Controllare se I'apparecchiatura è in stato di accensione e osservare se la luce di lavoro dell'apparecchiatura è accesa normalmente. •Verificare se la rete Wi-Fi è in buone condizioni e riavviare il router. •Se il dispositivo si trova lontano dal router, il che si traduce nell'impos- sibilità... - Page 18 •Si consiglia di utilizzare San Disk, Samsung e altre schede di marca; •Si consiglia di utilizzare una scheda TF di classe 10 standard; •E supportato solo il formato FAT32. •Impossibile identificare la scheda TF quando I'ambiente Internet non è buono. 5)Perché...
- Page 19 La spia dell'indicatore di carica del dispositivo é rossa, il che significa che e in carica. Una luce blu significa che la ricarica è completa. Ci vorranno circa 10 ore o più per caricarsi completamente. 8)Cosa devo fare se la carica fallisce? •Determina se I'alimentatore è...
- Page 20 *Montare il pannello solare in luoghi ben illuminati ed evitare luoghi come l'ombra di alberi, edifici o altri ostacoli per garantire una suffici- ente luce solare. *Regola la direzione del tuo pannello solare in modo che sia rivolto verso il vero sud (nell'emisfero nord) o il vero nord (nell'emisfero sud) e inclinalo all'angolo appropriato secondo la tua latitudine per assicurare la massima esposizione al sole.
- Page 21 ENGLISH CATALOG 1.WARM SERVICE .................21 2.WHAT YOU WILL GET..............22 3.PRODUCT INTRODUCTION ............23 4.ADD CAMERA TO APP ..............26 4.1.Download CloudEdge App .............26 4.2.Register CloudEdge Account ..........28 4.3.Turn on Camera ..............29 4.4.Connect the Camera to Wi-Fi..........30 5.MOUNTING THE CAMERA TO THE WALL........34 6.SOLAR PANEL INSTALLATION ..........37 7.FUNCTION INTRODUCTION ............39 7.1.Main Page ................39...
-
Page 22: Warm Service
1.WARM SERVICE Due to the continuous updating of the product&software, there may be a discrepancy between this user guide and App interface. All the instructions are subject to the actual operation interface. Manual contents are subject to change without notice in accordance with our policy of continuous product improvement. -
Page 23: What You Will Get
2.WHAT YOU WILL GET Camera Solar panel Screw kit Micro-USB User Manual Charging Cable E-mail: service@kfconcept.com... -
Page 24: Product Introduction
3.PRODUCT INTRODUCTION Photosensitive components IR LED Indicator light Camera Lens Microphone Power switch RESET Micro SD Card Slot Speaker Power Interface Charging Indicator E-mail: service@kfconcept.com... - Page 25 Press and hold the power button for 5 seconds to Power Key turn on the camera Press and hold RESET for 5 seconds to reset the Reset Key device (if you have modified the settings, they will revert to the factory default settings) SD Card Slot Support local SD card storage (up to 128G) Lens...
- Page 26 Choose a suitable place Face ths Sun (Suggested angle 45°) Power battery camera Solar Panel Features 1. Perfect for battery-powered security cameras. 2. Connecting the solar panels to the camera will provide an uninterrupted charge that can be charged when the camera is low, and there is no need to remove the solar panel.
-
Page 27: Add Camera To App
4.ADD CAMERA TO APP 4.1.DOWNLOAD “ CLOUDEDGE ” APP Search the “ CloudEdge ” in App Store /Google Play, or scan the QR code below to download and install it on your mobilephone. TIPS Please turn on the following 2 permissions when using the application for the first time 1 Allow "CloudEdge"... - Page 28 The following is a screenshot of the IOS mobile phone opinion, Android mobile phone permissions open method is basically the same as this method. E-mail: service@kfconcept.com...
-
Page 29: Register Cloudedge Account
4.2. REGISTER CLOUDEDGE ACCOUNT New users must register by email Tips: 1.When registering a new account, please choose the region which you are actually in. (Different registered regions can't share the camera.) 2.Please choose to register by e-mail. E-mail: service@kfconcept.com... -
Page 30: Turn On Camera
4.3. TURN ON CAMERA Tips: Please insert the Micro SD card before power on, otherwise, the SD card can not be read. Press and hold the power-on button for 5 seconds, and you can hear the 'Bugu' (if it can't be powered on, please plug-in 5V/2A USB standard adapter to charge the camera for 15 min first) then the working indicator light up, red light flashing slowly means the camera is waiting for connecting to Wi-Fi (if the working status light is not flashing red, please... -
Page 31: Connect The Camera To Wi-Fi
4.4.CONNECT THE CAMERA TO Wi-Fi 30cm~100cm Router Smartphone Tips: 1.To connect the camera successfully, please allow Cloudedge to use your WLAN& Cellular Data at the first run of this App. 2.The camera only supports 2.4GHz Wi-Fi, and doesn't support 5GHz Wi-Fi. 3.Press the Power Button once to wake up the camera from sleep mode and make sure the LED indicator flashes RED slowly. - Page 32 Connecting by Scanning the QR Code Step 1: Log in to CloudEdge App,tap ' +' to add Battery Camera. Step 2: Press the power button to wake the device if it is asleep. Make sure the LED indicator flashes RED slowly. E-mail: service@kfconcept.com...
- Page 33 Step 3: Select 2.4Ghz Wi-Fi and enter the password, then generate a connection QR code. Align the QR code on your mobile devices with the lens of the camera and keep a distance of 5-8 inches. After the devices recognize the QR code,it will sound“...
- Page 34 Processing Steps of Camera and Wi-Fi connection failure: 1.Please make sure you are using 2.4GHz Wi-Fi. In our experience, most users fail to connect the WI-Fl because of selecting 5GHz Wi-Fi and adding the camera incorrectly. 2. Make sure you use the correct Wi-Fi password and a fast Wi-Fi network.(Note: It requires that the Wi-Fi password doesn't have special characters such as (/l!@#$)) 3.
-
Page 35: Mounting The Camera To The Wall
5.MOUNTING THE CAMERA TO THE WALL WARM TIPS: In order to obtain the best product performance and avoid unneces- sary environmental disturbances, please pay attention to the follow- ing during the installation process: 1.Do not install the product nearly to the heat sources, such as outdoor units of air conditioners, kitchen exhausts, etc. - Page 36 Step 1: Select the location where you need to install the camera, take the camera and the phone to the location, and use the "Installation Guide" in the application to diagnose the network and determine whether the Wi-Fi signal at the location is good. It is recommended to install the camera in a location with good Wi-Fi signal for smooth camera opera- tion.
- Page 37 Suggestion: the best downward till angle of the lens is 15°to obtain the best alarm detection range. Motion Sensor Motion Sensor 9.8ft 8.2ft Downward 10° Downward 10° Height Height Detection Coverage Detection Coverage E-mail: service@kfconcept.com...
-
Page 38: Solar Panel Installation
6.SOLAR PANEL INSTALLATION Mount the bracket in the position that you choose before with the screws provided. Fasten the solar panel onto the bracket's bolt until the solar panel is not loose. Tips: The threaded hole is on the back of the solar panel. - Page 39 Tips for the installation of solar panel 1. When installed in the northern hemisphere, the panel faces south, and when in the southern hemisphere, the panel faces north. 2. Please install the solar panel in the correct position to prevent it from being blocked by kinds of stuff like eaves and branches.
-
Page 40: Function Introduction
7.FUNCTION INTRODUCTION 7.1.MAIN PAGE Go to the video browsing page Muti-screen viewing Adding Devices Device Sharing View alarm pictures and video Cloud Storage 7.2.PREVIEW PAGE Enter settings menu (alarm settings,video, lighting, device information,firmware upgrade, etc.) Turn on/off the speaker Video definition settings (SD, HD options) Full screen option SD card video playback... -
Page 41: Video Replay Page
7.3.VIDEO REPLAY PAGE Stretch the video screen with two fingers to zoom in on the image and view image details. Video timeline with drag-and-drop times election Timeline zoom button Select video playback date Select alarm video clips Video Screen-shot Record video, first click to start recording,click again to end recording Save video screen-shots and... -
Page 42: Setup Page
7.4.SETUP PAGE Modify device name (The default is S/N of device) Get device information (network information, Mac address, time zone) Installation Guide,Network Diagnostics Turn off the light,night vision settings,check the battery level Set the length of recording, alarm interval, optimize the battery life Motion detection settings, adjust the detection sensitivity, etc. -
Page 43: Device Sharing
7.5. DEVICE SHARING Others share camera steps: This function can be achieved through "Device Share". 1) Invite your friends to download and install "CloudEdge" APP and login. 2) Click the "Device Share " icon to watch the operation video, and then follow the steps to complete device sharing. When sharing, please make sure the APP account is registered in the same region. -
Page 44: Pir Motion Detection Settings
How to watch videos on SD card: Click the "History" or "Alert" button on the alarm information icon in the app to enter the video playback interface. Drag the timeline or select the alarm point to find the corresponding time period you want to record. Insert the SD card into your computer.The video file is in MP4 format. - Page 45 WARM TIPS You can adjust the sensitivity of the motion detection to solve the following problems when using this product in the process . • If the phone receives alarm messages too often, the camera will greatly consume battery power. It is recommended to adjust the motion detection sensitivity downward and set the alarm interval to turn on the alarm plan.
-
Page 46: Battery Management
7.8. BATTERY MANAGEMENT A.Charging the camera It is recommended to use a 5V/2A power adapter for charging, connect the USB charging cable that comes with the product, and plug the charging cable into the USB charging port of the device. NOTE If there is no 5V/2A power adapter, other specifications of 5V power adapter can also be charged. - Page 47 Power Interface Power Light Red Light: Charging Blue Light: Charging Completed E-mail: service@kfconcept.com...
- Page 48 B.Battery life If the device does not detect a moving object, the device will go into sleep mode to reduce the power consumption of the device.If the device detects a moving object, it quickly wakes up and starts within 1 seconand takes a screen-shot and records a video.
-
Page 49: Troubleshooting/Faq
8.TROUBLESHOOTING/FAQ For more detailed FAQs, please log in the APP, "Me"-"FAQ"-"Out- door Camera". 8.1. Device prompted offline? Check whether the equipment is in the energized state and observe whether the working light of the equipment lights up normally. Check whether the Wi-Fi network is good and restart the router. If the location of the device according to the router is far away, resulting in the inability to obtain a good Wi-Fi signal, it is recommended to move the router to a closer location, or add a WiFi amplifier to enhance the... - Page 50 • It is recommended to use San Disk, Samsung and other brand cards; It is recommended to use a standard class 10 TF card; • Only FAT32 format is supported. • TF card can't be identified when the internet environment is not good. 8.5.
- Page 51 hours or more to fully charge. 8.8. What should I do if the charge fails? • Determine whether the power adapter is good, try another one. • Determine whether the USB charging cable is good, try another one. • The charging indicator may be defective, please check the charging condition in the phone APP.
- Page 52 sunlight. • Adjust the direction of your solar panel to face the true south (in the northern hemisphere) or the true north (in the southern hemisphere) and tilt it to the appropriate angle according to your latitude to ensure maximum sun exposure. •...
- Page 53 FCC WARNING STATEMENT Changes or modifications not expressly approved by the party responsi- ble for compliance could void the user's authority to operate the equipment.This equipment has been tested and found to comply with the limits for a Class B digital device, pursuant to Part15 of the FCC Rules. These limits are designed to provide reasonable protection against harmful interference in a residential installation.This equipment gener- ates uses and can radiate radio frequency energy and, if not installed and...
- Page 54 ence that may cause undesired operation. RF Exposure Statement To maintain compliance with FCC's RF Exposure guidelines,This equipment should be installed and operated with minimum distance of 20cm the radiator your body. This device and its antenna(s) must not be co-located or operation in conjunction with any other antenna or transmit- ter.
Need help?
Do you have a question about the DQ201 and is the answer not in the manual?
Questions and answers