Table of Contents
Advertisement
Quick Links
Advertisement
Table of Contents

Related Manuals for K&F Concept F8

Summary of Contents for K&F Concept F8
- Page 1 4G Solar Camera Instruction Manual Model: F8 email: security@kfconcept.com...
- Page 2 WARM SERVICE Due to the continuous updating of the product&software, there may be a discrepancy between this user guide and App interface. All the instructions are subject to the actual operation interface. Manual contents are subject to change without notice in accordance with our policy of continuous product improvement.
-
Page 3: Table Of Contents
English I. Package Checklist II. Product Description 03-04 III. Charging Instructions IV. Product Connection 06-09 V. Product Installation 10-11 VI. APP Instructions for Use 12-14 VII. Specifications VIII. FAQs IX. Notice X. FCC Warning Statement ��... -
Page 4: Package Checklist
I. Package Checklist Camera * 1 Screw Package * 1 Mounting Base * 1 Solar Panel * 1 Instructions * 1 Important Tips* 1 ��... -
Page 5: Product Description
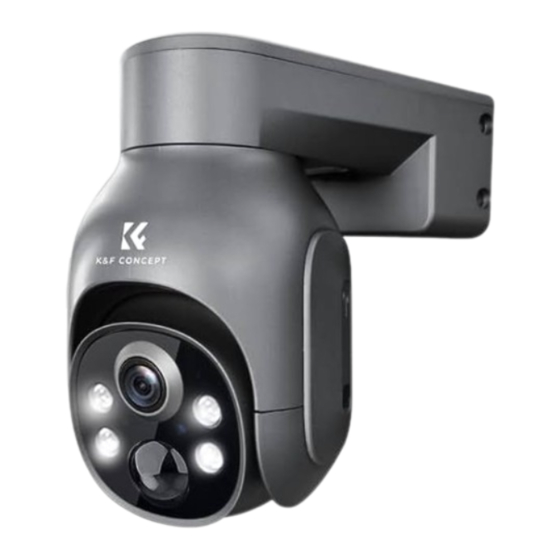
II. Product Description Antenna Indicator Lights Lens Dual source Light Light Sensor Sim Card Slot (chip facing down) Reset SD Card Slot (chip facing up) Speaker Power Charging indicator ��... - Page 6 Function Module Description press the power key for 1s until the red light is on, which indicates that the device is turned on/off Power key successfully. Reset key Long press for 5s to restore factory setting Provide wireless communication 4G SIM card SD card Store video image files ��...
-
Page 7: Charging Instructions
III. Charging Instructions TIPS: When using the product for the first time, please use a DC 5V-2A adapter to fully charge the product for about 10h. There are two options to generate the daily power supply: � Use a DC 5V-2A adapter to charge the battery Indicator Lights Charging indicator Scene... -
Page 8: Product Connection
IV. Product Connection 1. Please insert the SIM card into the machine under shutdown, and then start up Schematic diagram 1 Sim Card Slot (chip facing down) (insertion direction) TIPS: The complimentary SIM card has better compatibility. 50m traffic is given free of charge after opening, which is valid for 30 days and can be renewed later. - Page 9 2.Download APP: Two download methods: � Search for "UBOX" download in APP Store � Scan the QR code to download Supporting devices: Smartphones, excluding iPad. Supporting systems: Andorid 5.0 and above, iOS 10.0 and above. Please open all APP application permissions during installation, otherwise you can not connect to the device and receive the alert notice.
- Page 10 TIPS1: You shall connect to the Internet by mobile phone during installation TIPS2: You shall open the system push messages 3.Register and log in account number: Please register your account with your mailbox. Tips: Reasons for unsuccessful registration: � The mobile phone network is not turned on, or the APP does not have the permission to use the network and location.
- Page 11 4. Add a device: � Click "Add a device" on the APP, select "Setup 4G Device", and continue adding according to the APP guide TIPS: notice for device addition failure 1. The SIM card is not inserted, the SIM card is not inserted correctly, or the SIM card cannot be used;...
-
Page 12: Product Installation
V. Product Installation 1. Take the device to the location where it needs to be installed, open the APP to see if the monitoring picture is smooth. If it is, go to the next step. 2. Install the device at a height of 2-3 meters above the ground (the installation position should not be at a 90°... - Page 13 3.Camera installation � Please install the metal bracket on the wall; � Adjust the camera bracket hole to match with the metal bracket hole; � Tighten the camera bracket and fix it; 4. Install solar panels to ensure that the solar panels are at a right angle to receive sufficient sunlight ��...
-
Page 14: App Instructions For Use
VI. APP Instructions for Use 1. APP interface Enter to select your family or smart device location Turn on/off the push notification. Settings: Sharing, Cloud storage, Delete the device.. Press to enter the preview section. Press to add a smart device Account and value-added account management Smart device basic settings Grundeinstellungen des Smartgeräts... - Page 15 Check “my account” name and change password; Mein Konto“-Name überprüfen und Passwort ändern; Check and purchase the Cloud storage; Cloud-Speicher überprüfen und kaufen; Check and purchase the AI Cloud Facial Recognition; AI-Cloud-Gesichtserkennung überprüfen und kaufen; Check and add my friends list and permission; Freundschaftsliste und Berechtigungen überprüfen und hinzufügen;...
- Page 16 2. Recharging method of 4G traffic card If you use the 4G SIM card we provided, you can recharge it in the following ways: � iOS system mobile phone: scan the QR code on the SIM card package and recharge according to the TIPS �...
-
Page 17: Specifications
VII. Specifications Specifications PIR detection 10 m, 110 degrees Resolution 2034X1296 Weather resistance IP66 Working: -20-60 ℃, humidity < 95% Ambient temperature Storage: -25-65 ℃, humidity < 95% Input DC 5V 2A VII.FAQs 1. Fail to turn on � Make sure you have turned on the power button. �... -
Page 18: Notice
20cm the radiator of your body. This device and its antenna(s) must not be co-located or operation in conjunction with any other antenna or transmitter. FCC ID: 2AKFO-F8 ��...
Need help?
Do you have a question about the F8 and is the answer not in the manual?
Questions and answers