
Related Manuals for Leica VT1000 S


Summary of Contents for Leica VT1000 S
- Page 1 Leica VT1000 S Vibrating-blade microtome Instruction Manual Leica VT1000S V1.6 English - 11/2007 Always keep this manual near the instrument. Read carefully prior to operating the instrument.
- Page 3 Leica reserves the right to change technical speci- thorough investigation in this field. We are under no fications as well as manufacturing processes with- obligation to update the present manual periodically out prior notice.
-
Page 4: Table Of Contents
Table of contents Important notes ......................5 Symbols used in this manual and their meaning ............5 Qualification of personnel ....................5 Designated use / improper use ..................5 Safety ..........................6 General safety instructions .................... 6 Safety instructions for handling the instrument ............7 Instrument properties .................... -
Page 5: Important Notes
1. Important notes Symbols used in this manual and Designated use / improper use their meaning The VT1000 S has been designed for section- ing of specimens in medicine, biology and in- Warnings dustry, especially for sectioning fixed or fresh appear in a grey box and are marked tissue immersed in buffer solution. -
Page 6: Safety
Safety This instruction manual includes important instructions and information regarding the operating safety and maintenance of the instrument. The instruction manual is an important part of the product. It must be read carefully before using the instrument for the first time and must always be kept with the instrument. -
Page 7: Safety Instructions For Handling The Instrument
To release the switch, turn it in the direction of the arrow. The instrument cover may only be removed by qualified service personnel! Before removing the cover, ensure that the in- strument is unplugged. Leica VT1000 S – Microtome... -
Page 8: Instrument Properties
3. Instrument properties Technical Data General: Sectioning frequency (± 10 %) ......................0 - 100 Hz Amplitude .................. adjustable in 5 steps: 0.2; 0.4; 0.6; 0.8; 1 mm Sectioning speed (± 10 %) ...................... 0.025 - 2.5 mm/s Return stroke speed (± 10 %) ........................ 5 mm/s Total vertical specimen stroke .................. -
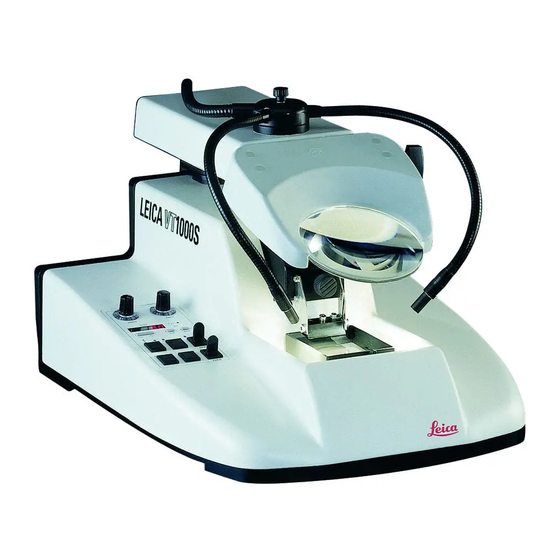
Page 9: Overview - Vt1000S
Overview - VT1000 S Fiber optics (optional) Cold light source Leica CLS 100 (optional) Magnifier carrier Magnifier glass Emergency stop switch (not visible here) Fixture for magnifier Cutting head Knife holder Buffer tray S Control panel Leica VT1000 S – Microtome... - Page 10 3. Instrument properties Control knob Control knob for sectioning for sectioning speed frequency Button for maximum advance speed LED mode indication: Indication of selected section 'Totalized section thickness’ thickness or totalized section 'Section thickness’ thickness in μm CLR-Clear button +/- Selection button DISP-Programming button for sectioning thickness (1 - 999 μm selectable),...
-
Page 11: Installation
-1 Allen key size 8.0 ..............0194 04792 -1 Manipulator ................0462 28930 1 Microtome protective cover, type 104 R – flexible....0212 04091 1 Instruction manual Leica VT1000 S, in 4 languages ....0702 37104 VT1000 S complete configuration 0472 35613 1 x VT1000 S Basic instrument .......... -
Page 12: Unpacking And Installing The Instrument
4. Installation Unpacking and installing the instrument If at all possible the instrument should be installed on a low-vi- bration workbench surface. Unpacking the instrument: - Open the transport box and carefully remove all the parts from the box. - Compare with the attached pack list to make sure the delivery is com- plete. -
Page 13: Operation
9. Plug the mains cable into the mains power wall outlet. 10. Switch the instrument ON (mains switch). The Leica VT1000 S is equipped with a wide-range power pack to cover voltages from 100 V to 240 V. Once the mains switch is turned on, the instrument carries out an initialization process: after performing a slight for- ward movement, the knife moves to the final rear position. -
Page 14: The Vt 1000 S Controls And Their Function
5. Operation The VT 1000 S controls and their function Attention: Practise working with the controls without a knife holder inserted. Only insert the knife holder when you are com- pletely familiar with all control functions. Locking lever SPEED - 10-Speed rotating potentiometer with scale - Function: Scale setting mm/s Continuous knife feed adjustment from 0.05... - Page 15 • In SINGLE mode, the knife stops automatically in the rear end posi- tion. • In CONT mode, START/STOP has to be pressed again to stop the sec- tioning movement. • The knife stops in the rear end position once the current section has been completed. Leica VT1000 S – Microtome...
- Page 16 5. Operation Function: Immediate interruption of knife movement. • Press PAUSE once again to continue sectioning. Toggle switch Function: To move the knife towards the specimen. Can also be used for manual sectioning. Because of safety aspects the FORW-movement is carried out only while the toggle switch is pressed and held;...
- Page 17 Once the switch is unlocked, the buffer tray is automatically raised until both signals switch off. • To select the retraction thickness, to deactivate retraction or to set the volume of the VT1000 S sound signal, press the following function key combinations: Volume adjustment: •...
-
Page 18: Adjusting The Amplitude
5. Operation - Adjusting the retraction - In programming mode, press DISP to display the specimen retraction menu. - The indication 'LO' will be displayed. - Press the -/+ button to set a specimen retraction value between 1 and 999 μm. Or to turn off the retraction by selecting '0'. - The selected value will be displayed in the FEED window. -
Page 19: Working With The Vt 1000 S On A Daily Base
- The clamping screw or one of the clamping devices must not be located over the gap in the specimen disc, as in these positions clamp- ing the specimen disc is not possible. - Remove the manipulator (8). Fig. 19.4 Leica VT1000 S – Microtome... - Page 20 - Use the adjusting lever (2) to select the desired clearance angle. - Secure the selected clearance angle by tightening the two screws (1). The Leica VT1000 S does not require the readjustment of the clearance angle every time you change the knife. The clearance angle needs to be readjusted only, when required by a different application (e.g.
- Page 21 (from the user´s view). - Pick up the section as shown on the left using a brush (5) to mount it on a glass slide (6). Fig. 21.3 Leica VT1000 S – Microtome...
-
Page 22: Daily Routine Maintenance / Switching The Vt1000S Off
Operation Daily routine maintenance / switching the VT1000 S off After you finish working, proceed as follows: • Switch off the mains switch at the back of the instrument. • Place the lid onto the magnifier • Remove the knife holder. -
Page 23: Trouble Shooting
Stop position. and after that the emergency - To reactivate the return stroke stop was released again with- movement, lock the REV/ out releasing the REV/FORW- FORW-button again (to REV button to its center position. position). Leica VT1000S – Microtome... - Page 24 Trouble shooting Error message Source of error Corrective action - Audible sound signal. - Operating error due to locking - Release the UP/DOWN-button - Downward stroke is not com- function of the UP/DOWN- to its center position. pleted. button: - To reactivate the downward - With the UP/DOWN-button motion, activate the UP/ locked in the DOWN position...
- Page 25 - Error code E0.5xx is displayed. feed) the Technical Service. - Audible sound signal. - Light barrier error (section - Switch the instrument off; call - Error code E0.600 is displayed. thickness feed) the Technical Service. Leica VT1000S – Microtome...
- Page 26 Trouble shooting Error message Source of error Corrective action - Audible sound signal. - Software detected severe - Switch the instrument off; call - Error code E0.700 is displayed hardware fault. the Technical Service. for approx. 2 secs. - Audible sound signal. - E-EPROM defective.
- Page 27 Technical sealed. Service. Do not use the instru- ment when in this condition. Leica VT1000S – Microtome...
-
Page 28: Cleaning And Maintenance
Cleaning and maintenance Cleaning the instrument Always remove the knife / blade before detaching the knife holder from the instrument. Al- ways put the knife (blade) back into the knife case or blade dispenser when not in use! When using cleaners, comply with the safety instructions of the manufacturer and the labor safety regulations of your laboratory! When cleaning the outer surfaces, do not use xylene or solvents containing acetone or xy- lene. -
Page 29: Exchanging The Main Fuses
- To exchange the fuses carefully open the sealing cover at the rear of the instrument with a small screw driver. Insert the screw driver into the small gap on the extreme left (1). - Remove the fuses and insert new ones of the same specification! Fig. 29 Leica VT1000 S – Microtome... -
Page 30: Ordering Information: Replacement Parts, Accessories And Consumables
Foot switch with protective guard ..........046327415 Magnifier, assy................... 046231191 Fiber optics ..................050230028 Cold light sources Leica CLS100X 100-120V/50-60Hz ..........050230214 Leica CLS100X 230-240V/50-60Hz ..........050230215 Leica CLS100X 240V/ 50-60Hz ..........050230216 Knife holder L, for standard low-profile blades, 70x50mm ..046327402 Buffer tray L** .................. -
Page 31: Additional Accessories For Standard Size Specimens (Functional Description)
L, buffer tray L and specimen disc L, not orientable. Ref. no. 0463 27402 (Knife holder L) Ref. no. 0463 27408 (Buffer tray L) Ref. no. 0463 27405 (Specimen disc L, non orientable) Fig. 31.3 Leica VT1000 S – Microtome... -
Page 32: Foot Switch (Functional Description)
Ordering information: replacement parts, accessories and consumables Specimen disc L, orientable - By rotating the screw (1) the specimen disc can be tilted on the x- axis (see arrow 2). Since the orientable specimen disc L cannot be rotated. Ref. no. 0463 27407 Fig. -
Page 33: Magnifier, Fiber Optics, Cold Light Source
Magnifier - To be inserted into the fixture. Ref. no. 0462 31191 Cold light source Leica CLS 100 - Light source of the fiber optics. 100-120 V, 50/60 Hz, Ref. no. 0502 30214 230 V, 50/60 Hz, Ref. no. 0502 30215 240 V, 50/60 Hz, Ref. -
Page 34: Warranty And Service
Leica Biosystems Nussloch GmbH guarantees that the contractual prod- uct delivered has been subjected to a comprehensive quality control procedure based on the Leica in-house testing standards, and that the prod- uct is faultless and complies with all technical specifications and/or agreed characteristics warranted. -
Page 35: Ec Declaration Of Conformity
10. EC Declaration of Conformity EC Declaration of Conformity We herewith declare, in exclusive responsibility, that the instrument Leica VT1000 S – Vibrating Blade Microtome was developed, designed and manufactured to conform with the • Council Directive 73/23/EEC, (Low Voltage) and •... -
Page 36: Peoples Republic Of China
11. Peoples Republic of China Instruction manual V1.6 – 11/2007...
Need help?
Do you have a question about the VT1000 S and is the answer not in the manual?
Questions and answers