Advertisement
IN THE BOX

SPECIFICATIONS
GL BEAM OFF

GL BEAM ON

*The maximum output brightness varies with the battery level. When the battery is fully charged, the maximum output brightness is 1,350 lumens. When the battery level drops to about 50%, the maximum output brightness drops to 500 lumens.
*The GL beam level is Class 3R, obeying the standard IEC 60825-1 requirement.
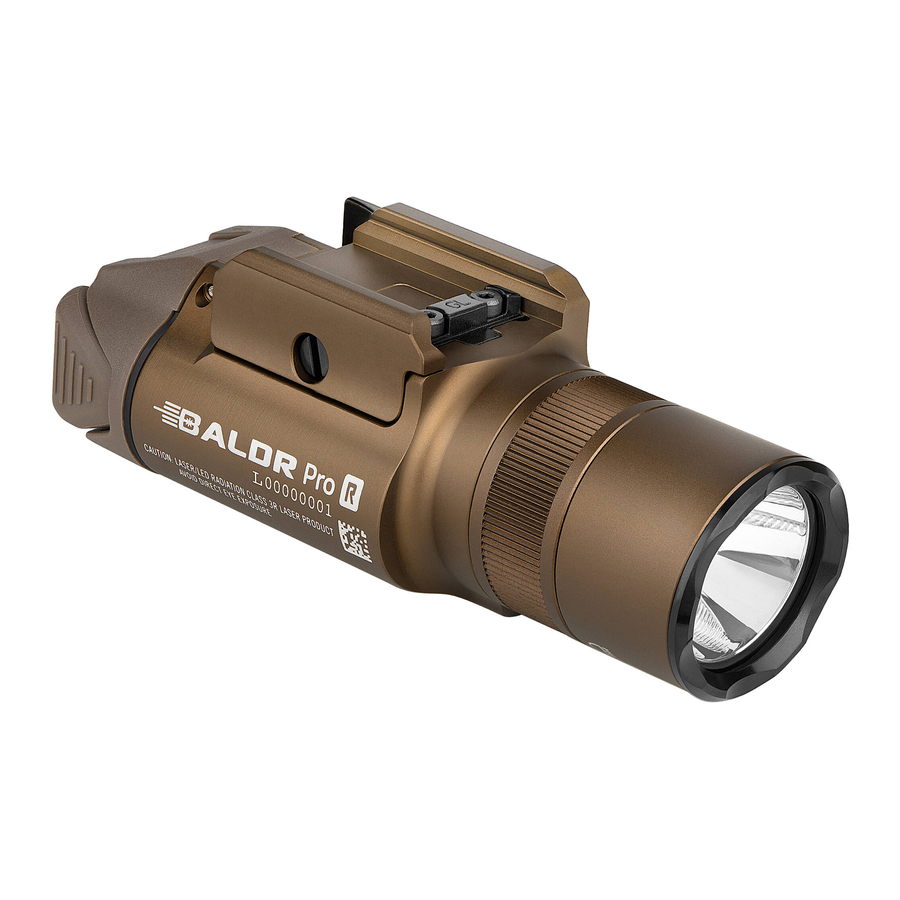
PRODUCT OVERVIEW

BEFORE FIRST USE
The BALDR Pro R ships in lockout mode. Before first use, please press and hold both switches at the same time for about 2 seconds until it accesses the high white light or GL beam, indicating that it has exited lockout mode.
*The indicator on the charging cable is red while charging and will turn green when fully charged.
*The low battery indicator will turn red when the light is working and the battery level is less than 10%.
COMPATIBILITY CHECK
The Light can be used on most Glock or Picatinny (MIL-STD-1913) type rails. The Glock adapter labelled "GL" is already installed and a Picatinny (MIL-STD-1913) adapter is included in the package. To install the light on Picatinny (MIL-STD-1913) rails, the user needs to replace the "GL" adapter with the included 1913 adapter using the screws and wrench provided in the package.
INSTALLATION
Open the swing arm as shown below. Make sure that the adapter fits inside your rail notch. Close the swing arm once it is aligned.

Pull open the swing arm

Close the swing arm
| ICON | LIGHT SETTING |
 | LIGHT |
 | LIGHT&GL BEAM |
 | GL BEAM |
GL BEAM CALIBRATION
Use the included allen wrench to rotate the two adjustment screws of the light to calibrate the vertical or horizontal angle of the GL beam, and finally sight in the GL beam for accurate use.


- DO NOT shine the light directly into human eyes. This may cause temporary blindness, or permanent damage to the eyes.
- DO NOT cover the flashlight's head or place the head on the ground when the flashlight is on. The radiation energy may cause damage to the flashlight itself, or even result in the burning of flammable objects nearby.
- DO NOT leave the light in any type of fabric bag or fusible plastic container under high temperature.

- Keep out of reach of children.
- The surface of the light may reach 50°C or above when the high brightness setting is used for a long time.
- GL beam light is bright and blinding - DO NOT shine at aircraft or vehicles at any distance.
NOTICE
- The setting switch is magnetically sensitive, when close to magnet, interference may occur.
- The LED light will work for one minute at the top output mode and gradually step down to 500 lumens within 0.5 minutes.
- When the battery voltage is too low, only the low mode with 300 lumens can be activated.
- The Baldr Pro R can be locked out only when its light is off.
- NYLOK is a registered trademark of NYLOK LLC.
EXCLUSION CLAUSE
Olight is not liable for damages or injuries sustained resulting from the usage of the product inconsistent with the warnings in the manual, including but not limited to using the product inconsistent with the recommended lockout mode.
HOW TO OPERATE
THREE LIGHT SETTINGS AVAILABLE:By rotating the ring at the head of the light to select white LED only, white LED/GL beam combined, GL beam only accordingly.
CONSTANT ON/OFF: Single click either side switch for constant on. When the light is on, click either side switch again to turn it off.
MOMENTARY ON: When the light is off, press and hold either side switch. Let go of the switch and it will turn off.
When the mode switch is positioned to white LED only or white LED/ GL beam combined mode, the following operations are effective:
CHANGE THE BRIGHTNESS LEVEL:When the light is on, quickly double click (or click three times or more) either side switch to change the brightness level. When the light is turned on again, it will return to the previously used brightness level.
HIGH WHITE LIGHT: When the light is off, quickly click either side of the tail switch twice to access high white light directly.
STROBE: Press both sides switches and release to enter strobe mode. Click either side switch to turn it off.
LOCKOUT/UNLOCK: To lock out the turned-off light, press and hold either switch for about half a second, then press and hold the other switch for about two seconds until the light turns off. In lockout mode, press either switch, and it turns on momentarily with a dim white light (about 100 lumens). To leave the lockout mode, press and hold both switches at the same time for about 2 seconds until it accesses the high white light or GL beam.
WARRANTY
Within 30 days of purchase:Contact the original seller for repair or replacement.
Within 2 years of purchase: Contact Olight for repair or replacement.
USB Magnetic Charging Cable: One year.
This warranty does not cover normal wear and tear, modifications, misuse, disintegrations, negligence, accidents, improper maintenance, or repair by anyone other than an authorized retailer or Olight itself.
EU-Declaration of Conformity

EU-Declaration of Conformity can be found here:
https://olightworld.com/ec-declaration
USA Customer Support
cs@olightstore.com
Global Customer Support
customer-service@olightworld.com
Visit www.olightworld.com to see our complete product line of portable illumination tools.

VideosOlight Baldr Pro R 1350 Lumen Weapon Light & Laser - Review Video
Documents / Resources
References
Olightworld.com.Olight Flashlights, Tactical Light, Outdoor Light, Weapon Light
Olightworld.com.Olight Flashlights, Tactical Light, Outdoor Light, Weapon Light
Download manual
Here you can download full pdf version of manual, it may contain additional safety instructions, warranty information, FCC rules, etc.
Download OLIGHT BALDR Pro R Rechargeable Light with Green Laser Manual
Advertisement


Need help?
Do you have a question about the BALDR Pro R and is the answer not in the manual?
Questions and answers