Table of Contents
Advertisement
Quick Links
Advertisement
Table of Contents

Related Manuals for Kramer WP-209


Summary of Contents for Kramer WP-209
- Page 1 Kramer Electronics, Ltd. USER MANUAL Model: WP-209 Wall Plate...
-
Page 2: Table Of Contents
Installing the WP-209 Operating the WP-209 Technical Specifications Figures Figure 1: WP-209 Front Panel for the US Version Figure 2: WP-209 Front Panel for the European Version Figure 3: WP-209 Right Panel Figure 4: WP-209 Lower Panel Figure 5: Example of Conference Room WP-209 Installation... -
Page 3: Introduction
GROUP 6: Accessories and Rack Adapters; GROUP 7: Scan Converters and Scalers; and GROUP 8: Cables and Connectors 2 Download up-to-date Kramer user manuals from the Internet at this URL: http://www.kramerelectronics.com 3 The complete list of Kramer cables is on our Web site at http://www.kramerelectronics.com Introduction... - Page 4 Getting Started KRAMER: SIMPLE CREATIVE TECHNOLOGY...
-
Page 5: Overview
An unbalanced stereo AUDIO input on a 3.5mm mini jack with a corresponding balanced stereo AUDIO output on a 5-pole terminal block In addition, the WP-209 wall plate comes with pass through connectors for: Composite video on an RCA connector... -
Page 6: Your Wp-209
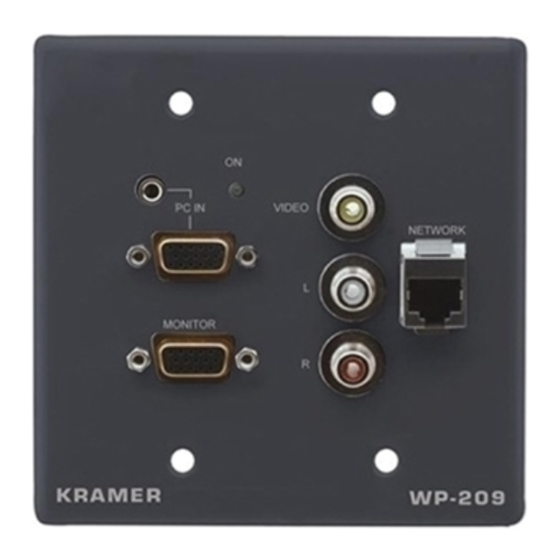
The Kramer WP-209E XGA/Audio/Video Line Driver is available in two versions—one for the US and one for Europe. This section defines the WP-209 front panel (see section 4.1), the right panel (see section 4.2), and the lower panel (see section 4.3). -
Page 7: Figure 2: Wp-209 Front Panel For The European Version
2 Can be used for any RGBHV resolution (for example, VGA, XGA, UXGA and so on). You can connect a component HD source (for example, a set top box with YPbPr outputs), using a breakout VGA-to-RCA/BNC cable (for example, the Kramer C-GM/3RVF cable). -
Page 8: Your Wp-209 Right Panel
4.2 Your WP-209 Right Panel Figure 3 and Table 2 define the right panel of the WP-209: Figure 3: WP-209 Right Panel 4.3 Your WP-209 Lower Panel Figure 4 and Table 3 define the lower panel of the WP-209: Figure 4: WP-209 Lower Panel... -
Page 9: Using The Wp-209
Using the WP-209 You can use your WP-209, for example, in a conference room, as the example in Figure 5 illustrates: Figure 5: Example of Conference Room WP-209 Installation For details of how to: Install your WP-209, see section 5.1 Operate your WP-209, see section 5.2... -
Page 10: Installing The Wp-209
4. If required, connect the ETHERNET RJ-45 connector. 1 For component HDTV, use a breakout VGA-to-RCA/BNC cable (for example, the Kramer C-GM/3RVF cable). For direct wiring, the output connector PINOUT is as follows: PIN 1 for Pr; PIN 2 for Y; and PIN 3 for Pb 2 Connect the wire labeled “+”... -
Page 11: Figure 7: Connecting The Wp-209
Using the WP-209 5. If required, adjust the left and/or right AUDIO LEVEL, and/or the UXGA EQ. level, and/or the UXGA LEVEL. Figure 7: Connecting the WP-209 1 Use a screwdriver to carefully rotate the trimmer, adjusting the appropriate level... -
Page 12: Technical Specifications
ACCESSORIES: 1 Specifications are subject to change without notice Technical Specifications of the WP-209 1 looping UXGA INPUT on HD-15 connectors 1 unbalanced stereo audio PC INPUT on a 3.5mm mini jack 1 composite video pass through input on an RCA connector... - Page 14 For the latest information on our products and a list of Kramer distributors, visit our Web site: www.kramerelectronics.com, where updates to this user manual may be found. We welcome your questions, comments and feedback. Safety Warning: Disconnect the unit from the power supply before opening/servicing.
Need help?
Do you have a question about the WP-209 and is the answer not in the manual?
Questions and answers