
Subscribe to Our Youtube Channel
Related Manuals for BRUEL & KJAER Matron 3


Summary of Contents for BRUEL & KJAER Matron 3
- Page 1 Technical Documentation Matron 3 Light Type 3652 Domestic Noise Monitoring System with 2250-M Hand-held Analyzer User Manual: For field use English BE 1773 – 11...
- Page 3 FIELD GUIDE FOR MATRON-Light with Type 2250-M analyser domestic noise monitoring system April 2007 (SVMATRON-123.2 Field Guide for MATRON-Light with 2250-M) MATRON-Light with 2250-M Field Guide...
-
Page 4: Table Of Contents
Contents Page Introduction 1. Assembling the MATRON- Light with 2250-M 1.1 MATRON-Light components 1.2 Assembly of the MATRON-Light system 1.3 Setting the combination lock 2. Initial setting up procedure 2.2 Preparing Type 2250-M Analyser to continuously log noise results & record sound 2.3 Detection of power interruption during the investigation Explorer 3. -
Page 5: Introduction
Introduction The Type 2250-M Hand-held analyser running Type BZ7140 Logging and sound recording software (Version 2.0) enables both noise measurement results and sound recordings to be stored to a standard memory card. This Field Guide includes some suggestions to help you use the MATRON-Light domestic noise monitoring system. -
Page 6: Assembling The Matron- Light With 2250-M
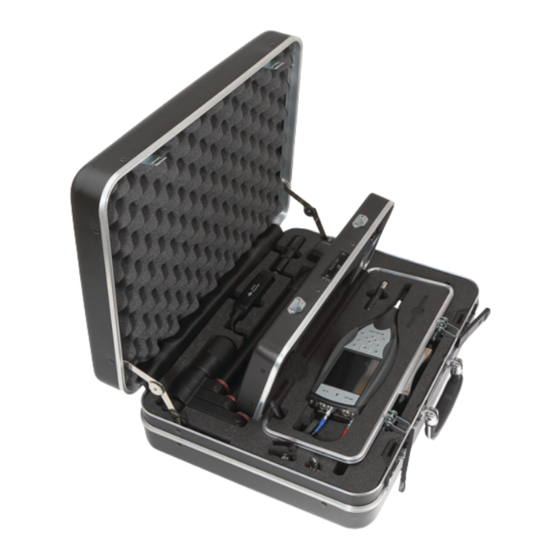
1. Assembling the MATRON - Light with 2250-M (running BZ7140 Logging and Sound Recording application). The MATRON-Light/2250-M system consists of the following components: KE-1015 Outer brief case (includes foam insert) KE-1016 Inner small lockable case (includes foam insert) ZH-0666 Hand switch and cable 2250-M Hand-held analyser running Type BZ7140 Logging and sound recording application (Version 2.0) including SD memory card Type UL-1009. - Page 7 MATRON-Light Outer MATRON-Light Outer brief case Type KE-1015 brief case Type KE-1015 Power supply Power supply Hand-switch Hand-switch Type ZG-0426 Type ZG-0426 Type ZH-0666 Type ZH-0666 Fold-flat Tripod Type Fold-flat Tripod Type Calibrator Calibrator UA1251 with small UA1251 with small Type 4231 Type 4231 extension rod...
- Page 8 a) To the top of your 2250-M: Connect the microphone cable to the front socket of your Type 2250-M. Please note that there is a red dot on the underside of the LEMO silver connector and this should be lined up with the corresponding white dot located on the back panel of your 2250- M.
-
Page 9: Setting The Combination Lock
CAUTION: This plug is captive so that if you wish to remove it, pull on the knurled part of the plug NOT the cable or protruding part of the plug. Setting the combination lock 1.3.1 You can choose a three-digit code to unlock the small padlock provided to lock the small MATRON-Light case. -
Page 10: Initial Setting Up Procedure
Initial setting up procedure 2.1.1 Before opening the outer case, ensure the “ Bruel & Kjaer ” label under the handle is the correct way up. 2.1.2 Open the (outer) briefcase by pulling the outer edges of the clips on either side of the carrying handle 2.1.3 Remove the inner brief case containing your 2250-M. - Page 11 2.2.4 Check that “MATRON Logging” is displayed on the top line as shown above. If not, tap on the bar at the top of the screen to reveal a drop-down list similar to: Tap on “MATRON Logging” from the list. This mode of operation will then load. 2.2.5 Tap on (Menu) followed by 2.2.6 Tap on...
- Page 12 2.2.10 Make the following alterations under each listed set-up group. Click on the (to open) or (to close) each group in turn: You can choose the “Z” weighting (similar to linear frequency weighting) if preferred. It is essential that the statistics are based on LAF (not LAS or LAeq) for use in the UK. In this example, the system is set up to monitor for 8 days with a logging period of 1 second.
- Page 13 If you want to change the total measurement time or period, just tap on the appropriate time and a numeric keypad appears. Select the required days/hours/minutes/seconds you wish to change and tap on the required value(s). Finally tap on to accept your changes. In this example, we have decided to select the LAeq value to give us a time history (profile) of that parameter during the monitoring.
- Page 14 a) Recording Control has been set for activation by the MATRON-3 hand- switch. b) The has been set to meaning that we are recording sound signals in the frequency range up to about 6.6kHz. Other recording frequency ranges and their meanings are given in the following table. Recording Approximate Sampl-...
- Page 15 2.2.11 Tap on to move up to the next storage level and show the available choices of “Internal Disc”, “SD-Card” or “CF-Card” and the amount of storage available: 2.2.12 Tap on if you have fitted a CF memory card) and then 2.2.13 Tap on to set the current job folder for future measurement results.
-
Page 16: Detection Of Power Interruption During The Investigation
2.3.4 Connect the plugs of the cables marked “DC In” and “Trigger” to the appropriate sockets as here: Trigger Trigger DC In DC In 2.3.5 If the mains supply is interrupted during the investigation then the 2250-M will switch off (with no re-chargeable battery present) until mains power is restored. -
Page 17: Office Preparation Before Site Visit
3. Office preparation before site visit. 3.1 Checking date and time and calibrating the 2250-M: 3.1.1 Attach the microphone extension cable to the small case and then attach the microphone and preamplifier assembly. 3.1.2 Switch on the 2250-M by pressing (On/Off). -
Page 18: Recording A Memory Card "Full" Dummy File
3.1.7 Apply sound level calibrator Type 4231 to the microphone and activate by pressing On/Off on some models). 3.1.8 Tap on (Menu) and then select 3.1.9 Follow the instructions on the top of the display. 3.1.10 During the calibration sequence, an Information message will ask you to accept the calibration. - Page 19 3.2.12 Close the window by tapping on 3.2.13 The preparations are complete so the 2250-M can now be switched off by pressing the (On/Off). MATRON-Light with 2250-M Field Guide, Page 17...
-
Page 20: Installing The Matron-Light System At Complainant's Home
4. Installing the MATRON-Light system at complainant’s home Locate the MATRON-Light system in a position where the complainant would normally be when hearing the noise under investigation. 4.1 The microphone and preamplifier (connected to the microphone extension cable) should be mounted on the short extension rod of the fold-flat tripod Type UA-1251 by using Tripod Adaptor Type UA-0588. - Page 21 diaphragm of the microphone causes an overload to occur during application and removal of the calibrator. 4.8 The calibration level will now be recorded. (If you wish, you can record the sound signal generated by the calibrator by pressing the push button of the hand-switch and then stopping the sound recording after 10-20 seconds.) After approximately 20 seconds, switch off the calibrator and remove it from the microphone.
- Page 22 The display shows that the sound recording has started and is being marked with the bar above “Sound”. Stop the sound recording. 4.12 Finally, ensure that the green lights are still active indicating that the measurements are continuing. 4.13 Close the lid of the small case and lock it. With the MATRON-Light now in place and with the complainant also in the room, sit (or stand) at a reasonable distance from the microphone, press the push button on the hand-switch (red light indicates recording has started) and state the following at your normal speaking level.
-
Page 23: Sound Recording: Instructions To The Complainant
5. Sound recording: instructions to the complainant. 5.1 When you wish to start recording the noise, press the push button on the hand-switch. A red light will indicate recording has commenced. 5.2 To stop recording, press the push button on the hand-switch. The red indicator will go off to indicate that recording has stopped. -
Page 24: Retrieving The Matron-Light After A Period Of Use
6. Retrieving the MATRON-Light after a period of use Unlock the padlock. The 2250-M might appear to be inactive but this is only because the lights will have turned off. Using the stylus, tap on the screen to activate the back-light and the green traffic lights will also appear. - Page 25 6.11 in answer to the warning message: 6.12 Close the window by tapping on 6.13 You may now continue your measurement by pressing the key (Pause/Start). 6.14 Apply sound level calibrator Type 4231 to the microphone and activate by pressing On/Off on some models).
-
Page 26: Processing Results And Recordings From Matron-Light
7. Processing results and recordings from MATRON-Light. The results stored in the 2250-M Hand-held analyser may be presented in graphical format with the sound recordings clearly marked. The results may be replayed directly on the screen of the analyser or may be transferred and stored in the Type BZ5503 Utilities software supplied with Type 2250-M Analyser and then transferred to software packages Types 7815 Noise Explorer or 7820 Evaluator for presentation and listening purposes. - Page 27 8.7 You can move the cursor to the sound recording(s) by tapping on the icon as here: 8.8 Highlight the section you wish to play back by placing the stylus in the marked section and dragging it across the sound recording like this: MATRON-Light with 2250-M Field Guide, Page 25...
- Page 28 8.9 Click on and then choose an appropriate option: “Repeat selection” plays the selected part until you press “Cancel” on the pop-up menu, “Selection” plays the part you have selected, “To end” plays from where you selected to the end of that recording, “All”...
-
Page 29: Transferring Results To Computer
9. Transferring results to computer This section assumes you have installed Type BZ5503 Utilities software for 2250-M on your computer (if not, see the Installation Manual for the Utility software at: ) and either software http://www.bksv.com/downloads/2250/BZ-5503 Installation Manual - BR169414.pdf Types 7815 Noise Explorer or 7820 Evaluator. - Page 30 Click on 9.1.12 Your new location for storing results will now appear at the bottom of the list as here: 9.1.13 Click on the User name on the memory card as here: 9.1.14 Right click and choose: 9.1.15 Click on your new archive for the MATRON results: and then right click and select 9.1.16 Click on your results:...
- Page 31 9.2 Transferring results using the USB connection from 2250 into the computer. 9.2.1 Ensure the software protection key (sometimes referred to as the “dongle” or “hasp” key) is present on the printer port or USB port of your computer. You will need the key present whilst transferring the results from BZ5503 software to 7815 or 7820 but it does not need to be present after this process.
-
Page 32: Transferring Results Using The Usb Connection From 2250-M
9.2.8 Transfer the results to your selected archive by clicking 9.2.9 Click on and locate the transferred file. 9.2.10 Click on your results: and right click and select 9.2.11 Depending on the software package you are using to present your results, choose . - Page 33 Choose the recommended option as shown (the alternative is explained under “Help”) and click Your results and sound recording will now be presented in the Type 7815 Noise Explorer or Type 7820 Evaluator software. MATRON-Light with 2250-M Field Guide, Page 31...
-
Page 34: Brief Introduction To Presentation Of Results: Type 7815 Noise Explorer And Type 7820 Evaluator Software Packages
10. Brief Introduction to Presentation of Results: Type 7815 Noise Explorer and Type 7820 Evaluator software packages. 10.1 After transfer, your results and sound recordings should appear similar to this: 10.2 Position the mouse pointer over the icon to the left of “Untitled” and then right-click the mouse: Properties appears. -
Page 35: Listen To Your Recordings
You may need to click on (Toggle Text) to obtain a layout similar to that above. 10.5 You can experiment with the display to see how to present it as you wish. Position the mouse pointer on the graph and try: moving the cursor with mouse pointer movement and left-click or using the keyboard arrows (the under the... - Page 36 recommended) or through a set of headphones or amplifier/speaker attached to the headphones output socket on your computer. 10.8 You can control the replay by the start button ( ) and stop button ( ) or use the spacebar on the computer keyboard. The volume can be increased ( use keyboard F7) and decreased ( or use keyboard F8).
- Page 38 HEADQUARTERS: DK-2850 Nærum · Denmark · Telephone: +45 4580 0500 · Fax: +45 4580 1405 · www.bksv.com · info@bksv.com Australia (+61) 2 9889-8888 · Austria (+43) 1 865 74 00 · Brazil (+55)11 5188-8161 · Canada (+1) 514 695-8225 China (+86) 10 680 29906 · Czech Republic (+420) 2 6702 1100 · Finland (+358) 9-755 950 · France (+33) 1 69 90 71 00 Germany (+49) 421 17 87 0 ·...
Need help?
Do you have a question about the Matron 3 and is the answer not in the manual?
Questions and answers