
Related Manuals for Arjo Opera


Summary of Contents for Arjo Opera
- Page 1 Opera Operating and Product Care Instructions KPX 01700.US KKX 52180.GB/2 Issue 1 Aug 2000 Jan. 2001...
- Page 2 The vertical and horizontal lines printed in the margins adjacent to the text/illustrations in these instructions are for ARJO use only and should be disregarded by the reader. Some of the information contained in these instructions become outdated, improvements made to the product in the future. If you have any questions regarding these instructions or your lift, please contact ARJO.
-
Page 3: Table Of Contents
Patient Scale (if fitted) ....... 28 Lift Battery Charging........ 29-30 Warnings for Charging......29 General Safety Practises for Batteries ..Care of the Opera ........31-33 Sling Care and Cleaning......31 Lift Care and Cleaning ......31 Periodic Testing......... Service Advice .......... 32 Labels............ -
Page 4: Foreword
Foreword Thank you for purchasing ARJO equipment The Opera is part of a series of quality products designed especially for hospitals, nursing homes and other healthcare uses. We are dedicated to serving your needs and providing the best products available, along with training that will bring your staff maximum benefit from every ARJO product. -
Page 5: Safety Instructions
AND REPLACED AS NEEDED. lift. Also, see the section titled “Care of the Opera”. This product is intended to be operated entirely by an attendant. No functions regarding the control of Warning : Use only ARJO slings and this product should be performed by the patient. -
Page 6: Product Description/Function
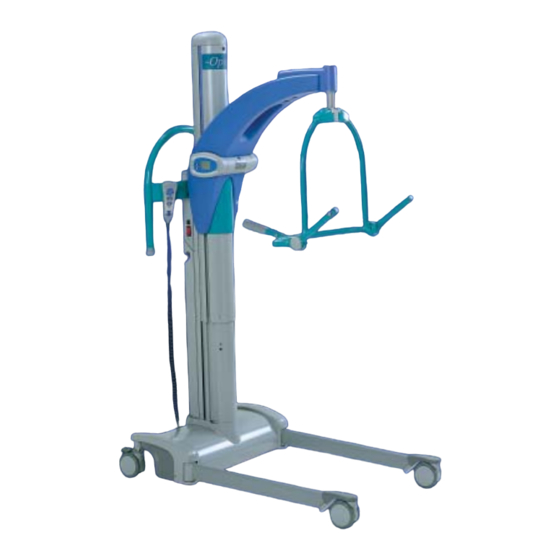
Product Description/Function Parts referred to in this manual Fig. 1... -
Page 7: Control Handset
Product Description/Function Fig. 1 Key Mast Adjustable chassis legs Braked castors Lift maneuvring handle Mast top cover 4-Point spreader bar 2-Point spreader bar (if supplied) Patient positioning handle 10. Lift battery pack 11. Battery release button 12. Patient scale (if fitted) 13. - Page 8 ARJO representative. Warning : Only use ARJO supplied slings and stretchers that are designed to be used with the Opera. The sling profiles illustrated (see Fig. 2) will help to identify the various ARJO slings and fabric stretchers available.
- Page 9 Product Description/Function ARJO standard sling profiles that can be used with the Opera Loop sling Soft stretcher 4-point toileting sling Loop sling (with headrest) 4-point amputee sling (with headrest) 4-point unpadded 4-point padded sling 4-point mesh sling sling Fig. 2...
- Page 10 Dual Control Panel (see Fig. 4): An additional feature fitted to the Opera is a mast mounted dual System switch panel. This operates in parallel with the...
- Page 11 If the system failure lower override switch or wind down facility has to be operated, do not use the lift Fig. 6 and contact the ARJO Service Department. System Cut-Out Switch (see Fig. 5): If the lift approximately 3/16 inch and slide the cover functions fail to operate when the buttons on the forward.
-
Page 12: Automatic Cut-Out
Jib and spreader bars/stretcher frame (see Fig. 1): chassis legs to any variable width. When pressure is If the Opera has not been supplied with a released from the button, the movement will stop “dedicated” or permanently attached powered... -
Page 13: Using The Opera
Attachment the Opera located at the rear of the mast (see Fig. yoke 1). To do this, first locate the recess across the bottom of the battery with the protrusion at the bottom of the battery position. -
Page 14: Using The 4-Point Spreader Bar
Fig. 13 For larger attachments, or if you are in Ensure that the Opera is close enough to be able to doubt about being able to lift and hold the attach the shoulder clips of the sling to the spreader attachment securely, use more than one bar. - Page 15 Fig. 17). This gives confidence and dignity and also downward movement. Do not continue to press the improves the mobility of the Opera. handset lowering button. • Note : If the handset button is released during lifting or lowering, powered motion will stop immediately.
-
Page 16: To Lift From A Bed
Use the adjustable width chassis to make adjustments to chassis leg widths to assist maneuvrability around obstructions, i.e. bed legs. Position the Opera so that the spreader bar is just above, and centrally situated over the patient. Warning: Care must be taken not to lower the spreader bar on to the patient. - Page 17 Move the Opera away before removing the sling from under the patient. If transferring the patient to a chair, refer to the section titled “To Lift from a Fig. 22 Chair”.
-
Page 18: At The Toilet
The patient may be positioned in a chair, or placed on a bed. If the patient is prone to extensor spasm, he/she may be lifted by the Opera, but special attention should be paid to support of the legs during the early part of the lift. -
Page 19: Powered Patient Positioning Spreader Bar (If Fitted)
Fig. 28 caution. Encourage the patient to hold tightly to the sling to avoid sliding out. Do The ARJO toilet sling has been specially designed not use the toilet sling for lifting and to help support patients while toileting. transportation apart from toilet visits. - Page 20 The PPP spreader bar is fully waterproof and is operates. classified by ARJO as a wet environment unit. It has a blue and white circular label attached to it to Powered movement will continue in the direction qualify this (see the section titled “Labels”).
-
Page 21: Using The 2-Point Spreader Bar
The slings to be used with the 2-point spreader bar reset quickly once powered movement has ceased, are the ARJO loop slings (see Fig. 2). They are and the obstruction or lift should then be moved to available in four sizes (small, medium, large and prevent this re-occurring. -
Page 22: To Lift From A Bed
Using the Opera METHOD 3 METHOD 1 Fig. 36 Fig. 34 Once the sling has been positioned and attached Method 2 - Repeat method 1, but before attaching securely to the spreader bar, a lift can be performed points “B” to the outer hooks on the spreader bar, using the control handset. -
Page 23: Using The Soft Stretcher
Warning: Apply the castor brakes when leaving the patient unattended, or to keep the Opera in position on a sloping surface. When the patient has been returned to the bed he/ she may be reclined before the sling is detached. - Page 24 Warning: It is essential to keep the patient at approximately normal bed height to ensure stability and maintain The stretcher frame is classified by ARJO as a wet patient/attendant contact. environment unit, and has a blue and white circular When lowering the jib, ensure that the label attached to it to qualify this (see the section patient’s or attendant’s legs and feet are...
-
Page 25: Using The Strap Stretcher
Using the Opera Using the Strap Stretcher Suspension Head End point label (Straps closer together) Side Section End tube (Right hand) Side Section End tube (Left hand) Cross Straps Suspension straps Clasp Strap Guide Strap Locking Clamp Side Section Orientation Label Approx. - Page 26 Using the Opera • Note: If desired, the straps may be passed under the pillow, thereby leaving it under the patient’s head for added comfort (see Fig. 47). Strap End of cross strap to be guide pushed under patient Fig. 44...
- Page 27 Using the Opera Once connected, lift the patient clear of the bed and rotate the stretcher frame until the patient’s feet are in proximity to the mast. In this position, the complete unit may be transported through wide doorways. Alternatively, leave the patient at 90º to the mast.
-
Page 28: Patient Scale (If Fitted)
Using the Opera Strap and scoop stretcher connection hook positions label - hook positions for strap and scoop stretcher attachment straps Fig. 50 • Note: Individual patient support straps can be loosened if attention to the patient is required. Warning: To ensure that the patient is securely supported, do not remove too many straps at one time. -
Page 29: Lift Battery Charging
Lift Battery Charging The Opera uses a battery discharge indicator, located on the rear side of the controls console (see Warning: Do NOT store batteries at Fig. 1). The display shows ten levels of battery state temperatures in excess of 60°C (140°F). - Page 30 Lift Battery Charging To ensure that the Opera is always ready for use, it is recommended that a freshly charged battery pack • Note: The cable that connects the main be always available. electricity supply to the charger is supplied as a detachable item. If using...
-
Page 31: Care Of The Opera
Care of the Opera Sling care and cleaning: Lift care and cleaning: Warning: The slings should be checked Warning: It is recommended that patient before and after use with each patient and, lifts and accessories are regularly cleaned if necessary, washed according to the... -
Page 32: Periodic Testing
Warning: If in doubt about the correct Check that all external fittings are secure functioning of the Opera, do not use it and and that all screws and nuts are tight. contact the ARJO Service Department. Ensure that all instruction labels are... - Page 33 Special tools are required for certain component replacement. Warning: The simplest, safest and most effective way to maintain your product, is to have it methodically and professionally serviced by an ARJO approved engineer using ARJO approved spare parts. information service maintenance contracts, please contact...
-
Page 34: Labels
System failure lower override control identification Sling size guide 10. Safe working load of individual component 11. Battery instruction/recycling information 12. Safe working load of lift 13. Stretcher attachment point (4-point attachment stretchers only) 14. ARJO wet environment product identification Fig. 52... -
Page 35: Technical Specification
Component Weights Opera (mast with “Lock and Load” jib) - without battery ....81.3 Opera (mast with “Lock and Load” scale jib) - without battery ...88.4 Opera (mast with PPP jib with 4-point spreader bar) - without battery .102.3 Opera (mast with PPP scale jib with 4-point spreader bar) - without battery ............. - Page 36 Technical Specification The Opera should not hold a weight in excess of the capacity of the lowest rated attachment fitted to it (see the table below for lift and attachments maximum lifting capacities). MAXIMUM CAPACITIES OF OPERA All slings 440lbs Lift + “Lock and Load”...
- Page 37 Technical Specification...
- Page 38 Notes...
- Page 39 Notes...
- Page 40 ARJO strongly advise and warn that only ARJO Designated Parts, which are designed for the purpose, should be used on equipment and other appliances supplied by ARJO, to avoid injuries attributable to the use of inadequate parts. ARJO’s Conditions of sale make specific provision confirming no liability in such circumstances.
Need help?
Do you have a question about the Opera and is the answer not in the manual?
Questions and answers