Advertisement
Table of Contents
- 1 Table of Contents
- 2 Safety
- 3 In the Box
- 4 Product Overview
- 5 Dustbin Overview
- 6 Robot Indicators
- 7 Setting up the Charging Dock
- 8 Setting up the Autovac Juno
- 9 Using the Ihome CLEAN App
- 10 Main Brush Maintenance
- 11 Maintaining the Dustbin and Filters
- 12 Side Brush and Sensor Maintenance
- 13 Autovac Juno Troubleshoot
- 14 Warranty
- Download this manual
Advertisement
Table of Contents

Related Manuals for iHome AUTO VAC JUNO iHRV9


Summary of Contents for iHome AUTO VAC JUNO iHRV9
- Page 1 A U T O V A C J U N O For support content and the latest digital copy of this manual, scan the QR code above or visit iHomeclean.com Owner’s Guide Model iHRV9...
-
Page 2: Table Of Contents
Product Overview Dustbin Overview Robot Indicators 7 - 8 Setting up the Charging Dock Setting Up The AutoVac Juno Using the iHOME CLEAN App Main Brush Maintenance Maintaining the Dustbin and Filters Side Brush and Sensor Maintenance AutoVac Juno Troubleshoot Warranty... -
Page 3: Safety
SAFETY SAFETY DEFINITIONS WARNING: Indicates a hazardous situation that, if not avoided, could result in death or serious injury. CAUTION: Indicates a hazardous situation that, if not avoided, could result in minor or moderate injury. NOTICE: Indicates a hazardous situation that, if not avoided, could result in property damage. Before using this product, please read the following safety instructions and follow all safety precautions. - Page 4 SAFETY NOTICE: • This robot is intended for dry floor use only. Do not use the robot to pick up any wet spills and do not allow the dustbin contents to become wet. • Do not place anything on top of your robot •...
-
Page 5: In The Box
IN THE BOX 1 : Charging Dock 3: Charging Adapter 5: HEPA Filter (installed) 2: AutoVac Juno 4: Sidebrush... -
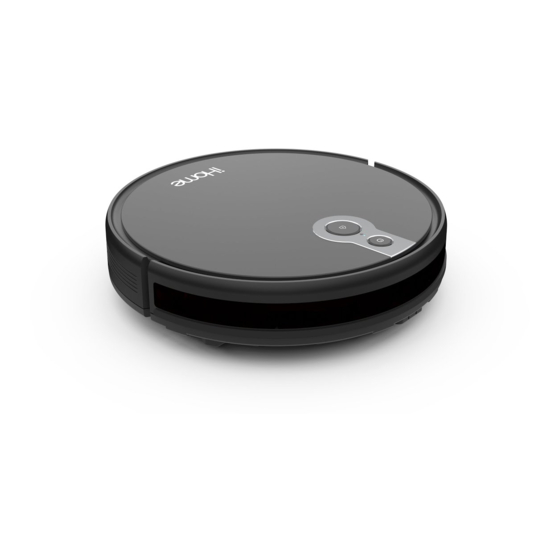
Page 6: Product Overview
PRODUCT OVERVIEW FRONT CHARGING BASE BOTTOM BACK 1 : Power Button 5: Navigation Sensors 9: Side Brush 13: Right Wheel 2: WiFi Indicator 6: Dustbin Release Latch 10: Omnidirectional Wheel 14: Main Brush 3: Home Button 7: Dustbin 11: Detection Sensors 4: Charging Contacts 8: Charging Contacts 12: Left Wheel... -
Page 7: Dustbin Overview
DUSTBIN OVERVIEW 1: Bin/Filter Release Latch 2: HEPA Filter 3: Screen Filter (Non removable) -
Page 8: Robot Indicators
ROBOT INDICATORS POWER BUTTON POWER/HOME LED STATES • Hold to turn on/off • Blinking Blue: Standby Mode • Press to start/pause cleaning • Solid Blue (OFF Charge Base): Cleaning • Solid Green (ON Charge Base): Fully Charged HOME BUTTON • Breathing Green: Charging •... - Page 9 SETTING UP YOUR AUTOVAC JUNO The following pages outline the complete setup process. For your convenience we created a step-by-step video to help guide you through setup. Please scan the QR code to access the video and other support content.
-
Page 10: Setting Up The Charging Dock
SETTING UP THE CHARGING DOCK ABOUT YOUR CHARGING DOCK Place the charging dock against the wall and make sure the place is an open & uncluttered area. Leaving at least 5 feet in front of the charging dock and 2 feet on both sides of the charging dock. NOTE: Clearance around the charging base is necessary to prevent obstructions when the Vacuum returns to charge. -
Page 11: Setting Up The Autovac Juno
SETTING UP THE AUTOVAC JUNO STEP 1 STEP 2 Position the Vacuum on the fl oor near your charge dock as shown. To turn on Press and Hold Install the side brush by pushing fi rmly down until it clicks into place. the Power button until the indicator turns blue. -
Page 12: Using The Ihome Clean App
Wi-Fi . The app will let you manage your Vacuum from anywhere, set cleaning schedules, view cleaning history, access support and more! The iHome Clean app provides an easy step by step guide to get your Vacuum connected to Wi-Fi. Here is a checklist of what you’ll need before getting started: •... -
Page 13: Main Brush Maintenance
MAIN BRUSH MAINTENANCE CAUTION: • Power off the vacuum before performing maintenance. Your Vacuum is designed to be used regularly. As with most fl oor care devices, regular use may cause build-up around brushes, in debris compartments and near fi lters. We recommend performing regular maintenance, as outlined in the following pages, to keep your AutoVac Juno running at optimal performance. 1: Pinch the left and right tabs on the main brush cover. -
Page 14: Maintaining The Dustbin And Filters
MAINTAINING THE DUSTBIN AND FILTERS Press the dustbin release button and remove the dustbin. Empty the dustbin contents into the trash and wipe the inside thoroughly with a dry cloth. To access the HEPA fi lter pull up on the fi lter housing tab. Remove the 4 Remove the HEPA fi lter, wipe down the surface with a dry cloth. -
Page 15: Side Brush And Sensor Maintenance
SIDE BRUSH AND SENSOR MAINTENANCE 1: Pop off the side brush by pulling it upward. 2: Remove dirt and debris and reinstall by pushing down in place. 3: It is recommended to wipe dust from the charging pins on your robot and charge dock regularly. Charging Pins NOTE: It is recommended to replace the side brush every 6-12 months depending on use. -
Page 16: Autovac Juno Troubleshoot
AUTOVAC JUNO TROUBLESHOOT PROBLEM SOLUTION Unable to power on Please charge before use. This is commonly caused due to low battery. Unable to start cleaning Please charge before use. This is commonly caused due to low battery. Unable to return to charging dock •... -
Page 17: Warranty
WARRANTY The One (1) Year Limited Warranty applies to purchases made from authorized retailers of Silver Point Innovations LLC. Warranty coverage applies to the original owner and to the original product only and is not transferable. We recommend registering your product online at www.ihomeclean.com SilverPoint warrants this product to be free from defects in workmanship and materials, under normal household use and conditions, one (1) year from the date of original purchase and maintained according to the requirements outlined in this User Manual.
Need help?
Do you have a question about the AUTO VAC JUNO iHRV9 and is the answer not in the manual?
Questions and answers
Won’t power up
The iHome AUTO VAC JUNO iHRV9 may not power up due to the following reasons:
1. The battery is not charged—ensure the vacuum is properly docked and charging contacts are clean.
2. The power button is not pressed—hold the power button to turn it on.
3. There is an issue with the battery—check for any damage or leakage and follow safety guidelines.
This answer is automatically generated