Advertisement
Table of Contents
- 1 Table of Contents
- 2 Questions? Contact Customer Service
- 3 In the Box
- 4 Product Overview
- 5 Dustbin Overview
- 6 AUTOVAC Indicators
- 7 Setting up the Charging Dock
- 8 Setting up the AUTOVAC
- 9 Using the Ihome Clean App
- 10 Using Your AUTOVAC
- 11 Using the Remote
- 12 Using Powermop Scrub
- 13 Main Brush Maintenance
- 14 Maintaining the Dustbin, Filters and Mop
- 15 Side Brush and Sensor Maintenance
- 16 AUTOVAC Eclipse Troubleshoot
- Download this manual
Advertisement
Table of Contents

Related Manuals for iHome AUTOVAC ECLIPSE iHRV10


Summary of Contents for iHome AUTOVAC ECLIPSE iHRV10
- Page 1 A U T O V A C E C L I P S E For support content and the latest digital copy of this manual, scan the QR code above or visit iHomeclean.com Owner’s Guide Model iHRV10...
-
Page 2: Table Of Contents
Product Overview Dustbin Overview AUTOVAC Indicators 6 - 7 Setting up the Charging Dock Setting Up The AUTOVAC Using the iHome Clean App Using Your AUTOVAC Using The Remote 12 - 14 Using Powermop Scrub Main Brush Maintenance Maintaining the Dustbin, Filters and Mop... - Page 3 SAFETY Before using this product, please read the following safety instructions and follow all safety precautions. Any operation inconsistent with this instruction manual may cause damage to this product. WARNING – To reduce the risk of fire, electric shock, or injury: •...
-
Page 4: Questions? Contact Customer Service
IN THE BOX 7: Extra Mop Pad 1 : Charging Dock 4: Charging Adapter 8: Cleaning Tool 2: Powermop Scrub Attachment 5: Remote 9: Extra Side Brush 3: Autovac Eclipse 6: Extra HEPA Filter Questions? Contact Customer Service Web/Email: iHomeclean.com Phone: 877-370-4580... -
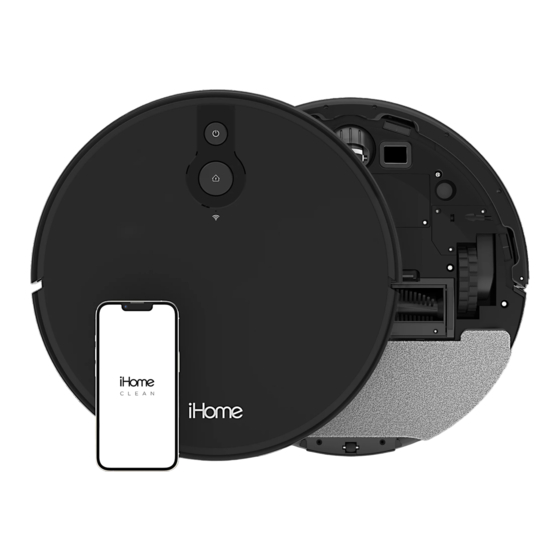
Page 5: Product Overview
PRODUCT OVERVIEW FRONT CHARGING BASE BOTTOM BACK 1 : Home Button 5: Charging Contacts Side Brush 13: Left Wheel 2: Power Button 6: Bin Release Button 10: Omnidirectional Wheel 14: Right Wheel 3: Infrared Sensors 7: 2-IN-1 Dustbin/Mop Tank 11: Charging Contacts 15: Main Brush 4: Charging Indicator 8: Powermop Scrub Attachment... -
Page 6: Dustbin Overview
DUSTBIN OVERVIEW 1 : Water Fill Cap 3: Bin Release Button 5: Screen Filter 7: Powermop Scrub Attachment 2: Filter Door Latch 4: HEPA Filter 6: Washable Mop Pad Dustbin Latch... -
Page 7: Autovac Indicators
AUTOVAC INDICATORS POWER BUTTON POWER/HOME LED STATES • Hold to turn on/off. • Flashing blue light: Powering on/configuring network/upgrading firmware. • Press to start/pause cleaning. • Solid blue light: Powered on/normal working state. • Flashing yellow light: Low battery/recharging. • Flashing green light: Charging. • Solid green light: Fully charged. HOME BUTTON •... - Page 8 SETTING UP YOUR AUTOVAC The following pages outline the complete setup process. For your convenience we created a step-by-step video to help guide you through setup. Please scan the QR code to access the video and other support content.
-
Page 9: Setting Up The Charging Dock
SETTING UP THE CHARGING DOCK ABOUT YOUR CHARGING DOCK Place the charging dock against the wall and make sure the place is an open & uncluttered area. Leaving at least 5 feet in front of the charging dock; 2 feet on both sides of the charging dock. NOTE: Clearance around the charging base is necessary to prevent obstructions when the Eclipse returns to charge. Avoid using a power source that may inadvertently be switched off (e.g. power strip, outlet controlled by a light switch, GFCI). SETTING UP THE CHARGING DOCK Plug the power adapter into the port on the bottom of the charging Choose a location on a hard floor surface near a power outlet. Place the charging dock... -
Page 10: Setting Up The Autovac
SETTING UP THE AUTOVAC STEP 1 Position the Eclipse on the floor near your charge dock as shown. To turn on Press and Hold the Power button until the indicator turns blue. STEP 2 Now press the button . The Eclipse will navigate to the charging dock and beep when properly docked. The Home icon will flash green while charging and turn solid green when finished. NOTE: Allow Eclipse to fully charge (up to 5 hours) before first use. The indicators on your robot will turn solid green when fully charged. -
Page 11: Using The Ihome Clean App
Wi-Fi . The app will let you manage Eclipse from anywhere, set cleaning schedules, view cleaning history, access support and more! The iHome Clean app provides an easy step by step guide to get your Eclipse connected to Wi-Fi. Here is a checklist of what you’ll need before getting started: •... -
Page 12: Using Your Autovac
Clean App to turn off vacuum suction during a Powermop cycle. Manual Control - Using the navigational D-Pad on the remote control (or in the iHome Clean App) you can manually control where the Eclipse goes to clean. -
Page 13: Using The Remote
USING THE REMOTE Home Button (return to charge) Manual Navigation Directional Keys Start/Pause Button (Starts an Auto Clean Cycle OR pause/resume an existing cleaning cycle) Mute Robot Audio Notifications Spot Clean Powermop Scrub 10 - 20 FT Suction Power Adjustment NOTE: 1: It is recommended to point the remote to the front of the Eclipse for best results. 2: The remote control range is 10 - 20 feet. -
Page 14: Using Powermop Scrub
USING POWERMOP SCRUB Your Autovac comes equipped with a Powermop Scrub mopping attachment that connects to the 2-in-1 Dustbin/Water Tank. Follow the steps below to initiate wet mopping with your Autovac. Place the mop pad onto the mop attachment and secure it to the Velcro Slide mop attachment onto dustbin as shown in figure below until you strips. Slip corners of the mop pad over the plastic tabs at the rear of hear a click confirming that it is locked in place. the mop attachment. - Page 15 USING POWERMOP SCRUB Remove the dustbin from the Eclipse with the mop Open the water fill cap on the dustbin and fill with water, then attachment still installed. close the cap. Please ensure that the mop attachment is connected before filling water.
- Page 16 USING POWERMOP SCRUB Install the dustbin with the mop attachement still Activate Powermop Scrub mode in the app or using the installed into the Eclipse according to the figure below. remote control.
-
Page 17: Main Brush Maintenance
MAIN BRUSH MAINTENANCE Your Eclipse is designed to be used regularly. As with most floor care devices, regular use may cause build-up around brushes, in debris compartments and near filters. We recommend performing regular maintenance, as outlined in the following pages, to keep your Autovac Eclipse running at optimal performance. 1: Pinch the left and right tabs on the main brush cover. Lift and remove the cover. 2: Remove the main brush and clean with the included cleaning tool as seen in the figure below. 3: Replace the main brush and snap the cover back into place. NOTE: It is recommended to replace the main brush every 6-12 months depending on use. Main Brush Cover Main Brush MAINTENANCE SCHEDULE PART CARE FREQUENCY REPLACEMENT FREQUENCY Main Brush Once a month Replace every 6-12 months... -
Page 18: Maintaining The Dustbin, Filters And Mop
MAINTAINING THE DUSTBIN, FILTERS AND MOP Press the dustbin release button and remove the dustbin. Clean the inside of the dustbin thoroughly with a dry cloth. Remove the primary filter and HEPA filter, wipe down the surface with Remove the mop pad to wash (machine washable). a dry cloth or use the cleaning tool. Rinse the primary filter with water and let dry completely before using. Mop Pad HEPA filter Primary filter... -
Page 19: Side Brush And Sensor Maintenance
SIDE BRUSH AND SENSOR MAINTENANCE 1: Use a Philips screwdriver to unscrew the side brush screw and remove the side brush. 2: Remove dirt and debris and reinstall using Philips screwdriver. 3: It is recommended to wipe dust from the charging pins on your robot and charge dock regularly. Charging Pins NOTE: It is recommended to replace the side brush every 6-12 months depending on use. Questions? Contact Customer Service Web/Email: iHomeclean.com Phone: 877-370-4580... -
Page 20: Autovac Eclipse Troubleshoot
AUTOVAC ECLIPSE TROUBLESHOOT PROBLEM SOLUTION Unable to power on Please charge before use. This is commonly caused due to low battery. Unable to start cleaning Please charge before use. This is commonly caused due to low battery. Unable to return to charging dock • There are too many obstacles near the charging dock. Please make sure there is a clear area 2 FT of space on either side and 5 FT in front of the charging dock. • Eclipse is out of range of the charging dock. Move the Eclipse closer to the charging dock to re-establish connection.
Need help?
Do you have a question about the AUTOVAC ECLIPSE iHRV10 and is the answer not in the manual?
Questions and answers