
Related Manuals for iHome WETVAC WV5


Summary of Contents for iHome WETVAC WV5
- Page 1 WETVAC ULTRA VERSATILE WET + DRY VACUUM For support content and the latest digital copy of this manual, scan the QR code above or visit iHomeclean.com Owner’s Guide Model iHWV5...
- Page 3 4. Use as described in this owner’s guide. Use manufacturer’s recommended parts and accessories. 5. Do not use with a damaged cord or plug. If appliance has been dropped, damaged, left outdoors or is not working as it should, contact our iHome Clean Customer Care Team at 877-370-4580.
-
Page 4: Table Of Contents
TABLE OF CONTENTS Safety Product Overview Digital Display 7 - 8 Getting Started Assembling the WETVAC Setting the Base Station Charging the WETVAC 9 - 10 Using your WETVAC Filling the Clean Water Tank Cleaning Floors with the WETVAC 11 - 15 Cleaning and Maintenance Self Cleaning Tank and Filter Cleaning... -
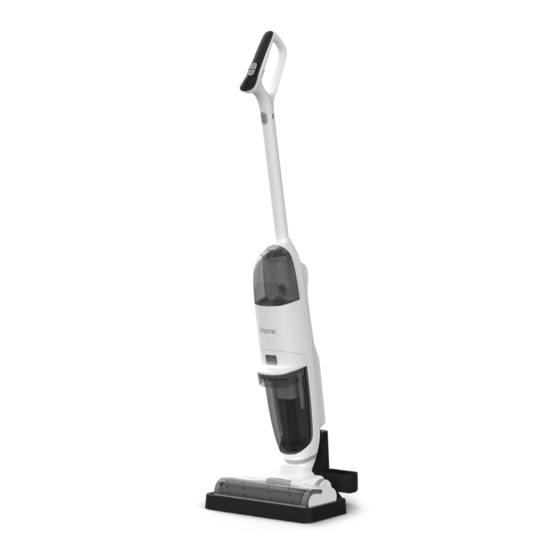
Page 5: Product Overview
PRODUCT OVERVIEW 1: On/Off Button 9: Carry Handle 18: Cleaning Brush 2: Max/Eco Button 10: Washable HEPA Filter 19: Strainer 3: Spray Trigger 11: Rechargeable Battery (non-removable) 20: DC Power Jack 4: Digital Display 12: Dirty Water Tank 21: Roller Brush 13: Wheel 22: Rubber Wiper 5: Voice Guidance On/Off Switch... -
Page 6: Digital Display
DIGITAL DISPLAY Max Suction Mode Eco Suction Mode Clean Water Tank Empty Battery Low Dirty Water Tank Full Spraying Water Voice Guidance On/Off Self Cleaning Mode... -
Page 7: Getting Started
GETTING STARTED ASSEMBLING THE WETVAC Remove all parts and accessories from the box prior to assembly. 1: Refer to image above. Push the handle down firmly into the slot. Ensure it is secure and not able to be removed. 2: Install the Clean Water Tank as shown above. Push the top of the tank toward the WetVac until you hear a click. 3: Install the HEPA filter into the Dirty Water Tank cap. -
Page 8: Setting The Base Station
GETTING STARTED SETTING THE BASE STATION 1: Slide the accessory storage part onto the Base Station as shown above. CHARGING THE WETVAC 1: Plug the power adapter into a functioning wall outlet. 2: Connect the plug directly into power jack at the back of the Base Station and place the vacuum onto the Base Station as shown above. -
Page 9: Using Your Wetvac
USING YOUR WETVAC FILLING THE CLEAN WATER TANK 1: Remove the Clean Water Tank from the vacuum by pushing down on the tank release and pulling the tank away from the vacuum as shown. 2: Open the latch on the tank as shown above. 3: Fill with tap water and then tightly close the tank latch as shown above. -
Page 10: Cleaning Floors With The Wetvac
USING YOUR WETVAC CLEANING FLOORS WITH THE WETVAC 1: Press the (Power Icon) button to turn the vacuum on. It will start in ECO mode by default. 2: Press the (Max/Eco button) to toggle between suction modes. 3: Choose a location to start cleaning. Hold the spray button for around 3-5 seconds to prime the roller before the first pass. Use the trigger as needed during the cleaning cycle. -
Page 11: Cleaning And Maintenance
CLEANING AND MAINTENANCE SELF CLEANING Your WETVAC is equipped with a self cleaning cycle that automatically performs a cleaning of the roller brush and main vacuum port. For optimal care, manual cleaning and maintenance may be required to avoid foul buildup and odors. Please refer to the following sections below. NOTE: The Self Clean cycle requires some water in the Clean Water Tank and some space in the Dirty Water Tank. -
Page 12: Tank And Filter Cleaning
CLEANING AND MAINTENANCE TANK AND FILTER CLEANING 1: Empty the Dirty Water by pouring through the Strainer tool to separate large debris. Empty large debris into a trash bin. 2: Thoroughly clean the Dirty Tank. Use mild detergent if necessary. Rinse all parts of the HEPA filter with water. 3: Set aside the parts to dry completely before assembling back into the vacuum. Allowing sufficient drying time will help avoid buildup and odors. DRYING TIME NOTE: Let all parts dry completely before reassembling. -
Page 13: Roller Brush Cleaning
CLEANING AND MAINTENANCE ROLLER BRUSH CLEANING 1: Release the lock button on the roller brush guard and pull up. 2: Open the brush guard and remove it as shown above. 3: Pull the brush out as shown below and pull up away from the vacuum. 4: Thoroughly clean the Roller Brush and Brush Guard. Use a mild detergent if necessary. Clean the crevices of the vacuum housing and main inlet with the cleaning tool provided. -
Page 14: Charging Station & Drying Tray Cleaning
CLEANING AND MAINTENANCE CHARGING STATION & DRYING TRAY CLEANING 1: Unplug the power supply and remove the WETVAC before cleaning. 2: Use a soft damp cloth to clean the charging station and drying tray. Wipe down with a dry cloth. NOTE: Cloth is not included. STORAGE 1: Thoroughly clean and dry all parts before storage. 2: The Roller Brush and HEPA filter can be stored in the accessory storage tray on the Base Station. NOTE: The Dirty Water Tank must be cleaned and dried after every single cleaning. The WETVAC must be stored in a dry and ventilated place without heat sources. -
Page 15: Care Frequency
CLEANING AND MAINTENANCE CARE FREQUENCY Part Care Replacement Clean Water Tank Rinse occasionally with Never clean water. Dirty Water Tank Clean and dry after Never each use HEPA Filter Clean and dry after Every 3-6 Months each use Brush Guard Clean after each use Never Roller Brushes... -
Page 16: Troubleshooting
TROUBLESHOOTING Problems Possible Reasons Solutions The WETVAC can not be 1. The power supply is not 1. Ensure adapter is plugged charged. connected well. into functioning wall outlet. 2. The WETVAC is not fully 2. Ensure vacuum is properly seated on the charging docked. - Page 17 TROUBLESHOOTING Problems Possible Reasons Solutions No water comes out when 1. The clean water tank is 1. Please fill up the clean water empty. tank. spraying. 2. The clean water tank is not 2. Please re-install the clean installed well. water tank.
-
Page 18: Error Codes
ERROR CODES Error Code Reason Solution E1, E2, E3, E4 Battery Error. Call Customer Support. Battery pack may require change. E5, E6, E7 Battery Temperature Error. Allow product to rest 2 hours before trying. Ensure product is not sitting in direct sunlight. Charging Current Error. - Page 19 WARRANTY The One (1) Year Limited Warranty applies to purchases made from authorized retailers of Silver Point Innovations LLC. Warranty coverage applies to the original owner and to the original product only and is not transferable. We recommend registering your product online at www.ihomeclean.com SilverPoint warrants this product to be free from defects in workmanship and materials, under normal household use and conditions, one (1) year from the date of original purchase and maintained according to the requirements outlined in this User...
Need help?
Do you have a question about the WETVAC WV5 and is the answer not in the manual?
Questions and answers