Advertisement
Quick Links
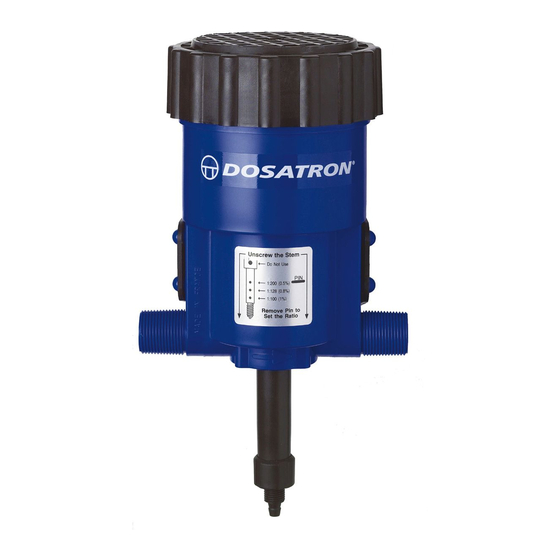
Proper protection, such as gloves, eye wear, and aprons, are recommended when disassembling a Dosatron.
D128R Troubleshooting - Part 1
This D128R Troubleshooting will cover: The medicator is clicking, but
not drawing the solution or liquid is going down into the stock tank.
800-523-8499
www.dosatronusa.com
l
NOTE: Before you start, make sure the unit is clicking.
It would be helpful to have a strap wrench, #1 Phillips
screw driver, and a large paper clip or awl.
Step 1: Unscrew and remove the lid. You may what to
use a strap wrench (Part #: TOOL01).
Step 2: Grab the metal wishbone and pull the piston
straight out. Set the piston aside.
Step 3: Unscrew and remove the black stem.
Page 1
Scan the QR
code to watch
our D128R
Troubleshooting
video.
Advertisement

Related Manuals for dosatron D128R


Summary of Contents for dosatron D128R
- Page 1 800-523-8499 www.dosatronusa.com Proper protection, such as gloves, eye wear, and aprons, are recommended when disassembling a Dosatron. D128R Troubleshooting - Part 1 This D128R Troubleshooting will cover: The medicator is clicking, but not drawing the solution or liquid is going down into the stock tank.
- Page 2 800-523-8499 www.dosatronusa.com Proper protection, such as gloves, eye wear, and aprons, are recommended when disassembling a Dosatron. D128R Troubleshooting - Part 1 Step 4: Remove the top seal (Part #: J002) that is located between the blue body and the black stem.
- Page 3 800-523-8499 www.dosatronusa.com Proper protection, such as gloves, eye wear, and aprons, are recommended when disassembling a Dosatron. D128R Troubleshooting - Part 1 Step 7: Inspect both seals for nicks, grooves, and wear. Make sure they aren’t gummy, sticky, or missing. If the seals are dirty, you may be able to just clean them and reinstall.
- Page 4 800-523-8499 www.dosatronusa.com Proper protection, such as gloves, eye wear, and aprons, are recommended when disassembling a Dosatron. D128R Troubleshooting - Part 1 Step 10: Spread the wishbone and remove from the inlet valve. Step 11: Remove the four screws in the center of the piston.
- Page 5 800-523-8499 www.dosatronusa.com Proper protection, such as gloves, eye wear, and aprons, are recommended when disassembling a Dosatron. D128R Troubleshooting - Part 1 Step 13: Unhook and remove the actuator springs (Part #: M009). Step 14: Remove the push rod (Part #: P008) by sliding it out.
- Page 6 800-523-8499 www.dosatronusa.com Proper protection, such as gloves, eye wear, and aprons, are recommended when disassembling a Dosatron. D128R Troubleshooting - Part 1 Step 16: To remove the slide valve from the plunger rod you will need a large paper clip or awl. Push the spring down and hold firmly.
- Page 7 800-523-8499 www.dosatronusa.com Proper protection, such as gloves, eye wear, and aprons, are recommended when disassembling a Dosatron. D128R Troubleshooting - Part 1 Step 19: Insert the plunger and reinstall the pin. The center hole is the 1:128 setting. If you need 1:200, install the pin in the top hole, if you need 1:100, install the pin in the bottom hole.
- Page 8 800-523-8499 www.dosatronusa.com Proper protection, such as gloves, eye wear, and aprons, are recommended when disassembling a Dosatron. D128R Troubleshooting - Part 1 Step 22: Install the actuator springs. Step 23: Align the push rod and inlet valve inside the piston shell and slide the actuator assembly in completely.
- Page 9 800-523-8499 www.dosatronusa.com Proper protection, such as gloves, eye wear, and aprons, are recommended when disassembling a Dosatron. D128R Troubleshooting - Part 1 Step 25: Now reinstall the four screws and tighten in a star pattern. Step 26: Reinstall the wishbone spring, then reinstall the washers and screws, hand tight.
- Page 10 800-523-8499 www.dosatronusa.com Proper protection, such as gloves, eye wear, and aprons, are recommended when disassembling a Dosatron. D128R Troubleshooting - Part 2 This D128R Troubleshooting will cover: Water going down into the stock tank. Step 1: Inspect the bottom seal (Part #: J003), slide valve (Part #: P010), and spring (Part #: M003).
- Page 11 800-523-8499 www.dosatronusa.com Proper protection, such as gloves, eye wear, and aprons, are recommended when disassembling a Dosatron. D128R Troubleshooting - Part 2 Step 4: Install the new slide valve and spring onto the plunger rod. To do this slide the new spring over the top of the slide valve and hold firmly.
- Page 12 800-523-8499 www.dosatronusa.com Proper protection, such as gloves, eye wear, and aprons, are recommended when disassembling a Dosatron. D128R Troubleshooting - Part 2 Step 7: Thread the black stem into the body, hand tight. Step 8: Insert the bottom seal, raised portion facing up, into the black cap and thread onto the stem, hand tight.
- Page 13 800-523-8499 www.dosatronusa.com Proper protection, such as gloves, eye wear, and aprons, are recommended when disassembling a Dosatron. D128R Troubleshooting - Part 2 Step 10: Pick up the blue body and insert the piston assembly into the body and slide it down as far as it will go.
- Page 14 800-523-8499 www.dosatronusa.com Proper protection, such as gloves, eye wear, and aprons, are recommended when disassembling a Dosatron. D128R Troubleshooting - Part 3 This D128R Troubleshooting will cover: Medicator not clicking. Step 1: Remove the lid. You may want to use a strap wrench (Part #: TOOL01).
- Page 15 800-523-8499 www.dosatronusa.com Proper protection, such as gloves, eye wear, and aprons, are recommended when disassembling a Dosatron. D128R Troubleshooting - Part 3 Step 4: Inspect the actuator springs (Part #: M009) on the bottom. If you see anything missing, replace.
- Page 16 800-523-8499 www.dosatronusa.com Proper protection, such as gloves, eye wear, and aprons, are recommended when disassembling a Dosatron. D128R Troubleshooting - Part 3 Step 7: Insert the piston back into the blue body. Step 8: Hand tighten the lid. Note: To watch the video go to Dosatron’s video page www.dosatronusa.com/videos.aspx or YouTube Channel www.youtube.com/user/DosatronIntl...
Need help?
Do you have a question about the D128R and is the answer not in the manual?
Questions and answers