Table of Contents
Advertisement
Quick Links
USER MANUAL
Special redundant
KT-6935L - Local unit
KT-6935R - Remote unit
Special uncompressed Set
KT-6936L - Local unit
KT-6936R - Remote unit
Check out our Installation
Channel:
Misprints, errors and technical changes reserved
4K
media
with RS232 & sound
4K DP 1.2 redundant and
connect Special
uncompressed
Advertisement
Table of Contents

Related Manuals for Ihse Kvm-Tec KT-6935L


Summary of Contents for Ihse Kvm-Tec KT-6935L
- Page 1 USER MANUAL Special redundant media connect Special KT-6935L - Local unit KT-6935R - Remote unit with RS232 & sound Special uncompressed Set KT-6936L - Local unit 4K DP 1.2 redundant and KT-6936R - Remote unit uncompressed Check out our Installation Channel: Misprints, errors and technical changes reserved...
-
Page 2: Table Of Contents
LINKS TABLE OF CONTENT 1. Introduction Do you want to learn more? Then simply click on the respec- 1.1 Intended use tive button and you will be forwarded directly to our home- page! 1.2 Safety intructions 1.3 Technical specifi cations 1.4 Product elements 1.5 About the status LED 2. - Page 3 TABLE OF CONTENT TABLE OF CONTENT 3.3 Update menu 5.2. Disposal 3.4 Settings 6. Support & First Aid 3.4.1 Defining what DDC data your PC uses 7.1 Requirements fiber cable 3.4.2 Select keyboard layout 7.1.Multi-Mode (standard) 3.4.3 Keyboard shortcuts 8. Switch specification 3.4.4 Keyboard Fallback Mode 8.1 Switches 3.4.5 Mouse Settings...
-
Page 4: Introduction
1. INTRODUCTION 1. INTRODUCTION 1. INTRODUCTION 1.1 INTENDED USE Congratulations on the purchase of your new media4Kconnect Special KVM Extender. You have bought a high quality extender. These instructions are part of this product. This product is intended as a device for professional use, for transmitting USB and video signals They contain important information regarding safety, use and disposal for every user over huge distances. -
Page 5: Safety Intructions
1. INTRODUCTION 1. INTRODUCTION 1.2 SAFETY INTRUCTIONS • The product must be connected to a permanent and earthed AC wall socket• • Protect the cables from tension, crushing and buckling and lay them so that people cannot trip over them. WARNING! Read and understand all safety instructions •... -
Page 6: Technical Specifications
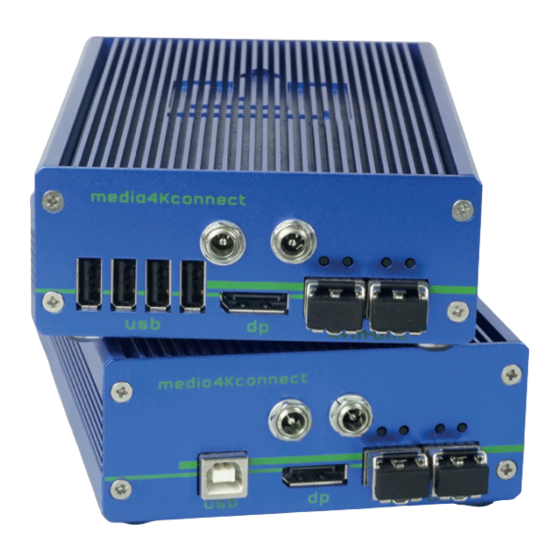
1. INTRODUCTION 1. INTRODUCTION 1.4 PRODUCT ELEMENTS 1.3 TECHNICAL SPECIFICATIONS Type: media4Kconnect Special redundant SET Remote Extender (CON) media4Kconnect Special uncompressed SET Model: media4Kconnect Fiber KVM Extender Power plug input voltage 2 x 12 VDC 2 A external Power supply redundant supply tolerances DC: +20% / -15% Redundant... -
Page 7: About The Status Led
1. INTRODUCTION 1. INTRODUCTION 1.5 ABOUT THE STATUS LED Local Extender (CPU) LED Status Update: Color Light display Autoupdate Mode fast flashing Update runs shining Update fails shining Update successful Bedeutung LED Anzeigen Color Light display Meaning shining only network connection available fast flashing no active connection shining... -
Page 8: Extender Installation
2. EXTENDER INSTALLATION 2. EXTENDER INSTALLATION 2. EXTENDER INSTALLATION 2.2 MOUNTING KIT 2.1 UNPACKING AND CHECKING THE CONTENT Before using the product for the first time it should be checked for damage. In case of damage 2.2.1 MOUNTING (OPTIONAL) due to transport inform the carrier immediately. Before delivery the product is checked for its function and its operating safety. - Page 9 2. EXTENDER INSTALLATION 2. EXTENDER INSTALLATION power supply power supply power supply power supply for 12V 2A for 12V 2A for 12V 2A for 12V 2A RS232 RS232 plug plug RS232 RS232 plug plug Duplex multimode OM4-fi ber cable (LC) up to 300m/984 ft main link 1 Duplex multimode OM4-fi...
-
Page 10: Start Up
2. EXTENDER INSTALLATION 2. EXTENDER INSTALLATION 2.4 MEDIA4KCONNECT SIMULTANEOUS DOWNSCLAING 2.5 START UP To start up the system: 1. Make sure that monitor and computer are switched on. 2. If you are using a Network Switch, connect the power cable to an earthed wall socket. 3. -
Page 11: Removing A Fiber Cable
2. EXTENDER INSTALLATION 2. EXTENDER INSTALLATION 2.8 BEST PRACTICE FOR WINDOWS 10 2.7 REMOVING A FIBER CABLE Disable USB Energy Savings in Windows 10 To remove a fi ber cable: • Press the latch down and slowly pull the cable out. 20 | kvm-tec kvm-tec | 21 Misprints, errors and technical changes reserved... - Page 12 2. EXTENDER INSTALLATION 2. EXTENDER INSTALLATION 22 | kvm-tec kvm-tec | 23 Misprints, errors and technical changes reserved Misprints, errors and technical changes reserved...
-
Page 13: Main Menu & Settings
3. MAIN MENU & SETTINGS 3. MAIN MENU & SETTINGS 3. USING ON SCREEN MENU 3.1. SYSTEM STATUS Use the monitor and keyboard to access the main menu. By pressing the „S“ key or by selecting the arrow keys, you access the status menu, where you will Access to the main menu fi nd information about hardware and software versions, as well as the activated upgrades 1. -
Page 14: Update Menu
3. MAIN MENU & SETTINGS 3. MAIN MENU & SETTINGS 3.3 UPDATE MENU Display of firmware version The current version of the firmware can be downloaded at http://www.kvm-tec.com/ By pressing the „U“ key or by selecting the arrow keys, you reach the update menu, in which the support . -
Page 15: Settings
3. MAIN MENU & SETTINGS 3. MAIN MENU & SETTINGS 3.4 SETTINGS By pressing the „G“ key or selecting the arrow keys you will have access to the Settings menu, where you can access all Extender settings. SCREEN „ Update“ SCREEN „Settings“... -
Page 16: Defining What Ddc Data Your Pc Uses
3. MAIN MENU & SETTINGS 3. MAIN MENU & SETTINGS 3.4.2 SELECT KEYBOARD LAYOUT 3.4.1 DEFINING WHAT DDC DATA YOUR PC USES In the Keyboard Layout menu you can switch between the keyboard layouts with which you can navigate the on screen display menu (OSD). Definition of the DDC information used in the PC: Make sure that the main menu is open ( 5 x scroll) Press ENTER for slecting DE, EN or FR keyboard... -
Page 17: Keyboard Shortcuts
3. MAIN MENU & SETTINGS 3. MAIN MENU & SETTINGS 4K Multiview Commander 3.4.4 KEYBOARD FALLBACK MODE 3.4.3 KEYBOARD SHORTCUTS To use the OSD menu, the keyboard on the remote device must be identified. For most keyboards, use the 0 setting. By pressing the „S“... -
Page 18: Managing Local Settings
3. MAIN MENU & SETTINGS 3. MAIN MENU & SETTINGS 3.4.6 MANAGING LOCAL SETTINGS 3.4.7 MONITOR POWER SAVE MODE By pressing the L key, or by selecting the arrow keys, you can access the Menu Local Power saving mode: The monitor turns off when no video signal is transmitted Settings Press the L key to open the Local Settings. -
Page 19: Extender Features
4. EXTENDER FEATURES 4. EXTENDER FEATURES 4. FEATURES 4.1.2 MATRIX SWITCHING SYSTEM Pressing „S“ takes you to the Matrix Switching System configuration. If this function is active, the Multiview Commander and Mouse Glide functions are controlled 4.1 MENU FEATURES via the Switching Manager software (see Switching Manager manual). All functions of the switching system can be controlled via the Switching Manager software can be operated. -
Page 20: Uncompressed Mode
4. EXTENDER FEATURES 5. MAINTANCE & CARE 4.1.6 UNCOMPRESSED MODE 5.MAINTANCE AND CARE 5.1 EXTENDER CARE By pressing „V“ you can activate and deactivate the Uncompressed Mode. Once enabled, the KVM Extender transmits up to 4K resolution uncompressed and in 10bit color depth. Caution! Do not use solvent-containing cleansers. -
Page 21: Support & First Aid
6. SUPPORT & FIRST AID 6. SUPPORT & FIRST AID First smart connection Error Cause solution LED is not The devices get no Is the power supply connected?Ne start device lighting power LED is lighting No connection Check if the RJ45/network cable is connected well. Video error (stripes in red... -
Page 22: Requirements Fiber Cable
7. CABLE REQUIREMENTS 8. SWITCH SPECIFICATION 8. REQUIREMENTS NETWORK SWITCH 7.1 REQUIREMENTS FIBER CABLE The entire switching network system requires its own separate network. For security reasons, it cannot be integrated into an existing corporate network. 7.1.MULTI-MODE (STANDARD) The network switch must meet the following specifications: Full HD: 1Gigabit Switch A multi-mode fiber cable should meet the following requirements 4K: 10Gigabit Switch... -
Page 23: Warranty
2 years standard warranty Art Nr KT-9003 warranty extension to 5 years per Set Art Nr KT-9002 warranty extension to 5 years KVM-TEC IHSE GmbH IHSE USA LLC IHSE GMBH Asia IHSE China Co.,Ltd Gewerbepark Benzstr.1 1 Corp.Dr.Suite 158Kallang... -
Page 24: Notes
11. NOTES 46 | kvm-tec Misprints, errors and technical changes reserved...
Need help?
Do you have a question about the Kvm-Tec KT-6935L and is the answer not in the manual?
Questions and answers