
Related Manuals for Planet UNC-NMS


Summary of Contents for Planet UNC-NMS
- Page 1 Universal Network Management Central Controller with LCD UNC-NMS Quick Installation Guide...
-
Page 2: Table Of Contents
1. Package Contents ..................3 2. Hardware Description .................. 4 2.1 Overview .................... 4 2.2 Dimensions ..................5 2.3 Hardware Specifications ............... 6 3. Product Features ..................7 4. Network Configuration ................. 9 5. Deployed Devices Monitored via UNC-NMS Controller ........10 Further Information: ..................14... -
Page 3: Package Contents
Controller. PLANET UNC-NMS is described below: UNC-NMS Universal Network Management Central Controller with LCD Open the box of the UNC-NMS and carefully unpack it. The box should contain the following items: UNC-NMS Controller x 1 Quick Installation Guide x 1 Power Cord x 1... -
Page 4: Hardware Description
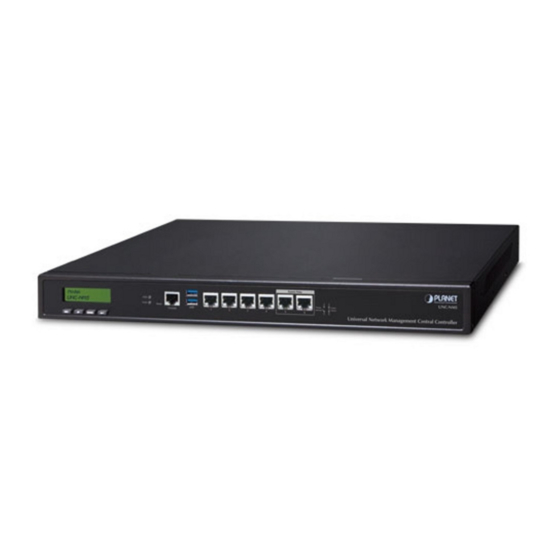
2. Hardware Description 2.1 Overview Console Port LAN 1~6 Ports Power/HDD LED Reset Button USB 3.0 Ports AC IN... -
Page 5: Dimensions
2.2 Dimensions Unit: mm... -
Page 6: Hardware Specifications
2.3 Hardware Specifications UNC-NMS Product Universal Network Management Central Controller with LCD & 6 10/100/1000T LAN Ports Form Factor 1U Rack-mount Physical Specifications 6 10/100/1000BASE-T Gigabit Ethernet RJ45 ports (LAN 5 and LAN 6 are bypass ports.) 2 USB 3.0 ports (They cannot be used at the same time.) -
Page 7: Product Features
3. Product Features Network Management Number of Managed Sites Number of Managed Devices 102,400 Auto Discovery by NMS agent Supports PLANET devices Providing the at-a-glance view of center system, Dashboard site summary, site Map, traffic, PoE network status To create site list, site map for NMS agent... - Page 8 Built-in DHCP Server for auto IP assignment to APs Console; Telnet; SSL; Web browser Network Management (Chrome is recommended.); SNMP v1, v2c, v3 Supports SNMP, ONVIF and PLANET Smart Discovery Discovery Backup System backup and restore to local or USB HDD Provides system reboot manually or automatically...
-
Page 9: Network Configuration
Launch the Web browser (Google Chrome is recommended) and enter the default IP address “https://192.168.1.100:8888”. Then, enter the default username and password shown above to log in to the system. The secure login with SSL (HTTPS) prefix is required. After logging on, connect the UNC-NMS Controller to the network to centrally control PLANET managed devices. -
Page 10: Deployed Devices Monitored Via Unc-Nms Controller
10.1.20.X 10.1.20.X Step 2: In UNC-NMS system, add a new site with NMS agent devices, such as NMS-500 and NMS-1000V and then create a certificate file import in to the NMS agent devices. It may need to build a VPN tunnel between UNC- NMS and NNS-500/NMS-1000V when the connection will go through the internet. - Page 11 1. In UNC-NMS, press the “Site” button. 2. Press the “add a new site” button. 3. 3.1 Enter the new site information and re-gen a Device ID. 3.2 Press the “Apply” button to finish the Configuration Successfully.
- Page 12 4. Press the “Export” button to create an “NMS-Agent-Conf” file. 5. Click the “Download NMS Agent Configuration” link to get the file.
- Page 13 Step 3: For UNC-NMS to successfully control the site, Site requires some configurations. In NMS, click on “Maintenance” and then select “Remote Management”. Go to the Remote Management page, select “Enable RW”, enter the UNC-NMS DNS or IP address and import the “NMS-Agent-Conf” file, and...
-
Page 14: Further Information
Further Information: The above steps introduce the simple installations and configurations of the UNC- NMS Central Controller. For further configurations of PLANET NMS, please refer to the user manual, which can be downloaded from the website. PLANET online FAQs: http://www.planet.com.tw/en/support/faq Support team mail address: support@planet.com.tw...
Need help?
Do you have a question about the UNC-NMS and is the answer not in the manual?
Questions and answers