Bresser ASTRO PLANETARIUM Operating Instructions Manual
Hide thumbs
Also See for ASTRO PLANETARIUM:
- Operating instructions manual (60 pages) ,
- Operating instructions manual (90 pages)

Related Manuals for Bresser ASTRO PLANETARIUM


Summary of Contents for Bresser ASTRO PLANETARIUM
- Page 1 ASTRO PLANETARIUM Bedienungsanleitung Operating Instructions Mode d’emploi Handleiding Manuale di istruzioni Instrucciones de uso Upute za rukovanje...
- Page 2 Bedienungsanleitung ..............4 Operating Instructions..............13 Mode d’emploi................22 Handleiding................... 31 Manuale di istruzioni..............40 Instrucciones de uso ..............49 Upute za rukovanje ..............58...
- Page 3 Fig. 2 1& 1& Fig. 1 Fig. 3...
- Page 4 GEFAHR von Körperschäden! Setzen Sie das Gerät keinen Temperaturen Tasche oder Transportverpackung auf. Batte- über 60° C aus! rien sollten aus dem Gerät entfernt werden, Dieses Gerät beinhaltet Elektroniktei- le, die über eine Stromquelle (Netzteil wenn es längere Zeit nicht benutzt wird. und/oder Batterien) betrieben werden.
- Page 5 Produkt die Übereinstimmung mit EN 60825-1:1994 + A1:2002 + A2:2001 nachfolgend aufgeführten EG-Richtlinien: EN-71, Part 1-3, Part 6 EN-71, Part 9 EN-62115 EN-60825-1 Produktbeschreibung: Astro Planetarium Typ / Bezeichnung: Star Projector Rhede, 13.03.2009 Meade Instruments Europe GmbH & Co. KG Helmut Ebbert Geschäftsführer...
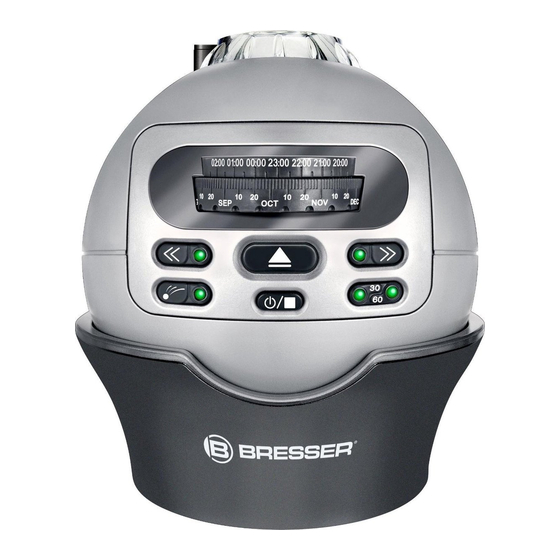
- Page 6 Teile-Übersicht (Abb. 1-3) Stellen Sie jetzt den Standfuß für die Planeta- riumskugel J auf einen ebenen und stabilen B Planetariumskugel Untergrund (z.B. Tisch) und setzen Sie die C Ein/Aus/Stopp-Taste Planetariumskugel B hinein. Dabei muss das D Knopf zum Öffnen des Dia-Fachs Objektiv H parallel zur Projektionsfläche (Wand E Taste für die Einstellung des Schlafmodus oder Decke) zeigen (Abb.
- Page 7 Himmelsprojektion mit dem sehen (Nachthimmel). Jeder Strich der Skala Astro-Planetarium entspricht 30 Minuten (Abb. 7). Drücken Sie den Knopf zum Öffnen des Dia- Fachs D. Die Lade öffnet sich (Abb. 2) auto- 30 Apr 2 days matisch. 26 28 Legen Sie eine der beiden Diascheiben 1) in die Halterung für die Diascheiben 1! ein.
- Page 8 Drehen Sie dazu das Rad für die Einstellung Projektionskugel B im Standfuß J bewegen. erscheint, haben Sie vermutlich nicht den rich- In Abb. 11 sehen Sie die Möglichkeiten für eine des Datums F so weit, bis der Strich für ‚00:00‘ tigen Abstand gewählt.
- Page 9 der eingestellten Rotationsgeschwindigkeit. Technische Daten Drücken Sie die Ein/Aus/Stopp-Taste C, um • Projektionsmethode: Optisch die Rotation zu stoppen. • Beobachtungsposition: 35° Nord* • Sternbilder: 61 In gleicher Weise können Sie die Bildrotati- on für die südliche Halbkugel aktivieren und • Sterne: 8.000 anpassen.
- Page 10 SERVICE UND GARANTIE Falls eine Reparatur bzw. ein Umtausch des Retourenmeldung Produkts erforderlich sein sollte, so wird Ihnen Vorgangsnr.*: ........... über den Mitarbeiter des Service-Centers eine Für dieses Gerät übernehmen wir eine Garan- Produktbezeichnung: ........ tie von 5 Jahren ab Kaufdatum. Bitte bewahren Retouren-Adresse mitgeteilt.
-
Page 11: Problembehebung
Problembehebung Es kann vorkommen, dass dein Astro-Planetarium nicht richtig funktioniert. Das muss nicht daran liegen, dass es defekt ist! Oft ist es so, dass eine Kleinigkeit beim Aufbau nicht beachtet wurde. Deshalb haben wir dir hier die häufigsten Fehler aufgeschrieben, damit du versuchen kannst, ein Pro- blem selbst zu beheben. - Page 12 Problem Möglicher Fehler Problembehebung Eventuell ist nicht die richtige Dia- Lege die Diascheibe 1) mit dem Simulation des Himmels in die Halterung scheibe eingelegt. 1! ein. Das Planetarium projeziert nicht den gewünschten Him- Vermutlich hast du Datum und Uhrzeit melsausschnitt. Stelle das Datum des Beobachtungszeitraums in Verbindung mit der richti- für den Beobachtungszeitraum nicht gen Uhrzeit wie in der Anleitung beschrieben ein.
-
Page 13: Risk Of Electrical Shock
RISK of physical injury! RISK of material damage! Do not dispose of electrical equipment This device contains electronic compo- Never take the device apart. In the event in your ordinary refuse. The European nents that are powered by either a mains of a defect, please contact the service guideline 2002/96/EU on Electronic and centre responsible for your Federal Land (as... - Page 14 EN 60825-1:1994 + A1:2002 + A2:2001 guidelines for this product: EN-71, Part 1-3, Part 6 EN-71, Part 9 EN-62115 EN-60825-1 Product description: Astro Planetarium Model /Description: Star Projector Rhede, 13-03-2009 Meade Instruments Europe GmbH & Co. KG Helmut Ebbert Managing director...
- Page 15 Finally, turn the planetarium sphere B in such tion is right. a way so that the side directly across from the Setting up the astro planetarium After you’ve installed the batteries 1% , put the slide plate holder h is pointing north (Fig. 4).
- Page 16 Sky projection with the astro 2 days 30 Apr planetarium 26 28 Press the button for opening the slide drawer d . The tray will open by itself (Fig. 2). Fig. 8 Set one of the two slide plates 1) into the slide Explanation of the knob for setting the date F plate holder 1! .
- Page 17 In order to save energy, the pro- month of January (JAN (Fig. 9). jection automatically shuts down after 2 hours. When the astro planetarium is not in use, the Fig. 10 device should be turned off simply by pressing Fig.
-
Page 18: Technical Information
Using the shooting stars function Technical information • Projection method: optical After activating the image rotation, you can also • Observation position: 35° North* switch on the shooting stars function. To do • Constellations: 61 this, press the button for activating the shooting •... -
Page 19: Service And Guarantee
SERVICE AND GUARANTEE In the case of returns, please note the fol- Returns form lowing: Transaction no.*: ........This device is guaranteed for 5 years from the • Make sure that the article is carefully pack- Product name: ......... aged. If possible use the original packaging. date of purchase. -
Page 20: Troubleshooting
Troubleshooting It can happen that your Astro-Planetarium doesn’t work properly. That does not mean that there is something wrong with the machine! It is often the case that a small detail was forgotten while you were setting up. For that reason, we have compiled the most common mistakes here so that you can try to fix the problem yourself. - Page 21 Problem Possible Mistake Solution Perhaps the wrong slide plate is in the Lay the slide plate 1) with the simulation of the sky into the holder 1! . The planetarium is not pro- machine. jecting the desired portion of the sky You have probably adjusted the date Adjust the date of the observation time span along with the correct time, as and time incorrectly.
- Page 22 RISQUE de blessures corporelles! des incendies voire des explosions! l’humidité! Conservez-le dans la sacoche in- cluse à la livraison ou bien dans l’emballage de Cet appareil contient des pièces électro- niques fonctionnant à l‘aide d’une source N’exposez jamais l’appareil à des températures transport.
- Page 23 EN 60825-1:1994 + A1:2002 + A2:2001 rectives de l‘UE ci-après: EN-71, Part 1-3, Part 6 EN-71, Part 9 EN-62115 EN-60825-1 Description du produit: Astro Planetarium Type / Désignation: Star Projector Rhede, 13-03-2009 Meade Instruments Europe GmbH & Co. KG Helmut Ebbert Gérant...
- Page 24 Aperçu-télé (Ilustr. 1-3) Montage de l’Astro-Planétarium ment à piles pour connaître la direction de la polarité. B Sphère Planétarium Ouvrez le couvercle du compartiment à piles 1@ Si tu as introduit les piles 1% , replacez le sup- C Touche Marche/Arrêt/Stop sur la partie inférieure de la Sphère Planéta- port de piles 1# et fixez-le.
- Page 25 Tournez la Sphère Planétarium B de sorte que 30 Apr 2 days la partie en face du support pour les disques de diapositives h soit orientée vers le nord 26 28 (Illustr. 4). Fig. 8 Projection du ciel avec l’Astro Planétarium Explication de la roue pour le réglage de Appuyez sur le bouton pour ouvrir de fente pour Fig.
- Page 26 une projection sur le plafond (a) ou le mur (b). Appuyez sur la touche pour le réglage du mode Tournez la roue de réglage de date F jusqu’à sommeil E pour activer l’heure souhaitée pour ce que le trait pour ’00:00’ soit au dessus sur l’échelle de temps G entre les deux petits traits le dispositif automatique de déconnexion (30 ou 60 minutes).
- Page 27 Données techniques Appuyez sur la touche Marche/Arrêt/Stop C • Méthode de projection : Optique pour arrêter la rotation. • Position d’observation : 35° Nord* De la même manière, vous pouvez activer et adapter la rotation de l’image pour l’hémisphère • Constellations : 61 •...
- Page 28 SERVICE ET GARANTIE lorsque des tiers ont fait des essais de répara- Déclaration de retour tion ou d’autres travaux de ce genre non auto- N° de dossier* :........Nous offrons une garantie de 5 ans pour cet risés. Si des réparations ou un échange du Désignation du produit :......
- Page 29 Dépannage Il peut arriver que ton Astro-Planétarium ne fonctionne pas correctement. Cela ne veut pas nécessairement dire qu’il est défectueux ! Souvent, il s’agit seulement d’un détail de montage qui n’a pas été respecté. C’est pourquoi nous avons décrit ci-dessous les erreurs les plus courantes pour que tu puisses essayer de régler le problème toi-même.
- Page 30 Problème Erreur possible Dépannage Peut-être n’as-tu pas introduit la bon- Introduis la diapositive 1) avec la simulation su ciel dans le support 1! . ne diapositive. Le Planétarium ne projet- te pas les extraits de ciel Peut-être n’as-tu pas correctement ré- souhaités.
- Page 31 GEVAAR voor lichamelijk letsel! Stel het apparaat niet bloot aan temperaturen tijd niet wordt gebruikt. Dit apparaat bevat elektronische onder- boven de 60ºC! delen die via een stroombron (stroom- AFVALVERWERKING GEVAAR voor materiële schade! Bied het verpakkingsmateriaal op soort voorziening of batterijen) worden aangedreven. Zorg dat kinderen tijdens de bediening altijd Demonteer het apparaat niet! Neem bij gescheiden als afval aan.
- Page 32 EG-richtlij- EN 60825-1:1994 + A1:2002 + A2:2001 nen: EN-71, Part 1-3, Part 6 EN-71, Part 9 EN-62115 EN-60825-1 Productbeschrijving: Astro Planetarium Type / aanduiding: Star Projector Rhede, 13-03-2009 Meade Instruments Europe GmbH & Co. KG Helmut Ebbert Directeur...
- Page 33 Overzicht van de onderdelen (afb. 1-3) Gebruiksklaar maken van het Als je de batterijen (15) er goed om in hebt astro-planetarium gelegd, zet je de batterijhouder (13) terug en B Planetariumbol schroeft hem weer vast. C Aan-/uit-/stop-toets Open het deksel van het batterijvak (12) aan de Tenslotte moet je het deksel van het batterijvak D Knop om het dia-vak te openen onderkant van de planetariumbol (afb.
- Page 34 de diaschijven (11) bevindt, naar het noorden 2 days 30 Apr wijst (afb. 4). 26 28 Hemelprojectie met het astro-planetarium afb. 8 Druk op de knop om het diavak (3) te openen. De la gaat open (afb. 2). Uitleg bij het wiel om de datum mee in te Leg een van de twee diaschijven (10) in de hou- stellen (5) afb.
- Page 35 Draai daarvoor het wiel om de datum mee in nuten automatisch uitgaat. De betreffende LED- te stellen (5) zo ver door, tot de streep voor lamp licht op. Na de ingestelde tijd schakelt het ‚00:00‘ bovenop de tijdschaal (6) tussen de apparaat over naar de slaapmodus (ook energie- twee korte strepen voor de ‚10‘...
-
Page 36: Technische Gegevens
Gebruik van de vallende-ster-functie Technische gegevens • Projectiemethode: Optisch Als u de beeldrotatie geactiveerd heeft (zie punt 4), kunt u ook de vallende-ster-functie • Observatiepositie: 35° Noord* gebruiken. Druk hiervoor op de toets voor de • Sterrenbeelden: 61 activering van de vallende-ster-functie (18). Nu •... -
Page 37: Service En Garantie
SERVICE EN GARANTIE ringen aan te brengen. Indien een reparatie of Retourmelding omruil van het apparaat nodig is zal de mede- Referentienr.*:.......... Voor dit apparaat leveren wij een garantie van werker van het servicecentrum een retouradres Productomschrijving:......... aan u verstrekken. 5 jaar, vanaf op de aankoopdatum. - Page 38 Het oplossen van problemen Het kan gebeuren dat je astro-planetarium niet goed werkt. Het hoeft daarom niet kapot te zijn! Vaak is het zo, dat er een kleinigheid bij de opbouw mis is gegaan. Daarom hebben we hier de meest voorkomende problemen opgesomd, zodat je je probleem zelf kunt proberen op te lossen. Probleem Mogelijke fout Oplossing...
- Page 39 Probleem Mogelijke fout Oplossing Waarschijnlijk heb je niet de juiste diaschijf in Leg de juiste diaschijf (10) met de nachthemel die je wilt bekijken in de houder (11). het apparaat. Het planetarium laat een andere nachthemel zien, dan ik heb inge- Het kan ook zijn dat je de datum en tijd van steld.
- Page 40 PERICOLO di lesioni! gliate. Non cortocircuitare l’apparecchio e/o le Proteggere l’apparecchio da polvere e umidità! Il presente apparecchio contiene parti batterie e non metterli a contatto con fiamme! Conservarlo nella custodia in dotazione o nella confezione originale. Laddove l’apparecchio elettroniche che funzionano con l’appor- L’esposizione a temperature eccessive o un to di energia da sorgenti elettriche (alimentato- uso improprio dell'apparecchio può...
- Page 41 EN 60825-1:1994 + A1:2002 + A2:2001 guenti direttive CE: EN-71, Part 1-3, Part 6 EN-71, Part 9 EN-62115 EN-60825-1 Descrizione del prodotto: Astro Planetarium Modello / Descrizione: Star Projector Rhede, 13-03-2009 Meade Instruments Europe GmbH & Co. KG Helmut Ebbert Direttore amministrativo...
- Page 42 Panoramica dei componenti (Fig. 1-3) Montaggio del planetario astronomico Dopo aver messo le pile (15), inserisci nuova- mente il supporto della batteria (13) e riavvitalo. B Sfera planetaria Apri il coperchio del vano batteria (12) situato Infine, rimetti al suo posto il coperchio del vano C Tasto ON/OFF/STOP nella parte inferiore della sfera planetaria (1) batteria (12).
- Page 43 Proiezione della volta celeste con il plane- 30 Apr 2 days tario astronomico 26 28 Premi il tasto per aprire il vano diapositive (3). Il vano si apre (fig. 2). afb. 8 Inserisci uno dei due dischi (10) nel supporto (11).
- Page 44 Gira la ruota per l’impostazione della data (5) lità di sospensione (4) per attivare il tempo di finché il trattino che corrisponde a “00:00” in spegnimento automatico desiderato (30 o 60 alto sulla scala del tempo (6) non si troverà tra minuti).
- Page 45 lare la rotazione dell'immagine per l'emisfero Dati tecnici australe. A tal proposito, premere il tasto per • Sistema di proiezione: ottico la rotazione a destra (16). Tutte le altre funzio- • Posizione di osservazione: 35° Nord* ni sono identiche alla rotazione a sinistra (vedi •...
- Page 46 SERVIZIO DI ASSISTENZA E GARANZIA vante da qualsivoglia tentativo di riparare l’appa- Notifica di rinvio recchio effettuato da persone non autorizzate. Numero pratica*: ........Per il presente apparecchio viene concessa Nel caso in cui si renda necessario riparare o Descrizione del prodotto: ......una garanzia di 5 anni dalla data d’acquisto.
- Page 47 Soluzione dei problemi Può succedere che il tuo planetario astronomico non funzioni bene. Questo però non vuol dire necessariamente che sia guasto! Spesso è solo così che non si sono osservate delle piccolezze durante il montaggio. Quindi abbiamo raccolto qui gli errori più frequenti in modo tale che tu possa provare a risolvere il problema da solo.
- Page 48 Problema Possibile errore Soluzione del problema Forse non hai inserito il disco delle Inserisci il disco (10) con la simulazione del cielo nel supporto (11). diapositive giusto. Il planetario non proietta il settore del cielo che vorrei Probabilmente non hai impostato cor- Regola correttamente la data e l’ora del periodo di osservazione, secondo vedere.
- Page 49 ¡PELIGRO de lesiones corporales! inadecuado se pueden producir cortocircuitos, ¡Proteja el aparato del polvo y la humedad! Este aparato incluye componentes incendios o incluso explosiones! Guárdelo en el maletín suministrado o en el electrónicos operados a través de una embalaje de transporte. Se recomienda retirar ¡No exponga el aparato a temperaturas supe- fuente de electricidad (equipo de alimentación las pilas del aparato si no se va a utilizar durante...
- Page 50 EN 60825-1:1994 + A1:2002 + A2:2001 rectivas de la UE enumeradas a continuación: EN-71, Part 1-3, Part 6 EN-71, Part 9 EN-62115 EN-60825-1 Descripción del producto: Astro Planetarium Modelo/Denominación: Star Projector Rhede, 13.03.2009 Meade Instruments Europe GmbH & Co. KG Helmut Ebbert Gerente...
- Page 51 Tele-resumen (Fig. 1-3): Estructura del planetario fijarse en las pequeñas inscripciones (+/-) que astronómico hay en el compartimento de las pilas. B Esfera del planetario C Tecla de encendido/apagado/parada Abra la tapa del compartimento de las pilas 1@ Una vez que haya introducido las pilas 1% vuelva D Botón para abrir el compartimen que se encuentra en la parte inferior de la esfe- a colocar el soporte 1# y atorníllelo.
- Page 52 ajustar la distancia de proyección necesaria. cualquier estación del año. Cada muesca de la A continuación, gire la esfera del planetario B de escala se corresponde con 30 minutos (Fig. 7). modo que la parte opuesta al soporte de los discos de diapositivas h señale hacia el Norte (Fig.
- Page 53 ver las posibilidades de una proyección en el Presione la tecla para el ajuste del modo stand- Para ello, gire la rueda de ajuste de la fecha F techo (a) o en la pared (b). by E a fin de activar el período de estado de hasta que la muesca correspondiente a «00:00»...
- Page 54 Datos técnicos rada C a fin de detener la rotación. Del mismo modo, puede activar y adaptar la ro- • Método de proyección: óptico • Posición de observación: 35° Norte* tación de imagen para el hemisferio sur. En ese • Constelaciones: 61 caso, presione la tecla de rotación hacia la de- •...
-
Page 55: Servicio Técnico Y Garantía
SERVICIO TÉCNICO Y GARANTÍA efectuado en el aparato intentos de reparación Nota de devolución o similares. Si es necesaria una reparación o N.º de expediente*:........Para este aparato, asumimos una garantía de 5 un cambio del producto, nuestro personal del Denominación del producto:....... - Page 56 Resolución de problemas Puede ocurrir que tu planetario astronómico no funcione correctamente. ¡Eso no significa que esté estropeado! Lo que suele pasar es que no se ha tenido en cuenta algún detalle durante el montaje. Por eso vamos a describirte aquí los errores más frecuentes, para que puedas intentar solucionar el problema por ti mismo.
- Page 57 Problema Posible error Resolución del problema El planetario sólo proyecta Seguro que no has introducido ningún Introduce en el soporte 1! uno de los discos de diapositivas 1) suministra- un círculo de luz claro. disco de diapositivas. dos. A pesar de que el apara- Apaga el aparato por medio del interruptor de encendido/apagado C y vuel- to está...
- Page 58 OPASNOST od ozljeđivanja tijela! OPASNOST nastanka predmetne štete! ZBRINJAVANJE Ovaj uređaj sadrži elektronske dijelove Ne rastavite uređaj! U slučaju kvara mo- Sve materijale ambalaže zbrinite u sorti- pogonjene preko izvora napona (mrežni limo da se obratite servisnom centru ranom stanju. Obavjesti o urednom zbri- element i/ili baterije).
- Page 59 EN 60825-1:1994 + A1:2002 + A2:2001 smjernicama EU: EN-71, Part 1-3, Part 6 EN-71, Part 9 EN-62115 EN-60825-1 Opis proizvoda: Astro Planetarium Tip / Naziv: Star Projector Rhede, 13.03.2009 Meade Instruments Europe GmbH & Co. KG Helmut Ebbert Poslovođa...
- Page 60 Tele-pregled (slike 1-3) ravnu i stabilnu podlogu (na primjer na stol) i kuglu planetarija B umetnite. Pritom se objektiv B Kugla planetarija H mora nalaziti paralelno u odnosu na projek- C Tipka Uklj/Isklj/Stop cijsku površinu (zid ili strop – slika 4). D Gumb za otvaranje dia-pretinca Fig.
- Page 61 godine. Stoga nisu uvijek vidljivi svi objekti. Iz crta na kotaču odgovara razdoblju od 2 dana tog razloga je važno, da uvijek izvršite korektno (slika 8). Duge linije pritom predstavljaju zadnji podešavanje vremena i datuma prije pokretanja dan prethodnog mjeseca, a ispod toga je nave- projekcije sa Astro-planetarijem.
- Page 62 gore na vremenskoj skali G ne dospije nepo- Okretanjem kotača za izoštravanje I možete ja, kada isti duže vrijeme (1 tjedan ili više) ne sredno ispred duge crte za mjesec sijećanj izvršiti podešenje oštrine slikovne projekcije koristite. (JAN) (slika 10). (slika 12).
- Page 63 NAPOMENA: Vremenski interval, u kojima se Tehnički podaci padajuće zvijezde pojavljuju, može biti skraćen povećanjem rotacijske brzine. • Projekcijska metoda: Optička • Pozicija promatranja: 35° Sjever* • Zvjezdane slike: 61 • Zvijezde: 8.000 • Osvjetljenje: bijela LED-rasvjeta sa velikom snagom osvjetljenja •...
- Page 64 SERVIS I JAMSTVO Ukoliko je potrebna popravka, odnosno zamje- Prijava za povratno slanje na proizvoda, onda će Vam suradnik servisnog Broj za obradu.*: ........Za ovaj uređaj dajemo jamstvo od 5 godina centra priopćiti odgovarajuću adresu, na koju Naziv proizvoda: ........počevši od datuma kupovine.
- Page 65 Otklanjanje problema Može se dogoditi, da tvoj Astro-planetarij ne funkcionira kako treba. To ne mora značiti da je uređaj defektan! Često stvari stoje tako, da je neka sitnica prilikom postavljanja zanemarena. Zbog toga smo ovdje naveli najučestalije probleme, pa možeš pokušati probleme samostalno riješiti. Problem Mogući kvar Otklanjanje problema...
- Page 66 Problem Mogući kvar Otklanjanje problema Eventualno nije umetnuta ispravna dia- Umetni dia-ploču 1) sa simulacijom neba u držač 1! . ploča. Planetarij ne projicira željeni isječak neba. Vjerojatno nisi ispravno podesio datum Datum i točno vrijeme razdoblja promatranja podesi na način opisan u upu- i vrijeme razdoblja promatranja.
- Page 68 Meade Instruments Europe GmbH & Co. KG Gutenbergstr. 2 DE-46414 Rhede Germany www.bresser.de...
Need help?
Do you have a question about the ASTRO PLANETARIUM and is the answer not in the manual?
Questions and answers