
Subscribe to Our Youtube Channel
Related Manuals for Grundig GEBM12600BHI


Summary of Contents for Grundig GEBM12600BHI
- Page 1 İT Built-in Oven User Manual Forno da incasso Manuale Utente GEBM12600BHI 385441840/ EN/ İT/ R.AA/ 03/06/2022 16:50 7768287684...
- Page 2 Welcome! Dear Customer, Thank you for choosing the Grundig product. We want your product, manufactured with high quality and technology, to offer you the best efficiency. Therefore, carefully read this manual and any other documentation provided before using the product.
-
Page 3: Safety Instructions
1 Safety Instructions • This section includes the Intended Use safety instructions necessary • This product is designed to be to prevent the risk of personal used at home. It is not suitable injury or material damage. for commercial use. •... -
Page 4: Electrical Safety
they are supervised or trained • Keep the packaging materials about the safe use and haz- out of the reach of children. ards of the product. There is a hazard of injury and • Children should not play with suffocation. the product. - Page 5 which the product is connec- Otherwise, cable insulation ted, in compliance with the may melt and cause fire as a electrical regulations and sep- result of short circuit. arating all poles from the net- • Use original cable only. Do not work.
- Page 6 • Make sure that the product Installation Safety plug is securely plugged into • Before the product is installed, the outlet to avoid arcing. check the product for any Transportation damage. If the product is Safety damaged, do not install it. •...
-
Page 7: Temperature Warn- Ings
• Do not climb on the product to • Do not place flammable / ex- reach anything or for any other plosive materials near the reason. product, as the edges will be • Never use the product when hot while it is operating. your judgement or coordina- •... -
Page 8: Cooking Safety
paper at an oven temperature Cooking Safety higher than the maximum use • Be careful when using alco- temperature specified on the holic drinks in your dishes. Al- greaseproof paper you are us- cohol evaporates at high tem- ing. Never place greaseproof peratures and may cause fire paper on the oven base. -
Page 9: Environmental Instructions
• Do not use steam cleaners to door glass. These materials clean the product as this may can cause glass surfaces to cause an electric shock. be scratched and broken. • Do not use harsh abrasive • Always keep the control panel cleaners, metal scrapers, wire clean and dry. -
Page 10: Your Product
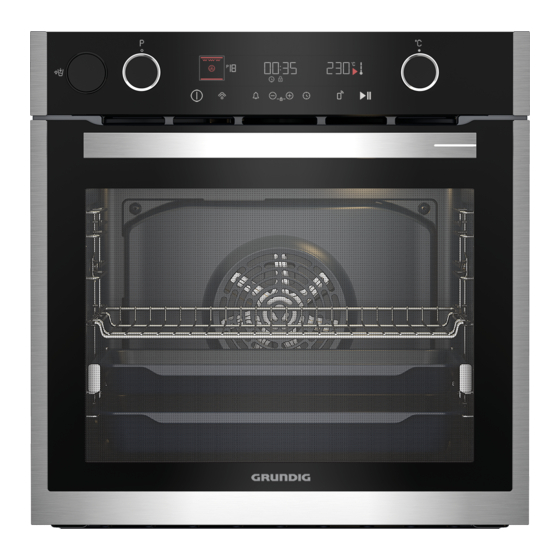
“Eco Fan Heating” operating function, and this temperature may differ from what is shown on the display. 3 Your product 3.1 Product Introduction 1 Control panel 2 Lamp 3 Wire shelves 4 Fan motor (behind the steel plate) 5 Door 6 Handle 7 Lower heater (under the steel plate) 8 Shelf positions... -
Page 11: Control Panel
3.2.1 Control Panel 1 On/off key 2 Remove control key 3 Touch display 4 Oven control knob 5 Lamp key 6 Key lock key If there are knob(s) controlling your product, Touch display in some models this/these knob(s) may be You can activate all kinds of functions by so that they come out when pushed (buried touching on the touch display, and you can... -
Page 12: Product Accessories
In order to save energy, you can use this function instead of us- Eco Fan Heating 160-220 ing “Fan Heating” in the range of 160-220°C. But; cooking time will be slightly longer. The lower heater and fan heating work. It is suitable for cooking Pizza 40-280 pizza. - Page 13 On models without wire shelves : Wire grill It is used for frying or placing the food to be baked, fried and stewed on the desired shelf. On models with wire shelves : Placing the wire grill on the cooking shelves On models with wire shelves : It is crucial to place the wire grill on the wire...
- Page 14 Placing the tray on the cooking shelves On models with wire shelves : On models with wire shelves : It is also crucial to place the trays on the wire side shelves properly. While placing the tray on the desired shelf, its side designed for holding must be on the front.
- Page 15 Proper placement of the wire grill and tray on the telescopic rails-On models with wire shelves and telescopic models Thanks to telescopic rails, trays or the wire grill can be easily installed and removed. When using trays and wire grills with the telescopic rail, care should be taken that the pins on the front and back of the telescopic rails, rest against the edges of the grill and...
-
Page 16: Technical Specifications
3.6 Technical Specifications General specifications Product external dimensions (height/width/depth) (mm) 595 /594 /567 Oven installation dimensions (height / width / depth) (mm) 590 - 600 /560 /min. 550 Voltage/Frequency 220-240 V ~; 50 Hz Cable type and section used/suitable for use in the product min. H05VV-FG 3 x 1,5 mm2 Total power consumption (kW) Oven type Multifunction oven... -
Page 17: First Use
4 First Use Before you start using your product, it is re- e. Touch "Date (Year)" on the screen or commended to do the following stated in the press the control knob once. following sections respectively. ð The "Date (Month)" field is activated on the screen. -
Page 18: Set The Language
ð The language setting change re- 02:25 Settings quires the watch to be restarted. Date (Year) For this, a warning screen is dis- Time (Hour) played to restart on the screen. Update d. Confirm restart. Restore Settings ð The language change is confirmed and the oven timer restarts. -
Page 19: Using The Oven
5 Using the Oven 5.1 General Information on Using • The oven operates for a maximum of 2 hours at temperatures of 280 ° C and the Oven above. Cooling fan ( It varies depending on the • While the oven operates in any function or product model. -
Page 20: Deactivating The Key Lock
Touch the button on the control panel for MANUAL COOKING 02:25 approximately 3 seconds and activate the Top+Bottom+Fan key lock When the key lock is activated, key on the control board will remain lit. Fan Heating When the key lock is active, only Multi (3D) Cooking key works. - Page 21 MANUAL COOKING MANUAL COOKING 02:25 02:25 Top+Bottom+Fan Top+Bottom+Fan 23:58 Temperature 200 C Time 23:59 02:26 Time Timeless Start Time 02:26 02:27 Step Cooking START Step Cooking START 02:28 g. To set the baking time: If you want to Temperature, probe temperature (if a operate your baking in the function and at meat probe is provided with your the temperature you have set for a while...
- Page 22 on the different shelves, which are men- of the baking time. The oven stops tioned on the baking table specific to to work at the end of the baking your meals. time. “Cook Ended” indication ap- pears on the display. MANUAL COOKING 02:25 Top+Bottom+Fan...
- Page 23 c. Turn the control knob to the right / left to h. For the automatic meal menu recipe: We select the "Automatic Cooking” menu you advise you to cook according to the re- want. cipes available in the timer for the auto- matic meal menus.
- Page 24 a. Touch the "Wi-fi" setting field on the setting is activated. If you will continue screen. with other settings, continue the other settings by tapping the relevant setting Settings 02:25 on the screen. Wi-fi Set the notification sound Brightness SCAN ü...
- Page 25 d. Confirm restart. play is not touched, the display saver you have selected shall be activated at ð The language change is confirmed and the end of the duration you have set. the oven timer restarts. Set the duration of switching to the Set the display saver standby mode.
- Page 26 a. Touch the "Hour" field on the screen. 02:25 Settings 2098 Date (Year) b. With "Time (Hour)" field enabled, set the 2099 time by turning the control knob to the Hour 2018 right / left. Update 2019 02:25 Settings Restore Settings 2020 Date (Year) c.
-
Page 27: Restoring Factory Defaults
Settings 02:25 Settings 02:25 Update Wi-fi Restore Settings Brightness UPDATE NOW SCAN Notice Sound Language b. While the "Update” field is active, "UP- b. While the "Wi-fi" field is active, bring the DATE NOW" option will be displayed on control knob to the SCAN level, press the the screen. -
Page 28: Favourites Menu
CE declaration of conformity Arçelik A.Ş. declares that this product complies with the 2014/53/EU Directive. A detailed RED Declaration of Conform- ity is available online in the support.grundig.com website within the additional documents in the product page for your product. - Page 29 create a risk of burns and affect the quality • Place your food on the appropriate shelf of your baking. Use the greaseproof paper recommended in the cooking table. Refer you will use in the temperature range spe- to the bottom shelf of the oven as shelf 1. cified.
- Page 30 Food Accessory to be Operating func- Shelf position Temperature (°C) Baking time used tion (min) (approx.) Round cake mould, 26 cm in Sponge cake diameter with Top+Bottom Heat 2 30 … 40 clamp on wire grill Round cake mould, 26 cm in Sponge cake diameter with Fan Heating...
- Page 31 Cooking table with operating function • Do not open the oven door when cooking in the “Eco Fan Heating” operating func- “Eco Fan Heating” tion. If the door does not open, the internal • Do not change the temperature setting temperature is optimized to save energy, after starting cooking in the operating and this temperature may differ from what...
-
Page 32: General Warnings
Food Accessory to be Operating func- Shelf position Temperature (°C) Baking time used tion (min) (approx.) 25 mins. 250/max, Turkey (5.5 kg) Standard tray * Multi (3D) Cooking 1 150 … 210 after 180 … 190 Wire grill * Fish Top+Bottom+Fan 3 20 …... - Page 33 Food Accessory to be Shelf position Temperature (°C) Baking time (min) used (approx.) Vegetable gratin Wire grill 4 - 5 20 … 30 Toast bread Wire grill 1 … 3 It is recommended to preheat for 5 minutes for all grilled food. Turn pieces of food after 1/2 of the total grilling time.
-
Page 34: Maintenance And Cleaning
Preheating is recommended for all food. *These accessories may not be included with your product. **These accessories are not included with your product. They are commercially available accessories. Grill Food Accessory to be Shelf position Temperature (°C) Baking time (min) used (approx.) Meatball (veal) - 12... -
Page 35: Cleaning Accessories
Enamelled surfaces • You can remove the calcium stains (yellow stains) on the glass surface with the com- • After each use, clean the enamel surfaces mercially available descaling agent, with a using dishwashing detergent, warm water descaling agent such as vinegar or lemon and a soft cloth or sponge and dry them juice. -
Page 36: Cleaning The Oven Door
After removing the door inner glasses, clean 7.4 Cleaning the inside of the oven them using a dishwashing detergent, warm (cooking area) water and a soft cloth or sponge and dry Follow the cleaning steps described in the them with a dry cloth. For lime residue that "General Cleaning Information"... - Page 37 e. (B) type hinge is available in soft closing door types. Illustration 6: Hinges - open position g. Get the oven door to a half-open posi- tion. Illustration 3: Hinges - closed position h. Pull the removed door upwards to re- lease it from the right and left hinges and remove it.
- Page 38 to place the lower corners of the inner- most glass (1) to meet the lower plastic slots. g. Push the plastic component towards the frame until a "click” sound is heard. 7.7 Cleaning the Oven Lamp In the event that the glass door of the oven lamp in the cooking area becomes dirty;...
-
Page 39: Troubleshooting
c. If your oven lamp is type (A) shown in the figure below, rotate the oven lamp as shown in the figure and replace it with a c. Lift the lamp's protective glass cover with new one. If it is type (B) model, pull it out a screwdriver. - Page 40 Oven light is not on. “Multiple bluetooth networks detected” warning shows while installing the • Oven lamp may be faulty. >>> Replace product to the "HomeWhiz" app. oven's lamp. • No electricity. >>> Ensure the mains is op- • In case more than one house appliance in erational and check the fuses in the fuse your home is set to setup mode at the box.
- Page 42 Benvenuto! Gentile cliente, Grazie per aver scelto il prodotto Grundig . Vogliamo che il tuo prodotto, realizzato con alta qualità e tecnologia, ti offra la massima efficienza. Quindi, prima di utilizzare il prodotto leggere con attenzione il presente manuale e qualsiasi altra documentazione fornita in dotazione.
-
Page 43: Uso Previsto
1 Istruzioni relative alla sicurezza • Questa sezione contiene istru- Uso previsto zioni di sicurezza necessarie a • Questo prodotto è progettato prevenire rischi di lesioni per- per essere usato in casa. Non sonali o danni alle cose. è utilizzabile per scopi com- •... -
Page 44: Sicurezza Elettrica
non sono in grado di sviluppa- • AVVERTENZA: Durante l'uso, re le proprie capacità fisiche, le superfici accessibili del pro- sensoriali o mentali, o che non dotto sono calde. Tenere i hanno esperienza e conoscen- bambini lontano dal forno. za, purché siano sorvegliati o •... - Page 45 • La spina o il collegamento gato, schiacciato e non deve elettrico del prodotto deve es- venire a contatto con alcuna sere in un luogo facilmente ac- fonte di calore. cessibile (non influenzato, per • Quando è in uso, la superficie esempio, dalla fiamma di un posteriore del forno diventa piano cottura).
- Page 46 Se il prodotto è dotato di cavo • Quando si deve trasportare il di alimentazione e spina: prodotto, avvolgerlo con ma- • Non inserire il prodotto in una teriale da imballaggio a bolle presa di corrente che sia allen- d'aria o cartone spesso e le- tata, che sia uscita dalla sua garlo con del nastro adesivo.
- Page 47 Utilizzo in sicurez- • La maniglia del forno non è un asciugamano. Quando si utiliz- za il prodotto, non appendere • Assicurarsi che il prodotto asciugamani, guanti o tessuti venga spento dopo ogni utiliz- simili alla maniglia. • Le cerniere dello sportello del •...
-
Page 48: Uso Degli Accessori
• Durante il funzionamento il • Gli scarti di cibo, l'olio, ecc. prodotto potrebbe surriscal- nella zona di cottura potrebbe- darsi. Fare attenzione a non ro prendere fuoco. Prima della toccare le parti calde, l'interno cottura, rimuovere lo sporco in del forno e gli elementi riscal- eccesso. - Page 49 • Non collocare teglie, piatti o • Non lavare il prodotto spruz- fogli di alluminio direttamente zando o versandovi acqua! sul fondo del forno. Il calore C'è rischio di scossa elettrica! accumulato potrebbe danneg- • Non utilizzare pulitori a vapore giare il fondo del forno.
-
Page 50: Consigli Per Risparmiare Ener- Gia
di raccolta. Lo smaltimento corretto dell'ap- • Scongelare i cibi congelati prima della cot- parecchio aiuta a prevenire conseguenze ne- tura. gative per l'ambiente e la salute umana. • Nel forno, utilizzare contenitori scuri o smaltati che trasmettono meglio il calore. •... -
Page 51: Presentazione Del Prodotto
3 Il prodotto 3.1 Presentazione del prodotto 1 Pannello di controllo 2 Lampada 3 Ripiani a filo 4 Motorino ventola (dietro alla piastra in acciaio) 5 Sportello 6 Maniglia 7 Riscaldatore inferiore (sotto la piastra 8 Posizioni del ripiano d'acciaio) 9 Riscaldatore superiore 10 Fori di ventilazione 3.2 Introduzione e utilizzo del pan-... -
Page 52: Pannello Di Controllo
3.2.1 Pannello di controllo 1 Tasto On/Off 2 Tasto del telecomando 3 Display a sfioramento 4 Manopola di controllo del forno 5 Tasto della lampada 6 Tasto blocco tastiera Se ci sono delle manopole che controllano il Display touch prodotto, in alcuni modelli queste manopole Puoi attivare tutti i tipi di funzioni toccando possono essere tali da uscire quando ven- sul display touch, e puoi scorrere le funzioni... - Page 53 Grazie alla ventola, l'aria calda riscaldata dal riscaldatore superio- Ris. con ventola 40-280 re viene distribuita equamente e rapidamente in tutto il forno. È adatta per la cottura a più vassoi e con diversi livelli di ripiano. Per risparmiare energia, sarà possibile utilizzare questa funzione Ris.
- Page 54 3.5 Uso degli accessori del prodot- Ripiani da cottura Nell’area di cottura ci sono 5 livelli di posizio- namento dei ripiani. È possibile anche vede- re l'ordine dei ripiani nei numeri sul frame an- teriore del forno. Vassoio per pasticceria Su modelli con ripiani in filo metallico : Viene utilizzato per la pasticceria, come dolci e biscotti.
- Page 55 Su modelli senza ripiani in filo metallico : Su modelli senza ripiani in filo metallico : è fondamentale posizionare correttamente il è fondamentale posizionare correttamente i grill a filo sui ripiani laterali. Il grill a filo può vassoi sui ripiani laterali. Il vassoio può esse- essere posizionato sul ripiano in una sola di- re posizionato sul ripiano in una sola direzio- rezione.
- Page 56 Su modelli senza ripiani in filo metallico : Funzione di arresto del vassoio - Su mo- delli con ripiani in filo metallico Per evitare che il vassoio si rovesci ed esca dal ripiano in filo metallico, è prevista una funzione di arresto. Durante la rimozione del vassoio, sganciarlo dalla presa di arresto po- steriore e tirarlo verso di sé...
-
Page 57: Specifiche Tecniche
3.6 Specifiche tecniche Specifiche generiche Dimensioni esterne del prodotto (altezza/larghezza/profon- 595 /594 /567 dità)(mm) Dimensioni di installazione del forno (altezza/larghezza/pro- 590 - 600 /560 /min. 550 fondità)(mm) Tensione/Frequenza 220-240 V ~; 50 Hz Tipo di cavo e sezione utilizzati/adatti all'uso nel prodotto min.H05VV-FG 3 x 1,5 mm2 Consumo energetico totale (kW) Tipo di forno... -
Page 58: Primo Utilizzo
4 Primo utilizzo Prima di iniziare ad utilizzare il prodotto, si 02:25 Impostazioni 2098 raccomanda di procedere come segue e in- Data (anno) 2099 dicato nelle seguenti sezioni. 2018 4.1 Prima impostazione del timer Aggiornare 2019 Ripristina impostazi 2020 Prima di utilizzare il forno, impostare sempre l'ora del giorno. -
Page 59: Pulizia Iniziale
attivato il campo "Tempo (ora)" e le im- 02:49 Impostazioni postazioni della data eseguite saranno Wi-fi Inglese confermate. Luminosità Türkçe Impostare il timer Notare il suono Italiano ü Dopo aver impostato la data; Lingua a. Toccare il campo "Ora" sullo schermo. c. -
Page 60: Utilizzo Del Forno
AVVISO: Alcuni detergenti o agenti deter- AVVISO: Durante il primo utilizzo, il fumo e genti potrebbero danneggiare la superficie. l'odore potrebbero risalire per diverse ore. Non utilizzare detergenti abrasivi, polveri de- Questo è normale e si necessita solo di una tergenti, creme detergenti o oggetti appuntiti buona ventilazione per rimuoverli. - Page 61 b. Toccare il pulsante sul pannello di con- 02:25 trollo per circa 3 secondi. La connessione del telecomando verrà interrotta. Cottura Manuale Pesce Carne Accensione e spegnimento della lampa- da del forno Carne di Pollame Dolci Pane a. Toccare il pulsante sul pannello di controllo per circa 3 secondi.
- Page 62 e. Quando sullo schermo è selezionata la Cottura Manuale 02:25 Statico+Ventola 05:59 funzione che si desidera utilizzare per la 200 C Temperatura 06:00 cottura, toccare la relativa funzione sullo Senza tempo Senza tempo schermo o premere una volta la manopo- la di controllo.
- Page 63 Cottura Manuale j. Se tutte le impostazioni sono corrette, av- 02:25 Statico+Ventola viare la cottura toccando il pulsante "AV- Funzione Statico+Ventola VIO” sullo schermo. Viene visualizzata la Temperatura Tempo rimanente (min) EDIT schermata di preriscaldamento. 00:30 CANCELLAZIONE k. Per impostare il preriscaldamento: Sul display del preriscaldamento, il forno porterà...
- Page 64 funzionare per altri 5 minuti con le impo- d. Selezionare il piatto/pietanza che si vuole stazioni di funzione e temperatura regola- cucinare ruotando la manopola di con- te. Se si porta la manopola di controllo al trollo a destra/sinistra o facendo scorrere livello "Schermo Di Casa"...
- Page 65 i. Per leggere la ricetta sulla schermata del- Impostazioni 02:25 le ricette, è possibile scorrere il display o Wi-fi ruotare la manopola di controllo verso Luminosità Scansione destra/sinistra. Notare il suono j. Per leggere il contenuto della ricetta, è Lingua possibile toccare su "Ingredienti"...
-
Page 66: Impostare La Lingua
ð Il cambiamento di impostazione del- nu. Se si intende continuare con altre impostazioni, proseguire toccando la re- la lingua richiede il riavvio dell'orolo- lativa impostazione sullo schermo. gio. A tal fine, sullo schermo viene visualizzata una schermata di avviso Impostare il suono di notifica per il riavvio. -
Page 67: Impostazione Della Data
stazione viene confermata e viene attiva- Impostazione della data ta la successiva impostazione del sotto- ü Per cambiare l'impostazione della data; menu. Se si intende continuare con altre a. Dal menu delle impostazioni, selezionare impostazioni, proseguire toccando la re- il campo “Data”. lativa impostazione sullo schermo. - Page 68 ð Se si intende impostare solo la data, si intende continuare con altre imposta- passare al menu superiore toccando il zioni, proseguire toccando la relativa im- postazione sullo schermo. pulsante sullo schermo. Le imposta- zioni effettuate saranno confermate. Per Impostare l'aggiornamento impostare l'orar, toccare il campo “Tem- ü...
- Page 69 b. Con il campo "Ripristina impostazi” attivo, d. Nella schermata della password visualiz- sullo schermo verrà visualizzata l’opzione zata, inserire la password della rete e toc- “Reset”. Ripristinare le impostazioni pre- care una volta "SALVA" sullo schermo. Il definite in fabbrica premendo una volta la prodotto si collegherà...
- Page 70 Dichiarazione di conformità CE Arçelik A.Ş. dichiara che questo prodotto è conforme alla Direttiva 2014/53/EU. Una dichiarazione di conformità RED dettagliata è disponibile online sul sito web support.grundig.com tra i documenti aggiuntivi nella pagina del prodotto. 6 Informazioni generali sulla cottura In questa sezione è...
- Page 71 Consigli per la cottura di torte 6.1.1 Pasticcini e alimenti da forno • Se la torta è troppo secca, aumentare la Informazioni di carattere generale temperatura di circa 10 ˚C e diminuire il • Per una buona cottura, si consiglia di utiliz- tempo di cottura.
- Page 72 Alimento Accessorio da Funzione opera- Posizione del ri- Temperatura (°C) Tempo di cottu- utilizzare tiva piano ra (min) (appros- simativ.) Stampo per dolci rotondo, diametro Pan di Spagna 26 cm con mor- Statico 30 … 40 setto su grill a filo Stampo per dolci rotondo, diametro Pan di Spagna...
- Page 73 Suggerimenti per cucinare con due vassoi Alimento Accessorio da Funzione opera- Posizione del ri- Temperatura (°C) Tempo di cottu- utilizzare tiva piano ra (min) (appros- simativ.) 2-Vassoio stan- dard * Torte di piccole di- Ris. con ventola 2 - 4 25 …...
-
Page 74: Avvertenze Generali
• Scaduto il tempo di cottura, lasciare la • Il pesce dovrebbe essere collocato su un carne in forno per circa 10 minuti. Il succo ripiano di medio o basso livello in un piatto della carne è meglio distribuito alla carne resistente al calore. - Page 75 • Durante la cottura alla griglia, chiude- • A seconda dello spessore dei pezzi da gri- gliare, i tempi di cottura indicati in tabella re lo sportello del forno. Non grigliare mai con lo sportello del forno aperto. potrebbero variare. •...
- Page 76 Tabella di cottura per i pasti di prova Suggerimento per la cottura con un vassoio singolo Alimento Accessorio da Funzione opera- Posizione del ri- Temperatura (°C) Tempo di cottu- utilizzare tiva piano ra (min) (appros- simativ.) Shortbread (bi- Vassoio standard * Statico 20 …...
-
Page 77: Manutenzione E Pulizia
Grill Alimento Accessorio da utiliz- Posizione del ripia- Temperatura (°C) Tempo di cottura zare (min) (approssima- tiv.) Polpette di carne (vitel- Grill a filo 20 … 30 lo) - 12 quantità Pane tostato Grill a filo 1 … 3 Si consiglia di preriscaldare per 5 minuti tutti i cibi da grigliare. Girare i pezzi di cibo dopo 1/2 del tempo totale di cottura al grill. - Page 78 spugnetta paglietta in lana d'acciaio anti- • Se la superficie è molto sporca, applicare il graffio. Non usare detergenti per forni detergente sulla macchia con una spugna esterni. e aspettare molto tempo perché funzioni • Prima di effettuare la pulizia dell’area cot- correttamente.
- Page 79 sportello". Dopo aver rimosso i vetri interni 7.4 Pulizia dell'interno del forno dello sportello, pulirli con detersivo per piatti, (area di cottura) acqua calda e un panno morbido o una spu- A seconda del tipo di superficie del forno, gna e asciugare con un panno asciutto. Per i seguire le fasi di pulizia descritte nella sezio- residui di calcare che potrebbero formarsi sul ne "Informazioni generali sulla pulizia"...
- Page 80 e. la cerniera di tipo (B) è disponibile nei tipi di sportelli a chiusura morbida. Illustrazione 6: Cerniere - posizione aperta g. Mettere lo sportello del forno in posizione semiaperta. Illustrazione 3: Cerniere - posizione chiusa h. Tirare lo sportello rimosso verso l'alto per sganciarlo dalle cerniere di destra e di si- nistra e rimuoverlo.
- Page 81 f. Nel rimontare il vetro più interno (1), fare attenzione a posizionare il lato stampato del vetro sul vetro interno. È fondamenta- le posizionare gli angoli inferiori del vetro più interno perché coincidano con le fes- sure inferiori in plastica. g.
-
Page 82: Risoluzione Dei Problemi
a. Scollegare il prodotto dalla rete elettrica. b. Rimuovere i ripiani in filo metallico secon- do la descrizione. b. Rimuovere il coperchio di vetro ruotando- lo in senso antiorario. c. Se la lampada del forno è del tipo (A), co- me mostrato in figura, ruotare la lampada c. - Page 83 Il prodotto non funziona. L'applicazione “HomeWhiz" non mostra correttamente lo stato del forno. • Il fusibile può essere difettoso o bruciato. >>> Controllare i fusibili nella scatola dei • Il collegamento potrebbe essere per un pò fusibili. Sostituirli, se necessario, o riattivar- interrotto.
Need help?
Do you have a question about the GEBM12600BHI and is the answer not in the manual?
Questions and answers