
Related Manuals for Jaton Video-PX6600-256


Summary of Contents for Jaton Video-PX6600-256
- Page 1 Video-PX 6600 series nVIDIA GeForce™ 6600 series User’s Manual Version 5.00 C o p y r i g h t © 2 0 0 5 J a t o n C o r p o r a t i o n , U S A...
-
Page 2: Table Of Contents
INTRODUCTION ... 3 FEATURES AND SPECIFICATIONS ... 4 SYSTEM REQUIREMENT ... 10 CHECK LIST ... 10 HARDWARE DESCRIPTION... 11 DISPLAY DEVICES OUTPUT ... 12 HARDWARE INSTALLATION... 13 NSTALLATION ROCEDURES : ... 13 TEPS SOFTWARE INSTALLATION... 14 ® XP D INDOWS RIVER ®... -
Page 3: Introduction
OW TO BTAIN ARRANTY LIMITED WARRANTY ... 28 ... 29 THER IMITS ... 29 XCLUSIVE BLIGATION ... 30 THER TATEMENTS ... 30 ERMS AND ONDITIONS :... 30 ERVICES AGREEMENT ... 31 NTIRE BLIGATION REDUCING WARRANTY CLAIM REJECTIONS... 31 Introduction Video-PX 6600 series video accelerators are nVIDIA GeForce™ 6600 core technology based 128MB/256MB DDR/DDR3 memory modules built-in onboard. -
Page 4: Features And Specifications
Video-PX 6600 series implement 64-bit texture filtering and blending technology, taking 3D graphics one step closer to film quality. Fully compatible with the OpenEXR standard used by Industrial Light & Magic, NVIDIA’s 64-bit texture implementation brings professional film rendering techniques to today’s games. This new technology delivers full floating point support throughout the entire pipeline including floating point filtering, floating point texturing and floating point blending. - Page 5 APIs, programmers can now develop shader programs utilizing these technologies and techniques: Infinite length shader programs: With CineFX 3.0 there are no hardware-imposed limitations on shader programs. The technology and speed advancements of CineFX 3.0 ensure that longer programs will run blazingly fast.
- Page 6 NVIDIA CineFX 3.0 is poised to unleash a new level of programming creativity. With full DirectX 9.0 Shader Model 3.0 support, the newest Video-PX 6600 series will soon power a new generation of games with unmatched realism, digital worlds with mind-blowing complexity, and lifelike characters that move through cinematic-quality environments.
- Page 7 Thus, emerging next-generation games, that employ multiple light sources with many visible objects in each scene—such as Doom III from id Software—will see dramatic improvements in execution speeds. The technology advancements in UltraShadow II also deliver a 4× performance increase (compared to the previous generation) for passes involving shadow volumes.
- Page 8 converting it into a defined digital format (encoding). The most common format for encoding or decoding is MPEG-2. Other popular formats, such as Windows Media Video9 (WMV9), are also supported in the Video-PX 6600 series GPUs. Unified Driver Architecture (UDA) The Nvidia UDA guarantees forward and backward compatibility with software drivers.
- Page 9 High-quality scaling and filtering technology improves video playback quality at any window size, including full-screen HDTV resolutions. Integrated TV Encoder Provides best-of-class TV-out functionality for resolutions up to 1024x768. Microsoft® DirectX® 9.0 Optimizations and Support Ensures the best performance and application compatibility for all DirectX 9 applications.
-
Page 10: System Requirement
• Hard Drive with at least 100MB Free space • MS Windows® 2000/XP operating system Check List • Video-PX6600, Video-PX6600-256, Video-PX6600LE, Video-PX6600LE-256 or Video-PX6600GT Multimedia Accelerator • Mini-DIN 9-pin (TV-Out) converter cable for Composite RCA or S-Video Out connection. •... -
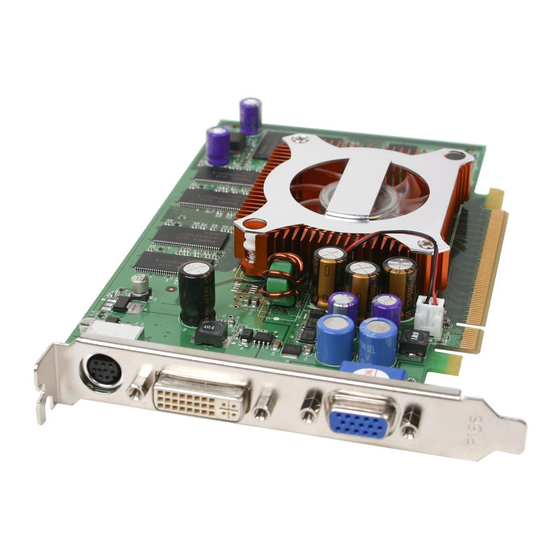
Page 11: Hardware Description
( TV out ) DVI-I 24Pin ( DVI out ) DB15 VGA ( RGB out ) Product name / PCB version Video-PX6600 82308A nVIDIA GeForce 6600 Video-PX6600-256 82308A nVIDIA GeForce 6600 Video-PX6600LE 82308A nVIDIA GeForce 6600LE Video-PX6600LE-256 82308A nVIDIA GeForce 6600LE... -
Page 12: Display Devices Output
Display Devices Output Monitor Monitor RGB out - DB15 VGA connector to analog monitor. DVI out - DVI connects to LCD display panel. DVI converts to RGB with DVI-RGB converter for Dual RGB out. TV-Out - MD4 connector converts S-Video to RCA Composite Output or direct connects S-Video to TV set. -
Page 13: Hardware Installation
Hardware Installation Installation Procedures The manufacturer assumes no liability for any damage, caused directly or indirectly, by improper installation of any components by unauthorized service personnel. If you do not feel comfortable performing the installation, consult with a qualified computer technician Steps: Turn OFF all powers to your system, including any peripherals (printer, external drives, modem, etc.). -
Page 14: Software Installation
Upgrade Steps: Add or change your video adapter to an existing system, you may precede a few steps before you install the new hardware and software (video display driver). The followings are some of the considerations: 1. To add a new adapter, ensure the mainboard has available IRQ for new devices, and there is no conflict between each other. - Page 15 Select [Next] to install driver. Select [Finish] to restart the computer. InstallShield® Program: Microsoft Windows® XP detects this new hardware and places appropriate display driver from its system folder automatically - it doesn’t matter if you have added a new driver or changed the existing one. To maximize the video board acceleration and increase its performance, you may install the manufacturer’s display driver as follows: Autorun feature brings-up the “Welcome Screen”, and you may...
- Page 16 Microsoft InstallShield® Wizard has start loading its setup process; please wait until it has completed. Click on “Next” to continue the process.
-
Page 17: Windows ® 2000 Driver Installation
The Windows system will copy all driver files from source media to your local hard disk; please wait until the process has completed. Click on “Finish” to restart your computer, the new display driver will be in place after Windows boots-up. ®... - Page 18 Select [Next] to install driver. Select [Finish] to restart the computer. InstallShield® Program: Microsoft Windows®2000 detects this new hardware and places appropriate display driver from its system folder automatically - it doesn’t matter if you have added a new driver or changed the existing one. To maximize the video board acceleration and increase its performance, you may install the manufacturer’s display driver as follows: Autorun feature brings-up the “Welcome Screen”, and you may...
- Page 19 Microsoft InstallShield® Wizard has start loading its setup process; please wait until it has completed. Click on “Next” to continue the process.
-
Page 20: Technical Assistance
Click on “Finish” to restart your computer, the new display driver will be in place after Windows boots-up. Notice: We believe that the all the installation steps mentioned above are clear from manufacturer software’s CD to your operating system. Any procedures other than these processes have not been specified. - Page 21 developer. To center the display with normal type (mode 3), and to reduce (decrease) the refresh rate with the monitor's specification. Q: What kind monitors can display 800x600 modes or higher resolution mode? Explain and Suggestion: To display 800x600 resolution at 60Hz refresh rate, the monitor must be capable of synchronizing a 31.5KHz horizontal scan rate (e.g., NEC 2A, 3D).
-
Page 22: Frequently Asked Questions (Faq)
driver should function properly with virtually every video board and VGA (or SVGA) monitor available. If that is an unsatisfactory solution, you may have to upgrade to a monitor that supports the desired video mode. Some new monitors are also synchronizing this problem because built-in DDC (Data-Digital-Channel) feature. -
Page 23: Pinout And Sync Frequencies
advanced-under TV format, select S-Video or RCA which you are attached. Then click apply-o.k. Q4: Why am I getting error when clicking on "Display Driver" from the CD DISC? Answer Older PC from Gateway / DELL / HP will have this problem due to older equipement which does not have the current information to process. -
Page 24: C Onversion T Able : P In A Dapters
Note: Analog monochrome type monitors use green video for all video input and ignore red and blue video. Conversion Table: Pin Adapters If you will be using a 9-to-15-pin adapter cable to link your 9-pin monitor connector to the 15-pin accelerator card connector, check Table carefully before you install the cable. -
Page 25: Digital Visual Interface (Dvi-I) Connector
Digital Visual Interface (DVI-I) Connector 24 pin DVI FEMALE connector built-in onboard. Pin Number C1 C2 24 C3 C4 Signals TMDS Data 2 - TMDS Data 2 + TMDS Data 2 Shield No Connection No Connection DDC Clock DDC Data No Connection TMDS Data 1 - TMDS Data 1 +... -
Page 26: Technical Support
In the event you have a technical problem with this product, please read the README files in the software CD_ROM. Updated drivers are available through Jaton Web site. Have following information handy when you contact technical support: Name of the product. - Page 27 Overwegwachter 3, 3034 G, Potterdam, Netherlands (Holland) 31-10-412-1154 In Thailand contact: Jaton (Thailand) Co., Ltd. 93, 93/1-2 Moo 4 Thana City PC Tower 1 Fl. Bangna-Trad KM.14 Bangchalong Bangplee Samutprakarn 10540 Thailand Tel: 662-336-1212 Fax: 662-336-1213 Tech Support: 662-336-0818 In Taiwan contact: In Australia contact: Jaton Technology pty, Ltd.
-
Page 28: Limited Warranty
Manufacturer warrants that the products sold hereunder are free from defects in material and workmanship for a period of two (2) years from manufacturing date. This limited warranty applies only to the original purchaser of Jaton Product and is not... -
Page 29: Other Limits
(original invoice date). This Limited Warranty does not cover any incompatibilities due to the user’s computer, hardware, software or any related system configuration in which the Jaton Products interfaces. Proof of purchase will be requiring before any consideration by Manufacturer occurs. -
Page 30: Other Statements
(1) All applicants shall complete service request form from Manufacturer. This warranty applies only for a period of two (2) years from purchase date of Jaton original invoice. This warranty applies only for a period of two (2) years from manufacturing date. -
Page 31: Entire Obligation
(2) All returned checks will be charged a $20.00 fee by Manufacturer. (3) All repair and replacement services allow 4-6 weeks from the date of receiving by Manufacturer. (4) All products without warranties require service processing fee $20 (payment in advance), which is not refundable. Entire Obligation This Limited Warranty states the entire obligation of Manufacturer with respect to the Products. - Page 32 • If you are unsure about installation for a new product, contact your dealer’s service department. We believe it is important for you to know and understand what your warranty coverage provides and what it does not. We also want you to be aware that most hardware warranties only relate to the function of the hardware.
Need help?
Do you have a question about the Video-PX6600-256 and is the answer not in the manual?
Questions and answers