
Related Manuals for Jaton Video-208PCI-128TV


Summary of Contents for Jaton Video-208PCI-128TV
- Page 1 Video-208PCI Series nVIDIA GeForce MX4000 User’s Manual Version 1.00 C o p y r i g h t © 2 0 0 4 J a t o n C o r p o r a t i o n , U S A...
-
Page 2: Table Of Contents
Contents INTRODUCTION...4 FEATURES...5 PCI B ...5 NTERFACE RAPHICS ROCESSOR ...5 ERFORMANCE ...6 OMPATIBILITY HDTV/DVD P ...6 LAYBACK SYSTEM REQUIREMENT...6 CHECK LIST...7 HARDWARE DESCRIPTION ...7 HARDWARE INSTALLATION ...9 NSTALLATION ROCEDURES : ...10 TEPS SOFTWARE INSTALLATION ...11 98 D INDOWS RIVER ... - Page 3 REQUENTLY SKED UESTIONS PINOUT AND SYNC FREQUENCIES...33 NALOG OLOR ISPLAY ONVERSION ABLE -15 P ONVERSION ...34 ECHNICAL UPPORT LIMITED WARRANTY...36 ..36 THER IMITS ...37 XCLUSIVE BLIGATION ..37 THER TATEMENTS ..37 ERMS AND ONDITIONS : ...38 ERVICES AGREEMENT .
-
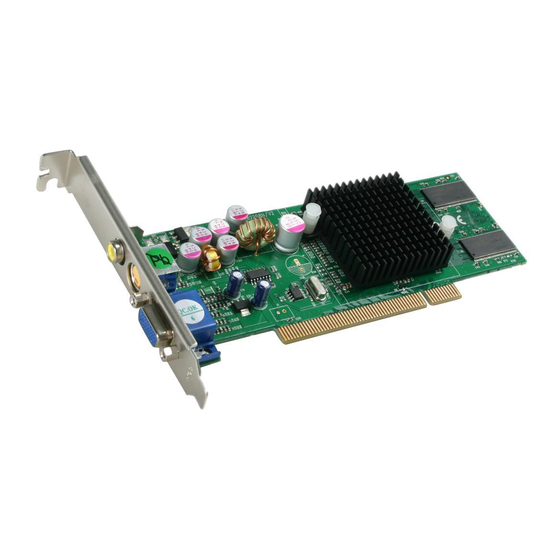
Page 4: Introduction
Introduction The Video-208PCI Series video accelerators are excellent 2D/3D multimedia video adapters for PCI local bus desktop PCs’. Based on nVIDIA GeForce4 MX4000 core technology, built-in with 64MB / 128MB DDR memory module and these video cards will provide multiple display outputs onboard for TV-Out (Analog and Digital) or Dual RGB out (Twin) as options. -
Page 5: Features
Features PCI Bus Interface • PCI Bus mastering compatible • PCI 2.2 compliance Graphics Processor Unit (GPU) • 256-bit graphics engine • 64MB / 128MB DDR memory access bus. • Integrated dual 270 MHz RAMDACs drives CRT display • 2 dual 128bit pixel pipelines rendering •... -
Page 6: Compatibility
• High-performance 2D rendering engine • API support - DirectX 8.1 and lower Compatibility • nVIDIA Unified Driver Architecture • Industry’s first fully compliant professional OpenGL 1.3 support for Windows® operating systems • Windows® 98, WindowsMe, Windows®NT™4.0, Windows® 2000, and WindowsXP HDTV/DVD Playback •... -
Page 7: Check List
82208N nVIDIA GeForce4 MX4000 82208N nVIDIA GeForce4 MX4000 82208N nVIDIA GeForce4 MX4000 Video-208PCI-128TV Special Bracket(s) Alternative P203 DB 15 VGA + MD 4Pin + RCA Composite -Low profile PC system brackets only available for PCB revision mentioned above. Alternative brackets for low profile system are sold separately. Please go to www.togopc.com for detail information. - Page 8 DB 15 VGA (RGB out) DB 15 VGA (RGB out) Product Name / PCB Version Core Chipset 82208M nVIDIA GeForce4 MX4000 Video-208PCI-64Twin 82208M nVIDIA GeForce4 MX4000 Video-208PCI-128Twin 82208M nVIDIA GeForce4 MX4000 Output Connections (TV-Out) TV set CRT Monitor Display nVIDIA MX4000 Memory PCB Size...
-
Page 9: Hardware Installation
Output Connections (Dual RGB) CRT Monitor 2 CRT Monitor 1 Hardware Installation Installation Procedures The manufacturer assumes no liability for any damage, caused directly or indirectly, by improper installation of any components by unauthorized service personnel. If you do not feel comfortable performing the installation, consult with a qualified computer technician (Additional output Connector) -
Page 10: Steps
Steps: Turn OFF all powers to your system, including any peripherals (printer, external drives, modem, etc.). Disconnect the power cord and the monitor cable from the back of the computer. Unfasten the cover mounting screws on your system and remove the system cover. Refer to your system user manual for instructions to determine the location of the mounting screws. -
Page 11: Software Installation
4. The driver installation for system upgrade is as the same as below, if an error occurs when you proceed with step 1, 2 or 3, please consult with your system’s dealer or the existing hardware manufacturer support. Software Installation ... - Page 12 5. Click the Next button. 6. Select Display a list of the drivers in a specific location... Then click the Next. 7. Insert the Software’s CD then Click the Have Disk button. 8. Under Copy manufacturer’s file from statement enter D:\Win9x, click the OK button. (Where D is the letter of your CD ROM drive, typically, D or E Drives, etc.) 9.
- Page 13 Autorun feature brings-up the “Welcome Screen”, and you may point to “display driver”, then press on it. Microsoft InstallShield Wizard has start loading its setup process; please wait until it is finished.
- Page 14 Click on “Next” to continue the process. Windows system will copy all driver files from source media to your local hard disk, please wait until the process has completed.
-
Page 15: Windows M Edrive Installation
Click on “Finish” to restart your computer, the new display driver will be in place after Windows boots-up. Windows Me Drive Installation Upgrade video adapter to an existing system. (Windows has been pre-loaded) Select [Next] to install Standard VGA Graphics Adapter at Add New Hardware Wizard screen. - Page 16 Select [Finish] to restart the computer. To a new system: 1. SELECT the “Display” icon from control panel and then tab on “Settings” screen. 2. Select Advanced at selection bar. 3. Click on Adapter tab. 4. Click the Change button at Adapter Screen 5.
- Page 17 software’s CD into CD ROM drive and proceed to the display driver installation which provided from the hardware manufacturer. Autorun feature brings-up the “Welcome Screen”, and you may point to “display driver”, then press on it. Microsoft InstallShield Wizard has start loading its setup process;...
- Page 18 Click on “Next” to continue the process. Windows system will copy all driver files from source media to your local hard disk, please wait until the process has completed.
-
Page 19: Microsoft Windows Nt™4.0
Click on “Finish” to restart your computer, the new display driver will be in place after Windows boots-up. Microsoft Windows The procedure of display driver installation requires setup with service pack 6 (Microsoft® Windows NT™4.0) first. After your windows desktop is loaded with service pack 6, you may insert the software CD into CD ROM drive and follow the install steps below: Upgrade video adapter to an existing system. - Page 20 Windows NT 4.0 prompt you for the location where those files for video driver. INPUT the path or unfold with “X:\Winnt4\”. (X: is the CD ROM drive where the Software & Documents CD has been inserted.) If the driver “Video-208PCI Series, NVIDIA GeForce4 MX4000”...
- Page 21 Autorun feature brings-up the “Welcome Screen”, and you may point to “display driver”, then press on it. Microsoft InstallShield Wizard has preparing its setup, please wait until it completes.
- Page 22 Click on “Next” to continue. Scroll down and Select on the “Video-208PCI Series, NVIDIA GeForce4 MX4000”, then click on “OK” for next screen.
-
Page 23: Windows 2000 Driver Installation
Windows system will transmit all driver files from source media to your local hard disk, please wait until the process has completed. Click on “Finish” to restart your computer, the new display driver will be in place after Windows boots-up. ... - Page 24 Check [Search for a suitable driver for my device (recommended)] then select [Next]. Insert the Software’s CD. Check [Specify a location:] Under [Copy manufacturer’s files from:] enter D:\WIN2K&XP, where D is your CD_ROM drive. Then click on [OK]. Select [Next] to install “Video-208PCI Series, NVIDIA GeForce4 MX4000”...
- Page 25 Autorun feature brings-up the “Welcome Screen”, and you may point to “display driver”, then press on it. Microsoft InstallShield Wizard has start loading its setup process, please wait until it has completed.
- Page 26 Click on “Next” to continue the process. Click on “Yes” to continue the installation. Otherwise, you may terminate the process by click on “No”.
-
Page 27: Windows Xp Driver Installation
Click on “Finish” to restart your computer, the new display driver will be in place after Windows boots-up. Windows XP Driver Installation Upgrade video adapter to an existing system. (Windows has been pre-loaded) Select [Next] at Found New Hardware Wizard. Check [Search for a suitable driver for my device (recommended)] then select [Next]. - Page 28 InstallShield Program: Microsoft Windows® XP detects this new hardware and places the appropriate display driver from its system folder automatically - it doesn’t matter if you have added a new driver or changed the existing one. To maximize the video board acceleration and increase its performance, you may install the manufacturer display driver as follows: Autorun feature brings-up the “Welcome Screen”, and...
- Page 29 Microsoft InstallShield Wizard has start loading its setup process, please wait until it has completed. Click on “Next” to continue the process.
- Page 30 3. Click on “Continue Anyway” to complete the installation. Otherwise, you will terminate the process at this time. Windows system will transmit all driver files from source media to your local hard disk, please wait until the process has completed. Click on “Finish”...
-
Page 31: Technical Assistance
Technical Assistance Frequently Asked Questions (FAQ) Q1 Why do we need 3D graphics capability in our PC? Answer 3D technology is becoming increasingly important (and common) not only in games, but also in other applications such as VRML, which allows 3D scene descriptions in Web applications. 3D technology is used for image editing, modeling, and an increasing number of these are found in home and business applications. - Page 32 data. This results in slower 3D pipeline operations between the CPU and the graphics controller. Q5 If we use powerful CPUs, such as a Pentium™ 200, can a standard 2D graphics card achieve 3D performance? Answer Yes and no. Software rendering can take advantage of "tricks" learned by force of necessity through years of trial and error.
-
Page 33: Pinout And Sync Frequencies
Pinout and Sync Frequencies Analog Color Display Pinouts (DB 15) FUNCTION Red Video 1 Green Video 1 Blue Video 1 Not Used Ground Red Return (ground) Green Return (ground) Blue Return (ground) Vcc (+5v DDC Power) Sync Return (ground) Monitor ID (not used) SDA (DDC support) Horizontal Sync Vertical Sync... -
Page 34: 9-To-15 Pin Conversion Table
Technical Support In the event you have a technical problem with this product, please read the README files in the software CD_ROM. Updated drivers are available through Jaton Web site. Have following information handy when you contact technical support: Name of the product. - Page 35 The information in this document is subject to change in order to improve reliability, design, or function without prior notice and does not represent a commitment on the part of the company. In no event will the company be liable for direct, indirect, special, incidental, or consequential damages arising out of the use or the inability to use the product or documentation, even if advised of the possibility of such damages.
-
Page 36: Limited Warranty
(2) years from manufacturing date. This limited warranty applies only to the original purchaser of Jaton Product and is not transferable. This limited warranty does not apply if failure to the Product Registration, or over thirty (30) days from purchase (original invoice date). -
Page 37: Exclusive Obligation
Terms and Conditions. Direct Jaton Customer: Reseller/ Vendor: This warranty applies only for a period of two (2) years from purchase date of Jaton original invoice. This warranty applies only for a period of two (2) years from manufacturing date. -
Page 38: Services Agreement
Registered User: Others: Services agreement: (1) All applicants shall complete a service request form from Manufacturer. (2) All returned checks will be charged a $20.00 fee by Manufacturer. (3) All repair and replacement services allow 4-6 weeks from the date of receiving by Manufacturer. -
Page 39: Entire Obligation
Entire Obligation. This Limited Warranty states the entire obligation of Manufacturer with respect to the Products. If any part of this Limited Warranty is determined to be void or illegal, the remainder shall remain in force and effect. Some states do not allow limitation of implied warranties, or exclusive or limitation on product incidental or consequential damages, so above limitation may not apply to you. - Page 40 • If you are unsure about installation for a new product, contact your dealer’s service department. We believe it is important for you to know and understand what your warranty coverage provides and what it does not. We also want you to be aware that most hardware warranties only relate to the function of the hardware.
Need help?
Do you have a question about the Video-208PCI-128TV and is the answer not in the manual?
Questions and answers