
Subscribe to Our Youtube Channel
Related Manuals for Kraus KCC-1300


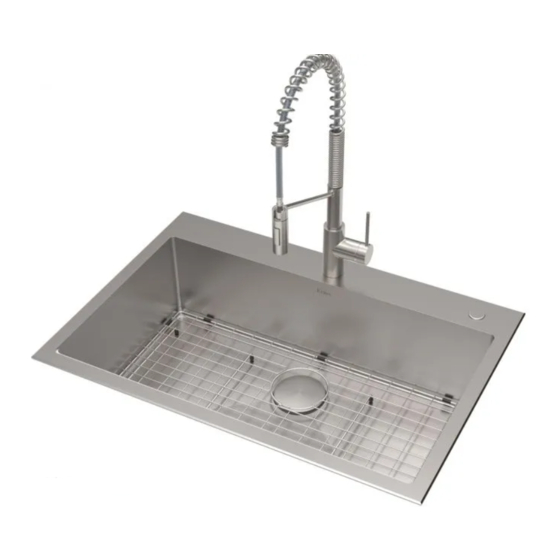
Summary of Contents for Kraus KCC-1300
- Page 1 All-In-One Kitchen Set KCC-1300 www.kraususa.com I Toll Free: 1.800.775.0703 I © 2018 Kraus USA Inc. I REV. December 27, 2018...
- Page 2 Please keep the box and packaging materials until your product is completely installed. If you have any questions, require technical assistance or have any problems with your product: Felicitaciones por la compra de su nuevo accesorio de plomería Kraus! Guarde la caja y los materiales de embalaje hasta que su producto esté completamente instalado. Si tiene alguna pregunta, necesita asistencia técnica o tiene algún problema con su producto:...
- Page 3 Asegúrese de contar con todas las piezas necesarias consultando la lista de piezas y el diagrama. Si falta alguna pieza o se encuentra dañada, póngase en contacto con el servicio de atención al cliente de Kraus al 800-775-0703 para obtener un repuesto.
- Page 4 Cinta métrica Destornillador de estrella (Phillips) Espátula Lápiz Destornillador NOTE: Specialized tools may be necessary to install Kraus Stainless Steel Kitchen sinks with countertop materials other than wood, marble or granite. NOTA: Tal vez requiera de herramientas especializadas Bucket Adjustable Wrench...
-
Page 5: Dimensions / Dimensiones
Kitchen Sink Installation / Instalación de fregadero de cocina Dimensions / Dimensiones: 3 1/2" (88.9mm) 2" (50.8mm) 1 3/8" (35mm) 4 1/2" (114.3mm) 3 1/2" (90mm) 3/8" 30 1/2" (774.7mm) (10mm) 33" (838.2mm) 3/8" (10mm) Model #: KHT400-33 Modelo #: KHT400-33 Sink Dimensions: 33”... - Page 6 Topmount Installation / Instalación de montaje superior Step 1. Position Template / Coloque la plantilla · Check the cut-out template against the actual sink to ensure a proper sized cut-out. · Place the cut-out template in the desired location on the countertop. ·...
- Page 7 Step 3. Cut Countertop / Corte la encimera · Cut the opening in the countertop by carefully following the traced line. · Corte la abertura en la encimera siguiendo cuidadosamente la línea trazada. NOTE: Please use the appropriate saw that best fits your countertop material. NOTA: utilice la sierra adecuada que se adapte mejor a su material de encimera.
- Page 8 Step 4. Attach Mounting Hardware/ Fije los accesorios de montaje · Attach mounting hardware to the prongs protruding from the underside of the sink rim. · Make sure the hooked side of the mounting clip is facing away from the sink. ·...
- Page 9 Step 5. Apply Silicone or Plumber's Putty/ Aplique masilla de silicona o de plomería Clean and dry the surface around the opening of the sink. · · Turn the unit upside down to apply sealant. Apply silicone-based sealant (not included) underneath the edge of the sink.
- Page 10 Step 6. Secure Sink to Countertop/ Asegure el fregadero a la encimera · Insert the sink into the opening, check the alignment of the sink to the cutout in the countertop and press firmly. · Tighten the screws in the front of the sink, followed by the ones in the back and on the sides of the sink. ·...
- Page 11 Step 7. Install Plumbing Fixtures/ Instale los accesorios de plomería · Connect drain to sink. Connect trap to drain. Connect water supply connections to faucet according to manufacturer's instructions. Run water into sink and check for leaks. · · Conecte el desagüe al fregadero. Conecte la trampa al drenaje. Conecte las conexiones de suministro de agua al grifo de acuerdo con las instrucciones del fabricante.
- Page 12 Use tijeras para cortar a lo largo de la línea de la plantilla de papel para el tipo de ranura deseado (negativa, positiva o · al ras) KRAUS Recommended Installation Type / Tipo de instalación recomendada por KRAUS 3/8" Positive Reveal / Ranura positiva de 3/8" Flush/Zero Reveal / Ranura al ras/cero 1/8"...
- Page 13 Step 2. Position template / Coloque la plantilla · Check the cut-out template against the actual sink to ensure a proper sized cut-out. · Place the cut-out template in the desired location on the countertop. · Compare la plantilla de recorte con el fregadero real para asegurar un recorte del tamaño adecuado.
- Page 14 Step 4. Cut Countertop / Corte la encimera · Cut the opening in the countertop by carefully following the traced line. · Corte la abertura en la encimera siguiendo cuidadosamente la línea trazada. NOTE: Please use the appropriate saw that best fits your countertop material.
- Page 15 Step 6. Drill hole in countertop / Taladre el orificio en la encimera · Drill 3/8" diameter x 1/2" deep hole in the countertop. · Taladre un orificio de 3/8 "de diámetro x 1/2" de profundidad en la encimera. Step 7. Install anchors / Instale los anclajes Insert anchors into drilled holes and lightly tap with a hammer until flush.
- Page 16 Step 8. Secure sink to countertop / Asegure el fregadero a la encimera · Use a bead of silicone (or preferred adhesive) around the rim of the sink. Check the alignment of the sink to the cutout in the countertop. Place sink over cutout hole and press firmly.
- Page 17 Step 10. Install Plumbing Fixtures/ Instale los accesorios de plomería · Connect drain to sink. Connect trap to drain. Connect water supply connections to faucet according to manufacturer's instructions. · Run water into sink and check for leaks. · Conecte el desagüe al fregadero. Conecte la trampa al drenaje. Conecte las conexiones de suministro de agua al grifo de acuerdo con las instrucciones del fabricante.
- Page 18 Kitchen Faucet Installation / Instalación de grifos de cocina Diagram and Parts List / Diagrama y lista de piezas Spray Head / Cabezal de aspersión Faucet Body / Cuerpo del grifo Supply Hose / Manguera de suministro Hot & Cold Waterlines / Líneas de agua caliente y agua fría Spray Hose / Manguera de pulverización...
- Page 19 Faucet Dimensions / Dimensiones del grifo 11" 279mm 4 1/4" 9 1/4" 106.5mm 233mm 1 7/8" Ø 48mm 1 3/8" Ø 35mm 9/16-24UNEF-2B Installer Tip / Consejo del instalador Shut off main water supply before installing new faucet / Cierre el suministro de agua principal antes de instalar un nuevo grifo...
- Page 20 Step 1: Install base / Instale la base · Insert base (I) into sink or countertop with “FR↑NT” facing forward. Tighten screws on base (I) with 4mm hex wrench (H2) until base is secure on sink or countertop. · Inserte la base (I) en el fregadero o la encimera con la indicación "FR↑NT"...
Need help?
Do you have a question about the KCC-1300 and is the answer not in the manual?
Questions and answers