
Related Manuals for Kraus KPF-1603CH


Summary of Contents for Kraus KPF-1603CH
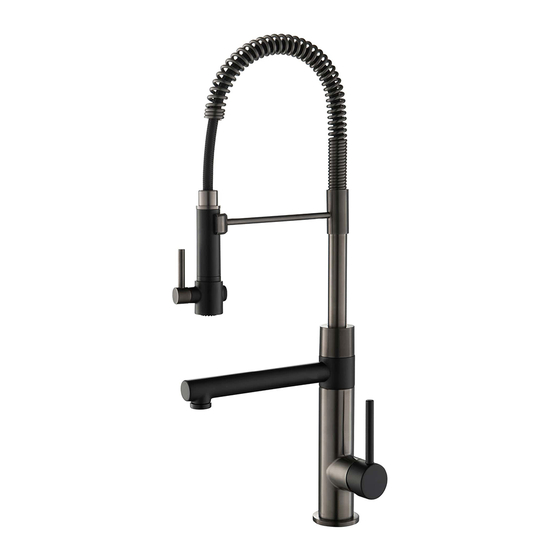
- Page 1 INSTALLATION MANUAL Artec Pro 2 Function Commercial Style Kitchen Faucet KPF-1603 www.kraususa.com Toll Free: 1.800.775.0703 © 2018 Kraus USA Inc. REV. December 10, 2020...
- Page 2 Congratulations on the purchase of your new Kraus plumbing fixture! Please keep the box and packaging materials until your product is completely installed. If you have any questions, require technical assistance or have any problems with your product: STOP DO NOT RETURN TO STORE Please contact our Customer Service Team 1-800-775-0703 / customerservice@kraususa.com...
-
Page 3: Prior To Installation
Prior to Installation: · Make sure you have all necessary parts by checking the diagram and parts list. If any part is missing or damaged, please contact Kraus Customer Service at 800-775-0703 for a replacement. · Turn off the hot and cold water supply at the angle stops and turn on the old faucet to release any built up pressure. - Page 4 Diagram and Parts List Faucet Body B1. Seat B2. Rubber Washer B3. Metal Washer B4. Mounting Nut B5. Screw Hex Wrench...
- Page 5 Faucet Installation Procedure 4 1/8" (106.5mm) 7 1/8" (182.6mm) 6" (153.2mm) 7 5/8" (198.2mm) 2 3/8" 9 3/4" (60mm) (248.2mm) 3/8" Compression Installer Tip: Shut off main water supply before installing new faucet.
- Page 6 Step 1. Remove washer and lock nut Shut off the water supply. Remove the old faucet. Clean the mounting surface. Remove mounting hardware (B) from faucet body (A). Step 2. Install faucet Insert faucet through hole in sink or countertop.From underneath sink, attach the seat (B1), rubber washer (B2), metal washer (B3), and nut (B4).
- Page 7 Step 3. Making the water supply connections Push the quick connector (2) firmly upward and attach it to the receiving block (1). Pull down moderately to ensure the connection has been made. If it is necessary to remove the quick connector (2), squeeze the tabs on the hose and then pull down to disconnect.
- Page 8 Step 5. Flushing and checking for leaks Pull the hose assembly out of the spout and remove the spray head by unscrewing it from the hose in a counterclockwise direction. Be sure to hold the end of the hose down into the sink and turn the faucet on to the warm position where it mixes hot and cold water.
- Page 9 Step 6. Flush faucet To activate the spray mode, simply press the handle (1) located under the spray head.
-
Page 10: Replacement Parts
Replacement Parts Replacement Parts List Finish/Color Part # 1. Spray Head KP27060 CH,SFS,SBBG,SFSB,SFACB, MBSB,BG,SFSMB,BGMB** 2. Magnet KP27061 3. Spray Hose BLBG,BLSFS,BLSB,BLSFACB KP27062* Assembly GRCH,GRSFS,BLSFSB** 4. Spring CH,SFS,BG,SB,SFACB,SFSB** KP27063 5. Inverter KP27080 KP27064 6. Spray Support CH,SFS,SBBG,SB,BG, Assembly SFSMB,BGMB,SFACB,SFSB** CH,SFS,BG, 7. Spout Nut KP27065 MB,SB,SFACB,SFSB** 8. -
Page 11: Troubleshooting
Troubleshooting If you have followed the instructions carefully and your faucet still does not work properly, take the following corrective steps: PROBLEM CAUSE ACTION Leakage under the handle Bonnet nut (12) has come loose Remove the index (14.3). Loosen set screw (14.2) with hex wrench (14). - Page 12 Any product reported to the authorized dealer or to Kraus as being defective within the warranty period will be repaired or replaced with a product of equal value at the option of Kraus. This warranty extends to the original owner or end-user, and is not transferable to a subsequent owner.
- Page 13 This warranty gives you specific legal rights, and you may also have other rights which vary from state to state. KRAUS USA has the right to change, modify, and/or update the warranty policy at any time. For the latest, most up to date comprehensive warranty, go to www.kraususa.com/warranty...
- Page 14 IMPORTANT Register Your Kraus Product Activate Your Warranty Access Premium Customer Support Get Product Information REGISTER TODAY http://www.kraususa.com/registration www.kraususa.com...
Need help?
Do you have a question about the KPF-1603CH and is the answer not in the manual?
Questions and answers