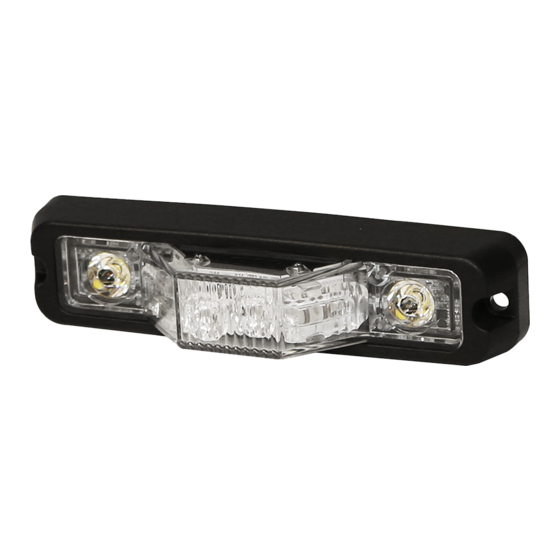
Ecco ED3777 Series Assembly, Installation And Operation Instructions

Ecco ED3777 Series Assembly, Installation And Operation Instructions

Led directionals

Advertisement

Quick Links

IMPORTANT! Read all instructions before installing and using. Installer: This manual must be delivered to the end user.
WARNING!
Failure to install or use this product according to manufacturer's recommendations may result in property damage, serious injury, and/
or death to those you are seeking to protect!
Do not install and/or operate this safety product unless you have read and understood the safety information
contained in this manual.
1.
Proper installation combined with operator training in the use, care, and maintenance of emergency warning devices are essential to
ensure the safety of emergency personnel and the public.
2.
Emergency warning devices often require high electrical voltages and/or currents. Exercise caution when working with live electrical
connections.
3.
This product must be properly grounded. Inadequate grounding and/or shorting of electrical connections can cause high current arcing,
which can cause personal injury and/or severe vehicle damage, including fire.
4.
Proper placement and installation is vital to the performance of this warning device. Install this product so that output performance of
the system is maximized and the controls are placed within convenient reach of the operator so that they can operate the system without
losing eye contact with the roadway.
5.
Do not install this product or route any wires in the deployment area of an air bag. Equipment mounted or located in an air bag
deployment area may reduce the effectiveness of the air bag or become a projectile that could cause serious personal injury or death.
Refer to the vehicle owner's manual for the air bag deployment area. It is the responsibility of the user/operator to determine a suitable
mounting location ensuring the safety of all passengers inside the vehicle particularly avoiding areas of potential head impact.
6.
It is the responsibility of the vehicle operator to ensure daily that all features of this product work correctly. In use, the vehicle operator
should ensure the projection of the warning signal is not blocked by vehicle components (i.e., open trunks or compartment doors),
people, vehicles or other obstructions.
7.
The use of this or any other warning device does not ensure all drivers can or will observe or react to an emergency warning signal.
Never take the right-of-way for granted. It is the vehicle operator's responsibility to be sure they can proceed safely before entering an
intersection, drive against traffic, respond at a high rate of speed, or walk on or around traffic lanes.
8.
This equipment is intended for use by authorized personnel only. The user is responsible for understanding and obeying all laws
regarding emergency warning devices. Therefore, the user should check all applicable city, state, and federal laws and regulations. The
manufacturer assumes no liability for any loss resulting from the use of this warning device.
SPECIFICATIONS
Size:
4.3"L x 0.9"W x 1.4"H
Weight:
0.3 lbs.
Voltage Range:
12-24VDC
Current draw at 12.8VDC:
ED3777X:
1.3A Max.
ED37777XX: 1.4A Max.
Prior to installation:
Carefully remove the unit from its packaging. If damage is found, contact the transit company or ECCO. Do not use broken or
damaged parts. Prior to mounting, consideration should be given to cable location.
Installation and Operation Instructions
ED3777 Series LED Directionals
Power Consumption at 12.8 VDC:
ED3777X:
ED3777XX: 16.9W Max.
Temperature Range:
Flash Rate:
15.6W Max.
-22° to 122°F
-30° to 50°C
See Flash Pattern Charts
Page 1 of 6

Advertisement

Table of Contents
loading

Summary of Contents for Ecco ED3777 Series

  • Page 1 See Flash Pattern Charts Prior to installation: Carefully remove the unit from its packaging. If damage is found, contact the transit company or ECCO. Do not use broken or damaged parts. Prior to mounting, consideration should be given to cable location.
  • Page 2: Mounting Instructions

    Mounting Instructions: Caution: When drilling into any vehicle surface, make sure the area is free from any electrical wires, fuel lines, vehicle upholstery, etc. that could be damaged 1. Select a flat mounting surface with the visibility of the flash and ease of wiring access taken into consideration.
  • Page 3 Wiring Instructions: Important! This unit is a safety device and it must be connected to its own separate, fused power point to assure its continued operation should any other electrical accessory fail. Wire as shown in FIGURE 1. All wiring should be a minimum of 20 AWG. The positive line must have a slow blow 3 amp fuse. Routing the ground wire directly back to negative battery terminal is recommended.
  • Page 4: Pattern Mode

    Synchronization: The directional is capable of syncing with other compatible ECCO products by setting the desired flash pattern on each unit individually. It is also strongly recommended that the same rate and style of flash pattern be used on all synced units to produce the most effective warning pattern.
  • Page 5 DUAL COLOR Flash Pattern Chart/COLOR DOBLE Tabla de patrones de destello/BICOLORE Tableau des effets clignotants MODE 1 MODE 2 MODE 1 Color 1 & Color 3 SAE J595 SAE J845 CA T13 ECE R65 PATTERN Color 1 & Color 3 Color 2 &...
  • Page 6: Exclusion Of Other Warranties

    833 West Diamond St, Boise, Idaho 83705 Customer Service USA 800-635-5900 UK +44 (0)113 237 5340 | AUS +61 (0)3 63322444 ECCOESG.com An ECCO SAFETY GROUP™ Brand ECCOSAFETYGROUP.com © 2016 ECCO, Inc. All rights reserved. 920-3777-00 Rev. H Page 6 of 6...
  • Page 7 Instrucciones de Instalación y Operación ED3777 Luz de Advertencia ¡IMPORTANTE! Lea todas las instrucciones antes de instalar y utilizar. Instalador: Este manual se debe entregar al usuario final. ¡ADVERTENCIA! Si no sigue las instrucciones del fabricante a la hora de instalar o usar el producto, pueden producirse daños materiales, y lesiones graves o incluso mortales a aquellos que pretende proteger! No instale ni opere este producto de seguridad, a menos que haya leído y comprendido la información de seguridad contenida en este manual.
  • Page 8 Ensamblaje: Ensamblaje en la superficie Ensamblaje adhesivo Superficie de MOUNTING ensamblaje SURFACE Superficie de MOUNTING ensamblaje SURFACE Ensamblaje en el borde Ensamblaje permanente Alambre: ED3777 ROJO: Positivo (se necesita añadir un fusible 2A) Cable: ED3777XX NEGRO: Negativo AZUL: Conmutación de patrones ROJO: Positivo, Colores 1 y 3 (se necesita añadir un fusible 5A) AMARILLO: Función sincronizada BLANCO: Positivo, Colores 2 y 4 (se necesita añadir un fusible 5A)
  • Page 9: Detección Y Resolución De Problemas

    833 West Diamond St, Boise, Idaho 83705 Servicio Al Cliente EE.UU. 800-635-5900 Reino Unido +44 (0)113 237 5340 | AUS +61 (0)3 63322444 ECCOESG.com An ECCO SAFETY GROUP™ Brand ECCOSAFETYGROUP.com © 2016 ECCO, Inc. Todos los derechos reservados. 920-3777-00 Rev. H Página 3 de 3...
  • Page 10 Instructions d'installation et d'utilisation ED3777 Éclairage d'avertissement IMPORTANT! Lisez toutes les instructions avant d’installer et d’utiliser le produit. Installateur : ce manuel doit être remis à l’utilisateur final. AVERTISSEMENT! Le non-respect des recommandations du fabricant au cours de l’installation ou de l’utilisation de ce produit peut entraîner des dommages matériels et causer à...
  • Page 11: Montage

    Montage : Montage en surface Fixation adhésive Surface de MOUNTING montage SURFACE Surface de MOUNTING montage SURFACE Montage permanent Montage de bord Câblage : ED3777 ROUGE : Positif (besoin d’ajouter un fusible 2A) NOIR : Négatif Câblage : ED3777XX BLEU : Commutation de configuration JAUNE : Fonction synchronisée ROUGE : Positif, couleurs 1 et 3 (besoin d’ajouter un fusible 5A) (Jusqu'à...
  • Page 12: Dépannage

    833 West Diamond St, Boise, Idaho 83705 Le Service Client États-Unis 800-635-5900 Royaume-Uni +44 (0)113 237 5340 | AUS +61 (0)3 63322444 ECCOESG.com An ECCO SAFETY GROUP™ Brand ECCOSAFETYGROUP.com © 2016 ECCO, Inc. Tous droits réservés. 920-3777-00 Rev. H Page 3 sur 3...

Table of Contents