Table of Contents
Advertisement
USER MANUAL
DIGITAL COLOR WEATHER STATION WITH
(Please Keep the Manual for Maintenance)
Thank you for purchasing BALDR digital color weather station.
To ensure a better user experience, please read the user manual
carefully. Any questions about our product, please feel free to
contact us via:
Email:
baldrservice@baldr.com
MODEL: B0359WST2H2PR-V2
(US VERSION)
BAROMETRIC PRESSURE
DRY
GOOD
HUMID
DRY
GOOD
HUMID
USA Tel.:
1-833-381-5659
Advertisement
Table of Contents

Related Manuals for BALDR B0359WST2H2PR-V2


Summary of Contents for BALDR B0359WST2H2PR-V2
- Page 1 (Please Keep the Manual for Maintenance) GOOD HUMID GOOD HUMID Thank you for purchasing BALDR digital color weather station. To ensure a better user experience, please read the user manual carefully. Any questions about our product, please feel free to contact us via: Email: USA Tel.:...
-
Page 2: Table Of Contents
CONTENTS 1. PRODUCT OVERVIEW 1.1 Weather Station (Main Unit) 1.2 Outdoor Sensor 1.3 Button Introduction 1.4 Package Includes 2. QUICK SET-UP GUIDE 2.1 Power Up 2.2 WWVB Signal Receiving 2.3 Manual Setting 3. ALARM AND SNOOZE FUNCTION 3.1 Alarm Time Setting 3.2 Alarm ON/OFF Setting 3.3 Snooze Function 4. -
Page 3: Product Overview
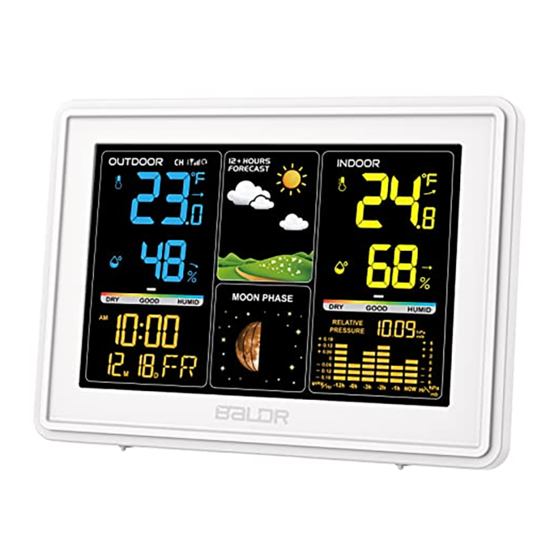
1. PRODUCT OVERVIEW 1.1 Weather Station (Main Unit) GOOD HUMID GOOD HUMID 1. Outdoor temperature and humidity 2. Max/Min records of outdoor temperature and humidity 3. Indoor temperature and humidity 4. Arrow trends 5. Max/Min records of indoor temperature and humidity 6. - Page 4 9. Barometric history for the past 12 hours 10. Calendar display Weekdays in 7 languages 11. Current time 12/24 hour format optional 12. Frost-point warning 13. High/Low temperature alerts 14. Low battery indication 15. Moon phase 16.“ ” button 17.“ SET ” button Enter manual setting 18.“...
-
Page 5: Outdoor Sensor
Positive pole Pick out WARNING: THIS PRODUCT CONTAINS A BUTTON-CELL BATTERY. IF SWALLOWED, IT COULD CAUSE SEVERE INJURY OR DEATH IN JUST 2 HOURS. SEEK MEDICAL ATTENTION IMMEDIATELY IF INGESTED. 1.2 Outdoor Sensor 1.Signal light 2. Hanging hole 3. Battery compartment 4. -
Page 6: Button Introduction
1.3 Button Introduction BUTTONS FUNCTIONS Normal Mode: PRESS AND HOLD for 3 seconds to enter Manual Setting. Normal Mode: PRESS to check alarm time, turn ON/OFF alarm. PRESS AND HOLD for 3 seconds to enter into alarm setting. Normal Mode: PRESS to switch channel from CH1, CH2, CH3, or Circular Channels Mode “... -
Page 7: Package Includes
1.4 Package Includes Following contents are included in the package: 1 x Weather Station Main Unit 1 x Outdoor Sensor (not included 2 x AA batteries) 1 x AC Adapter 1 x CR2032 Cell Battery 1 x User Manual 2. QUICK SET-UP GUIDE Note: Please use high quality alkaline or lithium batteries for the best product performance. -
Page 8: Wwvb Signal Receiving
Notes: 1.Make sure the main unit and sensor are in the same channel for synchronizing data. 2.The main unit channel setting order is CH1--CH2--CH3--Circular Channels Mode “ ”(from CH1 to CH2 to CH3, 5 seconds intervals). 3.If the signal receiving time exceeds 3 minutes, you need to press and hold the “▲/ CH ”... -
Page 9: Manual Setting
(2) Make sure the time zone is correct (Default time zone is 0) or you can set the time zone by 2.3 Manual Settings → Settings Menu Orders → refers to point 4. (3) When receiving RCC signal, please keep the weather station close to the window or receive RCC signal outdoors to enhance the signal reception. - Page 10 Language Sunday Monday Tuesday Wednesday Thursday Friday Saturday 2. Press “ SET ” button to turn ON/OFF RCC function. Default setting: ON. Press “▲/CH” or “ ▼/RCC ” button to select OFF or ON. 3. Press “ SET ” button to select DST ON/OFF. Default setting: ON.
- Page 11 5. Press “ SET ” button to select 12/24H Time Format. Default setting: 12 H. Press the “▲/CH” or “ ▼/RCC ” button to select 12H or 24H. 6. Press “ SET ” button to select Hours. Press “▲/CH” or “...
-
Page 12: Alarm And Snooze Function
3. ALARM AND SNOOZE FUNCTION 3.1 Alarm Time Setting 1. Press and hold“ ”button to enter into alarm time setting. 2. Press “▲/CH” or “ ▼/RCC ” button to adjust data, press and hold “▲/CH” or “ ▼/RCC ” button will quickly change the value by 8 steps. -
Page 13: Temperature & Humidity Max And Min Records
4. TEMPERATURE & HUMIDITY MAX AND MIN RECORDS 1. Press “MEM” button to check maximum temperature and humidity, the value will display for 5 seconds. 2. Press “MEM” button second time to check the minimum temperature and humidity, the value will display for 5 seconds. 3. -
Page 14: Temperature Alerts Setting
3. Setting orders: Outdoor High Temperature Alert→ Outdoor Low Temperature Alert→ Indoor High Temperature Alert → Indoor Low Temperature Alert→ Exit. Default setting: High Temperature Alert: 35 ℃(95℉), Low Temperature Alert: 10 ℃(50℉). 4. Temperature alerts symbol will display on screen after alerts turned on. -
Page 15: Weather Forecast
7. WEATHER FORECAST The weather forecast icon will be shown after power on. There are 5 kinds of weather modes: Sunny, Partly Cloudy, Cloudy, Rainy, Snowy. The weather icon displays are based on the hourly calculation of indoor/outdoor temperature & humidity and barometer data. -
Page 16: Comfort Level Indicator
9. COMFORT LEVEL INDICATOR The main unit indicates indoor/outdoor comfort in 5 levels according to the humidity values. Display GOOD HUMID GOOD HUMID GOOD HUMID GOOD HUMID GOOD HUMID TOO DRY: DRY: GOOD: WET: TOO WET: Humidity 1~25% 26~39% 40~75% 76~83% 84~99% 10. -
Page 17: Adjustable Backlight
12. ADJUSTABLE BACKLIGHT After powering on, touch “ ” button to adjust the • brightness of the backlight. Backlight brightness can be adjusted from 10%, 50%, 100% • and off. 13. LOW BATTERY INDICATOR About Outdoor Sensor: When battery indicator shows next to •... - Page 18 2. Keep well-ventilated and leave a certain space of gap between the sensor and the wall to avoid blocking the vent of the sensor. 3. Place the sensor at a height about 1.2-2.5 meters/3.93-8.20 feet vertically. ≥ 2m 4. Place the sensor near the main unit. Avoid thick walls between the units or or strong interference source using same signal frequency (433MHz), such as TVs, microwaves, computers, etc.
-
Page 19: Trouble Shooting
Note: Allow the main unit and the sensor together at the same position for 30 minutes to establish a strong connection. 15. TROUBLE SHOOTING Problem Possible Solution Press and hold the "▲/CH " button for 5-6 seconds to Outdoor reading reconnect the sensor ( (Please switch the channel of the is flashing or out door sensor to CH1). -
Page 20: Factory Settings
You can press and hold the “▼/RCC ” button to exit RCC suddenly receiving. If your BALDR product does not operate properly after trying the troubleshooting steps, please contact the seller on your order page or shoot an email to: baldrservice@baldr.com 16. -
Page 21: Specifications
5.Insert the batteries into the sensor within 3 minutes and make sure the channel fix at CH1, then place the sensor vertically on the table. 6.Insert the CR2032 battery. 7.Put them together for 30 minutes to create a strong connection. 17. -
Page 22: Precautions
18. PRECAUTIONS • Do not clean any part of the product with benzene, thinner or other solvent chemicals. When necessary, clean it with a soft cloth. • Never immerse the product in water. This can cause electrical shock and damage the product. •... -
Page 23: Warranty
19. WARRANTY Dear customer, Thank you for choosing BALDR. We provide 1-year limited warranty on this product from the date of purchase. This product has undergone thorough quality inspection at the factory to ensure that the product is in good condition. We will remedy all defects in workmanship or materials within the warranty period. -
Page 24: Fcc Statement
20.FCC STATEMENT This device complies with part 15 of FCC rules. Operation is subject to the following two conditions: 1- This device may NOT cause harmful interference, and 2- This device must accept any interference received, including interference that may cause undesired operation. WARNING: Changes or modifications to this unit not expressly approved by the party responsible for compliance could void the user’s authority to...
Need help?
Do you have a question about the B0359WST2H2PR-V2 and is the answer not in the manual?
Questions and answers