BALDR B0359WST4H4PR User Manual
Wireless color weather station with 3 remote sensors
Hide thumbs
Also See for B0359WST4H4PR:
- User manual (21 pages) ,
- Quick setup manual (6 pages) ,
- User manual (97 pages)
Table of Contents
Advertisement
Available languages
Available languages
USER MANUAL
WIRELESS COLOR WEATHER STATION
WITH 3 REMOTE SENSORS
inHg
mmHg
hPa mb
We thank you for your purchase of Baldr wireless color
weather station with 3 remote sensors.It has been designed
and constructed using innovative components and techniques
to enable the perfect display. Please read the instructions
carefully to become familiar with the properties and functions
before you use the unit.
For the start-up of this device:
Main unit by Ac adaptor (included) and 1x CR2032 (included)
Sensor by 6 x AA batteries (not included)
MODEL:B0359WST4H4PR
(US VERSION)
1
Advertisement
Table of Contents

Related Manuals for BALDR B0359WST4H4PR


Summary of Contents for BALDR B0359WST4H4PR
- Page 1 WITH 3 REMOTE SENSORS inHg mmHg hPa mb We thank you for your purchase of Baldr wireless color weather station with 3 remote sensors.It has been designed and constructed using innovative components and techniques to enable the perfect display. Please read the instructions carefully to become familiar with the properties and functions before you use the unit.
-
Page 2: Main Unit
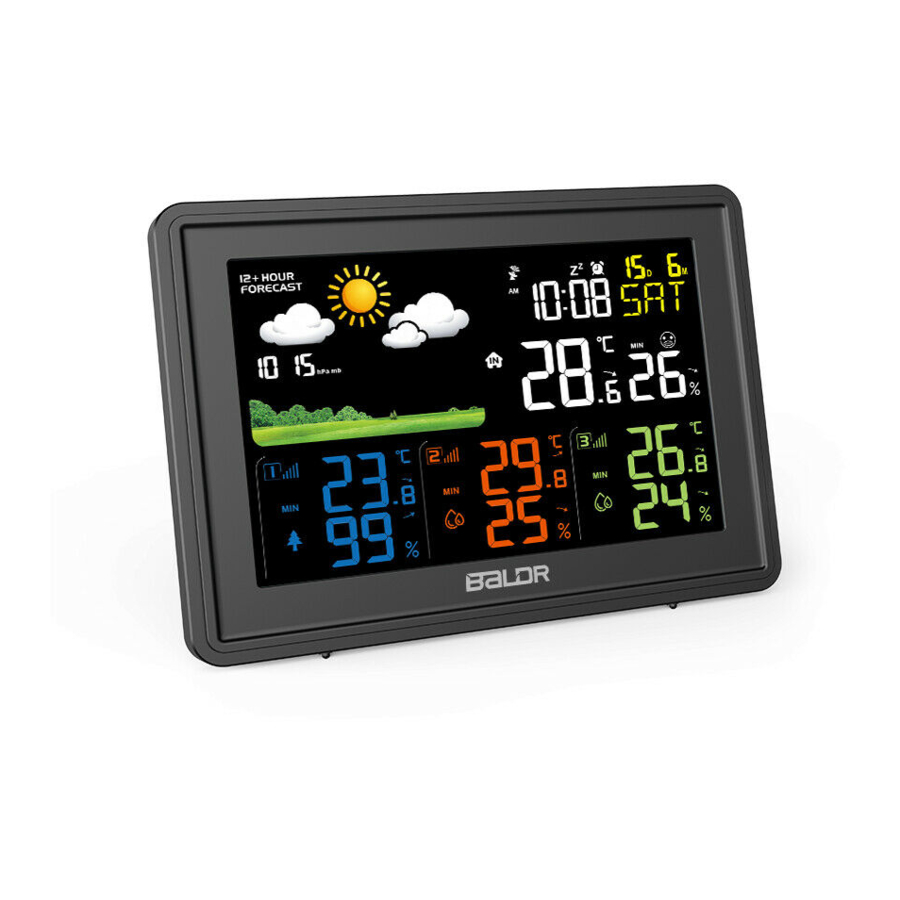
OVERVIEW MAIN UNIT inHg mmHg hPa mb 1. Temperature and humidity of channel 1/2/3 2. Max/min record of channel 1/2/3 3. Indoor temperature and humidity 4. Max/min record of indoor temperature and humidity 5. Three comfort level indication... - Page 3 13. “ CH ” button 6. Weather forecast Clear sensors data and Weather forecast for next re-registration 12-24 hours 7. Barometric pressure 14. “ ▲/RCC ” button Switch C/F, RCC function or Barometer display in mmHg, increase the data inHg or hPa/mb 15.
-
Page 4: Outdoor Sensor
Positive pole Pick out OUTDOOR SENSOR 1. Signal light 2. Hanging hole 3. Battery compartment 4. Channel 1-2-3 switch... -
Page 5: Package Content
3 x Remote Sensors 1 x AC Adaptor 1 x CR2032 Cell Battery 1 x User Manual GETTING START BALDR recommends high quality alkaline or lithium batteries for the best product performance. Heavy duty or rechargeable batteries are not recommended. -
Page 6: Sensor Installation
MAIN UNIT INSTALLATION Remove the cell battery’s Insulating strip ,then plug the adaptor to a powered outlet. SENSOR INSTALLATION 1. Remove the battery compartment cover; 2. Insert 2 x AA batteries in each sensor matching the polarity (+and-); 3. Replace the battery cover. SENSOR SETUP ●... - Page 7 Pressure Unit Weekday Display Time Date Format Display Date Language 12:00 AM inHg June 15. 2020 (12H format) Temperature Unit RCC Function Zone Alarm Time Function 0:00 Alarm OFF ℉ Barometer Calibration ● After power on, the pressure reading will be flashing for 10 seconds.
- Page 8 Meanwhile, the backlight brightness will automatically adjust to 3% (default brightness: 100%). 2. Once signal received, the main unit will display the received time/month/date/weekday. 3. Daily RCC signal receiving: there are regular radio signal receiving at UTC 7:00, 8:00, 9:00, 10:00, 11:00 each day. It starts receiving signal at 7:00 everyday.
- Page 9 3. Press “ SET ” to select Weekday Language. Default setting :ENG. Press the“▲/RCC” or “ ▼ ” button to select languages: ENG、GER、ITA、FRE、DUT、SPA、DAN optional . (English/German/Italian/French/Dutch/Spanish/ Danish) *Tips: press and hold “▲/RCC” or “ ▼ ” button will quickly change the value by 8 steps. 4.
-
Page 10: Alarm Function
Time Zone Atlantic Eastern Central Mountain Pacific Alaskan Hawaiian 13. Press “ SET ” to select DST ON/OFF. Default setting : ON. Press “▲/RCC” or “ ▼ ” button to select DST ON if you do observe Daylight Saving Time. DST symbol display: a. -
Page 11: Snooze Function
3. The setting order is: Hour → Minute→ Exit. 4. During setting, touch top button to save and exit setting. 5. During setting, if no operation for 10 seconds, it will automatically save and exit setting. 6. The alarm is default ON after setting the alarm time. Alarm symbol will display on screen. - Page 12 OPERATION GUIDELINES MAX AND MIN RECORD 1. Press “MEM” button to check maximum temperature and humidity, the value will display for 5 seconds. 2. Press “MEM” button second time to check the minimum temperature and humidity, the value will display for 5 seconds.
- Page 13 will display when the reading increase by 1.8℉ within one hour or compared with last reading. will display when the reading decrease by 1.8℉ within one hour or compared with last reading. 5. Accuracy: ±1.8℉. Temperature resolution is 0.1℉(0.1 ℃). 6.
-
Page 14: Weather Forecast
COMFORT LEVEL INDICATOR Display COMFORT Humidity DRY 1%- 39% WET 71%-99% 40%-70% RF RE-REGISTRATION ●Press and hold the "CH" button to clear all sensors data and start receiving signal again. WEATHER FORECAST ● The weather forecast icon will show after power on. There are 5 kinds of weather modes: Sunny, Sunny To Cloudy, Cloudy, Rainy, Stormy. -
Page 15: Troubleshooting
● About Cell Battery in Main Unit: The CR2032 cell battery is only for memorizing the setting during sudden power outage. When battery indicator shows next to your indoor temperature, replace battery. TROUBLE SHOOTING Problem Possible Solution Outdoor reading Flashing of the outdoor reading is is flashing or generally an indication of wireless showing dashes... - Page 16 “LL.L” will display on screen for indication. If your BALDR product does not operate properly after trying the troubleshooting steps, please contact the seller on your order page or shoot an email to: service@baldr.com.
- Page 17 PLACEMENT INSTRUCTION BALDR sensors are sensitive to surrounding environmental conditions. Proper placement of both the main unit and outdoor sensor are critical to the accuracy and performance of this product. Main Unit Placement Place main unit in a dry area free of dirt and dust. To help ensure an accurate indoor temperature measurement, be sure to place the Main unit away from heat sources or vents.
- Page 18 ● Please do not use other electrical products such as headphones or speakers operating on the same signal frequency. ● Neighbors using electrical devices operating on the same signal frequency can also cause interference. PRECAUTIONS ● Do not clean any part of the product with benzene, thinner or other solvent chemicals.
-
Page 19: Warranty
WARRANTY BALDR provides a 1-year limited warranty on this product against manufacturing defects in materials and workmanship. Warranty service can only be performed by our authorized service center. The original dated bill of sale must be presented upon request as proof of purchase to us, or our authorized service center. - Page 20 Nous vous remercions d'avoir acheté la station météorologique couleur sans fil Baldr avec 3 capteurs à distance. Elle a été conçue et construite en utilisant des composants et des techniques innovants pour permettre un affichage parfait. Veuillez lire attentivement les instructions afin de vous familiariser avec les propriétés et les fonctions...
-
Page 21: Vue D'ensemble
VUE D'ENSEMBLE UNITÉ PRINCIPALE inHg mmHg hPa mb 1. Température et humidité du canal 1/2/3 2. Enregistrement max/min du canal 1/2/3 3. Température et humidité intérieures 4. Enregistrement max/min de la température et de l'humidité intérieures 5. Indication des trois niveaux de confort... - Page 22 13. Bouton "CH" 6. Prévisions Effacer les données des météorologiques capteurs et réenregistrer Prévisions météorologiques pour les prochaines 12-24 14. Bouton "▲/RCC " heures Changer de C/F, de fonction 7. Pression barométrique RCC ou augmenter les Affichage du baromètre en données mmHg,inHg ou hPa/mb 15.
- Page 23 comme indiqué sur la figure ci-dessous, puis chargez une nouvelle pile correspondant à celle de polarity(+and-). Pôle positif Choisir OUTDOOR SENSOR 1. Feu de signalisation 2. trou de suspension 3. compartiment à piles 4. interrupteur du canal 1-2-3...
-
Page 24: Caractéristiques
1 x Adaptateur secteur 1 x pile CR2032 1 x Manuel de l'utilisateur DÉMARRAGE BALDR recommande des piles alcalines ou au lithium de haute qualité pour obtenir les meilleures performances du produit. Les piles lourdes ou rechargeables ne sont pas recommandées. -
Page 25: Installation De L'unité Principale
INSTALLATION DE L'UNITÉ PRINCIPALE Retirez la bande isolante de la pile, puis branchez l'adaptateur à une prise de courant. INSTALLATION DES CAPTEURS 1. Retirez le couvercle du compartiment des piles ; 2. Insérez 2 piles AA dans chaque capteur correspondant à polarity(+and-) ;... - Page 26 Unité de Langue de Affichage de Format de la Afficher la pression la semaine l'heure date date 12:00 AM inHg 15 juin 2020 (12H format) Unité de Unité de Fonction Heure de Zone température température l'alarme 0:00 Alarme ℉ désactivée Étalonnage du baromètre ●...
- Page 27 Réception du signal WWVB 1. Après la réception du signal RF, il commencera à rechercher le signal radio pendant 7 minutes avec le symbole de l'antenne qui s'affiche à l'écran,Pendant ce temps, la luminosité du rétroéclairage s'ajustera automatiquement à 3% (luminosité par défaut: 100%). 2.
- Page 28 canaux reçoivent un signal dans les 3 minutes ou si la fenêtre de réception se termine, il entrera dans la fenêtre de réception du signal WWVB. Réception du signal WWVB 1. Après la réception du signal RF, il commencera à rechercher le signal radio pendant 7 minutes avec le symbole de l'antenne qui s'affiche à...
- Page 29 9. Appuyez sur " SET " pour sélectionner la date. Appuyez sur le bouton "▲/RCC" ou " ▼ " pour ajuster la valeur. 10. Appuyez sur " SET " pour sélectionner l'unité barométrique. Réglage par défaut : inHg. Appuyez sur le bouton "▲/RCC" ou " ▼ " pour sélectionner l'unité...
- Page 30 14. Appuyez sur " SET " pour sélectionner Météo. Appuyez sur le bouton "▲/RCC"ou " ▼ " pour sélectionner le temps : Ensoleillé, Ensoleillé à nuageux, Nuageux, Pluvieux ou Orageux en option. 15. Appuyez sur "SET" pour confirmer et quitter. 16.
-
Page 31: Directives De Fonctionnement
Réglage de l'alarme ON/OFF 1. En mode d'affichage de l'heure, appuyez sur la touche " " pour vérifier l'heure de l'alarme. Appuyez deux fois sur la touche " " pour activer ou désactiver l'alarme à l'aide du symbole 2. En mode d'affichage de l'heure de l'alarme, appuyez sur la touche "... - Page 32 2. Appuyez une seconde fois sur le bouton "MEM" pour vérifier la température et l'humidité minimales, la valeur s'affiche pendant 5 secondes. 3. Appuyez une troisième fois sur le bouton "MEM" pour revenir au mode standard. 4. Appuyez et maintenez le bouton "MEM" pour effacer les enregistrements max et min et réactiver la mémoire.
- Page 33 5. Précision : ±1.8℉. La résolution de la température est de 0,1 ℉(0.1℃). 6. Appuyez sur le bouton "▲/RCC" pour passer du degré Celsius au degré Fahrenheit. HUMIDITÉ 1. Après la mise sous tension, l'humidité intérieure s'affiche automatiquement, la lecture est mise à jour toutes les 30 secondes et commence à...
-
Page 34: Prévisions Météorologiques
RF INSCRIPTION À NOUVEAU ●Press et maintenez le bouton "CH" enfoncé pour effacer toutes les données des capteurs et recommencer à recevoir le signal. PRÉVISIONS MÉTÉOROLOGIQUES ● L'icône des prévisions météorologiques s'affiche après la mise sous tension. Il existe 5 types de modes météo : Ensoleillé, Ensoleillé... - Page 35 LE DÉPANNAGE Problème Solution possible La lecture à Le clignotement de la lecture en plein l'extérieur air est généralement un indication clignote ou d'interférence sans fil. montre 1. Apportez le capteur et l'écran à tirets l'intérieur, côte à côte et retirer les piles de chacun.
- Page 36 extérieur. Les unitésdoivent se trouver à moins de 328pieds(100 mètres) l'unde l'autre. 3. Assurez-vous que les deux appareils sont placés à au moins 3pieds (0.9 mètres) detout appareil électronique susceptible deperturber la communication sans fil (tel quetéléviseur, micro-ondes, ordinateur, etc.). 4.
- Page 37 Si votre produit BALDR ne fonctionne pas correctement après avoir essayé les étapes de dépannage, veuillezcontactez le vendeur sur votre page de commande ou envoyez un courriel à :service@baldr.com. INSTRUCTION DE PLACEMENT Les capteurs BALDR sont sensibles aux conditions ambiantes. L'emplacement correct de l'unité principale et du capteur extérieur est essentiel à...
- Page 38 Lignes directrices importantes pour le placement ● La distance entre l'unité principale et l'émetteur doit être d'au moins5 à 6,5 pieds ( 1,5 à 2 mètres) de toute source d'interférence comme les écrans d'ordinateur ou les téléviseurs. ● Pour maximiser la portée sans fil, placez les appareils loin des gros objets métalliques, des murs épais, des surfaces métalliques ou d'autres objets qui peuvent limiter la communication sans fil.
-
Page 39: Garantie
GARANTIE BALDR offre une garantie limitée de 1 an sur ce produit contre les défauts de fabrication du matériel et de la fabrication. Le service de garantie ne peut être effectué que par notre centre de service agréé. - Page 40 BALDR pour la détermination du problème et la procédure de service. Merci pour votre choix des produits BALDR! www.baldr.com service@baldr.com...
Need help?
Do you have a question about the B0359WST4H4PR and is the answer not in the manual?
Questions and answers
I can not open the device to change the CR2032 battery. Even when removing the screw, the flap is held back by the raised screwhole.