Table of Contents
Advertisement
USER MANUAL
WIRELESS COLOR WEATHER STATION
WITH TEMPERATURE ALERTS
We thank you for your purchase of Baldr wireless color
weather station with temperature alerts. It has been designed
and constructed using innovative components and techniques
to enable the perfect display. Please read the instructions
carefully to become familiar with the properties and functions
before you use the unit.
For the start-up of this device:
Main unit by AC adaptor (included) and 1x CR2032 (included)
Sensor by 2 x AA batteries (not included)
MODEL:B0359WST2H2PR
(UK VERSION)
1
Advertisement
Table of Contents

Subscribe to Our Youtube Channel
Related Manuals for BALDR B0359WST2H2PR


Summary of Contents for BALDR B0359WST2H2PR
- Page 1 (UK VERSION) WIRELESS COLOR WEATHER STATION WITH TEMPERATURE ALERTS We thank you for your purchase of Baldr wireless color weather station with temperature alerts. It has been designed and constructed using innovative components and techniques to enable the perfect display. Please read the instructions carefully to become familiar with the properties and functions before you use the unit.
-
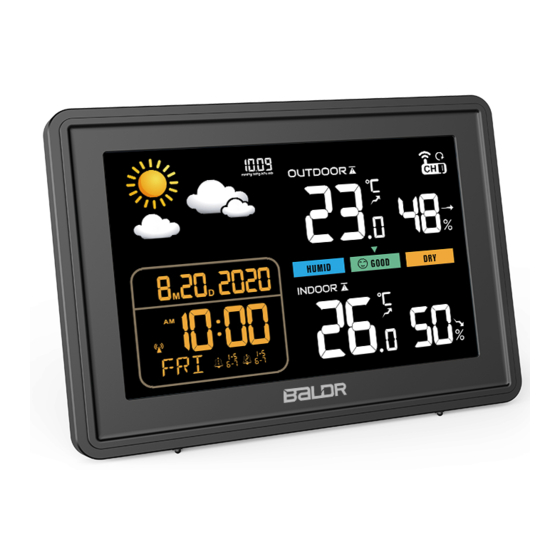
Page 2: Product Overview
PRODUCT OVERVIEW MAIN UNIT 1. Weather forecast Weather forecast for next 12-24 hours 2. Calendar display 3. Weekdays in 7 languages 4. Dual alarm function... -
Page 3: Outdoor Temperature And Humidity
5. Current time 12/24 hour format selectable 6. Indoor temperature and humidity 7. Outdoor temperature and humidity 8. Max/min record of indoor temperature and humidity 9. Max/min record of outdoor temperature and humidity 10. Low battery indication 11. High/ low temperature warning 12. - Page 4 Notes: 1. The default year is 2020, if the weekday display is incorrect . Please confirm year was set correctly. (for manual setting only) 2. The CR2032 cell battery is for memory function (included), Please do not used as power supply. If you need to replace the cell battery, please take out the part device as shown in the figure below, load new battery matching the polarity (+and-).
-
Page 5: Outdoor Sensor
OUTDOOR SENSOR 1. Signal light 2. Hanging hole 3. Battery compartment 4. Channel 1-2-3 switch FEATURES ● MSF radio controlled time ● Up to 3 RF channels for outdoor sensors (only one sensor included) ● Comfort level indication ● Calendar, alarm and snooze function ●... -
Page 6: Package Content
1 x AC Adaptor 1 x CR2032 Cell Battery 1 x User Manual GETTING START BALDR recommends high quality alkaline or lithium batteries for the best product performance. Heavy duty or rechargeable batteries are not recommended. MAIN UNIT INSTALLATION Remove the cell battery’s Insulating strip ,then plug the adaptor... -
Page 7: Sensor Installation
SENSOR INSTALLATION 1. Remove the battery compartment cover; 2. Insert 2 x AA batteries in each sensor matching the polarity (+and-); 3. Replace the battery cover. SENSOR SETUP ● Switch the Channel 1-2-3 of the senor to any channel you want. For example, you can set to Channel 1 for the sensor. -
Page 8: Main Unit Setup
MAIN UNIT SETUP When power on or reset, LCD will full display for 3 seconds with “BI” sound. Then display Indoor temperature and humidity, barometric pressure. The default value is : Weekday Pressure Unit Beep Display Time Date Format Language AM12:00 hPa mb (12H format) - Page 9 MSF Signal Receiving 1. After RF signal receiving, it will start searching radio signal for 7 minutes with the antenna symbol “ ” flashing on screen. Meanwhile, the backlight brightness will automatically turn to 3% brightness (default brightness: 100%). 2. Once signal received, the main unit will display the received time/ month/date/weekday with symbol “...
-
Page 10: Manual Settings
Manual Settings 1. After signal received, if there is no need for other settings, you can just finish reading here. If there is other setting requirements. Please check the following steps. Or if there is no signal received, you can follow bellow steps for Manual Setting. 2. -
Page 11: Alarm Function
11. Press “ SET ” to select the Date. Press “▲/ CH ” or “ ▼/RCC ” button to adjust the value. 12. Press “ SET ” to select 12/24H Time Format. Default setting :24 H. Press the “▲/ CH ” or “ ▼/RCC ” button to select 12H or 24H. 13. -
Page 12: Alarm Time Setting
Alarm Time Setting 1. When in alarm time display mode ,press “ ” button to select alarm mode you want (the selecting order is (1-5)→ (6-7) → (1-5)→ (6-7)), then press and hold “ ” button to enter alarm time setting. 2. - Page 13 OPERATION GUIDELINES MAX AND MIN RECORD 1. Press “MEM” button to check outdoor and indoor max/min temperature and humidity. 2. The checking order is : Max Record→Min Record→Exit. The value will display for 5 seconds. 3. When in Max Record or Min Record display mode. Press and hold the “MEM”...
-
Page 14: Temperature Alerts
5. Accuracy: For temperature between 0°C~50°C,the accuracy is ± 1°C, if out of this range the accuracy will be ± 2°C; Temperature resolution is 0.1°C(0.1°F). 6. Press “SET ” button to select the temperature unit °C/°F (Refer to Manual Settings point 6). TEMPERATURE ALERTS Check and Turn ON/OFF Alerts 1. - Page 15 Temperature Alerts Setting 1. When in time display mode, press and hold “ALERTS ” button to enter temperature alerts setting. The temperature alert value will be flashing. 2. Alerts setting order: Outdoor High Temperature Alert→ Outdoor Low Temperature Alert → Indoor High Temperature Alert →Indoor Low Temperature Alert →...
-
Page 16: Weather Forecast
4. Arrow indication for humidity changes: will display when humidity changes less than 5% RH within one hour or compared with last reading. will display when the reading increase by 5% RH within one hour or compared with last reading. will display when the reading decrease by 5% RH within one hour or compared with last reading. - Page 17 0°C. CALIBRATION Baldr weather stations were calibrated precisely at our manufacturing facility, but if you want the data of this product to be consistent with the reading of the...
-
Page 18: Adjustable Backlight
ADJUSTABLE BACKLIGHT ● After powering on, touch “ ”button to adjust the brightness of the backlight. ● Backlight brightness can be selected from 3%,10%,50%,100% and off. LOW BATTERY INDICATORS ● About Outdoor Sensor: When battery indicator shows next to the outdoor temperature, replace batteries in your outdoor sensor. - Page 19 Problem Possible Solution 1. Reload the batteries of both outdoor sensor and main unit. Please refer to the SENSOR SETUP section. 2. Relocate the main unit and/or the outdoor sensor. The units must be within 100m(328ft) of each other. 3. Make sure both units are placed at least 0.9 m (3 ft) away from No outdoor electronics that may interfere with...
- Page 20 “LL.L” will display on temperature screen for indication. If your BALDR product does not operate properly after trying the troubleshooting steps, please contact the seller on your order page or shoot an email to: service@baldr.com.
- Page 21 PLACEMENT INSTRUCTION BALDR sensors are sensitive to surrounding environmental conditions. Proper placement of both the main unit and outdoor sensor are critical to the accuracy and performance of this product. Main Unit Placement Place main unit in a dry area free of dirt and dust. To help ensure an accurate indoor temperature measurement, be sure to place the Main unit away from heat sources or vents.
- Page 22 PRECAUTIONS ● Do not clean any part of the product with benzene, thinner or other solvent chemicals. When necessary, clean it with a soft cloth. ● Never immerse the product in water. This can cause electrical shock and damage the product. ●...
-
Page 23: Warranty
WARRANTY BALDR provides a 1-year limited warranty on this product against manufacturing defects in materials and workmanship. Warranty service can only be performed by our authorized service center. The original dated bill of sale must be presented upon request as proof of purchase to us, or our authorized service center. - Page 24 service@baldr.com...
Need help?
Do you have a question about the B0359WST2H2PR and is the answer not in the manual?
Questions and answers
Adjustable backlight button is NOT a button at all and unit keeps going dark. How can I keep it lit all the time?
The BALDR B0359WST2H2PR unit stays lit all the time when powered by an AC adapter. The backlight cannot be turned off in this mode.
This answer is automatically generated