Table of Contents
Advertisement
Advertisement
Table of Contents

Related Manuals for Canon SELPHY CP1500


Summary of Contents for Canon SELPHY CP1500
- Page 1 Advanced User Guide CT2-D202-A © CANON INC. 2022...
-
Page 2: Table Of Contents
Contents Introduction..........4 Before Use. - Page 3 Printing from macOS..........80 Printing over a USB Connection.
-
Page 4: Introduction
Introduction • Before Use • Printer and Included Accessories • Ink and Paper (Sold Separately) • Instruction Manuals and SELPHY Photo Layout • Conventions in This Guide • Safety Instructions • Handling Precautions • Installation Location • Part Names... -
Page 5: Before Use
Before Use Images printed with this product are to be used for personal enjoyment. Unauthorized printing of copyrighted material is prohibited. The printer warranty is valid only in the country or area of purchase. In case of printer problems while abroad, return to the area of purchase before contacting a Customer Support Help Desk. -
Page 6: Printer And Included Accessories
Printer and Included Accessories Before use, make sure the following items are included in the package. If anything is missing, contact your dealer. SELPHY Printer Compact Power Adapter Power Cord Paper Cassette Printed matter is also included. Purchase a Color Ink / Paper Set separately. -
Page 7: Ink And Paper (Sold Separately)
Ink and Paper (Sold Separately) For best performance and easier printing, use genuine Canon Color Ink / Paper Sets for SELPHY CP printers. Regular postcards cannot be used with this printer, and ink and paper for the SELPHY ES series, SELPHY SQUARE QX10, or iNSPiC are not compatible. -
Page 8: Instruction Manuals And Selphy Photo Layout
Advanced User Guide Complete instructions are provided in this Advanced User Guide. For the latest Advanced User Guide, refer to the following website. https://cam.start.canon/P001/ SELPHY Photo Layout We recommend using the SELPHY Photo Layout mobile app when printing from a smartphone. -
Page 9: Conventions In This Guide
Conventions in This Guide In this guide, the product is referred to as “SELPHY” or “the printer”. On-screen text or icons are shown in square brackets, as in [ ]. Instructions in this guide apply to the printer under default settings. For convenience, all supported memory cards are simply referred to as “memory card”. -
Page 10: Safety Instructions
Safety Instructions Be sure to read these instructions in order to operate the product safely. Follow these instructions to prevent injury or harm to the operator of the product or others. WARNING Denotes the risk of serious injury or death. Use only power sources specified in this instruction manual for use with the product. - Page 11 CAUTION Follow the cautions below. Otherwise physical injury or property damage may result. Avoid using, placing, or storing the product in the following places: • Places subject to direct sunlight • Places subject to temperatures above 40 °C (104 °F) •...
-
Page 12: Handling Precautions
Handling Precautions Unplug the product from the power outlet when you are not using it. Do not place anything, such as cloth, on top of the product while in use. Leaving the product plugged in for a long period of time may cause it to overheat and distort, resulting in fire. -
Page 13: Installation Location
Installation Location Place the printer on a table or other flat, stable surface. Never place the printer on an unstable or tilted surface. Leave some space open behind SELPHY for paper to emerge temporarily during printing. (1) At least as long as the paper for printing (2) At least 10 cm (4 in.) -
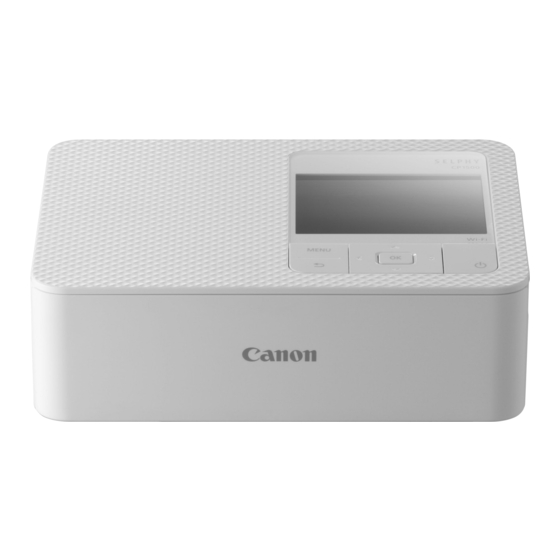
Page 14: Part Names
Part Names Home Screen Image Selection Screen (12) (10) (11) (19) (16) (13) (17) (14) (18) (15) - Page 15 Memory card slot Paper cassette compartment Paper cassette compartment cover Monitor Ink cassette lock Ink cassette compartment Ink cassette compartment cover < > Menu button < > Back button (10) < > Up, < > down, < > left, and < >...
- Page 16 Home Screen Select & Print Select images, specify the print quantity, and print. More print options Print in a variety of ways, such as printing an index or reprinting previously printed images. Shuffle print Print selected images from a memory card together at automatically selected sizes. Setup Set up printing or other printer operation.
- Page 17 Image Selection Screen Multi playback screen Screen displayed when < > is pressed. Enables you to return to the Home screen. Screen displayed when < > is pressed. Switches to single playback screen. Screen displayed when < > is pressed. Shows [Options]. Use <...
- Page 18 Single playback screen Screen displayed when < > is pressed. Shows [Options]. Screen displayed when < > is pressed. Shows a preview screen. Print quantity for the current image. For shuffle printing or ID photos, a check mark is displayed. Total quantity if you have printed other images.
-
Page 19: Preparing Selphy And Printing From Selphy Photo Layout
Preparing SELPHY and Printing from SELPHY Photo Layout This chapter describes how to prepare for printing and connect SELPHY Photo Layout to SELPHY. • Loading the Ink Cassette • Loading the Paper Cassette • Turning the Printer On • Using SELPHY Photo Layout... -
Page 20: Loading The Ink Cassette
Loading the Ink Cassette Check the ink cassette size. Make sure the size of the ink cassette matches the size of paper you will use. Open the ink cassette compartment cover. Load the ink cassette. Insert the ink cassette into the printer in the direction of the arrow on the cassette until it clicks into place. - Page 21 Close the ink cassette compartment cover. Changing ink cassettes If a message indicates that the ink has run out, open the ink cassette compartment cover without turning off the power. Move the lock in the direction shown to remove the ink cassette, and then insert a new ink cassette ( Caution Do not touch the ink sheet.
- Page 22 Note If the ink sheet is loose, turn the sprocket gently to tighten it. For an ink cassette that has a lock on the bottom, press the lock (as shown) to release it as you turn the sprocket to make the sheet taut.
-
Page 23: Loading The Paper Cassette
Loading the Paper Cassette Open the covers. There are two layers of covers. First open the outer cover (①) and then the inner cover (②). - Page 24 Load the paper. Remove the paper cassette paper from the bag, remove any protective sheets from the paper, and load all paper (18 sheets) in the paper cassette. Loading 19 or more sheets may damage the printer or cause malfunction. Holding the paper as shown, load it with the glossy side up.
- Page 25 When making postcard prints with space for a stamp, load the paper with the stamp area facing as shown. Close the inner cover. Close the inner cover firmly until it clicks into place. Leave the outer cover open when printing. Open the paper cassette compartment cover.
- Page 26 Load the paper cassette. Making sure the outer cover is open, insert the paper cassette all the way into the compartment. (It slides about 2 cm (0.8 in.) into the compartment.) Adding paper If a message indicates that the paper has run out, remove the paper cassette without turning off the power.
- Page 27 Caution Never do the following. This may damage the printer or cause malfunction. • Loading paper upside-down, with the glossy and back sides reversed • Bending or separating paper at the perforations before printing • Using label paper whose upper label surface is peeling off or has been partially pulled up •...
-
Page 28: Turning The Printer On
Turning the Printer On Connect the adapter cord to SELPHY. Connect and plug in the power cord. Turn on SELPHY. Hold down < > until “Canon” is displayed, and then release < >. - Page 29 Choose a language. The language selection screen is displayed the first time you turn on the power. Press < >< >< >< > to choose a language. You are now asked about installing SELPHY Photo Layout. If you will use SELPHY Photo Layout, press < >...
-
Page 30: Using Selphy Photo Layout
Using SELPHY Photo Layout Connecting Other Smartphones Install SELPHY Photo Layout on your smartphone and use it to connect to SELPHY. Do this after following the steps in Turning the Printer Install the app. Scan the QR code on the monitor with your smartphone to access the site. - Page 31 Establish a connection. Start SELPHY Photo Layout, choose [SELPHY CP1500] on the printer selection screen, and then follow the instructions displayed. Press < >. After the QR code scanning screen appears in SELPHY Photo Layout, scan the QR code on the monitor.
- Page 32 Caution Never pull out the paper cassette, open the ink cassette compartment cover, or remove a memory card while printing or when you hear printer operation sounds immediately after it has been turned on. This may damage the printer. To cancel printing in progress, always press < >.
- Page 33 Choose [Display Wi-Fi status] and press < >. Scan the QR code with your smartphone.
-
Page 34: Printing From A Memory Card
Printing from a Memory Card This chapter describes how to select and print images on a memory card. • Compatible Cards • Basic Printing (Select & Print) • More Print Options • Shuffle Print • ID Photo... -
Page 35: Compatible Cards
Compatible Cards USB Flash Drives Images You Can Print No adapter required SD memory cards SDHC memory cards SDXC memory cards Adapter required (sold separately) miniSD memory cards miniSDHC memory cards microSD memory cards microSDHC memory cards microSDXC memory cards Caution For memory cards that require an adapter, always insert the card into the adapter before inserting the adapter into the memory card slot. - Page 36 USB Flash Drives Images on commercially available USB Type-C flash drives can be printed the same way as images on memory cards. Remove any inserted memory cards. Insert a USB flash drive as shown. Images You Can Print JPEG images conforming to the Exif standard can be printed with SELPHY. Note Images may not be displayed or printed correctly if they have been edited on a computer, or if the long side exceeds 35000 pixels.
-
Page 37: Basic Printing (Select & Print)
Basic Printing (Select & Print) Options Select images on a memory card and print them as follows. Insert the memory card into the memory card slot. Insert the memory card facing as shown until it clicks into place. To remove the card, push it in until it clicks, and then slowly release it. The [Select &... - Page 38 Choose the print quantity. Press < > or < > to choose the print quantity. To choose another image to print at the same time, press < > or < >, and then choose the print quantity. Press < > to access the [Preview] screen. Print.
- Page 39 Caution Never pull out the paper cassette, open the ink cassette compartment cover, or remove a memory card while printing or when you hear printer operation sounds immediately after it has been turned on. This may damage the printer. To cancel printing in progress, always press < >.
- Page 40 Options On the image selection screen, you can view images by date and crop the selected image. Press < > on the image selection screen. Choose an option and press < >. All [Options] settings are reset when you turn off SELPHY or remove the memory card. Select all Selects all images on a memory card or USB flash drive at once (up to 5,000 images).
- Page 41 Adjust the image area to crop. Each press of < > switches between a mode for moving the crop frame and a mode for rotating or resizing it. Crop frame movement mode To move the crop frame, press < >< ><...
-
Page 42: More Print Options
More Print Options [More print options] on the Home screen offers index printing, reprinting, and other features for images on memory cards or USB flash drives. Insert a loaded paper cassette and an ink cassette in SELPHY ( Choose [More print options] and press < >. - Page 43 Bookmark Print two sets of selected images on a single sheet of L-size or postcard-size paper ( On postcard-size paper, rows of four images are arranged in an area that is 2 in. (1) by 6 in. (2). On L-size paper, rows of three images are arranged in an area that is approx. 1.75 in. (3) by 4.7 in.
- Page 44 Adjust the settings as needed, and then press < >. Choose images. Choose images, each with a print quantity of [1]. For L-size paper, choose up to 3 images, and for postcard-size paper, up to 4. Press < > to access the [Preview] screen. Print.
- Page 45 2-Up Fixed Size Print Two images can be printed together, each at about the size of a card, on one L or postcard- size sheet ( Cut along the cut marks in the corners to trim to card size. Choose [2-up fixed size print] and press < >.
- Page 46 Choose images. Choose two images, each with a quantity of [1]. Press < > to access the [Preview] screen. Print. Press < > to start printing.
- Page 47 Index Print Selected images are printed next to each other in rows. The number of images per sheet varies depending on the paper size. Choose [Index print] and press < >. Choose images. Pressing < > places a check mark in the quantity field. Press <...
- Page 48 Print. Press < > to start printing.
- Page 49 DPOF Print Inserting a memory card with printing information set on a camera will display [DPOF images remain Print images?]. To review the printing information set on the camera, press < >. Print. To adjust the settings displayed, press < >...
- Page 50 Reprint The printer keeps a record of images printed from [Select & Print] and [ID Photo] on the Home screen, as well as [Bookmark], [2-up fixed size print], and [Index print] in [More print options]. Images can be printed again by selecting them from these records. Choose [Reprint] and press <...
- Page 51 Print. Press < > to start printing. Pressing < >< > enables you to set the print quantity. Note The print history is erased when you turn off the printer or remove memory cards or USB flash drives. SELPHY stores up to 10 items in the print history. A record is created for the data of each sheet printed.
-
Page 52: Shuffle Print
Shuffle Print Use [Shuffle print] on the Home screen to arrange images in a variety of sizes on one sheet automatically. Use shuffle print for images on memory cards or USB flash drives as follows. Load an ink cassette and paper cassette (with any paper except card size) in SELPHY Note Shuffle printing is not available for images with an aspect ratio narrower than 3:1. - Page 53 Adjust the settings as needed, and then press < >. To use shuffle print for up to 8 images, set [Max. Images] to [8], and for 9–20 images, set it to [20]. Choose images. Pressing < > places a check mark in the quantity field. Press <...
- Page 54 Print. Press < > to start printing. Pressing < >< > enables you to set the print quantity. Printing is possible even with fewer images than the maximum set in [Max. Images] (8 or 20), and if you choose more images than this, a second sheet is used for shuffle printing.
-
Page 55: Id Photo
ID Photo Images on memory cards or USB flash drives can be printed for use in photo identification from [ID Photo] on the Home screen. Load an ink cassette and paper cassette (with any paper except card size) in SELPHY Choose [ID Photo] and press <... - Page 56 Choose a size. Choose from these three sizes. [Custom] Specify the length of the long and short sides before printing. [Standard] Print a photo that complies with the international ICAO standard. Print two sizes: 50×50 mm (approx. 2.0×2.0 in.) and 45×35 mm [Dual] (approx.
- Page 57 Print. Press < > to start printing.
-
Page 58: Printing Wirelessly From Smartphones Or Cameras
Setting up Wi-Fi on SELPHY • Printing from a Smartphone via AirPrint (iOS) • Printing from a Smartphone via Mopria (Android) • Printing from a Camera • Subsequent Printing Note You can also print using the dedicated Canon PRINT Inkjet/SELPHY app. -
Page 59: Setting Up Wi-Fi On Selphy
Setting up Wi-Fi on SELPHY Set up a direct Wi-Fi connection between smartphones or cameras and SELPHY. Choose [Wi-Fi settings] and press < >. Choose [Connection Settings] and press < >. Choose [Other] and press < >. - Page 60 Choose [Direct Connection] and press < >. Choose [On] and press < >.
- Page 61 Change the password. The current password is displayed. Change the password as needed, and then press < >. Press < > to access the input screen. The screen above is displayed. Connect from your smartphone or camera. Once you complete the [Direct Connection] settings, they can be used for subsequent connections.
-
Page 62: Printing From A Smartphone Via Airprint (Ios)
Choose an image to print in an app on your iPhone or iPad (such as a photo-viewing app), tap [ ], and in the menu options displayed, tap [Print]. Set up printer options. In [Printer], choose [Canon SELPHY CP1500]. Specify the number of copies. Print. Tap [Print] to print. - Page 63 Note During printing, a [Print Center] icon is listed among recently used apps, and you can do the following operations. • To check the status: Tap [Print Center]. • To cancel printing: Tap [Print Center], and then tap [Cancel Printing].
-
Page 64: Printing From A Smartphone Via Mopria (Android)
Choose an image to print in an app on your Android smartphone (such as a photo-viewing app), and then open the printing menu. Set up printing. As the printer, choose [Canon SELPHY CP1500]. Specify the number of copies, paper size, and other details. Print. -
Page 65: Printing From A Camera
Printing from a Camera You can print as follows by connecting the printer to a camera compatible with DPS over IP, the PictBridge standard for Wi-Fi connections. Set up Wi-Fi on SELPHY ( Connect to SELPHY from the camera. In the camera's Wi-Fi menu, select the network name (SSID) shown on SELPHY and enter the password. - Page 66 Note Any date or layout settings made on the camera take precedence over print settings made on SELPHY.
-
Page 67: Subsequent Printing
Subsequent Printing Once you have set up SELPHY for a direct connection, a network name (SSID) is displayed on the bottom of the Home screen. To print after the first connection, select this network name (SSID) on your smartphone or camera. Check the password as follows. - Page 68 Check the password. Press < > to display the password.
-
Page 69: Printing Via Wi-Fi From A Computer
Printing via Wi-Fi from a Computer This chapter describes how to print by connecting SELPHY to your computer via Wi-Fi. Before you can print via Wi-Fi from a computer, the computer with the images to send must be connected to a wireless router. Remove any inserted memory cards or USB flash drives. -
Page 70: Connecting Selphy To A Wireless Router
Connecting SELPHY to a Wireless Router How to connect varies depending on whether the router is WPS-compatible. WPS-Compatible Routers Non-WPS Routers WPS-Compatible Routers Check the router. Confirm that the router is on and ready for communication. Choose [Wi-Fi settings] and press < >. - Page 71 Choose [Other] and press < >. Choose [Via Wireless Router] and press < >. Choose [WPS Connection] and press < >.
- Page 72 Choose [PBC Method] and press < >. On the router, hold down the WPS connection button for a few seconds. For details on where the button is located and how long to press it, check the router user manual. On SELPHY, press < >.
- Page 73 Check the router name. Note If you selected [PIN Method] in step 7, enter the PIN code (shown on SELPHY) on the router, press < > on SELPHY, and go to step 9. For instructions on configuring PIN codes, refer to the router user manual.
- Page 74 Non-WPS Routers Check the router. Confirm that the router is on and ready for communication. Choose [Wi-Fi settings] and press < >. Choose [Connection Settings] and press < >.
- Page 75 Choose [Other] and press < >. Choose [Via Wireless Router] and press < >. Choose [Find wireless routers] and press < >.
- Page 76 Choose a router, and then press < >. Enter the password and press < >. Press < > to access the input screen, and then enter the password of the router selected in step 7. Confirm that SELPHY is now connected, and then press < >.
- Page 77 Check the router name.
-
Page 78: Printing From Windows
×. Steps on the computer Select [Settings] in the Start menu. Select [Devices]. Select [Printers & scanners], and then click [Add a printer or scanner]. Select [Canon SELPHY CP1500], and then click [Add device]. - Page 79 Access the printing dialog box. Start the photo software, select images to print, and access the printing dialog box. As the destination printer, choose [Canon SELPHY CP1500]. Choose printing options. Choose a paper size corresponding to the size of paper and ink cassettes in SELPHY.
-
Page 80: Printing From Macos
Confirm that the router is identified on the bottom of the Home screen, and that the antenna icon has no red ×. Steps on the computer From [System Preferences], open [Printers & Scanners] or [Print & Scan]. Click [+] below the list. Choose [Canon SELPHY CP1500]. Click [Add]. - Page 81 Access the printing dialog box. Start the photo software, select images to print, and access the printing dialog box. As the destination printer, choose [Canon SELPHY CP1500]. Choose printing options. Specify the paper size, orientation, and number of copies. Choose one of these paper sizes.
-
Page 82: Printing Over A Usb Connection
Printing over a USB Connection This chapter describes how to print by connecting SELPHY to a computer or PictBridge (USB) compatible camera with a USB cable. Prepare this kind of USB cable. • Commercially available cable not exceeding 2.5 m (8.2 ft.) •... -
Page 83: Printing From Windows
Select [Devices]. Select [Printers & scanners], and then click [Add a printer or scanner]. Select [Canon SELPHY CP1500], and then click [Add device]. Access the printing dialog box. Start the photo software, select images to print, and access the printing dialog box. - Page 84 Choose printing options. Choose a paper size corresponding to the size of paper and ink cassettes in SELPHY. Also choose bordered or borderless printing as an option with the listed paper sizes. Choose the printing orientation and number of copies, as desired. Print.
-
Page 85: Printing From Macos
From [System Preferences], open [Printers & Scanners] or [Print & Scan]. Click [+] below the list. Choose [Canon SELPHY CP1500]. Click [Add]. Access the printing dialog box. Start the photo software, select images to print, and access the printing dialog box. As the destination printer, choose [Canon SELPHY CP1500]. - Page 86 Choose printing options. Specify the paper size, orientation, and number of copies. Choose one of these paper sizes. Paper Size Description Paper Size L Size 89×119 mm P Size Postcard C Size 54×86 mm Print. Click [Print] to print. To print other images, repeat steps 7–9. Caution Avoid sleep or standby mode on your computer while SELPHY is connected via USB.
-
Page 87: Printing From A Camera
Printing from a Camera By connecting a PictBridge (USB) compatible camera, you can choose images with the camera and print. Use the USB cable to connect SELPHY to the camera. Turn on SELPHY and then the camera, and enter Playback mode. ] icon may be displayed, depending on the camera. -
Page 88: Configuring Settings
Configuring Settings This chapter describes the [Setup] and [Wi-Fi settings] items on the Home screen. • Print Settings • Printer Setup • Other Wi-Fi Settings... -
Page 89: Print Settings
Print Settings Print Finish Borders Page Layout Background Image Optimize Brightness Color Adjustment Filter Smooth Skin Correct Red-Eye Date File Number Print Dots to Prevent Re-use Several print settings for printing from memory cards or USB flash drives can be changed. Settings apply to all relevant printing, so there is no need to complete the settings for each image. - Page 90 Choose [Setup] and press < >. Choose [Print settings] and press < >. Choose an item to change and press < >. Print settings can also be shown on the [Preview] screen. (Settings unavailable for the current printing feature are grayed-out and cannot be adjusted.)
- Page 91 Print Finish By adding a subtle texture to the surface of prints, you can create a less glossy finish. Glossy (default) Prints with a glossy surface finish. Semi-gloss Applies a fine surface pattern, for a less glossy finish. Satin Applies a fine grid-like surface pattern, for a less glossy finish. Borders Print images with or without a border.
- Page 92 Page Layout Choose the number of images per sheet. For Color Ink/Label Set KC-18IL (8 Labels per Page, ), choose [8-up]. 1-up (default) Prints one image per sheet. 2-up Prints two images per sheet. 4-up Prints four images per sheet. 8-up Prints eight images per sheet.
- Page 93 Image Optimize Automatically corrects brightness and contrast to suit each image. On (default) / Off Brightness Adjust image brightness in a range of –3 to +3. Choose larger positive values to make images brighter, or larger negative values to make them darker. Color Adjustment Adjust the level of red, blue, cyan, and yellow (R/B/C/Y) in a range of 0–3.
- Page 94 Filter Choose special color tones to make prints look distinctive, or choose sepia or black-and- white prints. Off (default) - Vivid Images are vivid, with greater contrast and color saturation. Neutral Images are subdued, with less contrast and color saturation. PositiveFilm Images have a vibrant, natural appearance, as produced with positive film.
- Page 95 Date Add camera shooting dates when you print. [Subtle] makes the lettering imperceptible when viewed directly but visible at an angle. Off (default) / Prominent / Subtle Caution To avoid having two instances of the date for images already labeled by the camera, select [Off].
-
Page 96: Printer Setup
Printer Setup Manual/Software URL ID Photo Priority Keep Print Settings Date Format Power Saving Language Several settings that control SELPHY operation can also be changed. The setting is retained even when SELPHY is turned off or memory cards are removed. Choose [Setup] and press <... - Page 97 Choose an item to change and press < >. Manual/Software URL To download an instruction manual, scan the displayed QR code with a smartphone. ID Photo Priority Displays the ID Photo Settings screen ( ) automatically after SELPHY is turned on, when a memory card is inserted, and after printing.
- Page 98 Date Format When adding the date ( ), adjust the date format as needed. yyyy/mm/dd / mm/dd/yyyy / dd/mm/yyyy (default) Power Saving SELPHY turns off automatically if left idle for about five minutes. On (default) / Off Note SELPHY does not turn off automatically in these cases. •...
-
Page 99: Other Wi-Fi Settings
Other Wi-Fi Settings Wi-Fi Confirm Settings Other Settings Reset Settings Entering Information Besides setting up printing via Wi-Fi from [Wi-Fi settings] on the Home screen, you can also check setting information and reset Wi-Fi settings. Choose [Wi-Fi settings] and press < >. - Page 100 Wi-Fi To disable Wi-Fi connections, select [Disable]. Confirm Settings Enables you to check the printer name, IP address, and other details. Other Settings [Set Printer Name] enables you to rename the printer. Press < > to access the input screen, and then enter a new printer name ( Select [IPv4/IPv6 Settings] ►...
- Page 101 Entering Information When entering a printer name, password, or other information, press < > to access the input screen. Entering information Press < >< >< >< > to select a letter, number, or symbol, and then press < >. To enter a space, select [Space], and then press < >.
-
Page 102: Reference
Reference This chapter answers frequently asked questions and provides technical information about SELPHY. • Troubleshooting • Printing Without a Power Outlet • Storing Prints • After Printing • Specifications • Trademarks and Licensing... -
Page 103: Troubleshooting
Troubleshooting Power Screen Printing Paper Wi-Fi Error messages Power Cannot turn on SELPHY Confirm that the power cord is connected and plugged in correctly ( Hold down < > until the startup screen is displayed ( When using a battery pack, confirm that it is charged and inserted correctly. Screen Image selection screen is not displayed With the ID Photo settings screen displayed, press <... - Page 104 Printing Cannot print Confirm that SELPHY is on ( Confirm that the paper and ink cassettes are loaded correctly ( Confirm that the ink sheet is not loose ( Confirm that you are using paper designed especially for SELPHY ( Replace the ink cassette and refill the paper cassette as needed ( Confirm that you are using the correct combination of paper, paper cassette, and ink cassette (...
- Page 105 Cannot print from a computer Confirm that you have installed the printer driver correctly ( Remove any inserted memory cards or USB flash drives. When printing via Wi-Fi, confirm that both SELPHY and the computer are correctly connected to the router ( When printing via USB, confirm that SELPHY is connected directly to the computer with the USB cable ( ).
- Page 106 Printed colors do not match the colors displayed Color is produced in different ways by printers and display devices. Colors may also look different depending on the intensity and color temperature of lighting in the monitor viewing environment, as well as monitor color calibration. Individual images are printed reduced, in only one layout position Change the [Page Layout] setting ( ).
- Page 107 Paper Paper does not fit in the cassette Confirm that the paper is the same size as the paper cassette ( Paper feed problems or frequent paper jams occur Confirm that the paper and cassette are inserted correctly ( Confirm that there are less than 19 sheets in the cassette. Confirm that 19 or more prints have not collected on the paper cassette.
- Page 108 Wi-Fi Do not use the printer near sources of Wi-Fi signal interference, such as microwave ovens, Bluetooth devices, or other equipment operating on the 2.4 GHz band. Printer network name (SSID) is not displayed when connecting to a camera or smartphone As the connection method, choose [Direct Connection] ( Keep the printer near the camera or smartphone, without objects between them.
- Page 109 Can connect to router, but cannot print Remove any inserted memory cards or USB flash drives. Printing is not possible when the printer is already printing a job from another device, or when the printer is connected to a camera. Confirm that the camera, smartphone, or computer you are printing from is connected to the same router as SELPHY.
- Page 110 Error messages Error messages indicate problems with SELPHY. When error messages include troubleshooting tips, follow the instructions. If only an error message is displayed, follow the suggestions in “Troubleshooting” ( If the problem persists, contact a Customer Support Help Desk. Note If a problem occurs while SELPHY is connected to another device, an error message may also be displayed on the device.
-
Page 111: Printing Without A Power Outlet
To print where no power outlet is available, use Battery Pack NB-CP2LI (sold separately). A fully charged battery pack provides enough power to print up to about 100 sheets of L-size paper.* * According to Canon testing. May vary depending on printing conditions. Attaching the Battery Pack Charging the Battery Pack Before Use Attaching the Battery Pack Remove the battery pack mounting cover. - Page 112 SELPHY. Note Battery Pack NB-CP2LH (sold separately) is also supported. A fully charged battery pack provides enough power to print up to about 70 sheets of L-size paper.* * According to Canon testing. May vary depending on printing conditions.
- Page 113 Charging the Battery Pack Before Use With the battery attached and the compact power adapter connected, turning SELPHY off starts charging, and [ ] blinks on the screen. Fully charging NB-CP2LI takes about 4 hours (at normal temperatures), after which ] is no longer displayed.
-
Page 114: Storing Prints
When storing prints in an album, choose an album with photo covers made of nylon, polypropylene, or cellophane. Caution Color may change over time or depending on storage conditions. Canon cannot be held liable for discoloration. -
Page 115: After Printing
After Printing Turn off SELPHY ( ) and remove any memory cards or USB flash drives. Unplug the power cord from the outlet and disconnect the adapter plug from SELPHY. If the compact power adapter is still warm, wait for it to cool down before putting it away. -
Page 116: Specifications
Specifications Printing Method Color Ink / Paper Set Printing Speed Monitor External Interface Power Source Dimensions and Weight Operating Environment Wi-Fi Printing Method Printing method Dye-sublimation thermal transfer Printing resolution 300×300 dpi Gradation 256 shades per color... - Page 117 Color Ink / Paper Set Color ink Yellow, magenta, cyan * With overcoating Paper size Postcard size Paper size Paper specifications Before separated at perforations After separated at perforations 100.0×177.0 mm 100.0×148.0 mm Photo paper (3.94×6.97 in.) (3.94×5.83 in.) L size Paper size Paper specifications Before separated at perforations...
- Page 118 Printing Speed (Approx. time, in sec.) Print finish Postcard size L size Card size Glossy Semi-gloss/Satin * Measurement conditions: Room temperature, from the initial yellow printing pass until ejection...
- Page 119 Monitor Type TFT LCD color monitor Screen size 3.5-inch (aspect ratio of 3:2)
- Page 120 External Interface Card slot Insertion Direct insertion SD, SDHC, SDXC memory cards With adapter miniSD, miniSDHC, microSD, microSDHC, microSDXC memory cards * UHS-II is not supported. Applications Printing from memory cards Digital terminal Terminal type USB Type-C Transmission USB 2.0 Applications / connection method Applications Connection method...
- Page 121 Power Source External power source Compact Power Adapter CA-CP300 B Battery pack NB-CP2LI, NB-CP2LH Power consumption Printing 60 W or less Standby 4 W or less Compact Power Adapter CA-CP300 B Rated input 100–240 V AC (50/60 Hz), 0.88 A (100 V)–0.43 A (240 V) Rated output 24 V DC, 1.8 A Operating temperature...
- Page 122 Dimensions and Weight Dimensions Width × Height × Depth 182.2×57.6×133.0 mm (7.17×2.27×5.24 in.) * Including rubber soles Weight Approx. 850 g (Approx. 29.98 oz.) * Printer body only...
- Page 123 Operating Environment Operating temperature 5–40°C (41–104°F) Operating humidity 20–80%...
- Page 124 Wi-Fi Specifications Conforms to IEEE 802.11b/g Frequency 2.4 GHz band Channels 1 to 11 ch Communication modes Simultaneous Communication mode Security protocol connections • WEP* • WPA-PSK (TKIP/AES) • WPA2-PSK (TKIP/AES) Access point connections Connection via Wi-Fi rooter • WPA3-SAE (AES)* * Wi-Fi Protected Setup supported.
-
Page 125: Trademarks And Licensing
Trademarks and Licensing Microsoft and Windows are trademarks or registered trademarks of Microsoft Corporation in the United States and/or other countries. App Store and macOS are trademarks of Apple Inc., registered in the U.S. and other countries. iPhone, iPad and AirPrint are trademarks of Apple Inc. The SDXC, miniSDHC logos are trademarks of SD-3C, LLC. - Page 126 Third-Party Software cURL Curl and libcurl are true Open Source/Free Software and meet all definitions as such. It means that you are free to modify and redistribute all contents of the curl distributed archives. You may also freely use curl and libcurl in your commercial projects. Curl and libcurl are licensed under a MIT/X derivate license, see below.
- Page 127 Definitions "Package" refers to the script, suite, file, or collection of scripts, suites, and/or files distributed by the Copyright Holder, and to derivatives of that Package created through textual modification. "Standard Version" refers to such a Package if it has not been modified, or has been modified in accordance with the wishes of the Copyright Holder.
- Page 128 c) Accompany any non-standard executables with their corresponding Standard Version executables, give the non-standard executables non-standard names, and clearly document the differences in manual pages (or equivalent), together with instructions on where to get the Standard Version. d) Make other distribution arrangements with the Copyright Holder. 5.
- Page 129 THIS SOFTWARE IS PROVIDED BY THE COPYRIGHT HOLDERS AND CONTRIBUTORS "AS IS" AND ANY EXPRESS OR IMPLIED WARRANTIES, INCLUDING, BUT NOT LIMITED TO, THE IMPLIED WARRANTIES OF MERCHANTABILITY AND FITNESS FOR A PARTICULAR PURPOSE ARE DISCLAIMED. IN NO EVENT SHALL THE COPYRIGHT OWNER OR CONTRIBUTORS BE LIABLE FOR ANY DIRECT, INDIRECT, INCIDENTAL, SPECIAL, EXEMPLARY, OR CONSEQUENTIAL DAMAGES (INCLUDING, BUT NOT LIMITED TO, PROCUREMENT OF SUBSTITUTE GOODS OR SERVICES;...
- Page 130 iperf iperf, Copyright (c) 1999,2000,2001,2002,2003,2004,2005 The Board of Trustees of the University of Illinois All Rights Reserved. Iperf performance test Mark Gates Ajay Tirumala Jim Ferguson Jon Dugan Feng Qin Kevin Gibbs John Estabrook National Laboratory for Applied Network Research National Center for Supercomputing Applications University of Illinois at Urbana-Champaign http://www.ncsa.uiuc.edu...
- Page 131 Gilles Vollant and with the following additions to the disclaimer: There is no warranty against interference with your enjoyment of the library or against infringement. There is no warranty that our efforts or the library will fulfill any of your particular purposes or needs.
- Page 132 queue.h $NetBSD: queue.h,v 1.30 2001/06/22 06:18:22 chs Exp $ Copyright (c) 1991, 1993 The Regents of the University of California. All rights reserved. Redistribution and use in source and binary forms, with or without modification, are permitted provided that the following conditions are met: 1.
- Page 133 THIS SOFTWARE IS PROVIDED BY THE REGENTS AND CONTRIBUTORS ``AS IS'' AND ANY EXPRESS OR IMPLIED WARRANTIES, INCLUDING, BUT NOT LIMITED TO, THE IMPLIED WARRANTIES OF MERCHANTABILITY AND FITNESS FOR A PARTICULAR PURPOSE ARE DISCLAIMED. IN NO EVENT SHALL THE REGENTS OR CONTRIBUTORS BE LIABLE FOR ANY DIRECT, INDIRECT, INCIDENTAL, SPECIAL, EXEMPLARY, OR CONSEQUENTIAL DAMAGES (INCLUDING, BUT NOT LIMITED TO, PROCUREMENT OF SUBSTITUTE GOODS OR SERVICES;...
- Page 134 3. All advertising materials mentioning features or use of this software must display the following acknowledgement: This product includes software developed by the NetBSD Foundation, Inc. and its contributors. 4. Neither the name of The NetBSD Foundation nor the names of its contributors may be used to endorse or promote products derived from this software without specific prior written permission.
Need help?
Do you have a question about the SELPHY CP1500 and is the answer not in the manual?
Questions and answers